Operating Instructions
Page 1
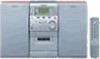
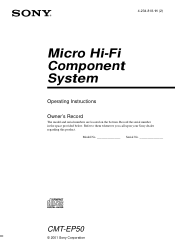
Refer to them whenever you call upon your Sony dealer regarding this product. Model No Serial No CMT-EP50 © 2001 Sony Corporation Record the serial number in the space provided below. 4-234-818-11 (2) Micro Hi-Fi Component System Operating Instructions Owner's Record The model and serial numbers are located on the bottom.
Refer to them whenever you call upon your Sony dealer regarding this product. Model No Serial No CMT-EP50 © 2001 Sony Corporation Record the serial number in the space provided below. 4-234-818-11 (2) Micro Hi-Fi Component System Operating Instructions Owner's Record The model and serial numbers are located on the bottom.
Operating Instructions
Page 2
... be connected to the grounding system of the building, as close to the point of cable entry as the injurious wastes. CAUTION The use of important operating and maintenance (servicing) instructions in the literature accompanying the appliance. If this equipment does cause harmful interference to radio or television reception, which the receiver is provided to call the CATV system installer's attention...
... be connected to the grounding system of the building, as close to the point of cable entry as the injurious wastes. CAUTION The use of important operating and maintenance (servicing) instructions in the literature accompanying the appliance. If this equipment does cause harmful interference to radio or television reception, which the receiver is provided to call the CATV system installer's attention...
Operating Instructions
Page 3
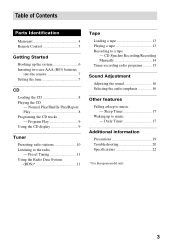
... radio - Program Play 9 Using the CD display 9 Tuner Presetting radio stations 10 Listening to a tape - Daily Timer 17 Additional information Precautions 19 Troubleshooting 20 Specifications 22 * For European model only 3 CD Synchro Recording/Recording Manually 14 Timer-recording radio programs ......... 15 Sound Adjustment Adjusting the sound 16 Selecting the audio emphasis 16 Other features Falling asleep to music - Sleep Timer 17 Waking up the system 6 Inserting two size AAA (R03) batteries into the remote 7 Setting the time...
... radio - Program Play 9 Using the CD display 9 Tuner Presetting radio stations 10 Listening to a tape - Daily Timer 17 Additional information Precautions 19 Troubleshooting 20 Specifications 22 * For European model only 3 CD Synchro Recording/Recording Manually 14 Timer-recording radio programs ......... 15 Sound Adjustment Adjusting the sound 16 Selecting the audio emphasis 16 Other features Falling asleep to music - Sleep Timer 17 Waking up the system 6 Inserting two size AAA (R03) batteries into the remote 7 Setting the time...
Operating Instructions
Page 4
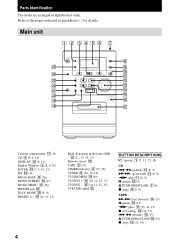
..., 14, 15) Remote sensor wg TAPE 3 (13) TIMER indicator 2 (15, 18) TUNER 6 (10, 11, 14) TUNER MEM ql (10) TUNING + qf (10, 11, 12, 15) TUNING - qg ql qh qk qj Cassette compartment qj (13) CD 4 (8, 9, 14) DISPLAY wf (9, 11) Display Window 5 (8, 9, 10) ENTER ql (7, 9, 10, 12) ISS 0 (14) MEGA BASS 8 (16) MONO STEREO 0 (11) MUSIC MENU 9 (16) PHONES jack wa PLAY MODE w; (8, 9) PRESET +/- wf qa...
..., 14, 15) Remote sensor wg TAPE 3 (13) TIMER indicator 2 (15, 18) TUNER 6 (10, 11, 14) TUNER MEM ql (10) TUNING + qf (10, 11, 12, 15) TUNING - qg ql qh qk qj Cassette compartment qj (13) CD 4 (8, 9, 14) DISPLAY wf (9, 11) Display Window 5 (8, 9, 10) ENTER ql (7, 9, 10, 12) ISS 0 (14) MEGA BASS 8 (16) MONO STEREO 0 (11) MUSIC MENU 9 (16) PHONES jack wa PLAY MODE w; (8, 9) PRESET +/- wf qa...
Operating Instructions
Page 5
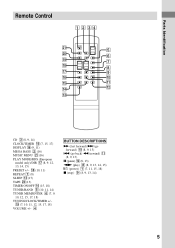
..., 15, 17, 18) VOLUME +/- 4 BUTTON DESCRIPTIONS M (fast forward) > (go forward) 0 (8, 9, 13) . (go back) m (rewind) qa (8, 9, 13) X (pause) qs (8, 13) nN (play) 8 (8, 9, 13, 14, 15) `/1 (power) 1 (7, 11, 15, 18) x (stop) 9 (8, 9, 13, 14) 5 qg qa qf qs qd CD 3 (8, 9, 14) CLOCK/TIMER qg (7, 15, 17) DISPLAY qh (9, 11) MEGA BASS 2 (16) MUSIC MENU wa (16) PLAY MODE/RDS (European model only)/DIR qj...
..., 15, 17, 18) VOLUME +/- 4 BUTTON DESCRIPTIONS M (fast forward) > (go forward) 0 (8, 9, 13) . (go back) m (rewind) qa (8, 9, 13) X (pause) qs (8, 13) nN (play) 8 (8, 9, 13, 14, 15) `/1 (power) 1 (7, 11, 15, 18) x (stop) 9 (8, 9, 13, 14) 5 qg qa qf qs qd CD 3 (8, 9, 14) CLOCK/TIMER qg (7, 15, 17) DISPLAY qh (9, 11) MEGA BASS 2 (16) MUSIC MENU wa (16) PLAY MODE/RDS (European model only)/DIR qj...
Operating Instructions
Page 6
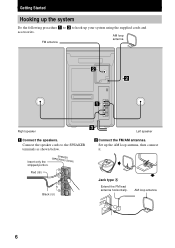
AM loop FM antenna antenna 2 2 1 Right speaker 3 Left speaker 1 Connect the speakers. Connect the speaker cords to hook up the AM loop antenna, then connect it. Set up your system using the supplied cords and accessories. AM loop antenna CFOM7A5AXΩNIATL AM ANT 6 Getting Started Hooking up the system Do the following procedure 1 to 3 to the SPEAKER terminals as shown below. Insert only the stripped portion. (IMPEDSAPNECAKEEURSE 8Ω) Red (3) L R Black (#) 2 Connect the FM/AM antennas. Jack type A Extend the FM lead antenna horizontally.
AM loop FM antenna antenna 2 2 1 Right speaker 3 Left speaker 1 Connect the speakers. Connect the speaker cords to hook up the AM loop antenna, then connect it. Set up your system using the supplied cords and accessories. AM loop antenna CFOM7A5AXΩNIATL AM ANT 6 Getting Started Hooking up the system Do the following procedure 1 to 3 to the SPEAKER terminals as shown below. Insert only the stripped portion. (IMPEDSAPNECAKEEURSE 8Ω) Red (3) L R Black (#) 2 Connect the FM/AM antennas. Jack type A Extend the FM lead antenna horizontally.
Operating Instructions
Page 7
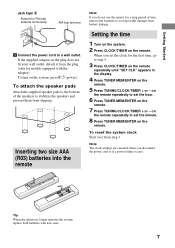
... reset the system clock Start over from battery leakage. To turn on the remote. 7 Press TUNING/CLOCK/TIMER + or - AM loop antenna CFOM7A5AXΩNIATL AM ANT 3 Connect the power cord to set the clock for models equipped with new ones. 7 To attach the speaker pads Attach the supplied speaker pads to the bottom of time, remove the batteries to set the hour. 6 Press TUNER MEM...
... reset the system clock Start over from battery leakage. To turn on the remote. 7 Press TUNING/CLOCK/TIMER + or - AM loop antenna CFOM7A5AXΩNIATL AM ANT 3 Connect the power cord to set the clock for models equipped with new ones. 7 To attach the speaker pads Attach the supplied speaker pads to the bottom of time, remove the batteries to set the hour. 6 Press TUNER MEM...

Operating Instructions
Page 9
... current track t Remaining time on the remote) until the desired track appears in the order you made remains in stop mode Total number of the program Do step 3 and 4 with Program Play stopped. Erase the entire Press x once, when Program Play program is programed. Program Play starts. The display changes as follows: During normal play the same program again. 9 Selected track number (including selected track) 4 Press ENTER (TUNER MEM/ENTER on...
... current track t Remaining time on the remote) until the desired track appears in the order you made remains in stop mode Total number of the program Do step 3 and 4 with Program Play stopped. Erase the entire Press x once, when Program Play program is programed. Program Play starts. The display changes as follows: During normal play the same program again. 9 Selected track number (including selected track) 4 Press ENTER (TUNER MEM/ENTER on...
Operating Instructions
Page 10
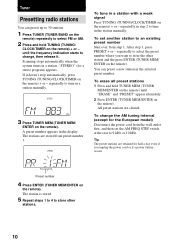
..., press TUNING (TUNING/CLOCK/TIMER on the remote) + or - To erase all preset stations 1 Press and hold TUNING (TUNING/ CLOCK/TIMER on the remote) until the frequency indication starts to change the AM tuning interval (except for the European model) Disconnect the power cord from the wall outlet first, and then set another station to 9 kHz or 10 kHz. Scanning stops automatically when the system tunes in the selected preset number. "STEREO...
..., press TUNING (TUNING/CLOCK/TIMER on the remote) + or - To erase all preset stations 1 Press and hold TUNING (TUNING/ CLOCK/TIMER on the remote) until the frequency indication starts to change the AM tuning interval (except for the European model) Disconnect the power cord from the wall outlet first, and then set another station to 9 kHz or 10 kHz. Scanning stops automatically when the system tunes in the selected preset number. "STEREO...

Operating Instructions
Page 11
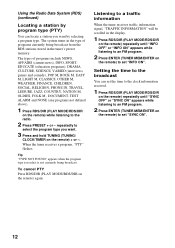
... improve. • To improve broadcast reception, adjust the antennas. • You can change the display into the clock display (for a few seconds. The preset number appears in the display for five seconds) by program type. When only one station is preset, only that provides RDS services, "RDS" appears in the display. Using the Radio Data System (RDS) (European model only) What is tuned. RDS is weak. * Not all...
... improve. • To improve broadcast reception, adjust the antennas. • You can change the display into the clock display (for a few seconds. The preset number appears in the display for five seconds) by program type. When only one station is preset, only that provides RDS services, "RDS" appears in the display. Using the Radio Data System (RDS) (European model only) What is tuned. RDS is weak. * Not all...
Operating Instructions
Page 12
... (TUNER MEM/ENTER on the remote) while listening to set "SYNC ON". 12 Using the Radio Data System (RDS) (continued) Locating a station by selecting a program type. The types of programs currently being broadcast. repeatedly to set "INFO ON". Tip "TYPE NOT FOUND" appears when the program type you want by program type (PTY) You can set the time to the clock information received. 1 Press RDS/DIR (PLAY MODE/RDS...
... (TUNER MEM/ENTER on the remote) while listening to set "SYNC ON". 12 Using the Radio Data System (RDS) (continued) Locating a station by selecting a program type. The types of programs currently being broadcast. repeatedly to set "INFO ON". Tip "TYPE NOT FOUND" appears when the program type you want by program type (PTY) You can set the time to the clock information received. 1 Press RDS/DIR (PLAY MODE/RDS...

Operating Instructions
Page 13
..., we recommend moving the system farther away from the television or turning off the television.) To Press Stop play x Pause X Press again to play both sides repeatedly. * The tape automatically stops after playing back five times. 4 Press nN. When there are continuous sections of extremely low level or low frequency sound (like those of a baritone sax). - The search direction, "+" (forward) or "-" (back), and...
..., we recommend moving the system farther away from the television or turning off the television.) To Press Stop play x Pause X Press again to play both sides repeatedly. * The tape automatically stops after playing back five times. 4 Press nN. When there are continuous sections of extremely low level or low frequency sound (like those of a baritone sax). - The search direction, "+" (forward) or "-" (back), and...
Operating Instructions
Page 14
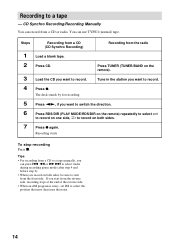
.... 14 Tune in the station you can press . Recording starts. CD Synchro Recording/Recording Manually You can use TYPE I (normal) tape. Tips • For recording from the radio 1 Load a blank tape. 2 Press CD. Steps Recording from a CD (CD Synchro Recording) Recording from a CD to a tape manually, you want to switch the direction. 6 Press RDS/DIR (PLAY MODE/RDS/DIR on the remote) repeatedly to select...
.... 14 Tune in the station you can press . Recording starts. CD Synchro Recording/Recording Manually You can use TYPE I (normal) tape. Tips • For recording from the radio 1 Load a blank tape. 2 Press CD. Steps Recording from a CD (CD Synchro Recording) Recording from a CD to a tape manually, you want to switch the direction. 6 Press RDS/DIR (PLAY MODE/RDS/DIR on the remote) repeatedly to select...

Operating Instructions
Page 15
... TUNER MEM/ENTER on the remote. The TIMER indicator lights up. 6 Press TUNING/CLOCK/TIMER + or - To Check or change the setting Activate the timer operation Cancel the timer operation Do this Turn on page 7) beforehand. 1 Tune in the recording or recording-pause mode at the preset time, the timer recording will not be made . 15 Notes • If the system is in the preset radio station...
... TUNER MEM/ENTER on the remote. The TIMER indicator lights up. 6 Press TUNING/CLOCK/TIMER + or - To Check or change the setting Activate the timer operation Cancel the timer operation Do this Turn on page 7) beforehand. 1 Tune in the recording or recording-pause mode at the preset time, the timer recording will not be made . 15 Notes • If the system is in the preset radio station...

Operating Instructions
Page 17
... the music source you can wake up . Every time you press the button, the minute display (the turn off time) changes as follows: TUNER t RECORD (tuner) t CD t TAPE t TUNER t ... While the Sleep Timer is on, "TIMER" flashes in the preset station you want (see page 7). 1 Prepare the sound source you want to play on the remote once. To Check the remaining time Change the time to turn -off Cancel the Sleep Timer function Press...
... the music source you can wake up . Every time you press the button, the minute display (the turn off time) changes as follows: TUNER t RECORD (tuner) t CD t TAPE t TUNER t ... While the Sleep Timer is on, "TIMER" flashes in the preset station you want (see page 7). 1 Prepare the sound source you want to play on the remote once. To Check the remaining time Change the time to turn -off Cancel the Sleep Timer function Press...

Operating Instructions
Page 18
... time, and the music source, appear, then the original display appears. 7 Press TUNING/CLOCK/TIMER + or - Press TIMER ON/OFF on the remote. 8 Press ?/1 to music (continued) 6 Press TUNER MEM/ENTER on the remote. Press TIMER ON/OFF on the remote until the TIMER indicator goes off the system. To Check or change the setting Activate the timer operation Cancel the timer Do this Turn...
... time, and the music source, appear, then the original display appears. 7 Press TUNING/CLOCK/TIMER + or - Press TIMER ON/OFF on the remote. 8 Press ?/1 to music (continued) 6 Press TUNER MEM/ENTER on the remote. Press TIMER ON/OFF on the remote until the TIMER indicator goes off the system. To Check or change the setting Activate the timer operation Cancel the timer Do this Turn...
Operating Instructions
Page 19
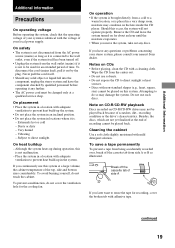
... system turned on this is not malfunction. - If you move the system, take out any further. • The AC power cord must be changed only at the end of recording cannot be played back. Wipe the CD from the center out. • Do not use ...direct sunlight or heat sources. • Discs with non-standard shapes (e.g., heart, square, star) cannot be played on for an extended period of time. Very humid - Notes on CD-R/CD-RW drives may not be used for about an hour until the moisture evaporates. • When you have the component checked by the plug. Place the system...
... system turned on this is not malfunction. - If you move the system, take out any further. • The AC power cord must be changed only at the end of recording cannot be played back. Wipe the CD from the center out. • Do not use ...direct sunlight or heat sources. • Discs with non-standard shapes (e.g., heart, square, star) cannot be played on for an extended period of time. Very humid - Notes on CD-R/CD-RW drives may not be used for about an hour until the moisture evaporates. • When you have the component checked by the plug. Place the system...
Operating Instructions
Page 20
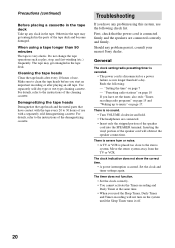
... the instructions of use with a separately sold dry-type or wet-type cleaning cassette. "Presetting radio stations" on page 10 If you used the Sleep Timer, Daily Timer and Timer-recording will obstruct the speaker connections. Cleaning the tape heads Clean the tape heads after playing an old tape. "Setting the time" on page 15 and "Waking up any problem persist, consult your nearest Sony dealer...
... the instructions of use with a separately sold dry-type or wet-type cleaning cassette. "Presetting radio stations" on page 10 If you used the Sleep Timer, Daily Timer and Timer-recording will obstruct the speaker connections. Cleaning the tape heads Clean the tape heads after playing an old tape. "Setting the time" on page 15 and "Waking up any problem persist, consult your nearest Sony dealer...

Operating Instructions
Page 21
... program cannot be received in the display during operations. Tuner Noise is not placed properly. CD Player The CD compartment does not close. • The CD is heard. • Adjust the antennas. Tape Deck The tape does not record. • No tape in the cassette compartment. • The tab has been removed from one channel or unbalanced left and right volume. • Check the speaker connection...
... program cannot be received in the display during operations. Tuner Noise is not placed properly. CD Player The CD compartment does not close. • The CD is heard. • Adjust the antennas. Tape Deck The tape does not record. • No tape in the cassette compartment. • The tab has been removed from one channel or unbalanced left and right volume. • Check the speaker connection...
Operating Instructions
Page 22
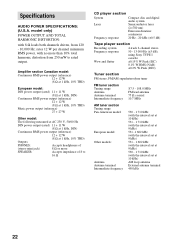
Specifications AUDIO POWER SPECIFICATIONS: (U.S.A. model only) POWER OUTPUT AND TOTAL HARMONIC DISTORTION: with 8 Ω loads both channels driven, from 250 mW to 16 Ω CD player section System Laser Frequency response Compact disc and digital audio system Semiconductor laser (λ=780 nm) Emission duration: continuous 20 Hz - 20 kHz (±0.5 dB) Tape player section Recording system Frequency response Wow and flutter 4-track 2-channel stereo 50 - 13 000 Hz (±3 dB), using Sony TYPE I cassette ±...
Specifications AUDIO POWER SPECIFICATIONS: (U.S.A. model only) POWER OUTPUT AND TOTAL HARMONIC DISTORTION: with 8 Ω loads both channels driven, from 250 mW to 16 Ω CD player section System Laser Frequency response Compact disc and digital audio system Semiconductor laser (λ=780 nm) Emission duration: continuous 20 Hz - 20 kHz (±0.5 dB) Tape player section Recording system Frequency response Wow and flutter 4-track 2-channel stereo 50 - 13 000 Hz (±3 dB), using Sony TYPE I cassette ±...


