
Operating Instructions
Page 1
3-867-342-13(1) Micro HiFi Component System Operating Instructions Owner's Record The model and serial numbers are located on the rear of the system. Record the serial number in the space provided below. Model No. Refer to them whenever you call upon your Sony dealer regarding this product. Serial No. CMT-ED2/ED2U ©1999 by Sony Corporation
3-867-342-13(1) Micro HiFi Component System Operating Instructions Owner's Record The model and serial numbers are located on the rear of the system. Record the serial number in the space provided below. Model No. Refer to them whenever you call upon your Sony dealer regarding this product. Serial No. CMT-ED2/ED2U ©1999 by Sony Corporation

Operating Instructions
Page 2
... turning the equipment off and on CATV system installer: This reminder is intended to alert the user to operate this manual could void your authority to the presence of uninsulated "dangerous voltage" within the product's enclosure that provides guidelines for help. INFORMATION This equipment has been tested and found to comply with the instructions, may be connected to the grounding system...
... turning the equipment off and on CATV system installer: This reminder is intended to alert the user to operate this manual could void your authority to the presence of uninsulated "dangerous voltage" within the product's enclosure that provides guidelines for help. INFORMATION This equipment has been tested and found to comply with the instructions, may be connected to the grounding system...

Operating Instructions
Page 3
... Step 1: Hooking up to music - Program Edit 24 3 Preset Tuning .. 16 Recording from a CD to a tape - REC Timer 29 Additional Information Precautions 31 Troubleshooting 32 Specifications 34 Parts identification for the remote 36 Index Back cover * European model only The Tape Deck Recording to a tape manually 23 Recording your favorite CD tracks to music - Program Play 22 Sound Adjustment Generating a more dynamic sound .......... 26 Selecting the sound mode 26 Other Features Using the Radio Data System (RDS...
... Step 1: Hooking up to music - Program Edit 24 3 Preset Tuning .. 16 Recording from a CD to a tape - REC Timer 29 Additional Information Precautions 31 Troubleshooting 32 Specifications 34 Parts identification for the remote 36 Index Back cover * European model only The Tape Deck Recording to a tape manually 23 Recording your favorite CD tracks to music - Program Play 22 Sound Adjustment Generating a more dynamic sound .......... 26 Selecting the sound mode 26 Other Features Using the Radio Data System (RDS...
Operating Instructions
Page 6
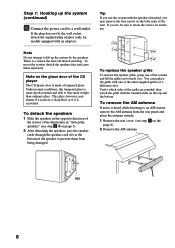
... 1: Hooking up the system by the speakers. To remove the AM antenna If noise is scratched. Slot 6 Note Do not attempt to lift up the system (continued) 6 Connect the power cord to retain the screws for models equipped...use . + - To detach the speakers 1 Slide the speakers in the opposite direction of the arrows of the illustration in "Attach the speakers" (see step 2-3 on the page 4). 2 Remove the AM antenna. If the plug does not fit the wall socket, detach the supplied plug adaptor (only for future use the system with one of the unit. To replace the speaker...
... 1: Hooking up the system by the speakers. To remove the AM antenna If noise is scratched. Slot 6 Note Do not attempt to lift up the system (continued) 6 Connect the power cord to retain the screws for models equipped...use . + - To detach the speakers 1 Slide the speakers in the opposite direction of the arrows of the illustration in "Attach the speakers" (see step 2-3 on the page 4). 2 Remove the AM antenna. If the plug does not fit the wall socket, detach the supplied plug adaptor (only for future use the system with one of the unit. To replace the speaker...

Operating Instructions
Page 7
... do not use the system's timer functions, set the internal clock. Notes on the display begins to prevent possible damage from the rear panel and place the antenna outside. The clock on batteries • Make sure the battery poles (plus/minus) are properly oriented. • Do not use a new battery with new ones. When the remote no longer operates the system, replace both...
... do not use the system's timer functions, set the internal clock. Notes on the display begins to prevent possible damage from the rear panel and place the antenna outside. The clock on batteries • Make sure the battery poles (plus/minus) are properly oriented. • Do not use a new battery with new ones. When the remote no longer operates the system, replace both...
Operating Instructions
Page 9
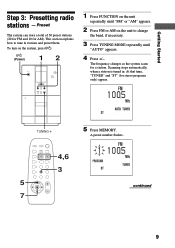
... that time, "TUNED" and "ST" (for AM). Preset The system can store a total of 30 preset stations (20 for FM and 10 for stereo programs only) appear. 1005 TUNING + 4,6 3 5 7 5 Press MEMORY. Scanning stops automatically when a station is tuned in stations and preset them. Getting Started Step 3: Presetting radio stations - The frequency changes as the system scans for a station. A preset number flashes. 1 1005 continued 9 This section explains how to change the band, if necessary. 3 Press TUNING MODE...
... that time, "TUNED" and "ST" (for AM). Preset The system can store a total of 30 preset stations (20 for FM and 10 for stereo programs only) appear. 1005 TUNING + 4,6 3 5 7 5 Press MEMORY. Scanning stops automatically when a station is tuned in stations and preset them. Getting Started Step 3: Presetting radio stations - The frequency changes as the system scans for a station. A preset number flashes. 1 1005 continued 9 This section explains how to change the band, if necessary. 3 Press TUNING MODE...
Operating Instructions
Page 10
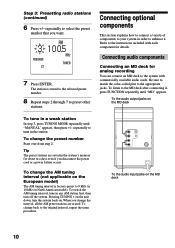
... details. The station is factory-preset to select the preset number that you disconnect the power cord or a power failure occurs. To the audio input jacks on North American model). To change the interval, all the AM preset stations are saved in a weak station In step 3, press TUNING MODE repeatedly until "MD" appears. When you change the preset number Start over from step 2. To the audio output jacks on the unit down, turn off the system. repeatedly...
... details. The station is factory-preset to select the preset number that you disconnect the power cord or a power failure occurs. To the audio input jacks on North American model). To change the interval, all the AM preset stations are saved in a weak station In step 3, press TUNING MODE repeatedly until "MD" appears. When you change the preset number Start over from step 2. To the audio output jacks on the unit down, turn off the system. repeatedly...
Operating Instructions
Page 14
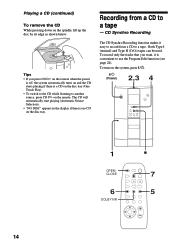
... to a tape - The CD will automatically start playing (Automatic Source Selection). • "NO DISC" appears in the display if there is a CD on the remote. n x N .m X M> Z 1 OPEN/ CLOSE 6 DOLBY NR x 7 5 14 Playing a CD (continued) To remove the CD While pressing down on the system, press ?/1. ?/1 (Power) 2,3 4 A ?/1 + - Tips • If you want, it easy to record from a CD to use the Program Edit function (see page...
... to a tape - The CD will automatically start playing (Automatic Source Selection). • "NO DISC" appears in the display if there is a CD on the remote. n x N .m X M> Z 1 OPEN/ CLOSE 6 DOLBY NR x 7 5 14 Playing a CD (continued) To remove the CD While pressing down on the system, press ?/1. ?/1 (Power) 2,3 4 A ?/1 + - Tips • If you want, it easy to record from a CD to use the Program Edit function (see page...
Operating Instructions
Page 16
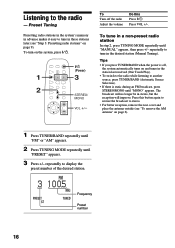
... display the preset number of the desired station. 3 1005 Frequency Preset number 16 To tune in the desired station (Manual Tuning). Press this Press ?/1. repeatedly to tune in a non-preset radio station In step 2, press TUNING MODE repeatedly until "MONO" appears. The broadcast will no longer be in the station last received (One Touch Play). • To switch to the radio while listening to the radio - To Turn off , the system automatically turns on the system, press ?/1. ?/1 (Power) 1 3 2 STEREO...
... display the preset number of the desired station. 3 1005 Frequency Preset number 16 To tune in the desired station (Manual Tuning). Press this Press ?/1. repeatedly to tune in a non-preset radio station In step 2, press TUNING MODE repeatedly until "MONO" appears. The broadcast will no longer be in the station last received (One Touch Play). • To switch to the radio while listening to the radio - To Turn off , the system automatically turns on the system, press ?/1. ?/1 (Power) 1 3 2 STEREO...
Operating Instructions
Page 27
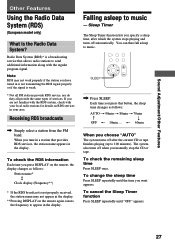
... button, the sleep time changes as follows: Station name* Y Clock display (Frequency**) * If the RDS broadcast is a broadcasting service that provides RDS services, the station name appears in your local radio stations for details on the remote again causes the frequency to music. The system also turns off automatically. When you specify a sleep time, after the current CD or tape finishes playing (up to music - Radio Data System (RDS)* is not properly received...
... button, the sleep time changes as follows: Station name* Y Clock display (Frequency**) * If the RDS broadcast is a broadcasting service that provides RDS services, the station name appears in your local radio stations for details on the remote again causes the frequency to music. The system also turns off automatically. When you specify a sleep time, after the current CD or tape finishes playing (up to music - Radio Data System (RDS)* is not properly received...

Operating Instructions
Page 28
... when the system turns on page 16). 2 Press VOL +/- OF1000 7 Set the stopping time by repeating step 6. 28 Waking up to adjust the volume. 3 Press TIMER SET. To start playing from a specific track, make a program (see "Playing CD tracks in a favorite order" on page 22). • Tape: Insert a tape with the side you want to play on facing towards you. • Radio: Tune in the preset radio station that...
... when the system turns on page 16). 2 Press VOL +/- OF1000 7 Set the stopping time by repeating step 6. 28 Waking up to adjust the volume. 3 Press TIMER SET. To start playing from a specific track, make a program (see "Playing CD tracks in a favorite order" on page 22). • Tape: Insert a tape with the side you want to play on facing towards you. • Radio: Tune in the preset radio station that...
Operating Instructions
Page 29
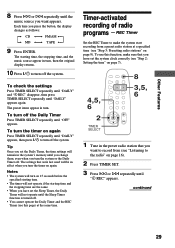
... Once you set the system clock correctly (see "Step 2: Setting the time" on page 7). 4,5, 6 2 TIMER SELECT 8 3,5, 6 1 Tune in the preset radio station that were last used will not operate if the starting time, the stopping time, and the music source appear in turn the timer on again. The settings that you turn . Other Features 8 Press l or L repeatedly until the Sleep Timer function is turned off. • You cannot operate the Daily...
... Once you set the system clock correctly (see "Step 2: Setting the time" on page 7). 4,5, 6 2 TIMER SELECT 8 3,5, 6 1 Tune in the preset radio station that were last used will not operate if the starting time, the stopping time, and the music source appear in turn the timer on again. The settings that you turn . Other Features 8 Press l or L repeatedly until the Sleep Timer function is turned off. • You cannot operate the Daily...
Operating Instructions
Page 30
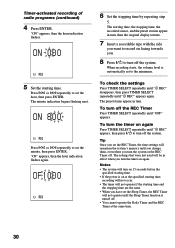
..., then the hour indication flashes. When recording starts, the volume level is automatically set the Sleep Timer, the REC Timer will not operate if the starting time. The minute indication begins flashing next. The starting time. • If the power is turned off the system. The settings that were last used will be in turn off . • You cannot operate the Daily Timer and the...
..., then the hour indication flashes. When recording starts, the volume level is automatically set the Sleep Timer, the REC Timer will not operate if the starting time. The minute indication begins flashing next. The starting time. • If the power is turned off the system. The settings that were last used will be in turn off . • You cannot operate the Daily Timer and the...

Operating Instructions
Page 31
... may condense on the lens inside the CD player. Should this tempered glass is brought directly from the center out. • Do not play a CD with tape, stickers, or adhesives on any questions or problems concerning your system, please consult your local power supply. On safety • The CD player door of time. If you later want to bear more...
... may condense on the lens inside the CD player. Should this tempered glass is brought directly from the center out. • Do not play a CD with tape, stickers, or adhesives on any questions or problems concerning your system, please consult your local power supply. On safety • The CD player door of time. If you later want to bear more...

Operating Instructions
Page 32
... in the tape deck's playing mechanism and become dirty - Do not change the tape operations such as thinner, benzene or alcohol. If the problem persists after every 10 hours of use any slack in the tape. the sound becomes distorted - the sound drops out - Cleaning the cabinet Clean the cabinet, panel and controls with a soft cloth slightly moistened with your nearest Sony dealer. Move...
... in the tape deck's playing mechanism and become dirty - Do not change the tape operations such as thinner, benzene or alcohol. If the problem persists after every 10 hours of use any slack in the tape. the sound becomes distorted - the sound drops out - Cleaning the cabinet Clean the cabinet, panel and controls with a soft cloth slightly moistened with your nearest Sony dealer. Move...
Operating Instructions
Page 33
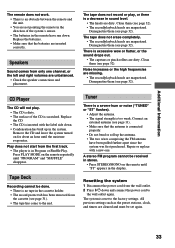
... two wires comprising the FM antenna have run down and connect the power cord to the factory settings. Noise increases or the high frequencies are missing. • The record/playback heads are cleared and must be received in the system. Remove the CD and leave the system turned on for about an hour until "ST" appears in Program or Shuffle Play. Resetting the system 1 Disconnect the power cord...
... two wires comprising the FM antenna have run down and connect the power cord to the factory settings. Noise increases or the high frequencies are missing. • The record/playback heads are cleared and must be received in the system. Remove the CD and leave the system turned on for about an hour until "ST" appears in Program or Shuffle Play. Resetting the system 1 Disconnect the power cord...
Operating Instructions
Page 34
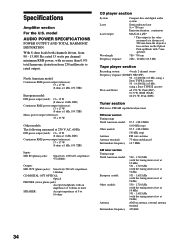
..., impedance 1 kilohm CD DIGITAL OUT OPTICAL: Optical PHONES (stereo phone jack): Accepts headphones with 7 mm aperture. 780 - 790 nm 2 Hz - 20 kHz (±0.5 dB) Tape player section Recording system 4-track 2-channel stereo Frequency response (DOLBY NR OFF) 50 - 13,000 Hz (±3 dB), using a Sony TYPE I cassette 50 - 14,000 Hz (±3 dB), using a Sony TYPE II cassette Wow and flutter ±0.15% W. Specifications Amplifier section For the U.S. model AUDIO POWER SPECIFICATIONS POWER OUTPUT AND...
..., impedance 1 kilohm CD DIGITAL OUT OPTICAL: Optical PHONES (stereo phone jack): Accepts headphones with 7 mm aperture. 780 - 790 nm 2 Hz - 20 kHz (±0.5 dB) Tape player section Recording system 4-track 2-channel stereo Frequency response (DOLBY NR OFF) 50 - 13,000 Hz (±3 dB), using a Sony TYPE I cassette 50 - 14,000 Hz (±3 dB), using a Sony TYPE II cassette Wow and flutter ±0.15% W. Specifications Amplifier section For the U.S. model AUDIO POWER SPECIFICATIONS POWER OUTPUT AND...
Operating Instructions
Page 35
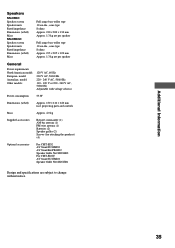
... attaching the speakers) (4) Optional accessories For CMT-ED2 AV Stand SU-EMD2 AV Stand Kit PK-ED2 Speaker Grille Net SSN-ED2 For CMT-ED2U AV Stand SU-EMD2 Speaker Grille Net SSN-ED1 Design and specifications are subject to change without notice. Additional Information 35 Speakers SS-CED2: Speaker system Speaker units Rated impedance Dimensions (w/h/d) Mass SS-CED2U: Speaker system Speaker units Rated impedance Dimensions (w/h/d) Mass Full range bass-reflex...
... attaching the speakers) (4) Optional accessories For CMT-ED2 AV Stand SU-EMD2 AV Stand Kit PK-ED2 Speaker Grille Net SSN-ED2 For CMT-ED2U AV Stand SU-EMD2 Speaker Grille Net SSN-ED1 Design and specifications are subject to change without notice. Additional Information 35 Speakers SS-CED2: Speaker system Speaker units Rated impedance Dimensions (w/h/d) Mass SS-CED2U: Speaker system Speaker units Rated impedance Dimensions (w/h/d) Mass Full range bass-reflex...
Operating Instructions
Page 36
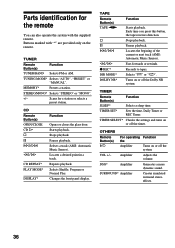
... Adjusts the volume. SURROUND* Amplifier Creates simulated surround stereo effects. 36 TUNING MODE* Selects "AUTO", "PRESET" or "MANUAL". Records to tapes. Stops playback. Locates a desired point in a track. Changes the front panel display. Pauses playback. Selects "g" or "j". OTHERS Remote Button(s) ?/1 For operating Function the Amplifier Turns on or off the system. DSG* Amplifier Generates a more dynamic sound. MEMORY* Presets a station. STEREO/MONO* Selects "STEREO" or "MONO". +/- Locates the begining of the current or next track (AMS: Automatic Music...
... Adjusts the volume. SURROUND* Amplifier Creates simulated surround stereo effects. 36 TUNING MODE* Selects "AUTO", "PRESET" or "MANUAL". Records to tapes. Stops playback. Locates a desired point in a track. Changes the front panel display. Pauses playback. Selects "g" or "j". OTHERS Remote Button(s) ?/1 For operating Function the Amplifier Turns on or off the system. DSG* Amplifier Generates a more dynamic sound. MEMORY* Presets a station. STEREO/MONO* Selects "STEREO" or "MONO". +/- Locates the begining of the current or next track (AMS: Automatic Music...
Operating Instructions
Page 40
... Sound mode 26 Speakers 4, 6 T Tape deck 14, 17, 18, 23, 29 Timer falling asleep to music 27 timer-activated recording 29 waking up to music 28 Troubleshooting 32 Tuner 9, 16, 17, 27, 29 U, V, W, X, Y, Z Using the display 20 Using the RDS 27 Sony Corporation Printed in China Index A Adjusting the volume 13, 16, 19 Antennas 6, 11 Automatic Source Selection 14, 16, 19 B Batteries 7 C CD player 13, 14, 20, 24 Clock setting 7 Connecting...
... Sound mode 26 Speakers 4, 6 T Tape deck 14, 17, 18, 23, 29 Timer falling asleep to music 27 timer-activated recording 29 waking up to music 28 Troubleshooting 32 Tuner 9, 16, 17, 27, 29 U, V, W, X, Y, Z Using the display 20 Using the RDS 27 Sony Corporation Printed in China Index A Adjusting the volume 13, 16, 19 Antennas 6, 11 Automatic Source Selection 14, 16, 19 B Batteries 7 C CD player 13, 14, 20, 24 Clock setting 7 Connecting...


