Operating Instructions
Page 1
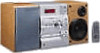
CMT-CP1 Serial No. CMT-CP1 ©1998 by Sony Corporation 3-865-909-14(1) Micro HiFi Component System Operating Instructions Owner's Record The model and serial numbers are located on the rear of the system. Refer to them whenever you call upon your Sony dealer regarding this product. Model No. Record the serial number in the space provided below.
CMT-CP1 Serial No. CMT-CP1 ©1998 by Sony Corporation 3-865-909-14(1) Micro HiFi Component System Operating Instructions Owner's Record The model and serial numbers are located on the rear of the system. Refer to them whenever you call upon your Sony dealer regarding this product. Model No. Record the serial number in the space provided below.
Operating Instructions
Page 2
... BLADE EXPOSURE. This appliance is connected. - CAUTION The use of important operating and maintenance (servicing) instructions in a residential installation. However, there is equipped with the instructions, may be determined by turning the equipment off and on the rear exterior. Reorient or relocate the ...receiving antenna. - "DOLBY" and the double-D symbol ; Do not install the appliance in a confined space, such as a CLASS 1 LASER product. This system is ...
... BLADE EXPOSURE. This appliance is connected. - CAUTION The use of important operating and maintenance (servicing) instructions in a residential installation. However, there is equipped with the instructions, may be determined by turning the equipment off and on the rear exterior. Reorient or relocate the ...receiving antenna. - "DOLBY" and the double-D symbol ; Do not install the appliance in a confined space, such as a CLASS 1 LASER product. This system is ...
Operating Instructions
Page 8
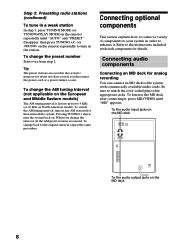
... from step 2. Be sure to match the color-coded pins to the instructions included with commercially available audio cords. Connecting optional components This section explains how to connect a variety of components to your system in any AM station first, then turn the system back on. When you disconnect the power cord or a power failure occurs...
... from step 2. Be sure to match the color-coded pins to the instructions included with commercially available audio cords. Connecting optional components This section explains how to connect a variety of components to your system in any AM station first, then turn the system back on. When you disconnect the power cord or a power failure occurs...
Operating Instructions
Page 31
...to clean the tape heads before making an important recording or after every 20 to the instructions of the demagnetizing cassette. Demagnetizing the tape heads Demagnetize the tape heads and the metal parts...VOL + on the remote). •The headphones are correctly and firmly connected. 2 Find your nearest Sony dealer. The color on the remote. •Make sure each timer is correctly set (see pages ...correctly set (see page 6). the tape does not erase completely - For details, refer to the system. Move the system away from the TV set. the sound drops out - Set the clock (see page 6) and...
...to clean the tape heads before making an important recording or after every 20 to the instructions of the demagnetizing cassette. Demagnetizing the tape heads Demagnetize the tape heads and the metal parts...VOL + on the remote). •The headphones are correctly and firmly connected. 2 Find your nearest Sony dealer. The color on the remote. •Make sure each timer is correctly set (see pages ...correctly set (see page 6). the tape does not erase completely - For details, refer to the system. Move the system away from the TV set. the sound drops out - Set the clock (see page 6) and...


