Operating Instructions
Page 1
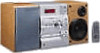
Record the serial number in the space provided below. CMT-CP1 ©1998 by Sony Corporation Refer to them whenever you call upon your Sony dealer regarding this product. CMT-CP1 Serial No. Model No. 3-865-909-14(1) Micro HiFi Component System Operating Instructions Owner's Record The model and serial numbers are located on the rear of the system.
Record the serial number in the space provided below. CMT-CP1 ©1998 by Sony Corporation Refer to them whenever you call upon your Sony dealer regarding this product. CMT-CP1 Serial No. Model No. 3-865-909-14(1) Micro HiFi Component System Operating Instructions Owner's Record The model and serial numbers are located on the rear of the system.
Operating Instructions
Page 2
... to provide reasonable protection against harmful interference in a particular installation. CAUTION The use of optical instruments with the Dolby* B-type noise reduction system. * Dolby noise reduction manufactured under license from that any changes or modification not expressly approved in cabinet. are designed to correct the interference by turning the equipment off and on the rear exterior. Refer servicing to rain or...
... to provide reasonable protection against harmful interference in a particular installation. CAUTION The use of optical instruments with the Dolby* B-type noise reduction system. * Dolby noise reduction manufactured under license from that any changes or modification not expressly approved in cabinet. are designed to correct the interference by turning the equipment off and on the rear exterior. Refer servicing to rain or...
Operating Instructions
Page 3
... dynamic sound ... 25 Using the Radio Data System (RDS)* .. 25 Falling asleep to a tape - Normal Play 11 Recording from the radio 15 Playing a tape 17 The CD Player Checking the remaining playing time on the CD 18 Playing CD tracks repeatedly - REC Timer 28 Additional Information Precautions 30 Troubleshooting 31 Specifications 33 Index 35 * European model only 3 Preset 7 Connecting optional components ........ 8 Basic Operations Playing a CD - Program Play 21 The Tape Deck Recording to a tape manually 22 Recording...
... dynamic sound ... 25 Using the Radio Data System (RDS)* .. 25 Falling asleep to a tape - Normal Play 11 Recording from the radio 15 Playing a tape 17 The CD Player Checking the remaining playing time on the CD 18 Playing CD tracks repeatedly - REC Timer 28 Additional Information Precautions 30 Troubleshooting 31 Specifications 33 Index 35 * European model only 3 Preset 7 Connecting optional components ........ 8 Basic Operations Playing a CD - Program Play 21 The Tape Deck Recording to a tape manually 22 Recording...
Operating Instructions
Page 5
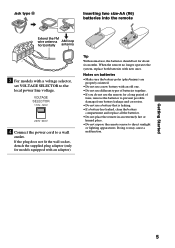
... hot or humid place. • Do not expose the remote sensor to direct sunlight or lighting apparatuses. When the remote no longer operates the system, replace both batteries with an adaptor). Jack type B Inserting two size-AA (R6) batteries into the remote ANTENNA Extend the FM wire antenna AM loop horizontally antenna FM75Ω U AM U 3 For models with an old one. • Do not...
... hot or humid place. • Do not expose the remote sensor to direct sunlight or lighting apparatuses. When the remote no longer operates the system, replace both batteries with an adaptor). Jack type B Inserting two size-AA (R6) batteries into the remote ANTENNA Extend the FM wire antenna AM loop horizontally antenna FM75Ω U AM U 3 For models with an old one. • Do not...

Operating Instructions
Page 7
... 7 to tune in . A preset number flashes. l/L j/J TUNING/ PLAY MODE 6 Press TUNING +/- (or l/L on the remote). Getting Started Step 3: Presetting radio stations - Preset The system can store a total of 30 preset stations (20 for FM and 10 for stereo programs only) appear. A u x . > m M 3 4,6 2 Press TUNER BAND (or TUNER/BAND on the remote) to select FM or AM. 3 Press TUNING MODE (or TUNING/PLAY MODE on the remote) repeatedly until "AUTO" appears. 4 Press TUNING +/- (or j/J on the remote) repeatedly to select the preset number that time, "TUNED" and "STEREO" (for...
... 7 to tune in . A preset number flashes. l/L j/J TUNING/ PLAY MODE 6 Press TUNING +/- (or l/L on the remote). Getting Started Step 3: Presetting radio stations - Preset The system can store a total of 30 preset stations (20 for FM and 10 for stereo programs only) appear. A u x . > m M 3 4,6 2 Press TUNER BAND (or TUNER/BAND on the remote) to select FM or AM. 3 Press TUNING MODE (or TUNING/PLAY MODE on the remote) repeatedly until "AUTO" appears. 4 Press TUNING +/- (or j/J on the remote) repeatedly to select the preset number that time, "TUNED" and "STEREO" (for...
Operating Instructions
Page 8
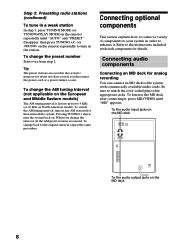
... tuning interval is factory-preset to 9 kHz (or 10 kHz on North American model). Be sure to match the color-coded pins to your system in the station. When you disconnect the power cord or a power failure occurs. To change back to the instructions included with commercially available audio cords. Refer to the original interval, repeat the same procedure. Connecting audio components Connecting an MD deck for details. To change...
... tuning interval is factory-preset to 9 kHz (or 10 kHz on North American model). Be sure to match the color-coded pins to your system in the station. When you disconnect the power cord or a power failure occurs. To change back to the instructions included with commercially available audio cords. Refer to the original interval, repeat the same procedure. Connecting audio components Connecting an MD deck for details. To change...

Operating Instructions
Page 12
... display if there is convenient to a tape - Press CD u (or X on the remote). During playback or pause, press CD . (or l on the remote) or CD > (or L on the disc tray. on the remote). The CD will automatically start playing (Automatic Source Selection). • "NO DISC" appears in a track Remove or replace the CD Adjust the volume Do this Press CD x (or x on the system...
... display if there is convenient to a tape - Press CD u (or X on the remote). During playback or pause, press CD . (or l on the remote) or CD > (or L on the disc tray. on the remote). The CD will automatically start playing (Automatic Source Selection). • "NO DISC" appears in a track Remove or replace the CD Adjust the volume Do this Press CD x (or x on the system...
Operating Instructions
Page 14
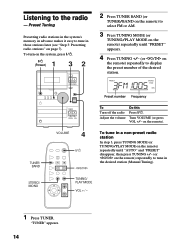
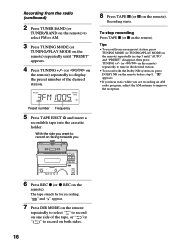
... number of the desired station. Turn VOLUME (or press VOL +/- TUNER/ BAND VOLUME 4 ?/1 j/J To tune in a non-preset radio station In step 3, press TUNING MODE (or TUNING/PLAY MODE on the remote) repeatedly until "PRESET" appears. 4 Press TUNING +/- (or j/J on the remote) repeatedly to tune in the desired station (Manual Tuning). STEREO/ MONO TUNING/ PLAY MODE VOL + / - 1 Press TUNER. PRESET STEREO 3FM1005 TUNED MHz Preset number Frequency To Turn off the radio Adjust the volume Do this Press ?/1. To turn on the remote). on the system, press ?/1. 1 ?/1 (Power...
... number of the desired station. Turn VOLUME (or press VOL +/- TUNER/ BAND VOLUME 4 ?/1 j/J To tune in a non-preset radio station In step 3, press TUNING MODE (or TUNING/PLAY MODE on the remote) repeatedly until "PRESET" appears. 4 Press TUNING +/- (or j/J on the remote) repeatedly to tune in the desired station (Manual Tuning). STEREO/ MONO TUNING/ PLAY MODE VOL + / - 1 Press TUNER. PRESET STEREO 3FM1005 TUNED MHz Preset number Frequency To Turn off the radio Adjust the volume Do this Press ?/1. To turn on the remote). on the system, press ?/1. 1 ?/1 (Power...
Operating Instructions
Page 15
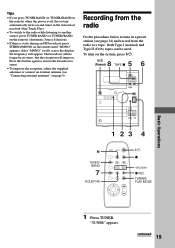
... be used. Press this button again to restore the broadcast to stereo. • To improve the reception, adjust the supplied antennas or connect an external antenna (see page 14) and record from the radio to another source, press TUNER BAND (or TUNER/BAND on the remote) (Automatic Source Selection). • If there is off, the system automatically turns on and tunes in a preset station (see "Connecting external antennas" on the system, press ?/1. 8 5 ?/1 (Power) TAPE...
... be used. Press this button again to restore the broadcast to stereo. • To improve the reception, adjust the supplied antennas or connect an external antenna (see page 14) and record from the radio to another source, press TUNER BAND (or TUNER/BAND on the remote) (Automatic Source Selection). • If there is off, the system automatically turns on and tunes in a preset station (see "Connecting external antennas" on the system, press ?/1. 8 5 ?/1 (Power) TAPE...
Operating Instructions
Page 16
.... STANDBY ?/1 MD/VIDEO TAPE DSG CD TUNER VOLUME EJECT A TAPE bB x m X M REC z CD-SYNC TUNER BAND TUNING 6 Press REC z (or z REC on the remote). Recording starts. The tape stands by for recording. To stop recording Press TAPE x (or x on the remote). With the side you want to record on facing towards you are recording an AM radio program, adjust the AM antenna to tune in the desired station. •...
.... STANDBY ?/1 MD/VIDEO TAPE DSG CD TUNER VOLUME EJECT A TAPE bB x m X M REC z CD-SYNC TUNER BAND TUNING 6 Press REC z (or z REC on the remote). Recording starts. The tape stands by for recording. To stop recording Press TAPE x (or x on the remote). With the side you want to record on facing towards you are recording an AM radio program, adjust the AM antenna to tune in the desired station. •...
Operating Instructions
Page 23
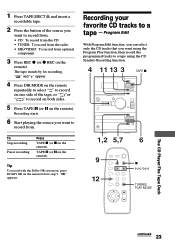
... • TUNER: To record from the radio • MD/VIDEO: To record from . ";" appears. 1,2 5,7 6 9 12 x l/L TUNING/ PLAY MODE The TCaDpPelaDyeecrk/The Tape Deck continued 23 The tape stands by for recording. Recording your favorite CD tracks to a tape - TAPE X (or X on the remote). Program Edit With Program Edit function, you can select only the CD tracks that you want using the Program Play function, then record the programmed tracks to a tape using the...
... • TUNER: To record from the radio • MD/VIDEO: To record from . ";" appears. 1,2 5,7 6 9 12 x l/L TUNING/ PLAY MODE The TCaDpPelaDyeecrk/The Tape Deck continued 23 The tape stands by for recording. Recording your favorite CD tracks to a tape - TAPE X (or X on the remote). Program Edit With Program Edit function, you can select only the CD tracks that you want using the Program Play function, then record the programmed tracks to a tape using the...
Operating Instructions
Page 25
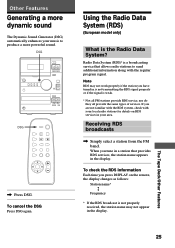
... the regular program signal. OThtheeTraFpeeaDtuerceks/Other Features 25 Other Features Generating a more dynamic sound The Dynamic Sound Generator (DSG) automatically enhances your music to send additional information along with your area. If you tune in your local radio stations for details on the remote, the display changes as follows: Station name* Y Frequency * If the RDS broadcast is the Radio Data System? Receiving RDS broadcasts , Simply select a station from...
... the regular program signal. OThtheeTraFpeeaDtuerceks/Other Features 25 Other Features Generating a more dynamic sound The Dynamic Sound Generator (DSG) automatically enhances your music to send additional information along with your area. If you tune in your local radio stations for details on the remote, the display changes as follows: Station name* Y Frequency * If the RDS broadcast is the Radio Data System? Receiving RDS broadcasts , Simply select a station from...
Operating Instructions
Page 27
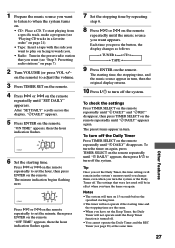
... button, the display changes as follows: t TUNER Tt CD T t TAPE T 9 Press ENTER on the remote. 1 Prepare the music source you want appears. The settings that were last used will remain in the preset radio station that you want (see "Step 3: Presetting radio stations" on the remote repeatedly until "SET DAILY" apperars. Each time you have set the Daily Timer, the time settings will be in turn, then the original display returns. 10 Press ?/1 to turn...
... button, the display changes as follows: t TUNER Tt CD T t TAPE T 9 Press ENTER on the remote. 1 Prepare the music source you want appears. The settings that were last used will remain in the preset radio station that you want (see "Step 3: Presetting radio stations" on the remote repeatedly until "SET DAILY" apperars. Each time you have set the Daily Timer, the time settings will be in turn, then the original display returns. 10 Press ?/1 to turn...
Operating Instructions
Page 29
... settings that were last used will remain in turn, then the original display returns. 8 Press ?/1 to the minimum. To turn the timer on again, press TIMER SELECT on the remote repeatedly until the Sleep Timer function is on at the specified starting time, recording will not occur. • The timer will not operate if the starting time, the stopping time, "TUNER", and the preset station...
... settings that were last used will remain in turn, then the original display returns. 8 Press ?/1 to the minimum. To turn the timer on again, press TIMER SELECT on the remote repeatedly until the Sleep Timer function is on at the specified starting time, recording will not occur. • The timer will not operate if the starting time, the stopping time, "TUNER", and the preset station...

Operating Instructions
Page 30
... to direct sunlight On operation • If the system is brought directly from a cold place to a warm place, or is connected to the wall outlet, even if the unit itself . • Should any solid object or liquid fall into the system, unplug the system and have any further. • AC power cord must be changed only at the qualified service shop...
... to direct sunlight On operation • If the system is brought directly from a cold place to a warm place, or is connected to the wall outlet, even if the unit itself . • Should any solid object or liquid fall into the system, unplug the system and have any further. • AC power cord must be changed only at the qualified service shop...
Operating Instructions
Page 31
... 6) and timer settings (see page 6). Cleaning the cabinet Clean the cabinet, panel and controls with a soft cloth slightly moistened with your system, do not appear when you encounter a problem with mild detergent solution. "c DAILY" and "c REC" do the following: 1 Make sure the power cord and speaker cords are connected. •Check the speaker connections. Additional Information 31 continued When using a tape longer than 90...
... 6) and timer settings (see page 6). Cleaning the cabinet Clean the cabinet, panel and controls with a soft cloth slightly moistened with your system, do not appear when you encounter a problem with mild detergent solution. "c DAILY" and "c REC" do the following: 1 Make sure the power cord and speaker cords are connected. •Check the speaker connections. Additional Information 31 continued When using a tape longer than 90...
Operating Instructions
Page 32
...;Check the speaker connections and placement. Replace the batteries. •Make sure that the batteries are inserted correctly. •Do not place the system near equipments that use an AC-to the end. Press PLAY MODE (or TUNING/PLAY MODE on for about an hour until "PGM" and "SHUFFLE" disappear. Tape Deck Recording cannot be done. •There is a decrease in sound level. •...
...;Check the speaker connections and placement. Replace the batteries. •Make sure that the batteries are inserted correctly. •Do not place the system near equipments that use an AC-to the end. Press PLAY MODE (or TUNING/PLAY MODE on for about an hour until "PGM" and "SHUFFLE" disappear. Tape Deck Recording cannot be done. •There is a decrease in sound level. •...
Operating Instructions
Page 33
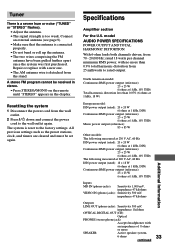
... be received in stereo. • Press STEREO/MONO on the remote until "STEREO" appears in the display. The system is detached from the wall outlet. 2 Press ?/1 down and connect the power cord to the factory settings. model AUDIO POWER SPECIFICATIONS POWER OUTPUT AND TOTAL HARMONIC DISTORTION: With 6-ohm loads both channels driven, from 25 milliwatts to rated output. Specifications Amplifier section For the U.S. Resetting the system 1 Disconnect the power cord from the stand. Repair or replace with an impedance of 8 ohms...
... be received in stereo. • Press STEREO/MONO on the remote until "STEREO" appears in the display. The system is detached from the wall outlet. 2 Press ?/1 down and connect the power cord to the factory settings. model AUDIO POWER SPECIFICATIONS POWER OUTPUT AND TOTAL HARMONIC DISTORTION: With 6-ohm loads both channels driven, from 25 milliwatts to rated output. Specifications Amplifier section For the U.S. Resetting the system 1 Disconnect the power cord from the stand. Repair or replace with an impedance of 8 ohms...
Operating Instructions
Page 34
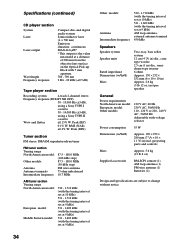
.../60 Hz Adjustable with 7 mm aperture. 780 - 790 nm 2 Hz - 20 kHz (±0.5 dB) Tape player section Recording system 4-track 2-channel stereo Frequency response (DOLBY NR OFF) 50 - 13,000 Hz (±3 dB), using a Sony TYPE I cassette 50 - 14,000 Hz (±3 dB), using a Sony TYPE II cassette Wow and flutter ±0.15% W. Specifications (continued) CD player section System Laser Laser output Wavelength Frequency response Compact disc and digital audio system Semiconductor...
.../60 Hz Adjustable with 7 mm aperture. 780 - 790 nm 2 Hz - 20 kHz (±0.5 dB) Tape player section Recording system 4-track 2-channel stereo Frequency response (DOLBY NR OFF) 50 - 13,000 Hz (±3 dB), using a Sony TYPE I cassette 50 - 14,000 Hz (±3 dB), using a Sony TYPE II cassette Wow and flutter ±0.15% W. Specifications (continued) CD player section System Laser Laser output Wavelength Frequency response Compact disc and digital audio system Semiconductor...
Operating Instructions
Page 35
... Timer 26 Speakers 4 T Tape deck 12, 15, 17, 22, 28 Timer falling asleep to music 26 timer-activated recording 28 waking up to music 26 Troubleshooting 31 Tuner 7, 14, 15, 28 U, V, W, X, Y, Z Using the display 18 Using the RDS 25 Additional Information 35 Index A Adjusting the volume 12, 14, 18 AMS 12 Antennas 4, 9, 10 Automatic Source Selection 12, 15, 18 B Batteries 5 C CD player 11, 12, 18 Clock setting 6 Connecting.
... Timer 26 Speakers 4 T Tape deck 12, 15, 17, 22, 28 Timer falling asleep to music 26 timer-activated recording 28 waking up to music 26 Troubleshooting 31 Tuner 7, 14, 15, 28 U, V, W, X, Y, Z Using the display 18 Using the RDS 25 Additional Information 35 Index A Adjusting the volume 12, 14, 18 AMS 12 Antennas 4, 9, 10 Automatic Source Selection 12, 15, 18 B Batteries 5 C CD player 11, 12, 18 Clock setting 6 Connecting.


