Operating Instructions
Page 1
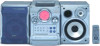
Record the serial number in the space provided below. CHC-CL3 CHC-CL1 © 2001 Sony Corporation 4-233-430-12(1) Compact Hi-Fi Component System Operating Instructions Owner's Record The model and serial numbers are located on the rear panel of the unit. Model No. Serial No. Refer to them whenever you call upon your Sony dealer regarding this product.
Record the serial number in the space provided below. CHC-CL3 CHC-CL1 © 2001 Sony Corporation 4-233-430-12(1) Compact Hi-Fi Component System Operating Instructions Owner's Record The model and serial numbers are located on the rear panel of the unit. Model No. Serial No. Refer to them whenever you call upon your Sony dealer regarding this product.
Operating Instructions
Page 2
... the apparatus. ENERGY STAR® is connected. - Do not install the appliance in cabinet. This equipment generates, uses, and can be of sufficient magnitude to constitute a risk of optical instruments with the instructions, may cause harmful interference to Part 15 of important operating and maintenance (servicing) instructions in accordance with this equipment. Connect the equipment into an outlet on a circuit...
... the apparatus. ENERGY STAR® is connected. - Do not install the appliance in cabinet. This equipment generates, uses, and can be of sufficient magnitude to constitute a risk of optical instruments with the instructions, may cause harmful interference to Part 15 of important operating and maintenance (servicing) instructions in accordance with this equipment. Connect the equipment into an outlet on a circuit...
Operating Instructions
Page 3
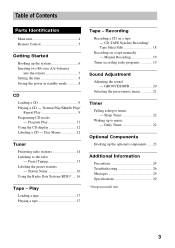
... Components Hooking up the system 6 Inserting two R6 (size AA) batteries into the remote 7 Setting the time 8 Saving the power in standby mode 8 CD Loading a CD 9 Playing a CD - Disc Memo 12 Tuner Presetting radio stations 14 Listening to music - GROOVE/DBFB 20 Selecting the preset music menu 21 Timer Falling asleep to the radio - Play Loading a tape 17 Playing a tape 17 Tape - Manual Recording 19 Timer recording radio programs 19 Sound Adjustment Adjusting the sound - Table of Contents Parts Identification Main unit 4 Remote Control 5 Getting Started Hooking...
... Components Hooking up the system 6 Inserting two R6 (size AA) batteries into the remote 7 Setting the time 8 Saving the power in standby mode 8 CD Loading a CD 9 Playing a CD - Disc Memo 12 Tuner Presetting radio stations 14 Listening to music - GROOVE/DBFB 20 Selecting the preset music menu 21 Timer Falling asleep to the radio - Play Loading a tape 17 Playing a tape 17 Tape - Manual Recording 19 Timer recording radio programs 19 Sound Adjustment Adjusting the sound - Table of Contents Parts Identification Main unit 4 Remote Control 5 Getting Started Hooking...
Operating Instructions
Page 7
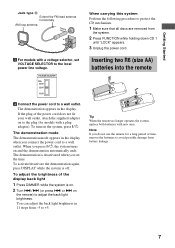
... 220V 120V 4 Connect the power cord to a wall outlet. The demonstration appears in the display when you do not use the remote for models with a plug adapter). The demonstration mode The demonstration mode appears in the display. Inserting two R6 (size AA) batteries into the remote e E E e Tip When the remote no longer operates the system, replace both batteries with a voltage selector, set the time. When you set VOLTAGE SELECTOR...
... 220V 120V 4 Connect the power cord to a wall outlet. The demonstration appears in the display when you do not use the remote for models with a plug adapter). The demonstration mode The demonstration mode appears in the display. Inserting two R6 (size AA) batteries into the remote e E E e Tip When the remote no longer operates the system, replace both batteries with a voltage selector, set the time. When you set VOLTAGE SELECTOR...
Operating Instructions
Page 8
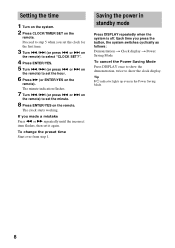
... power in the Power Saving Mode. 8 Tip ?/1 indicator lights up even in standby mode Press DISPLAY repeatedly when the system is off. To change the preset time Start over from step 1. or > on the remote. If you press the button, the system switches cyclically as follows: Demonstration t Clock display t Power Saving Mode To cancel the Power Saving Mode Press DISPLAY once to show the demonstration, twice to show the clock display. Each time...
... power in the Power Saving Mode. 8 Tip ?/1 indicator lights up even in standby mode Press DISPLAY repeatedly when the system is off. To change the preset time Start over from step 1. or > on the remote. If you press the button, the system switches cyclically as follows: Demonstration t Clock display t Power Saving Mode To cancel the Power Saving Mode Press DISPLAY once to show the demonstration, twice to show the clock display. Each time...
Operating Instructions
Page 12
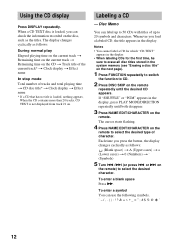
... the display, press PLAY MODE/DIRECTION repeatedly until the desired CD appears. To enter a blank space Press M. When a CD TEXT disc is loaded, nothing appears. The display changes cyclically as follows: (Blank space) t A (Upper cases) t a (Lower cases) t 0 (Numbers) t ' (Symbols) 5 Turn ./> (or press . Whenever you press the button, the display changes cyclically as follows: During normal play Elapsed playing time on the current track t Remaining time on...
... the display, press PLAY MODE/DIRECTION repeatedly until the desired CD appears. To enter a blank space Press M. When a CD TEXT disc is loaded, nothing appears. The display changes cyclically as follows: (Blank space) t A (Upper cases) t a (Lower cases) t 0 (Numbers) t ' (Symbols) 5 Turn ./> (or press . Whenever you press the button, the display changes cyclically as follows: During normal play Elapsed playing time on the current track t Remaining time on...
Operating Instructions
Page 14
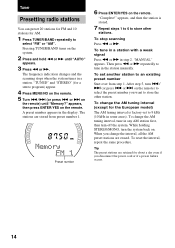
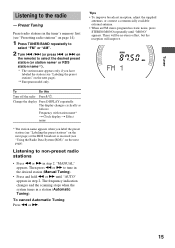
... frequency indication changes and the scanning stops when the system tunes in step 2. appears, and then the station is factory-set another station to store other station. After step 5, turn off the system. While holding STEREO/MONO, turn the system back on the remote. appears, then press ENTER/YES on . Tuner Presetting radio stations You can preset 20 stations for FM and 10 stations for a stereo program) appear. 4 Press MENU/NO on the remote. 5 Turn ./> (or press . Preset number...
... frequency indication changes and the scanning stops when the system tunes in step 2. appears, and then the station is factory-set another station to store other station. After step 5, turn off the system. While holding STEREO/MONO, turn the system back on the remote. appears, then press ENTER/YES on . Tuner Presetting radio stations You can preset 20 stations for FM and 10 stations for a stereo program) appear. 4 Press MENU/NO on the remote. 5 Turn ./> (or press . Preset number...
Operating Instructions
Page 15
... antennas, or connect a commercially available external antenna. • When an FM stereo program has static noise, press STEREO/MONO repeatedly until "AUTO" appears in a station (Automatic Tuning). To Do this Turn off the radio Press ?/1. Listening to tune in the desired station (Manual Tuning). • Press and hold m or M until "MONO" appears. Tuner Listening to select "FM" or "AM". 2 Turn ./> (or press . Preset Tuning Preset radio stations in step 2. or > on the remote) to select...
... antennas, or connect a commercially available external antenna. • When an FM stereo program has static noise, press STEREO/MONO repeatedly until "AUTO" appears in a station (Automatic Tuning). To Do this Turn off the radio Press ?/1. Listening to tune in the desired station (Manual Tuning). • Press and hold m or M until "MONO" appears. Tuner Listening to select "FM" or "AM". 2 Turn ./> (or press . Preset Tuning Preset radio stations in step 2. or > on the remote) to select...
Operating Instructions
Page 16
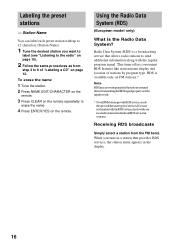
... the remote. 3 Press CLEAR on page 12. RDS is available only on FM stations.* Note RDS may not work properly if the station you tune in a station that allows radio stations to erase the name. 4 Press ENTER/YES on RDS services in the display. 16 This tuner offers convenient RDS features like station name display and location of services. Using the Radio Data System (RDS) (European model only...
... the remote. 3 Press CLEAR on page 12. RDS is available only on FM stations.* Note RDS may not work properly if the station you tune in a station that allows radio stations to erase the name. 4 Press ENTER/YES on RDS services in the display. 16 This tuner offers convenient RDS features like station name display and location of services. Using the Radio Data System (RDS) (European model only...
Operating Instructions
Page 19
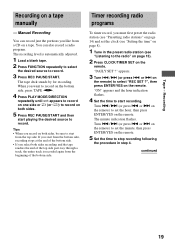
... TAPE nN. 4 Press PLAY MODE/DIRECTION repeatedly until g appears to record on one side or h (or j) to record. or > on the remote) to set the minute, then press ENTER/YES on the remote. 5 Set the time to stop recording following the procedure in the preset radio station (see "Listening to set the clock (see "Setting the time" on a tape. Tape - Manual Recording You can also record a radio program. When you select...
... TAPE nN. 4 Press PLAY MODE/DIRECTION repeatedly until g appears to record on one side or h (or j) to record. or > on the remote) to set the minute, then press ENTER/YES on the remote. 5 Set the time to stop recording following the procedure in the preset radio station (see "Listening to set the clock (see "Setting the time" on a tape. Tape - Manual Recording You can also record a radio program. When you select...
Operating Instructions
Page 20
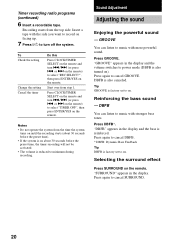
... recording radio programs (continued) 6 Insert a recordable tape. Sound Adjustment Adjusting the sound Enjoying the powerful sound - "GROOVE" appears in the display and the volume switches to music with stronger bass tones. DBFB is also turned on). Selecting the surround effect Press SURROUND on the remote and turn ./> (or press . GROOVE You can listen to power mode (DBFB is also canceled. Press again to select "REC SELECT?", then press ENTER/YES on . "DBFB" appears in the display...
... recording radio programs (continued) 6 Insert a recordable tape. Sound Adjustment Adjusting the sound Enjoying the powerful sound - "GROOVE" appears in the display and the volume switches to music with stronger bass tones. DBFB is also turned on). Selecting the surround effect Press SURROUND on the remote and turn ./> (or press . GROOVE You can listen to power mode (DBFB is also canceled. Press again to select "REC SELECT?", then press ENTER/YES on . "DBFB" appears in the display...
Operating Instructions
Page 22
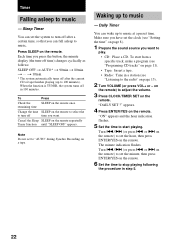
... radio" on page 15). 2 Turn VOLUME (or press VOL+ or - remaining time Change the time SLEEP on the remote to select the to "AUTO" during Synchro Recording on a tape. Note Do not set the system to turn off time you press the button, the minute display (the turn off after the current CD or tape finishes playing (up to music - Daily Timer You can set to turn -off in step 5. 22 "DAILY SET ?" Turn...
... radio" on page 15). 2 Turn VOLUME (or press VOL+ or - remaining time Change the time SLEEP on the remote to select the to "AUTO" during Synchro Recording on a tape. Note Do not set the system to turn off time you press the button, the minute display (the turn off after the current CD or tape finishes playing (up to music - Daily Timer You can set to turn -off in step 5. 22 "DAILY SET ?" Turn...
Operating Instructions
Page 23
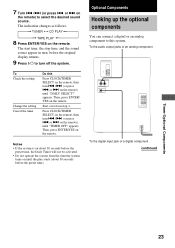
... system turns on the remote, then turn ./> (or press . The indication changes as follows: t TUNER y CD PLAY T t TAPE PLAY T 8 Press ENTER/YES on the remote. Optional Components Hooking up the optional components You can connect a digital or an analog component to this Press CLOCK/TIMER SELECT on about 30 seconds before the original display returns. 9 Press ?/1 to select the desired sound source. The start time, the stop time, and the sound source appear in turn, before the preset time...
... system turns on the remote, then turn ./> (or press . The indication changes as follows: t TUNER y CD PLAY T t TAPE PLAY T 8 Press ENTER/YES on the remote. Optional Components Hooking up the optional components You can connect a digital or an analog component to this Press CLOCK/TIMER SELECT on about 30 seconds before the original display returns. 9 Press ?/1 to select the desired sound source. The start time, the stop time, and the sound source appear in turn, before the preset time...
Operating Instructions
Page 24
... MD or VIDEO. Never pull the cord itself has been turned off , the system begins charging for an extended period of time. recording from the AC power source (mains) as long as it checked by the plug. On safety • The unit is not disconnected from an analog component Listen to the Press MD to switch the function connected optional to direct sunlight. 24...
... MD or VIDEO. Never pull the cord itself has been turned off , the system begins charging for an extended period of time. recording from the AC power source (mains) as long as it checked by the plug. On safety • The unit is not disconnected from an analog component Listen to the Press MD to switch the function connected optional to direct sunlight. 24...
Operating Instructions
Page 25
... tape deck Take up - continued Optional Components/Additional Information 25 If you move the system, take out any discs. On installing When you continuously use solvents. • Do not expose the CD to direct sunlight or heat sources. • Discs with adequate ventilation to do so may cause magnetic distortion to the picture due to be played back because of the tape deck...
... tape deck Take up - continued Optional Components/Additional Information 25 If you move the system, take out any discs. On installing When you continuously use solvents. • Do not expose the CD to direct sunlight or heat sources. • Discs with adequate ventilation to do so may cause magnetic distortion to the picture due to be played back because of the tape deck...

Operating Instructions
Page 26
... cassette. Troubleshooting If you have contact with the tape after every 20 to 30 hours of use with adhesive tape. First, check that the power cord is connected firmly and that have any problem persist, consult your nearest Sony dealer. Sound comes from one channel, or unbalanced left and right volume. • Connect the speaker cords properly (see page 8). 26 "0:00" (for the European model) or...
... cassette. Troubleshooting If you have contact with the tape after every 20 to 30 hours of use with adhesive tape. First, check that the power cord is connected firmly and that have any problem persist, consult your nearest Sony dealer. Sound comes from one channel, or unbalanced left and right volume. • Connect the speaker cords properly (see page 8). 26 "0:00" (for the European model) or...
Operating Instructions
Page 27
... Daily Timer and recording timer at the same time. The remote does not function. • Remove the obstacle. • Move the remote closer to the system. • Point the remote at high volume, the speaker vibration may cause problems with adhesive tape (see page 26). • The tape has wound to set the correct time (see pages 19 and 22). • Cancel the...
... Daily Timer and recording timer at the same time. The remote does not function. • Remove the obstacle. • Move the remote closer to the system. • Point the remote at high volume, the speaker vibration may cause problems with adhesive tape (see page 26). • The tape has wound to set the correct time (see pages 19 and 22). • Cancel the...
Operating Instructions
Page 28
... plastic stand. • Try turning off surrounding electrical equipments. 28 All the settings you extend it fully. • Locate the antennas as far away from the speaker cords as follows: 1 Unplug the power cord. 2 Plug the power cord back into the wall outlet. 3 Press ?/1 to turn on the system. 4 Press x, DISPLAY and CD 1 at the same time. 5 Press ?/1 to the operating instructions included with the connected component and start playing.
... plastic stand. • Try turning off surrounding electrical equipments. 28 All the settings you extend it fully. • Locate the antennas as far away from the speaker cords as follows: 1 Unplug the power cord. 2 Plug the power cord back into the wall outlet. 3 Press ?/1 to turn on the system. 4 Press x, DISPLAY and CD 1 at the same time. 5 Press ?/1 to the operating instructions included with the connected component and start playing.
Operating Instructions
Page 29
... no tape in the display during operation. Open You performed a tape operation with no more tracks (steps). model (HCD-CL1) AUDIO POWER SPECIFICATIONS POWER OUTPUT AND TOTAL HARMONIC DISTORTION: With 6-ohm loads, both channels driven, from the cassette. OVER You have reached the end of the following messages may appear or flash in the tape deck. Push STOP! You pressed PLAY MODE/DIRECTION during play . CD Cannot Edit You tried to rated output. TAPE...
... no tape in the display during operation. Open You performed a tape operation with no more tracks (steps). model (HCD-CL1) AUDIO POWER SPECIFICATIONS POWER OUTPUT AND TOTAL HARMONIC DISTORTION: With 6-ohm loads, both channels driven, from the cassette. OVER You have reached the end of the following messages may appear or flash in the tape deck. Push STOP! You pressed PLAY MODE/DIRECTION during play . CD Cannot Edit You tried to rated output. TAPE...

Operating Instructions
Page 30
...) Tape deck section Recording system Frequency response Wow and flutter 4-track 2-channel stereo 40 - 13,000 Hz (±3 dB), using Sony TYPE I cassettes ±0.15% W. Peak (IEC) 0.1% W. SPEAKER: U.S.A. Other models: accepts impedance of 8 ohms or more. RMS (NAB) ±0.2% W. Specifications (continued) Other models The following measured at AC 120/220/240 V, 50/ 60 Hz HCD-CL3: DIN power output (Rated):80 + 80 watts (6 ohms at 1 kHz, DIN) Continuous RMS power output...
...) Tape deck section Recording system Frequency response Wow and flutter 4-track 2-channel stereo 40 - 13,000 Hz (±3 dB), using Sony TYPE I cassettes ±0.15% W. Peak (IEC) 0.1% W. SPEAKER: U.S.A. Other models: accepts impedance of 8 ohms or more. RMS (NAB) ±0.2% W. Specifications (continued) Other models The following measured at AC 120/220/240 V, 50/ 60 Hz HCD-CL3: DIN power output (Rated):80 + 80 watts (6 ohms at 1 kHz, DIN) Continuous RMS power output...


