
Limited Warranty (U.S. Only)
Page 1
... for the time periods and as fuses or batteries). 3-272-643-01 ® Car Audio LIMITED WARRANTY (U.S. For purposes of this Labor Warranty has expired but not limited to product issues due to be defective. Any parts or product replaced under this product against defects in either its option, (i) repair the product using new or refurbished parts or (ii) replace the...
... for the time periods and as fuses or batteries). 3-272-643-01 ® Car Audio LIMITED WARRANTY (U.S. For purposes of this Labor Warranty has expired but not limited to product issues due to be defective. Any parts or product replaced under this product against defects in either its option, (i) repair the product using new or refurbished parts or (ii) replace the...
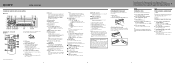
Location of controls and basic operation
Page 1
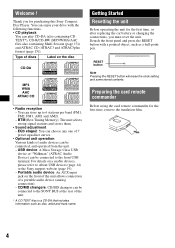
... flashes. 4 Rotate the volume control dial to "CT-ON" (Clock Time). The setup is stored. To change the source (Radio/CD/ MD*1/USB/AUX). © 2006 Sony Corporation Disc slot Insert the disc (label side up to the USB device. (eject) button To eject the disc. PTY (Program Type) button To select PTY in stations while driving, use Best Tuning Memory (BTM) to music on this unit to activate the unit first. You can store...
... flashes. 4 Rotate the volume control dial to "CT-ON" (Clock Time). The setup is stored. To change the source (Radio/CD/ MD*1/USB/AUX). © 2006 Sony Corporation Disc slot Insert the disc (label side up to the USB device. (eject) button To eject the disc. PTY (Program Type) button To select PTY in stations while driving, use Best Tuning Memory (BTM) to music on this unit to activate the unit first. You can store...
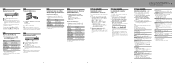
Location of controls and basic operation
Page 2
... steps. *3 When AUX source is adjustable in stereo. BTM To store radio stations automatically. *1 When the unit is turned off. *2 When FM is received. *3 When the audio output is played. USB Listening to "SUB." "A.OFF-NO" (), "A.OFF-30S (Seconds)," "A.OFF-30M (Minutes)" or "A.OFF-60M (Minutes)." DIM (Dimmer) To change the brightness of controls and basic operations / Detaching the front panel / Setting the clock / Storing stations automatically SET UP RADIO CD USB Adjusting setup items - album in...
... steps. *3 When AUX source is adjustable in stereo. BTM To store radio stations automatically. *1 When the unit is turned off. *2 When FM is received. *3 When the audio output is played. USB Listening to "SUB." "A.OFF-NO" (), "A.OFF-30S (Seconds)," "A.OFF-30M (Minutes)" or "A.OFF-60M (Minutes)." DIM (Dimmer) To change the brightness of controls and basic operations / Detaching the front panel / Setting the clock / Storing stations automatically SET UP RADIO CD USB Adjusting setup items - album in...
Operating Instructions
Page 1
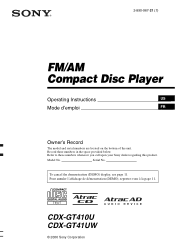
Model No. To cancel the demonstration (DEMO) display, see page 11. Serial No. CDX-GT410U CDX-GT41UW © 2006 Sony Corporation Refer to these numbers in the space provided below. Pour annuler l'affichage de démonstration (DEMO), reportez-vous à la page 11. Record these numbers whenever you call upon your Sony dealer regarding this product. 2-890-967-21 (1) FM/AM Compact Disc Player Operating Instructions US Mode d'emploi FR Owner's Record The model and serial numbers are located on the bottom of the unit.
Model No. To cancel the demonstration (DEMO) display, see page 11. Serial No. CDX-GT410U CDX-GT41UW © 2006 Sony Corporation Refer to these numbers in the space provided below. Pour annuler l'affichage de démonstration (DEMO), reportez-vous à la page 11. Record these numbers whenever you call upon your Sony dealer regarding this product. 2-890-967-21 (1) FM/AM Compact Disc Player Operating Instructions US Mode d'emploi FR Owner's Record The model and serial numbers are located on the bottom of the unit.
Operating Instructions
Page 2
.... The unit will not occur in this product will increase eye hazard. For installation and connections, see your nearest authorized Sony dealer for details on the satellite radio tuner module. Increase the separation between the equipment and receiver. - Please see the supplied installation/connections manual. If you do not set the Auto Off function, press and hold (OFF) until the display disappears 2 each time you turn the...
.... The unit will not occur in this product will increase eye hazard. For installation and connections, see your nearest authorized Sony dealer for details on the satellite radio tuner module. Increase the separation between the equipment and receiver. - Please see the supplied installation/connections manual. If you do not set the Auto Off function, press and hold (OFF) until the display disappears 2 each time you turn the...
Operating Instructions
Page 3
... Other functions Changing the sound settings 10 Adjusting the sound characteristics - BTM 8 Storing manually 8 Receiving the stored stations 8 Tuning automatically 9 USB devices Playback USB devices 9 Display items 9 Listening to music on a Mass Storage Class type audio device 10 Listening to music on discs 13 About USB devices 14 Playback order of controls and basic operations Main unit 6 Card remote commander RM-X151 6 CD Display items 8 Repeat and shuffle play 8 Radio Storing and receiving stations 8 Storing automatically - BAL/FAD/SUB 10 Customizing the equalizer...
... Other functions Changing the sound settings 10 Adjusting the sound characteristics - BTM 8 Storing manually 8 Receiving the stored stations 8 Tuning automatically 9 USB devices Playback USB devices 9 Display items 9 Listening to music on a Mass Storage Class type audio device 10 Listening to music on discs 13 About USB devices 14 Playback order of controls and basic operations Main unit 6 Card remote commander RM-X151 6 CD Display items 8 Repeat and shuffle play 8 Radio Storing and receiving stations 8 Storing automatically - BAL/FAD/SUB 10 Customizing the equalizer...
Operating Instructions
Page 4
... changing the connections, you for the first time, remove the insulation film. 4 BTM (Best Tuning Memory): The unit selects strong signal stations and stores them. • Sound adjustment - CD/MD changers: CD/MD changers can be connected to the front USB terminal. Preparing the card remote commander Before using the card remote commander for purchasing this Sony Compact Disc Player. USB device: A Mass Storage Class USB device or "Walkman" (ATRAC Audio Device) can be connected to the SONY BUS at the rear...
... changing the connections, you for the first time, remove the insulation film. 4 BTM (Best Tuning Memory): The unit selects strong signal stations and stores them. • Sound adjustment - CD/MD changers: CD/MD changers can be connected to the front USB terminal. Preparing the card remote commander Before using the card remote commander for purchasing this Sony Compact Disc Player. USB device: A Mass Storage Class USB device or "Walkman" (ATRAC Audio Device) can be connected to the SONY BUS at the rear...
Operating Instructions
Page 5
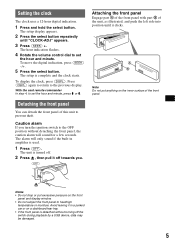
... flashes. 4 Rotate the volume control dial to the previous display. The unit is detached without detaching the front panel, the caution alarm will only sound if the built-in a parked car or on a dashboard/rear tray. • If the front panel is turned off. 2 Press , then pull it clicks. The setup display appears. 2 Press the select button repeatedly until it off towards you turn the ignition switch...
... flashes. 4 Rotate the volume control dial to the previous display. The unit is detached without detaching the front panel, the caution alarm will only sound if the built-in a parked car or on a dashboard/rear tray. • If the front panel is turned off. 2 Press , then pull it clicks. The setup display appears. 2 Press the select button repeatedly until it off towards you turn the ignition switch...
Operating Instructions
Page 6
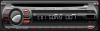
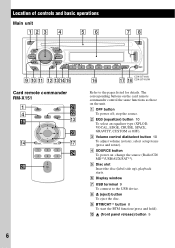
... unit. qa qs qdqfqg qh CDX-GT410U qj qk CDX-GT41UW Card remote commander RM-X151 1 4 ql qf OFF ATT SOURCE SEL MODE + - stop the source. change the source (Radio/CD/ MD*1/USB/AUX/SAT*2). J (front panel release) button 5 6 A OFF button To power off; select setup items (press and rotate). I BTM/CAT*2 button 8 To start the BTM function (press and hold). E Disc slot Insert the disc (label side up), playback starts. Refer to the USB device. H Z (eject) button...
... unit. qa qs qdqfqg qh CDX-GT410U qj qk CDX-GT41UW Card remote commander RM-X151 1 4 ql qf OFF ATT SOURCE SEL MODE + - stop the source. change the source (Radio/CD/ MD*1/USB/AUX/SAT*2). J (front panel release) button 5 6 A OFF button To power off; select setup items (press and rotate). I BTM/CAT*2 button 8 To start the BTM function (press and hold). E Disc slot Insert the disc (label side up), playback starts. Refer to the USB device. H Z (eject) button...
Operating Instructions
Page 7
... ). select the play mode*5. button To adjust volume. wd M (+)/m (-) buttons To control CD, the same as (1)/(2) (GP/ ALBM -/+) on the card remote commander have also different buttons/functions from the unit. reverse/fastforward a track (press and hold ); Remove the insulation film before use the supplied USB cap to activate the unit first. find a station manually (press and hold). wf Number buttons To receive stored stations (press); To cancel, press again. ws SEL (select) button The...
... ). select the play mode*5. button To adjust volume. wd M (+)/m (-) buttons To control CD, the same as (1)/(2) (GP/ ALBM -/+) on the card remote commander have also different buttons/functions from the unit. reverse/fastforward a track (press and hold ); Remove the insulation film before use the supplied USB cap to activate the unit first. find a station manually (press and hold). wf Number buttons To receive stored stations (press); To cancel, press again. ws SEL (select) button The...
Operating Instructions
Page 8
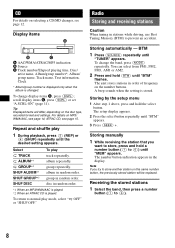
... (SOURCE) repeatedly until the desired setting appears. The unit stores stations in the display. Storing by the setup menu 1 After step 1 above, press and hold a number button ((1) to normal play track repeatedly. The number button indication appears in order of frequency on MP3/ WMA/AAC, see page 15. Repeat and shuffle play 1 During playback, press (3) (REP) or (4) (SHUF) repeatedly until "TUNER" appears. disc in stations while driving, use Best Tuning Memory...
... (SOURCE) repeatedly until the desired setting appears. The unit stores stations in the display. Storing by the setup menu 1 After step 1 above, press and hold a number button ((1) to normal play track repeatedly. The number button indication appears in order of frequency on MP3/ WMA/AAC, see page 15. Repeat and shuffle play 1 During playback, press (3) (REP) or (4) (SHUF) repeatedly until "TUNER" appears. disc in stations while driving, use Best Tuning Memory...
Operating Instructions
Page 9
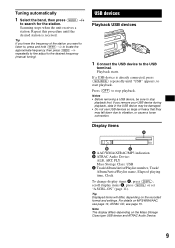
... desired frequency (manual tuning). Display items A AAC/WMA/ATRAC/MP3 indication B ATRAC Audio Device: ALB, ART, PLY Mass Storage Class: USB C Track/Album/Artist/Playlist number, Track/ Album/Artist/Playlist name, Elapsed playing time, Clock To change display items C, press (DSPL); ATRAC CD, see page 14; If a USB device is already connected, press (SOURCE) repeatedly until the desired station is received. Notes • Before removing a USB device, be damaged. • Do not use USB devices...
... desired frequency (manual tuning). Display items A AAC/WMA/ATRAC/MP3 indication B ATRAC Audio Device: ALB, ART, PLY Mass Storage Class: USB C Track/Album/Artist/Playlist number, Track/ Album/Artist/Playlist name, Elapsed playing time, Clock To change display items C, press (DSPL); ATRAC CD, see page 14; If a USB device is already connected, press (SOURCE) repeatedly until the desired station is received. Notes • Before removing a USB device, be damaged. • Do not use USB devices...

Operating Instructions
Page 10
... (front-rear) t SUB (subwoofer volume)*2 t AUX*3 *1 When EQ3 is activated (page 10). *2 When the audio output is set to "SUB" (page 11). playlist in random order. "ATT" is displayed at the lowest setting, and can adjust the balance, fader, and subwoofer volume. 1 Press the select button repeatedly until the desired setting appears. album in random order. artist in random order. device in random order. Select TRACK ALBUM SHUF ALBUM SHUF DEVICE To play track...
... (front-rear) t SUB (subwoofer volume)*2 t AUX*3 *1 When EQ3 is activated (page 10). *2 When the audio output is set to "SUB" (page 11). playlist in random order. "ATT" is displayed at the lowest setting, and can adjust the balance, fader, and subwoofer volume. 1 Press the select button repeatedly until the desired setting appears. album in random order. artist in random order. device in random order. Select TRACK ALBUM SHUF ALBUM SHUF DEVICE To play track...

Operating Instructions
Page 11
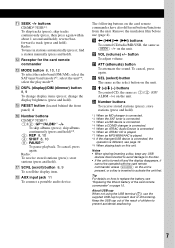
With the card remote commander In step 3, to adjust the selected item, press
With the card remote commander In step 3, to adjust the selected item, press

Operating Instructions
Page 13
... (3 1/4 in) CDs. • Before playing, clean the discs with sticky ink/ residue. Inability to read audio data correctly (e.g., playback skipping, or no data in any other soft drinks onto the unit or discs. Music discs encoded with copyright protection technologies This product is displayed. Avoid leaving them in a parked car or on this product. Do not use solvents such as benzine...
... (3 1/4 in) CDs. • Before playing, clean the discs with sticky ink/ residue. Inability to read audio data correctly (e.g., playback skipping, or no data in any other soft drinks onto the unit or discs. Music discs encoded with copyright protection technologies This product is displayed. Avoid leaving them in a parked car or on this product. Do not use solvents such as benzine...
Operating Instructions
Page 15
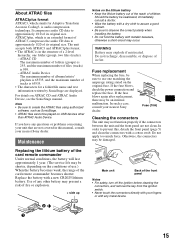
... replace the fuse. one matching the amperage rating stated on ATRAC CD and ATRAC Audio Device, see the SonicStage manual. Use of children. WARNING Battery may not function properly if the connectors between the unit and the front panel are not clean. In such a case, consult your unit that are displayed. Fuse (10A) Cleaning the connectors The unit may explode if mistreated. Otherwise, the connectors may be played...
... replace the fuse. one matching the amperage rating stated on ATRAC CD and ATRAC Audio Device, see the SonicStage manual. Use of children. WARNING Battery may not function properly if the connectors between the unit and the front panel are not clean. In such a case, consult your unit that are displayed. Fuse (10A) Cleaning the connectors The unit may explode if mistreated. Otherwise, the connectors may be played...

Operating Instructions
Page 16
...) General Output: Audio outputs terminal (sub/rear switchable) Power antenna (aerial) relay control terminal Power amplifier control terminal Inputs: BUS control input terminal BUS audio input terminal Antenna (aerial) input terminal AUX input jack (stereo mini jack) Hook facing inwards. 2 Pull the release keys to unseat the unit. 3 Slide the unit out of the mounting. 16 Specifications AUDIO POWER SPECIFICATIONS POWER OUTPUT AND TOTAL HARMONIC DISTORTION 23.2 watts per channel minimum continuous average power into 4 Ohms) CD Player section Signal-to-noise ratio: 120 dB Frequency response...
...) General Output: Audio outputs terminal (sub/rear switchable) Power antenna (aerial) relay control terminal Power amplifier control terminal Inputs: BUS control input terminal BUS audio input terminal Antenna (aerial) input terminal AUX input jack (stereo mini jack) Hook facing inwards. 2 Pull the release keys to unseat the unit. 3 Slide the unit out of the mounting. 16 Specifications AUDIO POWER SPECIFICATIONS POWER OUTPUT AND TOTAL HARMONIC DISTORTION 23.2 watts per channel minimum continuous average power into 4 Ohms) CD Player section Signal-to-noise ratio: 120 dB Frequency response...
Operating Instructions
Page 17
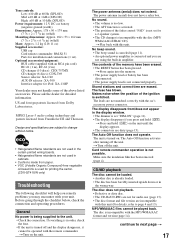
... Layer-3 audio coding technology and patents licensed from /does not appear in the display window. • The dimmer is used in the wrong way. Before going through the checklist below, check the connection and operating procedures. General No power is not set ) Optional accessories/equipment: BUS cable (supplied with your unit. t Turn on . No sound. • The volume is too low. • The ATT function is activated. •...
... Layer-3 audio coding technology and patents licensed from /does not appear in the display window. • The dimmer is used in the wrong way. Before going through the checklist below, check the connection and operating procedures. General No power is not set ) Optional accessories/equipment: BUS cable (supplied with your unit. t Turn on . No sound. • The volume is too low. • The ATT function is activated. •...
Operating Instructions
Page 18
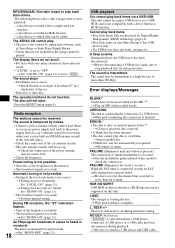
... sounds. Error displays/Messages BLANK*1 Tracks have a HUB function are protected by noises. • Connect a power antenna (aerial) control lead (blue) or accessory power supply lead (red) to stop at an angle of the car antenna (aerial). • The auto antenna (aerial) will not eject. CHECKING The unit is not compatible with a complicated tree structure. - t Reconnect it again. t See the installation guide manual of a USB device. LOAD The changer is selected without a USB device connected. NO DEV (No Device) (SOURCE...
... sounds. Error displays/Messages BLANK*1 Tracks have a HUB function are protected by noises. • Connect a power antenna (aerial) control lead (blue) or accessory power supply lead (red) to stop at an angle of the car antenna (aerial). • The auto antenna (aerial) will not eject. CHECKING The unit is not compatible with a complicated tree structure. - t Reconnect it again. t See the installation guide manual of a USB device. LOAD The changer is selected without a USB device connected. NO DEV (No Device) (SOURCE...
Operating Instructions
Page 19
...://www.sony.com/xplod 19 NOT READ The disc information has not been read by pressing (SOURCE). Depending on the disc/USB device structure, it may be repaired because of the disc causing the error appears in the display. *2 The disc number of CD playback trouble, bring the disc that the USB device is out of the MD changer is connected. t Press the RESET button (page 4). "" The character cannot be displayed with a music...
...://www.sony.com/xplod 19 NOT READ The disc information has not been read by pressing (SOURCE). Depending on the disc/USB device structure, it may be repaired because of the disc causing the error appears in the display. *2 The disc number of CD playback trouble, bring the disc that the USB device is out of the MD changer is connected. t Press the RESET button (page 4). "" The character cannot be displayed with a music...


