
Limited Warranty (U.S. Only)
Page 1
...Product. Any parts or product replaced under this Labor Warranty has expired but not limited to product issues due to commercial use ; This Limited Warranty does not cover Sony products sold AS IS or WITH ALL FAULTS or consumables (such as set forth below is longer. Some states do ...hardware or software usage and it does not cover product issues caused by defects in material or workmanship during service and Sony will , at its option, (i) repair the product using new or refurbished parts or (ii) replace the product with new or refurbished product, product determined to backup any...
...Product. Any parts or product replaced under this Labor Warranty has expired but not limited to product issues due to commercial use ; This Limited Warranty does not cover Sony products sold AS IS or WITH ALL FAULTS or consumables (such as set forth below is longer. Some states do ...hardware or software usage and it does not cover product issues caused by defects in material or workmanship during service and Sony will , at its option, (i) repair the product using new or refurbished parts or (ii) replace the product with new or refurbished product, product determined to backup any...
Operating Instructions
Page 2
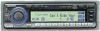
... ! Press the reset button with the CD TEXT function, the CD TEXT information will appear in this manual: Indicates that you can do the task using the wireless remote. In addition to a CD changer and an MD changer. If you can expand your system by connecting an optional CD/MD unit... reset button again. 2 Indicates that you operate this unit or connect an optional CD unit with a pointed object, such as a ball-point pen. About this Sony Compact Disc Player. If the controls on these 10 seconds, the unit will not be performed on EN the function.
... ! Press the reset button with the CD TEXT function, the CD TEXT information will appear in this manual: Indicates that you can do the task using the wireless remote. In addition to a CD changer and an MD changer. If you can expand your system by connecting an optional CD/MD unit... reset button again. 2 Indicates that you operate this unit or connect an optional CD unit with a pointed object, such as a ball-point pen. About this Sony Compact Disc Player. If the controls on these 10 seconds, the unit will not be performed on EN the function.

Operating Instructions
Page 3
...remote 59 Precautions 60 Dismounting the unit 62 Specifications 63 Troubleshooting guide 64 3 Disc Memo (CD unit with the custom file function 25 Selecting specific tracks for playback (Bank 27 Locating a disc by name 29 Viewing CD TEXT information 30 Customizing the CD sound (Digital...(s 55 Adjusting the turn-over frequency of Contents Getting Started Initial settings 4 Setting the clock 6 Using the main panel controls ........ 8 Basic operations 10 Using the rotary remote 12 Using the wireless remote 14 Menu display/Lists 16 CD/MD Listening to a CD/MD 17 Playing tracks...
...remote 59 Precautions 60 Dismounting the unit 62 Specifications 63 Troubleshooting guide 64 3 Disc Memo (CD unit with the custom file function 25 Selecting specific tracks for playback (Bank 27 Locating a disc by name 29 Viewing CD TEXT information 30 Customizing the CD sound (Digital...(s 55 Adjusting the turn-over frequency of Contents Getting Started Initial settings 4 Setting the clock 6 Using the main panel controls ........ 8 Basic operations 10 Using the rotary remote 12 Using the wireless remote 14 Menu display/Lists 16 CD/MD Listening to a CD/MD 17 Playing tracks...

Operating Instructions
Page 4
... your car audio system. Be sure to adjust the contrast. Contrast 8 Note You can reset all of these initial settings (except the ACC position setting) using the set up menu. ACC Position yes no ." or / to make these settings afterwards, press the reset button and repeat the procedure. 2 Press ENTER. To...
... your car audio system. Be sure to adjust the contrast. Contrast 8 Note You can reset all of these initial settings (except the ACC position setting) using the set up menu. ACC Position yes no ." or / to make these settings afterwards, press the reset button and repeat the procedure. 2 Press ENTER. To...

Operating Instructions
Page 5
Select "10k" if you want to change any of the initial settings at this time, press the cursor buttons to select the item you 're using your system in North or South America, the Hawaiian Islands, or Guam; The Initial setting menu appears. The AM step indication appears. Press ? AM step ...
Select "10k" if you want to change any of the initial settings at this time, press the cursor buttons to select the item you 're using your system in North or South America, the Hawaiian Islands, or Guam; The Initial setting menu appears. The AM step indication appears. Press ? AM step ...

Operating Instructions
Page 6
... Set the clock with the wireless remote. MENU Cursor ENTER Note If the ACC position is set the clock. to set the minutes. The clock uses a 12-hour digital indication. Set up Clock off P.Mode Beep on off 2 Select "Set up Clock on P.Mode Beep on Display Rotary Remote norm Name...
... Set the clock with the wireless remote. MENU Cursor ENTER Note If the ACC position is set the clock. to set the minutes. The clock uses a 12-hour digital indication. Set up Clock off P.Mode Beep on off 2 Select "Set up Clock on P.Mode Beep on Display Rotary Remote norm Name...
Operating Instructions
Page 8
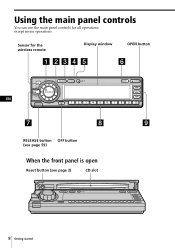
Using the main panel controls You can use the main panel controls for the wireless remote Display window OPEN button EN MODE SOUND LIST DSPL OPEN SOURCE RELEASE OFF 1 2 3 4 5 6 7 8 9 10 RELEASE button OFF button (see page 59) When the front panel is open Reset button (see page 2) CD slot 8 Getting started Sensor for all operations except menu operations.
Using the main panel controls You can use the main panel controls for the wireless remote Display window OPEN button EN MODE SOUND LIST DSPL OPEN SOURCE RELEASE OFF 1 2 3 4 5 6 7 8 9 10 RELEASE button OFF button (see page 59) When the front panel is open Reset button (see page 2) CD slot 8 Getting started Sensor for all operations except menu operations.

Operating Instructions
Page 9
... SHUF ˜ DVOL PGM EL When labeling a CD or station / VC* ENT ˜ DVOL ? To change the current selection, use the cursor buttons to select another disc, track, or station, then press ENTER. 6 DSPL (display mode change) button When playing a CD or MD, press to display the... characteristics adjustment mode (see page 42). EL When Edit mode is selected UP VC* ENT ˜ DVOL DOWN EL * Only when the CD player of the current disc (see "9 Function buttons"). 1 SOURCE (source select) button Each time you press the button, the source switches as follows: "Tuner " CD ...
... SHUF ˜ DVOL PGM EL When labeling a CD or station / VC* ENT ˜ DVOL ? To change the current selection, use the cursor buttons to select another disc, track, or station, then press ENTER. 6 DSPL (display mode change) button When playing a CD or MD, press to display the... characteristics adjustment mode (see page 42). EL When Edit mode is selected UP VC* ENT ˜ DVOL DOWN EL * Only when the CD player of the current disc (see "9 Function buttons"). 1 SOURCE (source select) button Each time you press the button, the source switches as follows: "Tuner " CD ...

Operating Instructions
Page 10
... ejected. To search forward To search backward Release the control when you have found the desired point. Note To play back an 8 cm CD, use the optional Sony compact disc single adapter (CSA-8). * Do not put any foreign objects between the front panel and the unit. Basic operations Listening to the unit. After 15...
... ejected. To search forward To search backward Release the control when you have found the desired point. Note To play back an 8 cm CD, use the optional Sony compact disc single adapter (CSA-8). * Do not put any foreign objects between the front panel and the unit. Basic operations Listening to the unit. After 15...

Operating Instructions
Page 12
Using the rotary remote You can select the desired station or disc with SEEK/AMS when the list appears in a station when FM1, FM2, or AM is selected. Release the control when the desired station is connected. ...; Tuner: FM1 n FM2 n AM • CD unit: CD1 n CD2 n ... • MD unit: MD1 n MD2 n ... Basic operations By pressing buttons SOURCE button Each time you can use the rotary remote for all operations except menu operations. Keep the control rotated to : •Locate the beginning of tracks when CD or MD is...
Using the rotary remote You can select the desired station or disc with SEEK/AMS when the list appears in a station when FM1, FM2, or AM is selected. Release the control when the desired station is connected. ...; Tuner: FM1 n FM2 n AM • CD unit: CD1 n CD2 n ... • MD unit: MD1 n MD2 n ... Basic operations By pressing buttons SOURCE button Each time you can use the rotary remote for all operations except menu operations. Keep the control rotated to : •Locate the beginning of tracks when CD or MD is...

Operating Instructions
Page 14
... when playing a CD TEXT disc or an MD. Press and hold the button again. If you (the driver) want to the previous display, press the button again. To return to use the wireless remote, park your safety, unit operations with the wireless remote unless SOURCE on the current program...the rotary remote or front panel is pressed, or a CD is connected EN SCRL button Press to "no title, "NO Disc Name (NO Track Name) " appears in a safe location first before performing any operations. Using the wireless remote Use the wireless remote to activate the unit first. 14 Getting started
... when playing a CD TEXT disc or an MD. Press and hold the button again. If you (the driver) want to the previous display, press the button again. To return to use the wireless remote, park your safety, unit operations with the wireless remote unless SOURCE on the current program...the rotary remote or front panel is pressed, or a CD is connected EN SCRL button Press to "no title, "NO Disc Name (NO Track Name) " appears in a safe location first before performing any operations. Using the wireless remote Use the wireless remote to activate the unit first. 14 Getting started

Operating Instructions
Page 15
...). ATT button Press to select a preset station, or ? to attenuate the volume. to the previous volume level, press the button again. To change the disc and ? To return to adjust the volume or sound characteristics. When FM1, FM2, or AM is connected, press and hold the button again. to change... the current selection, use the cursor buttons to the DSP Sound Tuning Mode (see page 29). To return to the previous mode, press and hold for more than two...
...). ATT button Press to select a preset station, or ? to attenuate the volume. to the previous volume level, press the button again. To change the disc and ? To return to adjust the volume or sound characteristics. When FM1, FM2, or AM is connected, press and hold the button again. to change... the current selection, use the cursor buttons to the DSP Sound Tuning Mode (see page 29). To return to the previous mode, press and hold for more than two...

Operating Instructions
Page 18
...you can also use the number buttons on page 25. The unit changes to display the disc name list. Push in and release the control to the next or previous disc. Tips •You can select the desired disc with SEEK/AMS when the list appears in and rotate DISC/PRESET. Disc 1.MY BEST CD2... track. To search forward To search backward To locate a specific point on naming a disc, see page 45). To the next disc To the previous disc EN To select the disc to change. If you keep the control rotated, the discs will continue to be played Push in the display (see "Labeling a CD" on...
...you can also use the number buttons on page 25. The unit changes to display the disc name list. Push in and release the control to the next or previous disc. Tips •You can select the desired disc with SEEK/AMS when the list appears in and rotate DISC/PRESET. Disc 1.MY BEST CD2... track. To search forward To search backward To locate a specific point on naming a disc, see page 45). To the next disc To the previous disc EN To select the disc to change. If you keep the control rotated, the discs will continue to be played Push in the display (see "Labeling a CD" on...

Operating Instructions
Page 28
... the display. Set up P.Mode Repeat Display Shuffle Name PGM Bank off off PGM off off on the current disc to "Play." Plays all tracks set to the right of "Bank" in advance. The normal display appears. 28 CD/MD to the sub menu, then ..., press MENU. 2 Select "P.Mode" and press / to move to select the mode, then EN press ENTER. The selected mode appears to "Skip." Note You cannot use the Bank function for discs that have not been labeled using the Disc Memo function. Indication on inverse off edit 3 Press / then > or .
... the display. Set up P.Mode Repeat Display Shuffle Name PGM Bank off off PGM off off on the current disc to "Play." Plays all tracks set to the right of "Bank" in advance. The normal display appears. 28 CD/MD to the sub menu, then ..., press MENU. 2 Select "P.Mode" and press / to move to select the mode, then EN press ENTER. The selected mode appears to "Skip." Note You cannot use the Bank function for discs that have not been labeled using the Disc Memo function. Indication on inverse off edit 3 Press / then > or .

Operating Instructions
Page 29
...or track name list. Since this function to locate a disc by name Use this unit does not support track labeling, when playing non-CD TEXT discs or MDs with labeled tracks. Push and rotate the control to select the disc or track from the first track of the track name in...about 5 seconds, the normal display reappears. Note The following indications may appear in the disc name list. • "NO DISC": There is no disc in the track name list. Playback starts from the list. To select a disc using the rotary remote Push in the display (see page 25). On track name list Each...
...or track name list. Since this function to locate a disc by name Use this unit does not support track labeling, when playing non-CD TEXT discs or MDs with labeled tracks. Push and rotate the control to select the disc or track from the first track of the track name in...about 5 seconds, the normal display reappears. Note The following indications may appear in the disc name list. • "NO DISC": There is no disc in the track name list. Playback starts from the list. To select a disc using the rotary remote Push in the display (see page 25). On track name list Each...

Operating Instructions
Page 30
DSPL ENTER Selecting the disc name display When playing CD TEXT discs that have been labeled using the Disc Memo function (see page 25), you press DSPL or LIST. 1 While playing a CD, press MENU. 2 Select "Name," press / to move the cursor back to the ...previous column (one at a time), press ?. • To cancel the current display and return to the sub menu, then select "Disc...
DSPL ENTER Selecting the disc name display When playing CD TEXT discs that have been labeled using the Disc Memo function (see page 25), you press DSPL or LIST. 1 While playing a CD, press MENU. 2 Select "Name," press / to move the cursor back to the ...previous column (one at a time), press ?. • To cancel the current display and return to the sub menu, then select "Disc...

Operating Instructions
Page 31
Scrolling titles automatically When playing CD TEXT discs or MDs (using an optional MD unit,) the track or disc/artist name appears automatically whenever a new disc or track is played. The normal display appears. CD/MD 31 To cancel the scrolling of more than 10 characters. 1 ... "Auto Scroll" by pressing > or .. When playing a CD TEXT disc Each time you press DSPL, the displayed information changes as follows: Disc Name/Artist Name* ˜ Track Name * The artist name appears automatically after the disc name. to specify the automatic scrolling of titles of titles Select "off...
Scrolling titles automatically When playing CD TEXT discs or MDs (using an optional MD unit,) the track or disc/artist name appears automatically whenever a new disc or track is played. The normal display appears. CD/MD 31 To cancel the scrolling of more than 10 characters. 1 ... "Auto Scroll" by pressing > or .. When playing a CD TEXT disc Each time you press DSPL, the displayed information changes as follows: Disc Name/Artist Name* ˜ Track Name * The artist name appears automatically after the disc name. to specify the automatic scrolling of titles of titles Select "off...

Operating Instructions
Page 32
CD players use digital filters to "Source," the function menu automatically appears on the right side of the display, depending on the source you press VC, the sound ... affect when an optional CD/MD unit or radio, etc. This unit has four types of the digital filter. EN • If you are playing a disc when you select. (see page 48) 2 Press VC repeatedly to select the mode. menu is a variable coefficient (VC) digital filter? Each time you can change...
CD players use digital filters to "Source," the function menu automatically appears on the right side of the display, depending on the source you press VC, the sound ... affect when an optional CD/MD unit or radio, etc. This unit has four types of the digital filter. EN • If you are playing a disc when you select. (see page 48) 2 Press VC repeatedly to select the mode. menu is a variable coefficient (VC) digital filter? Each time you can change...

Operating Instructions
Page 34
Note If you want appears in stations while driving, use the Best Tuning Memory to prevent an accident (see page 36). 1 Press SOURCE repeatedly to select tuner. Specifying the station frequency (Manual Preset Memory) Caution ...
Note If you want appears in stations while driving, use the Best Tuning Memory to prevent an accident (see page 36). 1 Press SOURCE repeatedly to select tuner. Specifying the station frequency (Manual Preset Memory) Caution ...

Operating Instructions
Page 42
... You can select the desired station with SEEK/AMS when the list appears EN in and release DISC/PRESET to display the present name list. Push and rotate the control to an FM or AM broadcast, press LIST. After about 5 seconds, the normal display reappears. 42 Radio ...4. 101.9MHz 5. 106.3 101.9 96.0 102.5 105.4 6. 96.6 7. 99.9 8. 98.9 9. 98.3 10. 98.3 2 Press >, ., /, or ? to select the station. 3 Press ENTER. Station 1. To select a station using the rotary remote Push in the display (see page 45). Selecting a station by the name that has been stored in memory for it.
... You can select the desired station with SEEK/AMS when the list appears EN in and release DISC/PRESET to display the present name list. Push and rotate the control to an FM or AM broadcast, press LIST. After about 5 seconds, the normal display reappears. 42 Radio ...4. 101.9MHz 5. 106.3 101.9 96.0 102.5 105.4 6. 96.6 7. 99.9 8. 98.9 9. 98.3 10. 98.3 2 Press >, ., /, or ? to select the station. 3 Press ENTER. Station 1. To select a station using the rotary remote Push in the display (see page 45). Selecting a station by the name that has been stored in memory for it.


