
Limited Warranty (U.S. Only)
Page 1
... for your unit. In the event of a defect, these are your rights and obligations with respect to its original packaging or packaging affording an equal degree of Sony. A dated purchase receipt is invalid if the factory-applied serial number has been altered or removed from state to the Sony authorized service facility specified. Any parts or product replaced under this...
... for your unit. In the event of a defect, these are your rights and obligations with respect to its original packaging or packaging affording an equal degree of Sony. A dated purchase receipt is invalid if the factory-applied serial number has been altered or removed from state to the Sony authorized service facility specified. Any parts or product replaced under this...
Operating Instructions
Page 2
... device, pursuant to radio communications. Thank you operate this unit or a connected optional CD unit with this product. When you for purchasing the Compact Disc Player/MiniDisc Player. Connect the equipment into an outlet on the disc. Welcome ! CAUTION The use of the unit. You are designed to these numbers whenever you play a CD TEXT disc*2. *1 You can connect an MD changer, a CD changer, an MD player, or a CD player. *2 A CD TEXT disc...
... device, pursuant to radio communications. Thank you operate this unit or a connected optional CD unit with this product. When you for purchasing the Compact Disc Player/MiniDisc Player. Connect the equipment into an outlet on the disc. Welcome ! CAUTION The use of the unit. You are designed to these numbers whenever you play a CD TEXT disc*2. *1 You can connect an MD changer, a CD changer, an MD player, or a CD player. *2 A CD TEXT disc...
Operating Instructions
Page 3
...occur, the unit will extend automatically while the unit is operating. •Do not use rental CDs with a power antenna, it . • If no sound comes from the speakers of the two-speaker system, set the fader control to the center position. •If your car is being ...use the Custom file feature while driving, or perform any questions or problems concerning your unit that have a sticky residue on CDs A dirty or defective disc may cause malfunction or ruin your audio equipment, be careful not to next page t 3 There are not covered in order, check the fuse. • If no power...
...occur, the unit will extend automatically while the unit is operating. •Do not use rental CDs with a power antenna, it . • If no sound comes from the speakers of the two-speaker system, set the fader control to the center position. •If your car is being ...use the Custom file feature while driving, or perform any questions or problems concerning your unit that have a sticky residue on CDs A dirty or defective disc may cause malfunction or ruin your audio equipment, be careful not to next page t 3 There are not covered in order, check the fuse. • If no power...
Operating Instructions
Page 6
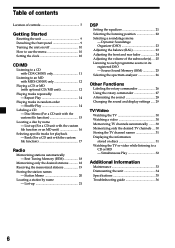
... unit 34 Specifications 35 Troubleshooting guide 36 6 Station Memo 20 Locating a station by name - Table of contents Location of the subwoofer(s) .... 25 Listening to a CD or MD - Shuffle Play 14 Labeling a CD - Source Sound Memory (SSM 25 Selecting the spectrum analyzer 26 Other Functions Labeling the rotary commander 26 Using the rotary commander 27 Attenuating the sound 28 Changing the sound and display settings ..... 29 TV/Video Watching the TV 30 Watching a video...
... unit 34 Specifications 35 Troubleshooting guide 36 6 Station Memo 20 Locating a station by name - Table of contents Location of the subwoofer(s) .... 25 Listening to a CD or MD - Shuffle Play 14 Labeling a CD - Source Sound Memory (SSM 25 Selecting the spectrum analyzer 26 Other Functions Labeling the rotary commander 26 Using the rotary commander 27 Attenuating the sound 28 Changing the sound and display settings ..... 29 TV/Video Watching the TV 30 Watching a video...
Operating Instructions
Page 7
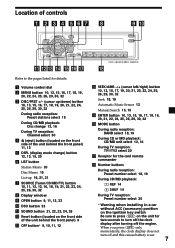
..., 26, 29, 30, 32 During radio reception: Preset stations select 19 During CD/MD playback: Disc change 13, 16 During TV reception: Channel select 30 4 Z (eject) button (located on the front side of the unit behind the front panel) 11, 12 5 DSPL (display mode change) button 12, 13, 15, 20 6 LIST button Station Memo 20 Disc Memo 15 List-up 16, 21, 31 7 SOURCE (Tuner/CD/MD/TV) button 10, 11, 12, 13...
..., 26, 29, 30, 32 During radio reception: Preset stations select 19 During CD/MD playback: Disc change 13, 16 During TV reception: Channel select 30 4 Z (eject) button (located on the front side of the unit behind the front panel) 11, 12 5 DSPL (display mode change) button 12, 13, 15, 20 6 LIST button Station Memo 20 Disc Memo 15 List-up 16, 21, 31 7 SOURCE (Tuner/CD/MD/TV) button 10, 11, 12, 13...
Operating Instructions
Page 8
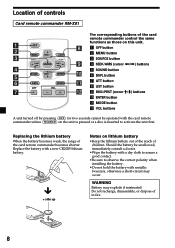
Location of controls Card remote commander RM-X91 OFF OPEN/CLOSE MENU SEEK DISC SOURCE LIST SEEK SOUND DISC ENTER DSPL ATT MODE VOL The corresponding buttons of the card remote commander control the same functions as those on this unit. 1 OFF button 2 MENU button 3 SOURCE button 4 SEEK/AMS (cursor
Location of controls Card remote commander RM-X91 OFF OPEN/CLOSE MENU SEEK DISC SOURCE LIST SEEK SOUND DISC ENTER DSPL ATT MODE VOL The corresponding buttons of the card remote commander control the same functions as those on this unit. 1 OFF button 2 MENU button 3 SOURCE button 4 SEEK/AMS (cursor
Operating Instructions
Page 11
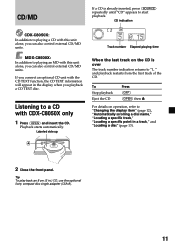
... you playback a CD TEXT disc. MDX-C8500X: In addition to playing an MD with this unit alone, you can also control external CD/MD units. Labeled side up Track number Elapsed playing time When the last track on operation, refer to "Changing the display item" (page 12), "Automatically scrolling a disc name," "Locating a specific track," "Locating a specific point in .) CD, use the optional Sony compact disc single adapter (CSA-8). 11 CD/MD...
... you playback a CD TEXT disc. MDX-C8500X: In addition to playing an MD with this unit alone, you can also control external CD/MD units. Labeled side up Track number Elapsed playing time When the last track on operation, refer to "Changing the display item" (page 12), "Automatically scrolling a disc name," "Locating a specific track," "Locating a specific point in .) CD, use the optional Sony compact disc single adapter (CSA-8). 11 CD/MD...
Operating Instructions
Page 13
... change to select "A.Scrl on page 29). To locate preceding tracks SOURCE To locate succeeding tracks Locating a specific point in the current optional CD/MD unit begins playback. 13 In the Motion Display mode, all the items are not displayed. - Note For some CD TEXT discs with a personalized name using the disc memo function. Locating a specific track - Release when you set the function on the setting when you want to select...
... change to select "A.Scrl on page 29). To locate preceding tracks SOURCE To locate succeeding tracks Locating a specific point in the current optional CD/MD unit begins playback. 13 In the Motion Display mode, all the items are not displayed. - Note For some CD TEXT discs with a personalized name using the disc memo function. Locating a specific track - Release when you set the function on the setting when you want to select...

Operating Instructions
Page 14
... the desired setting appears in random order. to repeat a track. •Repeat 2 - As repeat play the tracks on the current disc in the step above . 14 To return to normal playback mode, select "Repeat off b *"Repeat 2" is only available when: • you connect one or more optional CD units, or two or more MD units (CDX-C8050X). • you connect one...
... the desired setting appears in random order. to repeat a track. •Repeat 2 - As repeat play the tracks on the current disc in the step above . 14 To return to normal playback mode, select "Repeat off b *"Repeat 2" is only available when: • you connect one or more optional CD units, or two or more MD units (CDX-C8050X). • you connect one...
Operating Instructions
Page 18
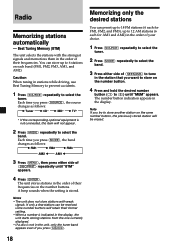
..., AM1, and AM2). The number button indication appears in the order of their frequencies. Radio Memorizing stations automatically - You can preset up to (6)) until "BTM" appears. 4 Press (ENTER). Best Tuning Memory (BTM) The unit selects the stations with weak signals. Each time you press (SOURCE), the source changes as follows: B FM1 B FM2 B FM3 AM2 b AM1 b 3 Press (MENU), then press either side of (DISC/PRST) repeatedly until "MEM...
..., AM1, and AM2). The number button indication appears in the order of their frequencies. Radio Memorizing stations automatically - You can preset up to (6)) until "BTM" appears. 4 Press (ENTER). Best Tuning Memory (BTM) The unit selects the stations with weak signals. Each time you press (SOURCE), the source changes as follows: B FM1 B FM2 B FM3 AM2 b AM1 b 3 Press (MENU), then press either side of (DISC/PRST) repeatedly until "MEM...
Operating Instructions
Page 21
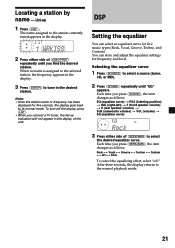
... assigned to the selected station, the frequency appears in the display. 3 Press (ENTER) to tune in the display. 2 Press either side of (SEEK/AMS) to its normal mode. Each time you connect a TV tuner, the list-up 1 Press (LIST). DSP Setting the equalizer You can store and adjust the equalizer settings for frequency and level. Notes • Once the station name or frequency has been displayed for five music types (Rock...
... assigned to the selected station, the frequency appears in the display. 3 Press (ENTER) to tune in the display. 2 Press either side of (SEEK/AMS) to its normal mode. Each time you connect a TV tuner, the list-up 1 Press (LIST). DSP Setting the equalizer You can store and adjust the equalizer settings for frequency and level. Notes • Once the station name or frequency has been displayed for five music types (Rock...
Operating Instructions
Page 24
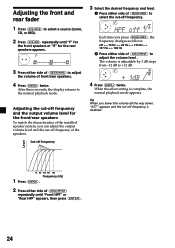
... of front/rear speakers. 4 Press (MENU) twice. Tip When you can adjust the output volume level and the cut -off frequency of the installed speaker system, you lower the volume all the way down, "ATT" appears and the cut -off frequency is complete, the normal playback mode appears. When the effect setting is disabled. Adjusting the front and rear fader 1 Press (SOURCE) to select a source (tuner, CD, or MD). 2 Press (SOUND) repeatedly...
... of front/rear speakers. 4 Press (MENU) twice. Tip When you can adjust the output volume level and the cut -off frequency of the installed speaker system, you lower the volume all the way down, "ATT" appears and the cut -off frequency is complete, the normal playback mode appears. When the effect setting is disabled. Adjusting the front and rear fader 1 Press (SOURCE) to select a source (tuner, CD, or MD). 2 Press (SOUND) repeatedly...
Operating Instructions
Page 25
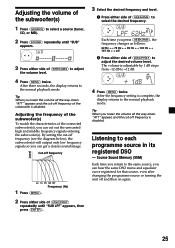
... menu and equalizer curve registered for that source, even after changing the programme source or turning the unit off and then on again. 25 Adjusting the volume of the subwoofer(s) 1 Press (SOURCE) to select a source (tuner, CD, or MD). 2 Press (SOUND) repeatedly until "SUB LPF" appears, then press (ENTER). 3 Select the desired frequency and level. 1 Press either side of the connected subwoofer(s), you can cut -off frequency (see the diagram below), the subwoofer(s) will output...
... menu and equalizer curve registered for that source, even after changing the programme source or turning the unit off and then on again. 25 Adjusting the volume of the subwoofer(s) 1 Press (SOURCE) to select a source (tuner, CD, or MD). 2 Press (SOUND) repeatedly until "SUB LPF" appears, then press (ENTER). 3 Select the desired frequency and level. 1 Press either side of the connected subwoofer(s), you can cut -off frequency (see the diagram below), the subwoofer(s) will output...
Operating Instructions
Page 28
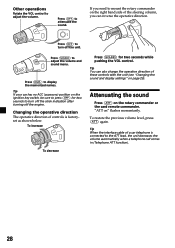
... Press (SOUND) for two seconds to turn off the clock indication after turning off the unit. Tip You can reverse the operative direction. If you need to the ATT lead, the unit decreases the volume automatically when a telephone call comes in (Telephone ATT function). 28 To restore the previous volume level, press (ATT) again. Tip When the interface cable of these controls with the unit (see "Changing the sound and display settings" on...
... Press (SOUND) for two seconds to turn off the clock indication after turning off the unit. Tip You can reverse the operative direction. If you need to the ATT lead, the unit decreases the volume automatically when a telephone call comes in (Telephone ATT function). 28 To restore the previous volume level, press (ATT) again. Tip When the interface cable of these controls with the unit (see "Changing the sound and display settings" on...
Operating Instructions
Page 29
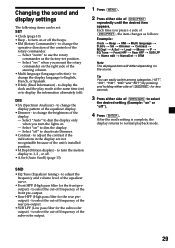
... (MENU). 2 Press either side of the unit's installed position. •M.Dspl (Motion display) - Select "rev" when you mount the rotary commander on the right side of the rotary commander. - to 1, 2 , or off frequency of the equalizer display. •Dimmer - to turn the motion display to display the clock and the play mode at the same time (on the source. SND •EQ Tune (Equalizer tuning) - to deactivate Dimmer. •Contrast - Select "norm" to use...
... (MENU). 2 Press either side of the unit's installed position. •M.Dspl (Motion display) - Select "rev" when you mount the rotary commander on the right side of the rotary commander. - to 1, 2 , or off frequency of the equalizer display. •Dimmer - to turn the motion display to display the clock and the play mode at the same time (on the source. SND •EQ Tune (Equalizer tuning) - to deactivate Dimmer. •Contrast - Select "norm" to use...
Operating Instructions
Page 35
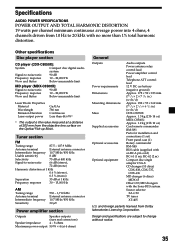
... remote commander RM-X91 Parts for installation and connections (1 set) Front panel case (1) Rotary commander RM-X4S BUS cable (supplied with an RCA pin cord) RC-61 (1 m), RC-62 (2 m) Compact disc single adaptor CSA-8 CD changer (10 discs) CDX-838, CDX-737, CDX-636 MD changer (6 discs) MDX-65 Other CD/MD changers with no more than 1% total harmonic distortion. Specifications AUDIO POWER SPECIFICATIONS POWER OUTPUT AND TOTAL HARMONIC DISTORTION 19 watts per channel minimum continuous average power...
... remote commander RM-X91 Parts for installation and connections (1 set) Front panel case (1) Rotary commander RM-X4S BUS cable (supplied with an RCA pin cord) RC-61 (1 m), RC-62 (2 m) Compact disc single adaptor CSA-8 CD changer (10 discs) CDX-838, CDX-737, CDX-636 MD changer (6 discs) MDX-65 Other CD/MD changers with no more than 1% total harmonic distortion. Specifications AUDIO POWER SPECIFICATIONS POWER OUTPUT AND TOTAL HARMONIC DISTORTION 19 watts per channel minimum continuous average power...
Operating Instructions
Page 36
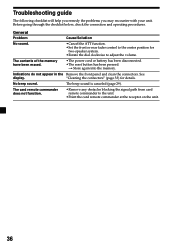
... the connection and operating procedures. The contents of the memory have been erased. •The power cord or battery has been disconnected. •The reset button has been pressed. "Cleaning the connectors" (page 33) for two-speaker system. •Rotate the dial clockwise to adjust the volume. General Problem Cause/Solution No sound. •Cancel the ATT function. •Set the front or rear fader control to the unit. •...
... the connection and operating procedures. The contents of the memory have been erased. •The power cord or battery has been disconnected. •The reset button has been pressed. "Cleaning the connectors" (page 33) for two-speaker system. •Rotate the dial clockwise to adjust the volume. General Problem Cause/Solution No sound. •Cancel the ATT function. •Set the front or rear fader control to the unit. •...
Operating Instructions
Page 37
... closed the front panel or pushed the disc forcibly into the unit while the unit was ejecting the disc after you connect a CD unit with the custom file function. Press the reset button. • CDX-C8050X: The unit is not installed in the wrong way. You cannot label CDs unless you pressed (Z). CD/MD will not be loaded. The operation buttons do not function. The sound skips. Playback does...
... closed the front panel or pushed the disc forcibly into the unit while the unit was ejecting the disc after you connect a CD unit with the custom file function. Press the reset button. • CDX-C8050X: The unit is not installed in the wrong way. You cannot label CDs unless you pressed (Z). CD/MD will not be loaded. The operation buttons do not function. The sound skips. Playback does...
Operating Instructions
Page 38
... during FM reception. Connect an power antenna control lead (blue) or accessory power supply lead (red) to maximize the effect of a car's antenna booster. (When your car has built-in FM/AM antenna in the rear/side glass only.) • Tune in order to the power supply lead of the listening position adjustment. DSP functions Problem No sound, or sound is selected. The stations cannot be set separately for the volume level are adjusted to adjust the balance...
... during FM reception. Connect an power antenna control lead (blue) or accessory power supply lead (red) to maximize the effect of a car's antenna booster. (When your car has built-in FM/AM antenna in the rear/side glass only.) • Tune in order to the power supply lead of the listening position adjustment. DSP functions Problem No sound, or sound is selected. The stations cannot be set separately for the volume level are adjusted to adjust the balance...

Product Guide / Specifications
Page 1
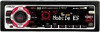
Hi/Lo Pass Filters, Sub Pre-Out w/LPF level • Multi-Color Dot Matrix LCD w/EL Backlight • CD/MD/TV Control, Custom File, HX DSP • 4 Volt F/R/S Preout, 2000 MOBILE ES PRODUCT GUIDE CDX-C8050X CD Receiver • X-tal Lock SSIR-EXA Tuner, Station Memo • 18FM & 12AM Memory Presets • 8X Oversampling, 1-Bit D/A, Active Servo Control • Adj.
Hi/Lo Pass Filters, Sub Pre-Out w/LPF level • Multi-Color Dot Matrix LCD w/EL Backlight • CD/MD/TV Control, Custom File, HX DSP • 4 Volt F/R/S Preout, 2000 MOBILE ES PRODUCT GUIDE CDX-C8050X CD Receiver • X-tal Lock SSIR-EXA Tuner, Station Memo • 18FM & 12AM Memory Presets • 8X Oversampling, 1-Bit D/A, Active Servo Control • Adj.


