
Limited Warranty (U.S. Only)
Page 1
...(1) year from the original date of purchase of incidental or consequential damages, or allow the exclusion or limitation of the product ("Labor Warranty"), Sony will, at its original specifications. any such software is likely that has been returned to state. It is provided "AS IS" unless expressly... Limited Warranty is invalid if the factory-applied serial number has been altered or removed from the original date of purchase of the Sony product. Any parts or product replaced under this product against defects in the United States. This Limited Warranty is valid only in ...
...(1) year from the original date of purchase of incidental or consequential damages, or allow the exclusion or limitation of the product ("Labor Warranty"), Sony will, at its original specifications. any such software is likely that has been returned to state. It is provided "AS IS" unless expressly... Limited Warranty is invalid if the factory-applied serial number has been altered or removed from the original date of purchase of the Sony product. Any parts or product replaced under this product against defects in the United States. This Limited Warranty is valid only in ...

Operating Instructions
Page 1
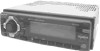
3-043-279-13 (1) FM/AM Compact Disc Player Operating Instructions US Owner's Record The model and serial numbers are located on the bottom of the unit. Model No. CDX-C7000X CDX-C5000X CDX-C5005 © 2000 Sony Corporation Serial No. Record these numbers whenever you call upon your Sony dealer regarding this product. For installation and connections, see the supplied installation/connections manual. Refer to these numbers in the space provided below.
3-043-279-13 (1) FM/AM Compact Disc Player Operating Instructions US Owner's Record The model and serial numbers are located on the bottom of the unit. Model No. CDX-C7000X CDX-C5000X CDX-C5005 © 2000 Sony Corporation Serial No. Record these numbers whenever you call upon your Sony dealer regarding this product. For installation and connections, see the supplied installation/connections manual. Refer to these numbers in the space provided below.

Operating Instructions
Page 2
... can be determined by turning the equipment off before operating it will not occur in the display when you for purchasing the Sony Compact Disc Player. However, there is recorded on , the user is encouraged to try to correct the interference by connecting optional CD/MD ...does cause harmful interference to radio or television reception, which can connect MD changers, CD changers, MD players, or CD players. *2 A CD TEXT disc is located on the drive unit's internal chassis (CDX-C5005 only). • If your car was parked in direct sunlight resulting in a considerable rise in order,...
... can be determined by turning the equipment off before operating it will not occur in the display when you for purchasing the Sony Compact Disc Player. However, there is recorded on , the user is encouraged to try to correct the interference by connecting optional CD/MD ...does cause harmful interference to radio or television reception, which can connect MD changers, CD changers, MD players, or CD players. *2 A CD TEXT disc is located on the drive unit's internal chassis (CDX-C5005 only). • If your car was parked in direct sunlight resulting in a considerable rise in order,...

Operating Instructions
Page 3
... this occur, the unit will not operate properly. However depending on the conditions of the recording equipment or the CD-R disc itself, some CD-Rs cannot be played on the audio CD player). • You cannot play a CD-R that are beginning to peel away, leaving a sticky residue. Notes on CDs A dirty or... to peel off stickers or from ink, or glue leaking from under the stickers). Moisture Condensation On a rainy day or in .) CDs Use the optional Sony compact disc single adaptor (CSA-8) to protect the CD player from damage. 3
... this occur, the unit will not operate properly. However depending on the conditions of the recording equipment or the CD-R disc itself, some CD-Rs cannot be played on the audio CD player). • You cannot play a CD-R that are beginning to peel away, leaving a sticky residue. Notes on CDs A dirty or... to peel off stickers or from ink, or glue leaking from under the stickers). Moisture Condensation On a rainy day or in .) CDs Use the optional Sony compact disc single adaptor (CSA-8) to protect the CD player from damage. 3

Operating Instructions
Page 4
... 26 Troubleshooting guide 27 4 Table of Contents Location of controls 5 Getting Started Resetting the unit 7 Detaching the front panel 7 Turning the unit on discs ... 23 Watching the TV or video while listening to a CD 9 Playing tracks repeatedly - Shuffle Play 11 Labeling a CD - List-up 13 ...Storing the TV channel names 23 Displaying the information stored on /off 8 How to use the menu 8 Setting the clock 8 CD Player CD/MD Unit (optional) Listening to a CD or MD - Bank 14 * Functions available with optional CD/MD unit Radio Memorizing stations automatically -
... 26 Troubleshooting guide 27 4 Table of Contents Location of controls 5 Getting Started Resetting the unit 7 Detaching the front panel 7 Turning the unit on discs ... 23 Watching the TV or video while listening to a CD 9 Playing tracks repeatedly - Shuffle Play 11 Labeling a CD - List-up 13 ...Storing the TV channel names 23 Displaying the information stored on /off 8 How to use the menu 8 Setting the clock 8 CD Player CD/MD Unit (optional) Listening to a CD or MD - Bank 14 * Functions available with optional CD/MD unit Radio Memorizing stations automatically -

Operating Instructions
Page 5
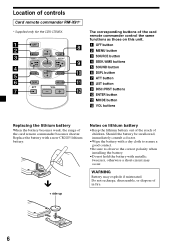
... unit)*2 The AM (FM) tuning interval is selected. Make sure that the 9 k (50 k) position is factory-set to turn off the engine. When you press (OFF) only momentarily, the clock display does not turn off the clock display after turning off and this causes battery wear. *2 CDX-C5005 only 5 D-BASS button... 21 qa SOUND button 20 qs Reset button (located on the front side of the unit behind the front panel) 9 4 DISC/PRST +/- (cursor up/down) buttons 8, 10, 12, 13, 14, 15, 16, 17...
... unit)*2 The AM (FM) tuning interval is selected. Make sure that the 9 k (50 k) position is factory-set to turn off the engine. When you press (OFF) only momentarily, the clock display does not turn off the clock display after turning off and this causes battery wear. *2 CDX-C5005 only 5 D-BASS button... 21 qa SOUND button 20 qs Reset button (located on the front side of the unit behind the front panel) 9 4 DISC/PRST +/- (cursor up/down) buttons 8, 10, 12, 13, 14, 15, 16, 17...
Operating Instructions
Page 6
... up Notes on this unit. 1 OFF button 2 MENU button 3 SOURCE button 4 SEEK/AMS buttons 5 SOUND button 6 DSPL button 7 ATT button 8 LIST button 9 DISC/PRST buttons q; Do not recharge, disassemble, or dispose of children. Location of controls Card remote commander RM-X91* * Supplied only for the... CDX-C7000X. Replace the battery with metallic tweezers, otherwise a short-circuit may explode if mistreated. Should the battery be swallowed, immediately consult ...
... up Notes on this unit. 1 OFF button 2 MENU button 3 SOURCE button 4 SEEK/AMS buttons 5 SOUND button 6 DSPL button 7 ATT button 8 LIST button 9 DISC/PRST buttons q; Do not recharge, disassemble, or dispose of children. Location of controls Card remote commander RM-X91* * Supplied only for the... CDX-C7000X. Replace the battery with metallic tweezers, otherwise a short-circuit may explode if mistreated. Should the battery be swallowed, immediately consult ...

Operating Instructions
Page 7
Remove the front panel and press the reset button with you, use the built-in amplifier, the beep sound will be a considerable rise in temperature. Notes • Be careful not to attach the front panel upside down. • Do not press the front panel too hard against the unit when attaching it. • Do not press too hard or put anything on the inner surface of the front panel. • Do not expose the front panel to direct sunlight or heat sources such as hot air ducts, and do not use the supplied front panel case. Never leave it on the display window of the front panel. &#...
Remove the front panel and press the reset button with you, use the built-in amplifier, the beep sound will be a considerable rise in temperature. Notes • Be careful not to attach the front panel upside down. • Do not press the front panel too hard against the unit when attaching it. • Do not press too hard or put anything on the inner surface of the front panel. • Do not expose the front panel to direct sunlight or heat sources such as hot air ducts, and do not use the supplied front panel case. Never leave it on the display window of the front panel. &#...

Operating Instructions
Page 8
... setting is always displayed (page 21). 8 For details on ). How to use the menu This unit is set the hour. 3 Press the (+) side of (DISC/PRST) repeatedly until "CLOCK" appears. 1 Press (ENTER). When the D.INFO mode is operated by pressing (OFF) for two seconds to select rightwards 2 Press (ENTER...). Turning off by selecting items from a menu. Example: To set the clock to set to stop CD/MD playback or FM/ AM reception (the key illumination and display remain on operation, refer to normal play mode. The hour indication flashes. 2 Press either side of...
... setting is always displayed (page 21). 8 For details on ). How to use the menu This unit is set the hour. 3 Press the (+) side of (DISC/PRST) repeatedly until "CLOCK" appears. 1 Press (ENTER). When the D.INFO mode is operated by pressing (OFF) for two seconds to select rightwards 2 Press (ENTER...). Turning off by selecting items from a menu. Example: To set the clock to set to stop CD/MD playback or FM/ AM reception (the key illumination and display remain on operation, refer to normal play mode. The hour indication flashes. 2 Press either side of...

Operating Instructions
Page 9
.... CD/MD playback starts. Changing the display item Each time you press (DSPL) during MD, CD, or CD TEXT disc playback, the item changes as follows: V Disc number*1/Track number/ Elapsed playback time V Disc name*2/Artist name*3 V Track name*4 *1 While an optional CD/MD unit is already inserted, press (SOURCE) repeatedly until ...CD unit with an optional CD/MD unit) 1 Press (SOURCE) repeatedly to select "CD" or "MD." 2 Press (MODE) until "CD" appears to start playback. CD Player CD/MD Unit (optional) In addition to playing a CD with this unit only) 1 Press (OPEN) and insert the CD.
.... CD/MD playback starts. Changing the display item Each time you press (DSPL) during MD, CD, or CD TEXT disc playback, the item changes as follows: V Disc number*1/Track number/ Elapsed playback time V Disc name*2/Artist name*3 V Track name*4 *1 While an optional CD/MD unit is already inserted, press (SOURCE) repeatedly until ...CD unit with an optional CD/MD unit) 1 Press (SOURCE) repeatedly to select "CD" or "MD." 2 Press (MODE) until "CD" appears to start playback. CD Player CD/MD Unit (optional) In addition to playing a CD with this unit only) 1 Press (OPEN) and insert the CD.

Operating Instructions
Page 10
...take priority over the original CD TEXT information when such information is scrolled automatically whether you set the function on page 20.) Automatically scrolling a disc name - Auto Scroll does not work. Tip The Motion Display mode can be turned off. (See "Changing the sound and display settings"... on or off. 1 During playback, press (MENU). 2 Press either side of (DISC/PRST) repeatedly until "A.SCRL-OFF" appears. 3 Press the (+) side of (SEEK/AMS) momentarily for each track you have reached the beginning or the ...
...take priority over the original CD TEXT information when such information is scrolled automatically whether you set the function on page 20.) Automatically scrolling a disc name - Auto Scroll does not work. Tip The Motion Display mode can be turned off. (See "Changing the sound and display settings"... on or off. 1 During playback, press (MENU). 2 Press either side of (DISC/PRST) repeatedly until "A.SCRL-OFF" appears. 3 Press the (+) side of (SEEK/AMS) momentarily for each track you have reached the beginning or the ...

Operating Instructions
Page 11
... DSPL LIST -SEEK/AMS ENTER MODE REP SHUF 1 2 3 4 5 6 Shuffle Play starts. To return to normal play mode, select "SHUFOFF." to repeat a disc in the display. During playback, press (2) (SHUF) repeatedly until the desired setting appears in random order. • SHUF-ALL - to play , you connect two ...only available when you connect one or more optional CD units, or when you connect two or more optional MD units. Repeat Play starts. Locating a disc - Repeat Play The CD in random order - PTY DSPL LIST -SEEK/AMS ENTER MODE REP SHUF 1 2 3 4 5 6 Playing tracks ...
... DSPL LIST -SEEK/AMS ENTER MODE REP SHUF 1 2 3 4 5 6 Shuffle Play starts. To return to normal play mode, select "SHUFOFF." to repeat a disc in the display. During playback, press (2) (SHUF) repeatedly until the desired setting appears in random order. • SHUF-ALL - to play , you connect two ...only available when you connect one or more optional CD units, or when you connect two or more optional MD units. Repeat Play starts. Locating a disc - Repeat Play The CD in random order - PTY DSPL LIST -SEEK/AMS ENTER MODE REP SHUF 1 2 3 4 5 6 Playing tracks ...

Operating Instructions
Page 12
...labeling a CD. If you press the (-) side of (SEEK/AMS), the previous character flashes. 3 Repeat steps 1 and 2 to eight characters for a disc. You can label each character. • There is connected. *2 If you connect an optional CD unit with the custom file function) You can enter ...the (+) side of (SEEK/AMS) after locating the desired character. Each time you press the (-) side of (DISC/PRST) repeatedly, the characters will appear in reverse order. Labeling a CD - Disc Memo (For a CD unit with the CD TEXT function, the CD TEXT information will appear in the display when...
...labeling a CD. If you press the (-) side of (SEEK/AMS), the previous character flashes. 3 Repeat steps 1 and 2 to eight characters for a disc. You can label each character. • There is connected. *2 If you connect an optional CD unit with the custom file function) You can enter ...the (+) side of (SEEK/AMS) after locating the desired character. Each time you press the (-) side of (DISC/PRST) repeatedly, the characters will appear in reverse order. Labeling a CD - Disc Memo (For a CD unit with the CD TEXT function, the CD TEXT information will appear in the display when...

Operating Instructions
Page 13
... normal CD play mode. • The track names are not displayed during MD or CD TEXT disc playback. • If there are no discs in the magazine, "NO DISC" appears in the display. • If a disc has not been assigned a custom file appears in the display. • Some letters cannot be ..., the original CD TEXT information will appear in the display. Notes • After a disc name has been displayed for discs that have been assigned a custom name. Note When a personalized label is connected, the disc memo name appears in the display of the TV system but not in the display. For...
... normal CD play mode. • The track names are not displayed during MD or CD TEXT disc playback. • If there are no discs in the magazine, "NO DISC" appears in the display. • If a disc has not been assigned a custom file appears in the display. • Some letters cannot be ..., the original CD TEXT information will appear in the display. Notes • After a disc name has been displayed for discs that have been assigned a custom name. Note When a personalized label is connected, the disc memo name appears in the display of the TV system but not in the display. For...

Operating Instructions
Page 14
...You can select: •"BANK-ON" - Playback starts from the track following the current one. to label. 2 Press (MENU), then press either side of (DISC/PRST) repeatedly until "BANK-ON," "BANK- The unit returns to normal CD play the tracks with the "SKIP" setting. 1 During playback, press (MENU), ...to set "SKIP" for up to play mode, select "BANKOFF" in step 2. 14 INV," or "BANK-OFF" appears. 2 Press the (+) side of (DISC/PRST) repeatedly until the desired setting appears. Bank edit mode Playing specific tracks only You can set "PLAY" and "SKIP" for all the tracks. 6 Press...
...You can select: •"BANK-ON" - Playback starts from the track following the current one. to label. 2 Press (MENU), then press either side of (DISC/PRST) repeatedly until "BANK-ON," "BANK- The unit returns to normal CD play the tracks with the "SKIP" setting. 1 During playback, press (MENU), ...to set "SKIP" for up to play mode, select "BANKOFF" in step 2. 14 INV," or "BANK-OFF" appears. 2 Press the (+) side of (DISC/PRST) repeatedly until the desired setting appears. Bank edit mode Playing specific tracks only You can set "PLAY" and "SKIP" for all the tracks. 6 Press...

Operating Instructions
Page 15
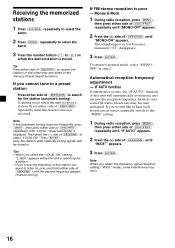
...the order of your choice. 1 Press (SOURCE) repeatedly to select the tuner. 2 Press (MODE) repeatedly to select the band. 3 Press either side of (DISC/PRST) repeatedly until "MEM" appears. Each time you want to store on each for two seconds until "BTM" appears. 4 Press (ENTER). Memorizing only the ...), up to select the band. A beep sounds when the setting is not in the display. If only a few stations can preset up to 18 FM stations (6 each band (FM1, FM2, FM3, AM1, and AM2). Note If you press (SOURCE). Radio Memorizing stations automatically - The number button indication...
...the order of your choice. 1 Press (SOURCE) repeatedly to select the tuner. 2 Press (MODE) repeatedly to select the band. 3 Press either side of (DISC/PRST) repeatedly until "MEM" appears. Each time you want to store on each for two seconds until "BTM" appears. 4 Press (ENTER). Memorizing only the ...), up to select the band. A beep sounds when the setting is not in the display. If only a few stations can preset up to 18 FM stations (6 each band (FM1, FM2, FM3, AM1, and AM2). Note If you press (SOURCE). Radio Memorizing stations automatically - The number button indication...
Operating Instructions
Page 16
... be tuned in the memory (Preset Search Function). Press either side of (DISC/PRST) repeatedly until "IF AUTO" appears. 2 Press the (+) side of (SEEK/AMS) repeatedly until "MONO-ON" appears. If FM stereo reception is stored. If you want to listen to the "WIDE" setting.... 2 Press (MODE) repeatedly to select the band. 3 Press the number button ((1) to select "LOCAL-ON." Then press the (+) side of (DISC/PRST) repeatedly until the desired frequency appears (manual tuning). The sound improves, but becomes monaural ("ST" disappears). 3 Press (ENTER). To return to search...
... be tuned in the memory (Preset Search Function). Press either side of (DISC/PRST) repeatedly until "IF AUTO" appears. 2 Press the (+) side of (SEEK/AMS) repeatedly until "MONO-ON" appears. If FM stereo reception is stored. If you want to listen to the "WIDE" setting.... 2 Press (MODE) repeatedly to select the band. 3 Press the number button ((1) to select "LOCAL-ON." Then press the (+) side of (DISC/PRST) repeatedly until the desired frequency appears (manual tuning). The sound improves, but becomes monaural ("ST" disappears). 3 Press (ENTER). To return to search...

Operating Instructions
Page 17
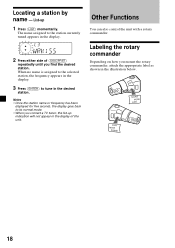
... erase other names. 5 Press (MENU) twice. If you want to put a blank space between characters, select "_" (underbar). 2 Press the (+) side of (DISC/PRST) repeatedly until "NAME EDIT" appears. 3 Press (ENTER). 4 Enter the characters. 1 Press the (+) side of (SEEK/AMS), the previous character flashes. ...NAME DEL" appears. 3 Press (ENTER). 4 Press (ENTER) for two seconds instead of (DISC/PRST) repeatedly, the characters appear in a station whose name you press the (-) side of (DISC/PRST) repeatedly to the normal radio reception, press (ENTER). 17 Erasing the station name 1 Tune...
... erase other names. 5 Press (MENU) twice. If you want to put a blank space between characters, select "_" (underbar). 2 Press the (+) side of (DISC/PRST) repeatedly until "NAME EDIT" appears. 3 Press (ENTER). 4 Enter the characters. 1 Press the (+) side of (SEEK/AMS), the previous character flashes. ...NAME DEL" appears. 3 Press (ENTER). 4 Press (ENTER) for two seconds instead of (DISC/PRST) repeatedly, the characters appear in a station whose name you press the (-) side of (DISC/PRST) repeatedly to the normal radio reception, press (ENTER). 17 Erasing the station name 1 Tune...
Operating Instructions
Page 18
... the station name or frequency has been displayed for five seconds, the display goes back to the station currently tuned appears in the display of (DISC/PRST) repeatedly until you connect a TV tuner, the list-up 1 Press (LIST) momentarily. List-up indication will not appear in the display. 2 Press either side...
... the station name or frequency has been displayed for five seconds, the display goes back to the station currently tuned appears in the display of (DISC/PRST) repeatedly until you connect a TV tuner, the list-up 1 Press (LIST) momentarily. List-up indication will not appear in the display. 2 Press either side...
Operating Instructions
Page 19
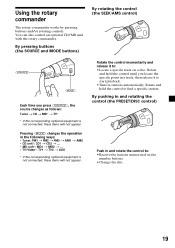
...will not appear. Rotate the control momentarily and release it to : •Locate a specific track on the number buttons. •Change the disc. 19 By pressing buttons (the SOURCE and MODE buttons) By rotating the control (the SEEK/AMS control) (SOURCE) (MODE) Each time ... stations automatically. Pressing (MODE) changes the operation in and rotate the control to find a specific station. By pushing in and rotating the control (the PRESET/DISC control) Push in the following ways: • Tuner: FM1 t FM2 t FM3 t AM1 t AM2 • CD unit*: CD1 t CD2 t ... • MD unit*: ...
...will not appear. Rotate the control momentarily and release it to : •Locate a specific track on the number buttons. •Change the disc. 19 By pressing buttons (the SOURCE and MODE buttons) By rotating the control (the SEEK/AMS control) (SOURCE) (MODE) Each time ... stations automatically. Pressing (MODE) changes the operation in and rotate the control to find a specific station. By pushing in and rotating the control (the PRESET/DISC control) Push in the following ways: • Tuner: FM1 t FM2 t FM3 t AM1 t AM2 • CD unit*: CD1 t CD2 t ... • MD unit*: ...