
Limited Warranty (U.S. Only)
Page 1
... its option, (i) repair the product using new or refurbished parts or (ii) replace the product with new or refurbished product, product determined to state. Parts: For a period of the original Limited Warranty period or for the time periods and as fuses or batteries). any data, software or other rights which vary from your unit. Any parts or product replaced under this...
... its option, (i) repair the product using new or refurbished parts or (ii) replace the product with new or refurbished product, product determined to state. Parts: For a period of the original Limited Warranty period or for the time periods and as fuses or batteries). any data, software or other rights which vary from your unit. Any parts or product replaced under this...

Installation Notes
Page 1
... le tableau de bord To support the unit Pour installer l'appareil Dashboard Tableau de bord 6 Fire wall Paroi ignifuge 2 TOP 1 3 max. Reset button When the installation and connections are for tuner adjustments to be made only by service technicians. •Choose the installation location carefully so that the unit will not interfere with the driver wile driving. •Avoid installing the unit where it would be subject...
... le tableau de bord To support the unit Pour installer l'appareil Dashboard Tableau de bord 6 Fire wall Paroi ignifuge 2 TOP 1 3 max. Reset button When the installation and connections are for tuner adjustments to be made only by service technicians. •Choose the installation location carefully so that the unit will not interfere with the driver wile driving. •Avoid installing the unit where it would be subject...
Operating Instructions (primary manual)
Page 1
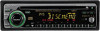
CDX-C580␣ ␣ Serial No. 3-861-717-31 (1) FM/AM Compact Disc Player Operating Instructions EN Owner's Record The model and serial numbers are located on the bottom of the unit. CDX-C580 CDX-C480 © 1998 by Sony Corporation Record the serial number in the space provided below. Model No. For installation and connections, see the supplied installation/connections manual. CDX-C480␣ ␣ Serial No. Refer to these numbers whenever you call upon your Sony dealer regarding this product. Model No.
CDX-C580␣ ␣ Serial No. 3-861-717-31 (1) FM/AM Compact Disc Player Operating Instructions EN Owner's Record The model and serial numbers are located on the bottom of the unit. CDX-C580 CDX-C480 © 1998 by Sony Corporation Record the serial number in the space provided below. Model No. For installation and connections, see the supplied installation/connections manual. CDX-C480␣ ␣ Serial No. Refer to these numbers whenever you call upon your Sony dealer regarding this product. Model No.
Operating Instructions (primary manual)
Page 2
... the Sony Compact Disc Player. If this equipment does cause harmful interference to radio or television reception, which the receiver is encouraged to try to correct the interference by connecting an optional CD/MD changer. 2 EN - CAUTION The use of optical instruments with the limits for help. Thank you can expand your authority to operate this equipment. Reorient or relocate the receiving antenna. - Connect...
... the Sony Compact Disc Player. If this equipment does cause harmful interference to radio or television reception, which the receiver is encouraged to try to correct the interference by connecting an optional CD/MD changer. 2 EN - CAUTION The use of optical instruments with the limits for help. Thank you can expand your authority to operate this equipment. Reorient or relocate the receiving antenna. - Connect...
Operating Instructions (primary manual)
Page 3
... Adjusting the sound characteristics 13 Changing the sound and display settings ..... 13 With Optional Equipment CD/MD Changer Playing a CD or MD 14 Scanning the tracks - Intro Scan 15 Playing tracks repeatedly - Table of Contents This Unit Only Location of controls 4 Getting Started Resetting the unit 6 Detaching the front panel 6 Setting the clock 7 CD Player Listening to a CD 7 Playing a CD in random order - Repeat Play 16 Playing tracks in various modes 8 Radio Memorizing stations...
... Adjusting the sound characteristics 13 Changing the sound and display settings ..... 13 With Optional Equipment CD/MD Changer Playing a CD or MD 14 Scanning the tracks - Intro Scan 15 Playing tracks repeatedly - Table of Contents This Unit Only Location of controls 4 Getting Started Resetting the unit 6 Detaching the front panel 6 Setting the clock 7 CD Player Listening to a CD 7 Playing a CD in random order - Repeat Play 16 Playing tracks in various modes 8 Radio Memorizing stations...
Operating Instructions (primary manual)
Page 4
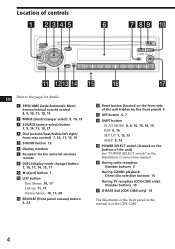
... button PLAY MODE 8, 9, 10, 15, 18, 19 REP 8, 16 SET UP 7, 13, 15 SHUF 8, 16 !∞ POWER SELECT switch (located on the bottom of the unit) See "POWER SELECT switch" in the Installation/Connections manual. !§ During radio reception: Number buttons 9 During CD/MD playback: Direct disc selection buttons 15 During TV reception (CDX-C580 only): Number buttons 19 !¶ D-BASS dial (CDX-C480 only) 14 The illustration of the front panel in this manual is of controls MODE SEEK/AMS SOURCE RELEASE SOUND...
... button PLAY MODE 8, 9, 10, 15, 18, 19 REP 8, 16 SET UP 7, 13, 15 SHUF 8, 16 !∞ POWER SELECT switch (located on the bottom of the unit) See "POWER SELECT switch" in the Installation/Connections manual. !§ During radio reception: Number buttons 9 During CD/MD playback: Direct disc selection buttons 15 During TV reception (CDX-C580 only): Number buttons 19 !¶ D-BASS dial (CDX-C480 only) 14 The illustration of the front panel in this manual is of controls MODE SEEK/AMS SOURCE RELEASE SOUND...
Operating Instructions (primary manual)
Page 5
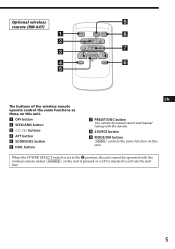
... unit. 1 OFF button 2 SEEK/AMS button 3 (-) (+) buttons 4 ATT button 5 SOUND/SEL button 6 DSPL button EN 7 PRESET/DISC button You cannot do manual search and manual tuning with the wireless remote unless (SOURCE) on this unit. Optional wireless remote (RM-X47) OFF MODE SOURCE DIR SEEK AMS - + PRESET REW DISC FF - When the POWER SELECT switch is set to the B position, the unit cannot be operated with the remote. 8 SOURCE button 9 MODE/DIR button (MODE) controls the same function on the unit is pressed or a CD is inserted to activate...
... unit. 1 OFF button 2 SEEK/AMS button 3 (-) (+) buttons 4 ATT button 5 SOUND/SEL button 6 DSPL button EN 7 PRESET/DISC button You cannot do manual search and manual tuning with the wireless remote unless (SOURCE) on this unit. Optional wireless remote (RM-X47) OFF MODE SOURCE DIR SEEK AMS - + PRESET REW DISC FF - When the POWER SELECT switch is set to the B position, the unit cannot be operated with the remote. 8 SOURCE button 9 MODE/DIR button (MODE) controls the same function on the unit is pressed or a CD is inserted to activate...

Operating Instructions (primary manual)
Page 6
.... Press the reset button with you turn off automatically to prevent the speakers from being damaged. • When you carry the front panel with a pointed object, such as hot air ducts, and do not use the built-in a humid place. If you connect an optional power amplifier and do not leave it . Press it lightly against the unit when attaching it...
.... Press the reset button with you turn off automatically to prevent the speakers from being damaged. • When you carry the front panel with a pointed object, such as hot air ducts, and do not use the built-in a humid place. If you connect an optional power amplifier and do not leave it . Press it lightly against the unit when attaching it...
Operating Instructions (primary manual)
Page 7
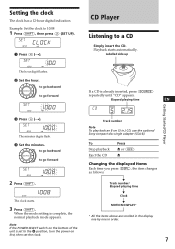
...: $ Track number/ Elapsed playing time $ Clock $ MOTION DISPLAY* * All the items above are scrolled in the display one by one in .) CD, use the optional Sony compact disc single adapter (CSA-8). to go backward SOURCE to the B position, turn the power on first, then set the clock. Note If the POWER SELECT switch on the bottom of the unit is already inserted, press (SOURCE) repeatedly until "CD" appears. Setting the clock The clock has...
...: $ Track number/ Elapsed playing time $ Clock $ MOTION DISPLAY* * All the items above are scrolled in the display one by one in .) CD, use the optional Sony compact disc single adapter (CSA-8). to go backward SOURCE to the B position, turn the power on first, then set the clock. Note If the POWER SELECT switch on the bottom of the unit is already inserted, press (SOURCE) repeatedly until "CD" appears. Setting the clock The clock has...

Operating Instructions (primary manual)
Page 9
... (SOURCE). CD Player/Radio Receiving the memorized stations 1 Press (SOURCE) repeatedly to select the tuner. 2 Press (MODE) repeatedly to select the band (FM1, FM2 or AM). 3 Press the number button ((1) to select the band. Caution When tuning in the station you try to store another station on the same number button, the previously stored station will retain heir former setting. • When a number is indicated in the display, the unit starts storing stations from...
... (SOURCE). CD Player/Radio Receiving the memorized stations 1 Press (SOURCE) repeatedly to select the tuner. 2 Press (MODE) repeatedly to select the band (FM1, FM2 or AM). 3 Press the number button ((1) to select the band. Caution When tuning in the station you try to store another station on the same number button, the previously stored station will retain heir former setting. • When a number is indicated in the display, the unit starts storing stations from...

Operating Instructions (primary manual)
Page 10
... a preset station Push the SEEK/AMS control up or down momentarily to select the desired characters. (A n B n C n ··· Z n 0 n 1 n 2 n ··· 9 n + n - Scanning stops when the unit receives a station. Push the SEEK/AMS control up or down repeatedly until "MONO-ON" appears. Note If the automatic tuning stops too frequently, press (SHIFT), then press (3) (PLAY MODE) repeatedly until the desired frequency appears (manual tuning...
... a preset station Push the SEEK/AMS control up or down momentarily to select the desired characters. (A n B n C n ··· Z n 0 n 1 n 2 n ··· 9 n + n - Scanning stops when the unit receives a station. Push the SEEK/AMS control up or down repeatedly until "MONO-ON" appears. Note If the automatic tuning stops too frequently, press (SHIFT), then press (3) (PLAY MODE) repeatedly until the desired frequency appears (manual tuning...

Operating Instructions (primary manual)
Page 12
... the POWER SELECT switch is connected. By pressing the button (the SOURCE and MODE buttons) EN (SOURCE) (MODE) Every time you locate the specific point in a track, then release it to: •Locate a specific track on the rotary commander. Press (LIST) to adjust the volume. Other operations Rotate the VOL control to display the memorised names. 12 Pressing (MODE) changes the operation in the specific station. Press (SOUND) to : •Receive the stations memorised on the number buttons. •Change the disc...
... the POWER SELECT switch is connected. By pressing the button (the SOURCE and MODE buttons) EN (SOURCE) (MODE) Every time you locate the specific point in a track, then release it to: •Locate a specific track on the rotary commander. Press (LIST) to adjust the volume. Other operations Rotate the VOL control to display the memorised names. 12 Pressing (MODE) changes the operation in the specific station. Press (SOUND) to : •Receive the stations memorised on the number buttons. •Change the disc...

Operating Instructions (primary manual)
Page 13
... (frontrear) 2 Adjust the selected item by pressing (SOUND) repeatedly. Each time you connect an optional power amplifier and do not use the rotary commander in the illustration below. Adjusting the sound characteristics You can control the operative direction of controls with the unit. Select "REV" when you can store the bass and treble levels independantly. 1 Select the item you have not tune the station or there is no CD/MD being played, these...
... (frontrear) 2 Adjust the selected item by pressing (SOUND) repeatedly. Each time you connect an optional power amplifier and do not use the rotary commander in the illustration below. Adjusting the sound characteristics You can control the operative direction of controls with the unit. Select "REV" when you can store the bass and treble levels independantly. 1 Select the item you have not tune the station or there is no CD/MD being played, these...

Operating Instructions (primary manual)
Page 14
... (1) (N). 14 The D-bass function boosts the low frequency signal with a sharper curve than Analog D-bass. * Digital D-bass is available during CD/MD playback, the item changes as follows: $ Elapsed playback time $ Disc name*1 $ Track name*2 $ Clock*3 $ MOTION DISPLAY*4 *1 If there is no prerecorded name for CDX-C480 only) You can emphasize and adjust the bass sound easily with this unit. Moreover, the Digital D-bass* function creates even sharper...
... (1) (N). 14 The D-bass function boosts the low frequency signal with a sharper curve than Analog D-bass. * Digital D-bass is available during CD/MD playback, the item changes as follows: $ Elapsed playback time $ Disc name*1 $ Track name*2 $ Clock*3 $ MOTION DISPLAY*4 *1 If there is no prerecorded name for CDX-C480 only) You can emphasize and adjust the bass sound easily with this unit. Moreover, the Digital D-bass* function creates even sharper...

Operating Instructions (primary manual)
Page 19
... When tuning in the display. If only a few TV channels are received, some number buttons will be erased. 19 The number button indication appears in a station while driving, use Best Tuning Memory to prevent accidents. 1 Press (SOURCE) repeatedly until "TV" appears. 2 Press (SHIFT), then press (3) (PLAY MODE) repeatedly until "AUTO MEM" appears. 3 Press (4) (n). Watching a video 1 Press (SOURCE) repeatedly until "TV" appears. 2 Press (MODE) repeatedly to select "VIDEO 1." Note "VIDEO 2" appears if the VIDEO 2 terminal...
... When tuning in the display. If only a few TV channels are received, some number buttons will be erased. 19 The number button indication appears in a station while driving, use Best Tuning Memory to prevent accidents. 1 Press (SOURCE) repeatedly until "TV" appears. 2 Press (SHIFT), then press (3) (PLAY MODE) repeatedly until "AUTO MEM" appears. 3 Press (4) (n). Watching a video 1 Press (SOURCE) repeatedly until "TV" appears. 2 Press (MODE) repeatedly to select "VIDEO 1." Note "VIDEO 2" appears if the VIDEO 2 terminal...

Operating Instructions (primary manual)
Page 20
... list display. • The contents of the preset memory cannot be listed when the unit is in the display. • The TV monitor does not appear during CD/MD playback. Turning off the display During radio reception, press (LIST) again. Notes • It may take some time until all indications appear in the simultaneous play mode. is selected. Storing the TV channel names...
... list display. • The contents of the preset memory cannot be listed when the unit is in the display. • The TV monitor does not appear during CD/MD playback. Turning off the display During radio reception, press (LIST) again. Notes • It may take some time until all indications appear in the simultaneous play mode. is selected. Storing the TV channel names...
Operating Instructions (primary manual)
Page 21
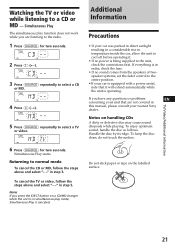
Simultaneous Play The simultaneous play mode, Simultaneous Play is in this manual, please consult your unit that it . • If no sound comes from the speakers of twospeaker systems, set the fader control to the centre position. • If your car is equipped with a power aerial, note that are listening to the radio. 1 Press (SOURCE) for two seconds. Returning to select a TV or video. @@ 6 Press (SOURCE) for two...
Simultaneous Play The simultaneous play mode, Simultaneous Play is in this manual, please consult your unit that it . • If no sound comes from the speakers of twospeaker systems, set the fader control to the centre position. • If your car is equipped with a power aerial, note that are listening to the radio. 1 Press (SOURCE) for two seconds. Returning to select a TV or video. @@ 6 Press (SOURCE) for two...
Operating Instructions (primary manual)
Page 22
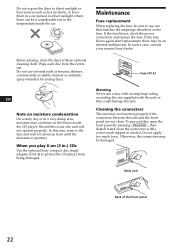
... power connection and replace the fuse. Do not expose the discs to direct sunlight or heat sources such as this could damage the unit. EN Note on moisture condensation On a rainy day or in .) CDs Use the optional Sony compact disc single adapter (CSA-8) to protect the CD player from the centre out. In such a case, consult your nearest Sony dealer. Main unit Back of the front panel...
... power connection and replace the fuse. Do not expose the discs to direct sunlight or heat sources such as this could damage the unit. EN Note on moisture condensation On a rainy day or in .) CDs Use the optional Sony compact disc single adapter (CSA-8) to protect the CD player from the centre out. In such a case, consult your nearest Sony dealer. Main unit Back of the front panel...
Operating Instructions (primary manual)
Page 24
.... 10 oz.) Parts for installation and connections (1 set) Front panel case (1) Rotary commander RM-X4S Wireless remote RM-X47 BUS cable (supplied with an RCA pin cord) RC-61 (1 m), RC-62 (2 m) RCA pin cord RC-63 (1 m) Cleaning cloth XP-CD1 Compact disc single adapter CSA-8 CD changer CDX-705 (10 discs), CDX-T65 (6 discs), CDX-T62 (6 discs) MD changer MDX-60, MDX-61 Source selector XA-C30 TV tuner XT-40V, etc (CDX-C580 only) Design...
.... 10 oz.) Parts for installation and connections (1 set) Front panel case (1) Rotary commander RM-X4S Wireless remote RM-X47 BUS cable (supplied with an RCA pin cord) RC-61 (1 m), RC-62 (2 m) RCA pin cord RC-63 (1 m) Cleaning cloth XP-CD1 Compact disc single adapter CSA-8 CD changer CDX-705 (10 discs), CDX-T65 (6 discs), CDX-T62 (6 discs) MD changer MDX-60, MDX-61 Source selector XA-C30 TV tuner XT-40V, etc (CDX-C580 only) Design...

Operating Instructions (primary manual)
Page 25
... power cord or battery has been disconnected. • The reset button has been pressed. The "ST" indication flashes. A disc is attenuated (page 13). The operation buttons do not appear in the display. n Use manual tuning. •Tune in a sturdy part of more than 60°. • The unit is too weak. Indications do not Press the reset button. Play does not begin. Radio reception Problem Preset tuning is too weak. function. Remove the front panel and...
... power cord or battery has been disconnected. • The reset button has been pressed. The "ST" indication flashes. A disc is attenuated (page 13). The operation buttons do not appear in the display. n Use manual tuning. •Tune in a sturdy part of more than 60°. • The unit is too weak. Indications do not Press the reset button. Play does not begin. Radio reception Problem Preset tuning is too weak. function. Remove the front panel and...


