Camera Operations Guide
Page 72
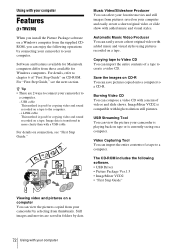
...) When you install the Picture Package software on a Windows computer from the supplied CDROM, you can enjoy the following software. • USB Driver • Picture Package Ver.1.5 • ImageMixer VCD2 • "First Step Guide" Viewing video and pictures on a computer You can view ...the pictures copied from your camcorder by connecting your camcorder to your camcorder to a computer. - For details, refer to a CD-R. For "First Step Guide," see "First Step Guide." Music Video/...
...) When you install the Picture Package software on a Windows computer from the supplied CDROM, you can enjoy the following software. • USB Driver • Picture Package Ver.1.5 • ImageMixer VCD2 • "First Step Guide" Viewing video and pictures on a computer You can view ...the pictures copied from your camcorder by connecting your camcorder to your camcorder to a computer. - For details, refer to a CD-R. For "First Step Guide," see "First Step Guide." Music Video/...
Camera Operations Guide
Page 73
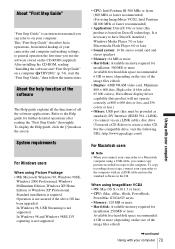
... edited) • Display: 4 MB VRAM video card, Minimum 800 × 600 dots, High color (16 bit color, 65 000 colors), DirectDraw display driver capability (this product will not operate correctly at 800 × 600 dots or less, and 256 colors or less.) • Others: USB port (this... users b Note • When you connect your computer. After installing the CD-ROM, reading "Installing the software and "First Step Guide" on your camcorder to a Macintosh computer using ImageMixer VCD2, Intel Pentium III 800 MHz or faster recommended) • Application: DirectX 9.0c or later (this must be ...
... edited) • Display: 4 MB VRAM video card, Minimum 800 × 600 dots, High color (16 bit color, 65 000 colors), DirectDraw display driver capability (this product will not operate correctly at 800 × 600 dots or less, and 256 colors or less.) • Others: USB port (this... users b Note • When you connect your computer. After installing the CD-ROM, reading "Installing the software and "First Step Guide" on your camcorder to a Macintosh computer using ImageMixer VCD2, Intel Pentium III 800 MHz or faster recommended) • Application: DirectX 9.0c or later (this must be ...
Camera Operations Guide
Page 88
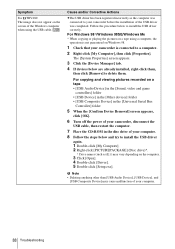
... Device] in the [Universal Serial Bus Controller] folder 5 When the [Confirm Device Removal] screen appears, click [OK]. 6 Turn off the power of your camcorder, disconnect the USB cable, then restart the computer. 7 Place the CD-ROM in the disc drive of your computer. 8 Follow the steps below and try... the pictures on a tape using the USB cable. Symptom For TRV280: The image does not appear on the screen of the USB driver was connected to your camcorder before the installation of the Windows computer when using a computer, the operation is not guaranteed on Windows 98. 1 Check that your...
... Device] in the [Universal Serial Bus Controller] folder 5 When the [Confirm Device Removal] screen appears, click [OK]. 6 Turn off the power of your camcorder, disconnect the USB cable, then restart the computer. 7 Place the CD-ROM in the disc drive of your computer. 8 Follow the steps below and try... the pictures on a tape using the USB cable. Symptom For TRV280: The image does not appear on the screen of the USB driver was connected to your camcorder before the installation of the Windows computer when using a computer, the operation is not guaranteed on Windows 98. 1 Check that your...
Camera Operations Guide
Page 89
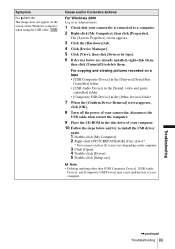
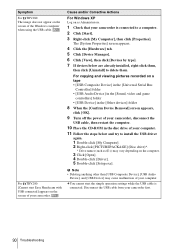
...Confirm Device Removal] screen appears, click [OK]. 8 Turn off the power of your camcorder, disconnect the USB cable, then restart the computer. 9 Place the CD-ROM in the disc drive of your camcorder is connected to a computer. 2 Right-click [My Computer], then click [Properties]. ...Cause and/or Corrective Actions For Windows 2000 Log on as Administrators. 1 Check that your computer. 10 Follow the steps below are already installed, right-click them, then click [Uninstall] to install the USB driver...
...Confirm Device Removal] screen appears, click [OK]. 8 Turn off the power of your camcorder, disconnect the USB cable, then restart the computer. 9 Place the CD-ROM in the disc drive of your camcorder is connected to a computer. 2 Right-click [My Computer], then click [Properties]. ...Cause and/or Corrective Actions For Windows 2000 Log on as Administrators. 1 Check that your computer. 10 Follow the steps below are already installed, right-click them, then click [Uninstall] to install the USB driver...
Camera Operations Guide
Page 90
...], [USB Audio Device], and [USB Device] may vary depending on the computer. 3 Click [Open]. 4 Double-click [Driver]. 5 Double-click [Setup.exe]. cYou cannot start Easy Handycam with USB connected] appears on the screen of your camcorder is connected. Disconnect the USB cable from your computer. 11 Follow the steps below are already installed...
...], [USB Audio Device], and [USB Device] may vary depending on the computer. 3 Click [Open]. 4 Double-click [Driver]. 5 Double-click [Setup.exe]. cYou cannot start Easy Handycam with USB connected] appears on the screen of your camcorder is connected. Disconnect the USB cable from your computer. 11 Follow the steps below are already installed...


