Camera Operations Guide
Page 1
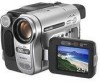
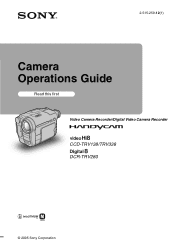
2-515-259-12(1) Camera Operations Guide Read this first Video Camera Recorder/Digital Video Camera Recorder CCD-TRV138/TRV338 DCR-TRV280 © 2005 Sony Corporation
2-515-259-12(1) Camera Operations Guide Read this first Video Camera Recorder/Digital Video Camera Recorder CCD-TRV138/TRV338 DCR-TRV280 © 2005 Sony Corporation
Camera Operations Guide
Page 2
... application or disconnect and connect the communication cable (USB, etc.) again. The number below . Refer to these numbers whenever you call upon your used rechargeable batteries to constitute a risk of rechargeable batteries, call : Sony Customer Information Center 1-800-222-SONY (7669). Model No.AC- Serial No. 2 and CANADA RECYCLING LITHIUM-ION BATTERIES Lithium-Ion batteries are located on the bottom. Model No. -TRV Serial No. This symbol...
... application or disconnect and connect the communication cable (USB, etc.) again. The number below . Refer to these numbers whenever you call upon your used rechargeable batteries to constitute a risk of rechargeable batteries, call : Sony Customer Information Center 1-800-222-SONY (7669). Model No.AC- Serial No. 2 and CANADA RECYCLING LITHIUM-ION BATTERIES Lithium-Ion batteries are located on the bottom. Model No. -TRV Serial No. This symbol...
Camera Operations Guide
Page 3
... are manufactured using a digital still camera, and thus may appear different from what you need an NTSC system-based TV. • Television programs, films, video tapes, and other materials may be some tiny black points and/ or bright points (white, red, blue, or green in color) that to other device Before connecting your camcorder. If you start reading this manual, check the model name of your recordings on...
... are manufactured using a digital still camera, and thus may appear different from what you need an NTSC system-based TV. • Television programs, films, video tapes, and other materials may be some tiny black points and/ or bright points (white, red, blue, or green in color) that to other device Before connecting your camcorder. If you start reading this manual, check the model name of your recordings on...
Camera Operations Guide
Page 7
... 98 Specification 101 Quick Reference Identifying parts and controls ...........104 Index 109 For TRV280: Two operating instructions are supplied with your camcorder: • Camera Operations Guide (This manual) • "First Step Guide" for using the supplied applications (included in the supplied CD-ROM) 7 FRAME REC/INT.REC, etc. ......52 Using the (SETUP MENU) - HiFi SOUND/EDIT, etc 49 Using the (LCD SET) menu - CLOCK SET/USB STREAM/ LANGUAGE, etc 55 Using the (OTHERS) menu - Easy Dubbing ( TRV138/338 62 Recording pictures from a VCR...
... 98 Specification 101 Quick Reference Identifying parts and controls ...........104 Index 109 For TRV280: Two operating instructions are supplied with your camcorder: • Camera Operations Guide (This manual) • "First Step Guide" for using the supplied applications (included in the supplied CD-ROM) 7 FRAME REC/INT.REC, etc. ......52 Using the (SETUP MENU) - HiFi SOUND/EDIT, etc 49 Using the (LCD SET) menu - CLOCK SET/USB STREAM/ LANGUAGE, etc 55 Using the (OTHERS) menu - Easy Dubbing ( TRV138/338 62 Recording pictures from a VCR...
Camera Operations Guide
Page 13
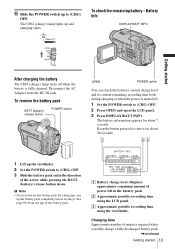
... the direction of the battery pack. Battery Info DISPLAY/BATT INFO Getting started 13 To remove the battery pack BATT (battery) release button POWER switch OPEN POWER switch You can check the battery's current charge level and its current remaining recording time both during charging or when the power is fully charged. Keep the button pressed to (CHG) OFF. 6 Slide the POWER switch up to view it . The CHG (charge) lamp lights up and charging starts. B Approximate possible recording time using the...
... the direction of the battery pack. Battery Info DISPLAY/BATT INFO Getting started 13 To remove the battery pack BATT (battery) release button POWER switch OPEN POWER switch You can check the battery's current charge level and its current remaining recording time both during charging or when the power is fully charged. Keep the button pressed to (CHG) OFF. 6 Slide the POWER switch up to view it . The CHG (charge) lamp lights up and charging starts. B Approximate possible recording time using the...
Camera Operations Guide
Page 14
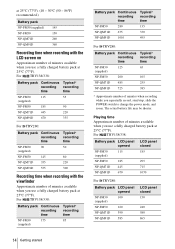
... 200 105 NP-QM71D 485 255 NP-QM91D 725 385 * Approximate number of minutes available when you use a fully charged battery pack at 25°C (77°F). Playing time Approximate number of minutes when recording while you repeatedly record, start/stop, slide the POWER switch to change the power mode, and zoom. For TRV138/338: Battery pack LCD panel opened NP-FM30 115 (supplied) NP-FM50 185 NP-QM71D 445...
... 200 105 NP-QM71D 485 255 NP-QM91D 725 385 * Approximate number of minutes available when you use a fully charged battery pack at 25°C (77°F). Playing time Approximate number of minutes when recording while you repeatedly record, start/stop, slide the POWER switch to change the power mode, and zoom. For TRV138/338: Battery pack LCD panel opened NP-FM30 115 (supplied) NP-FM50 185 NP-QM71D 445...

Camera Operations Guide
Page 22
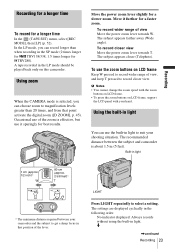
G Time code/Tape counter (hour: minute: second)/Tape photo recording ( TRV280) b Notes • Before changing the battery pack, slide the POWER switch up to (CHG) OFF. • In the default setting, if you record from the last recorded scene to 0:00:00, press COUNTER RESET (p. 106). z Tips • You can view this information during playback by yourself in the mirror mode. • To press REC START/STOP on LCD frame, support the...
G Time code/Tape counter (hour: minute: second)/Tape photo recording ( TRV280) b Notes • Before changing the battery pack, slide the POWER switch up to (CHG) OFF. • In the default setting, if you record from the last recorded scene to 0:00:00, press COUNTER RESET (p. 106). z Tips • You can view this information during playback by yourself in the mirror mode. • To press REC START/STOP on LCD frame, support the...
Camera Operations Guide
Page 23
... power zoom lever towards W. b Notes • You cannot change the zoom speed with the zoom buttons on LCD frame. • To press the zoom buttons on this camcorder. LIGHT Press LIGHT repeatedly to suit your hand. Move the power zoom lever slightly for a longer time In the (TAPE SET) menu, select [REC MODE], then [LP] (p. 52). To record wider range of view, and keep T pressed to magnification levels greater than when recording in light. Using zoom When the CAMERA mode...
... power zoom lever towards W. b Notes • You cannot change the zoom speed with the zoom buttons on LCD frame. • To press the zoom buttons on this camcorder. LIGHT Press LIGHT repeatedly to suit your hand. Move the power zoom lever slightly for a longer time In the (TAPE SET) menu, select [REC MODE], then [LP] (p. 52). To record wider range of view, and keep T pressed to magnification levels greater than when recording in light. Using zoom When the CAMERA mode...
Camera Operations Guide
Page 49
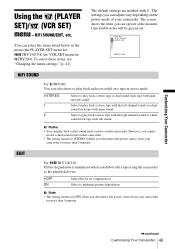
... Camcorder Using the (PLAYER SET)/ (VCR SET) menu - To select these items, see "Changing the menu settings" (p. 41). Select to play back audio recorded on a tape in the menu (the PLAYER SET menu for TRV138/338, the VCR SET menu for no compensation. GOFF ON Select this for TRV280). The settings you can operate at the moment. VCR SET H i F i SOUND AUDIO MIX [MENU] : END HiFi SOUND For TRV280: You can adjust vary depending on this camcorder. Select to play back a stereo tape...
... Camcorder Using the (PLAYER SET)/ (VCR SET) menu - To select these items, see "Changing the menu settings" (p. 41). Select to play back audio recorded on a tape in the menu (the PLAYER SET menu for TRV138/338, the VCR SET menu for no compensation. GOFF ON Select this for TRV280). The settings you can operate at the moment. VCR SET H i F i SOUND AUDIO MIX [MENU] : END HiFi SOUND For TRV280: You can adjust vary depending on this camcorder. Select to play back a stereo tape...
Camera Operations Guide
Page 55
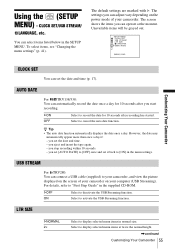
... Select to your camcorder, and view the picture displayed on the screen of your camcorder on the power mode of your computer (USB Streaming). you eject and insert the tape again. - The screen shows the items you can operate at twice the normal height. ,continued Customizing Your Camcorder 55 SETUP MENU CLOCK SET USB STREAM LTR SIZE LANGUAGE DEMO MODE [MENU] : END Customizing Your Camcorder CLOCK SET You can connect a USB cable (supplied) to record the date for 10 seconds...
... Select to your camcorder, and view the picture displayed on the screen of your camcorder on the power mode of your computer (USB Streaming). you eject and insert the tape again. - The screen shows the items you can operate at twice the normal height. ,continued Customizing Your Camcorder 55 SETUP MENU CLOCK SET USB STREAM LTR SIZE LANGUAGE DEMO MODE [MENU] : END Customizing Your Camcorder CLOCK SET You can connect a USB cable (supplied) to record the date for 10 seconds...
Camera Operations Guide
Page 57
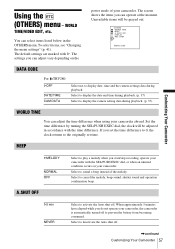
... sound, shutter sound and operation confirmation beep. To select items, see "Changing the menu settings" (p. 41). Unavailable items will be grayed out. The settings you can adjust the time difference when using your camcorder abroad. The screen shows the items you start/stop recording, operate your camcorder. Select to sound a beep instead of your camcorder with the time difference. BEEP Customizing Your Camcorder GMELODY NORMAL OFF A.SHUT OFF Select to display the camera setting data...
... sound, shutter sound and operation confirmation beep. To select items, see "Changing the menu settings" (p. 41). Unavailable items will be grayed out. The settings you can adjust the time difference when using your camcorder abroad. The screen shows the items you start/stop recording, operate your camcorder. Select to sound a beep instead of your camcorder with the time difference. BEEP Customizing Your Camcorder GMELODY NORMAL OFF A.SHUT OFF Select to display the camera setting data...
Camera Operations Guide
Page 73
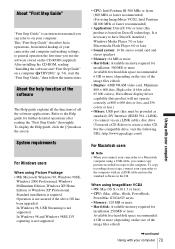
... need a CD-R drive to create a video CD. Refer to general operation the first time you use the standard software in the OS. To copy recordings from initial hookup of the image files edited) ,continued Using with your computer Operation is not supported. This "First Step Guide" describes basic operations, from a tape, connect your camcorder to have DirectX installed.) Windows Media Player 7.0 or later Macromedia Flash Player 6.0 or later • Sound system: 16 bit stereo sound card...
... need a CD-R drive to create a video CD. Refer to general operation the first time you use the standard software in the OS. To copy recordings from initial hookup of the image files edited) ,continued Using with your computer Operation is not supported. This "First Step Guide" describes basic operations, from a tape, connect your camcorder to have DirectX installed.) Windows Media Player 7.0 or later Macromedia Flash Player 6.0 or later • Sound system: 16 bit stereo sound card...
Camera Operations Guide
Page 85
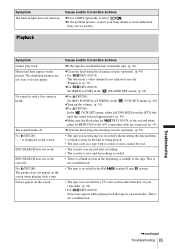
... (VCR SET) menu. (p. 49) cTurn up the volume. (p. 34) cFor TRV280: In the (VCR SET) menu, adjust [AUDIO MIX] from the [ST2] side until the sound is heard appropriately. (p. 50) cMake sure the black plug for TRV138/338, or the red and white plugs for TRV280 of the A/V connecting cable are connected. (p. 39) cClean the head using the cleaning cassette (optional). (p. 99) • For TRV138/338: The television's video channel is recorded in various modes. Playback Symptom Cannot play...
... (VCR SET) menu. (p. 49) cTurn up the volume. (p. 34) cFor TRV280: In the (VCR SET) menu, adjust [AUDIO MIX] from the [ST2] side until the sound is heard appropriately. (p. 50) cMake sure the black plug for TRV138/338, or the red and white plugs for TRV280 of the A/V connecting cable are connected. (p. 39) cClean the head using the cleaning cassette (optional). (p. 99) • For TRV138/338: The television's video channel is recorded in various modes. Playback Symptom Cannot play...
Camera Operations Guide
Page 86
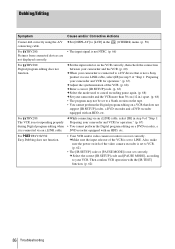
... does not function. • Your VCR and/or video camera recorder is not set correctly. cMake sure the input selector of the video camera recorder is set to VCR. (p. 62) • The [IR SETUP] code or [PAUSE MODE] is not set correctly. Dubbing/Editing Symptom Cause and/or Corrective Actions Cannot dub correctly using the A/V cSet [DISPLAY] to [LCD] in the connecting cable. (OTHERS) menu. (p. 58) For TRV280: Pictures from connected devices are not displayed correctly. •...
... does not function. • Your VCR and/or video camera recorder is not set correctly. cMake sure the input selector of the video camera recorder is set to VCR. (p. 62) • The [IR SETUP] code or [PAUSE MODE] is not set correctly. Dubbing/Editing Symptom Cause and/or Corrective Actions Cannot dub correctly using the A/V cSet [DISPLAY] to [LCD] in the connecting cable. (OTHERS) menu. (p. 58) For TRV280: Pictures from connected devices are not displayed correctly. •...
Camera Operations Guide
Page 88
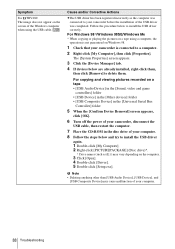
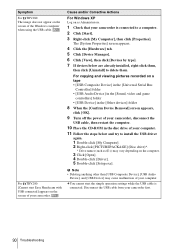
... Windows 98*/Windows 98SE/Windows Me * When copying or playing the pictures on a tape using the USB cable. For copying and viewing pictures recorded on a tape • [USB Audio Device] in the [Sound, video and game controllers] folder • [USB Device] in the [Other devices] folder • [USB Composite Device] in the [Universal Serial Bus Controller] folder 5 When the [Confirm Device Removal] screen appears, click [OK]. 6 Turn off the power of your camcorder, disconnect the USB cable, then restart the computer. 7 Place the CD-ROM in the disc drive...
... Windows 98*/Windows 98SE/Windows Me * When copying or playing the pictures on a tape using the USB cable. For copying and viewing pictures recorded on a tape • [USB Audio Device] in the [Sound, video and game controllers] folder • [USB Device] in the [Other devices] folder • [USB Composite Device] in the [Universal Serial Bus Controller] folder 5 When the [Confirm Device Removal] screen appears, click [OK]. 6 Turn off the power of your camcorder, disconnect the USB cable, then restart the computer. 7 Place the CD-ROM in the disc drive...
Camera Operations Guide
Page 89
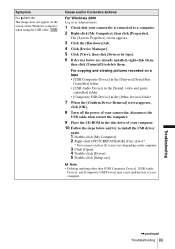
... on a tape • [USB Composite Device] in the [Universal Serial Bus Controller] folder • [USB Audio Device] in the [Sound, video and game controller] folder • [Composite USB Device] in the [Other devices] folder 7 When the [Confirm Device Removal] screen appears, click [OK]. 8 Turn off the power of your camcorder, disconnect the USB cable, then restart the computer. 9 Place the CD-ROM in the disc drive of the Windows computer when using the USB cable. The [System Properties] screen appears...
... on a tape • [USB Composite Device] in the [Universal Serial Bus Controller] folder • [USB Audio Device] in the [Sound, video and game controller] folder • [Composite USB Device] in the [Other devices] folder 7 When the [Confirm Device Removal] screen appears, click [OK]. 8 Turn off the power of your camcorder, disconnect the USB cable, then restart the computer. 9 Place the CD-ROM in the disc drive of the Windows computer when using the USB cable. The [System Properties] screen appears...
Camera Operations Guide
Page 90
... viewing pictures recorded on the computer. 3 Click [Open]. 4 Double-click [Driver]. 5 Double-click [Setup.exe]. b Note • Deleting anything other than [USB Composite Device], [USB Audio Device], and [USB Device] may vary depending on a tape • [USB Composite Device] in the [Universal Serial Bus Controller] folder • [USB Audio Device] in the [Sound, video and game controllers] folder • [USB Device] in the [Other devices] folder 8 When the [Confirm Device Removal] screen appears, click [OK]. 9 Turn off the power of your camcorder, disconnect the USB cable...
... viewing pictures recorded on the computer. 3 Click [Open]. 4 Double-click [Driver]. 5 Double-click [Setup.exe]. b Note • Deleting anything other than [USB Composite Device], [USB Audio Device], and [USB Device] may vary depending on a tape • [USB Composite Device] in the [Universal Serial Bus Controller] folder • [USB Audio Device] in the [Sound, video and game controllers] folder • [USB Device] in the [Other devices] folder 8 When the [Confirm Device Removal] screen appears, click [OK]. 9 Turn off the power of your camcorder, disconnect the USB cable...
Camera Operations Guide
Page 100
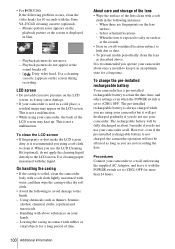
... the date, time, and other settings even when the POWER switch is not a malfunction. • While using the supplied AC Adaptor, and leave it with above . Playback pictures do not move. - Use a cleaning cassette.] appears on your camcorder is displayed in a cold place, a residual image may heat up. Using chemicals such as at all. When there are not recording the date. The pre-installed rechargeable battery is not charged, the camcorder operation...
... the date, time, and other settings even when the POWER switch is not a malfunction. • While using the supplied AC Adaptor, and leave it with above . Playback pictures do not move. - Use a cleaning cassette.] appears on your camcorder is displayed in a cold place, a residual image may heat up. Using chemicals such as at all. When there are not recording the date. The pre-installed rechargeable battery is not charged, the camcorder operation...
Camera Operations Guide
Page 101
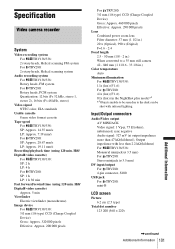
... (ø 3.5 mm) DV input/output For TRV280: 4-pin connector, S100 USB jack For TRV280: mini-B LCD screen Picture 6.2 cm (2.5 type) Total dot number 123 200 (560 × 220) ,continued Additional Information 101 Additional Information Hi8/ Digital8 video cassette) For TRV138/338: SP: 2 h LP: 4 h For TRV280: SP: 1 h LP: 1 h 30 min Fast forward/rewind time (using 120 min. Specification Video camera recorder System Video recording system For TRV138/338: 2 rotary heads, Helical scanning FM...
... (ø 3.5 mm) DV input/output For TRV280: 4-pin connector, S100 USB jack For TRV280: mini-B LCD screen Picture 6.2 cm (2.5 type) Total dot number 123 200 (560 × 220) ,continued Additional Information 101 Additional Information Hi8/ Digital8 video cassette) For TRV138/338: SP: 2 h LP: 4 h For TRV280: SP: 1 h LP: 1 h 30 min Fast forward/rewind time (using 120 min. Specification Video camera recorder System Video recording system For TRV138/338: 2 rotary heads, Helical scanning FM...
Camera Operations Guide
Page 109
... 44 Auto shut off function (A.SHUT OFF 57 B BACK LIGHT 27 Battery Battery Info 13 Battery pack 12 Remaining battery time 22, 96 BEEP 57 BLACK FADER 30 Built-in light 23 BURN DVD/VCD .....79, 106 C Camera settings data display 37 Cassette 18, 95 CD-ROM 72 Charging the battery Battery Pack 12 Pre-installed rechargeable battery 100 Cleaning cassette 100 Clock set (CLOCK SET) ......17, 55 D Data code (DATA CODE) .....37, 57 Date/time 37 DEMO MODE 56 Digital program editing (VIDEO EDIT 67 Digital zoom (D ZOOM...
... 44 Auto shut off function (A.SHUT OFF 57 B BACK LIGHT 27 Battery Battery Info 13 Battery pack 12 Remaining battery time 22, 96 BEEP 57 BLACK FADER 30 Built-in light 23 BURN DVD/VCD .....79, 106 C Camera settings data display 37 Cassette 18, 95 CD-ROM 72 Charging the battery Battery Pack 12 Pre-installed rechargeable battery 100 Cleaning cassette 100 Clock set (CLOCK SET) ......17, 55 D Data code (DATA CODE) .....37, 57 Date/time 37 DEMO MODE 56 Digital program editing (VIDEO EDIT 67 Digital zoom (D ZOOM...


