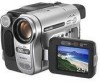
Camera Operations Guide
Page 7
...STREAM/ LANGUAGE, etc 55 Using the (OTHERS) menu - Easy Dubbing ( TRV138/338 62 Recording pictures from a VCR ( TRV280 66 Dubbing selected scenes from a tape - Digital program editing ( TRV280 67 Using with your camcorder: • Camera Operations Guide (This manual) • "First Step ... TIME/VIDEO EDIT, etc 57 Dubbing/Editing Connecting to a VCR 59 Dubbing to DVD") ( TRV280 79 Troubleshooting Troubleshooting 82 Warning indicators and messages .....92 Additional Information Using your camcorder abroad 94 Usable cassette tapes 95 About the "InfoLITHIUM" battery pack 96 About i....
...STREAM/ LANGUAGE, etc 55 Using the (OTHERS) menu - Easy Dubbing ( TRV138/338 62 Recording pictures from a VCR ( TRV280 66 Dubbing selected scenes from a tape - Digital program editing ( TRV280 67 Using with your camcorder: • Camera Operations Guide (This manual) • "First Step ... TIME/VIDEO EDIT, etc 57 Dubbing/Editing Connecting to a VCR 59 Dubbing to DVD") ( TRV280 79 Troubleshooting Troubleshooting 82 Warning indicators and messages .....92 Additional Information Using your camcorder abroad 94 Usable cassette tapes 95 About the "InfoLITHIUM" battery pack 96 About i....
Camera Operations Guide
Page 67
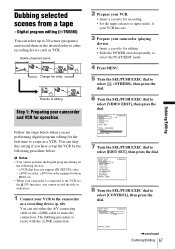
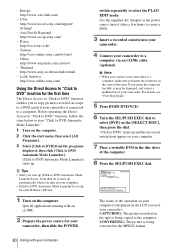
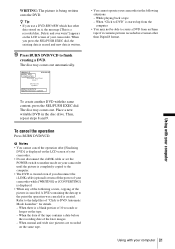
... for operation Follow the steps below when you have set up to select [VIDEO EDIT], then press the dial. a DVD recorder, a DVD recorder equipped with an HDD, etc • When your camcorder is easier with the i.LINK connection. 2 Prepare your VCR. • Insert a cassette for editing. • Slide... press the dial. The dubbing procedure is connected to the VCR via the DV Interface, you cannot record the title or indicators. 1 Connect your camcorder (playing device). • Insert a cassette for recording. • Set the input selector to input mode, if your VCR has one. 3 Prepare...
... for operation Follow the steps below when you have set up to select [VIDEO EDIT], then press the dial. a DVD recorder, a DVD recorder equipped with an HDD, etc • When your camcorder is easier with the i.LINK connection. 2 Prepare your VCR. • Insert a cassette for editing. • Slide... press the dial. The dubbing procedure is connected to the VCR via the DV Interface, you cannot record the title or indicators. 1 Connect your camcorder (playing device). • Insert a cassette for recording. • Set the input selector to input mode, if your VCR has one. 3 Prepare...
Camera Operations Guide
Page 79
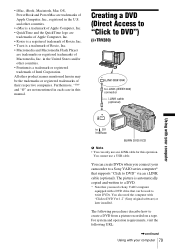
... is a registered trademark of Roxio, Inc. • Toast is automatically copied and written to a DVD. * Note that you connect your camcorder to DVD" via an i.LINK cable (optional). You also need a Sony VAIO computer equipped with "Click to write DVDs. The picture is a trademark of Roxio, Inc. • Macromedia and Macromedia Flash Player are not...
... is a registered trademark of Roxio, Inc. • Toast is automatically copied and written to a DVD. * Note that you connect your camcorder to DVD" via an i.LINK cable (optional). You also need a Sony VAIO computer equipped with "Click to write DVDs. The picture is a trademark of Roxio, Inc. • Macromedia and Macromedia Flash Player are not...
Camera Operations Guide
Page 80
... a few hours to create a DVD. 3 Insert a recorded cassette into your camcorder. 4 Connect your camcorder to the MPEG2 format. 80 Using with an i.LINK. 2 Prepare the power source for each Windows XP user. 1 Turn on your camcorder. - USA http://www.ita.sel.sony.com/support/ dvimag/ - Before operating... the Direct Access to "Click to DVD" function, follow the steps below to start "Click to DVD Automatic Mode Launcher." 1 Turn on the computer. 2 Click the...
... a few hours to create a DVD. 3 Insert a recorded cassette into your camcorder. 4 Connect your camcorder to the MPEG2 format. 80 Using with an i.LINK. 2 Prepare the power source for each Windows XP user. 1 Turn on your camcorder. - USA http://www.ita.sel.sony.com/support/ dvimag/ - Before operating... the Direct Access to "Click to DVD" function, follow the steps below to start "Click to DVD Automatic Mode Launcher." 1 Turn on the computer. 2 Click the...
Camera Operations Guide
Page 81
.... Delete and overwrite?] appears on it, the message [This is started up to the help files of the later images. - When "Click to DVD" is a recorded disc. When there is a blank portion of your camcorder. • Do not disconnect the i.LINK cable or set the POWER switch to another mode on your... is displayed on the LCD screen of 10 seconds or longer on the same tape. Using with your computer 81 Place a new writable DVD in the following occurs, copying of your camcorder in the disc drive. A DVD containing the data up from the computer • You may not be able to finish creating...
.... Delete and overwrite?] appears on it, the message [This is started up to the help files of the later images. - When "Click to DVD" is a recorded disc. When there is a blank portion of your camcorder. • Do not disconnect the i.LINK cable or set the POWER switch to another mode on your... is displayed on the LCD screen of 10 seconds or longer on the same tape. Using with your computer 81 Place a new writable DVD in the following occurs, copying of your camcorder in the disc drive. A DVD containing the data up from the computer • You may not be able to finish creating...
Camera Operations Guide
Page 86
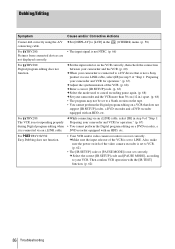
... program editing does not function. For TRV138/338: Easy Dubbing does not function. • Your VCR and/or video camera recorder is not a Sony product via an i.LINK cable. cWhile connecting via an i.LINK cable, select [IR] in step 9 of "Step 1: Preparing your camcorder and VCR for operation." (p. 67)... code or [PAUSE MODE] is not set to a blank section on the tape. • You cannot perform the Digital program editing on a DVD recorder, a DVD recorder equipped with the [IR TEST] function. (p. 62) 86 Troubleshooting cMake sure the input selector of "Step 1: Preparing your...
... program editing does not function. For TRV138/338: Easy Dubbing does not function. • Your VCR and/or video camera recorder is not a Sony product via an i.LINK cable. cWhile connecting via an i.LINK cable, select [IR] in step 9 of "Step 1: Preparing your camcorder and VCR for operation." (p. 67)... code or [PAUSE MODE] is not set to a blank section on the tape. • You cannot perform the Digital program editing on a DVD recorder, a DVD recorder equipped with the [IR TEST] function. (p. 62) 86 Troubleshooting cMake sure the input selector of "Step 1: Preparing your...
Camera Operations Guide
Page 98
...with DV device. device. a VAIO series personal computer) as well as Digital Televisions, DVD recorders/players, and MICROMV recorders/players are not using your camcorder and have it checked by Sony (e.g. Some i.LINK compatible video device such as to direct sunlight. Near windows or outdoors...exposed to video device. Before connecting to other i.LINK (DV Interface) compatible device made by a Sony dealer before operating it may not be sure to record properly. - The camcorder may occur. - If sand or dust gets in the following locations. - This damages the inside...
...with DV device. device. a VAIO series personal computer) as well as Digital Televisions, DVD recorders/players, and MICROMV recorders/players are not using your camcorder and have it checked by Sony (e.g. Some i.LINK compatible video device such as to direct sunlight. Near windows or outdoors...exposed to video device. Before connecting to other i.LINK (DV Interface) compatible device made by a Sony dealer before operating it may not be sure to record properly. - The camcorder may occur. - If sand or dust gets in the following locations. - This damages the inside...
Camera Operations Guide
Page 106
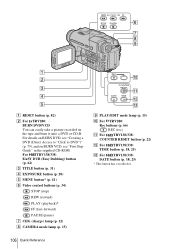
... You can easily take a picture recorded on BURN VCD, see "Creating a DVD (Direct Access to "Click to DVD")" (p. 79), and on the tape and burn it onto a DVD or CD-R. For TRV138/338: EASY DUB (Easy Dubbing) button (p. 62) C TITLE button (p. 31) D EXPOSURE button (p. 28) E MENU button* (p. 41)...CAMERA mode lamp (p. 15) I PLAY/EDIT mode lamp (p. 15) J For TRV280: Rec buttons (p. 66) REC (rec) K For TRV138/338: COUNTER RESET button (p. 22) L For TRV138/338: TIME button (p. 18, 25) M For TRV138/338: DATE button (p. 18, 25) * This button has a tactile dot. 106 Quick Reference For details on BURN...
... You can easily take a picture recorded on BURN VCD, see "Creating a DVD (Direct Access to "Click to DVD")" (p. 79), and on the tape and burn it onto a DVD or CD-R. For TRV138/338: EASY DUB (Easy Dubbing) button (p. 62) C TITLE button (p. 31) D EXPOSURE button (p. 28) E MENU button* (p. 41)...CAMERA mode lamp (p. 15) I PLAY/EDIT mode lamp (p. 15) J For TRV280: Rec buttons (p. 66) REC (rec) K For TRV138/338: COUNTER RESET button (p. 22) L For TRV138/338: TIME button (p. 18, 25) M For TRV138/338: DATE button (p. 18, 25) * This button has a tactile dot. 106 Quick Reference For details on BURN...
Camera Operations Guide
Page 109
...Date/time 37 DEMO MODE 56 Digital program editing (VIDEO EDIT 67 Digital zoom (D ZOOM)... 45 Digital8 system 95 Direct Access to "Click to DVD 79 DirectX 9.0c 76 Display DISPLAY 58 Display indicator....... 108 DNR 50 Dual sound track tape ........ 49 Dubbing 59 DV Interface 79 E Easy Dubbing... 62 Easy Handycam 26, 36 EDIT 49 END SEARCH 33 Exposure 27 F FADER 30 First Step Guide........... 73, 74 Focus 29 Frame recording (FRAME REC 53 Full...
...Date/time 37 DEMO MODE 56 Digital program editing (VIDEO EDIT 67 Digital zoom (D ZOOM)... 45 Digital8 system 95 Direct Access to "Click to DVD 79 DirectX 9.0c 76 Display DISPLAY 58 Display indicator....... 108 DNR 50 Dual sound track tape ........ 49 Dubbing 59 DV Interface 79 E Easy Dubbing... 62 Easy Handycam 26, 36 EDIT 49 END SEARCH 33 Exposure 27 F FADER 30 First Step Guide........... 73, 74 Focus 29 Frame recording (FRAME REC 53 Full...


