
Operating Instructions
Page 5
... - BACK LIGHT 25 Shooting in light (CCD-TRV107/TRV308/TRV408/ TRV608 only 46 5 USB Streaming (Windows users only 59 Customizing Your Camcorder Changing the menu settings 67 Recording - Basics... Playing back a tape 29 Viewing the recording on pictures 27 Checking the recording - NightShot 26 Superimposing the date and time on TV 32 Troubleshooting Types of contents Main Features 4 Quick Start Guide 6 Getting started Using this manual 8 Checking supplied accessories 10 Step 1 Preparing the power supply...
... - BACK LIGHT 25 Shooting in light (CCD-TRV107/TRV308/TRV408/ TRV608 only 46 5 USB Streaming (Windows users only 59 Customizing Your Camcorder Changing the menu settings 67 Recording - Basics... Playing back a tape 29 Viewing the recording on pictures 27 Checking the recording - NightShot 26 Superimposing the date and time on TV 32 Troubleshooting Types of contents Main Features 4 Quick Start Guide 6 Getting started Using this manual 8 Checking supplied accessories 10 Step 1 Preparing the power supply...

Operating Instructions
Page 6
... compartment, and press Z EJECT. Quick Start Guide This chapter introduces you to the basic features of your camcorder outdoors (p. 11). See the page in parentheses "( )" for more information. The cassette compartment opens automatically. AC power adaptor (supplied) Inserting a cassette (p. 18) 1 Open the lid of the cassette compartment. EJECT 2 Insert a cassette into the cassette...
... compartment, and press Z EJECT. Quick Start Guide This chapter introduces you to the basic features of your camcorder outdoors (p. 11). See the page in parentheses "( )" for more information. The cassette compartment opens automatically. AC power adaptor (supplied) Inserting a cassette (p. 18) 1 Open the lid of the cassette compartment. EJECT 2 Insert a cassette into the cassette...
Operating Instructions
Page 10
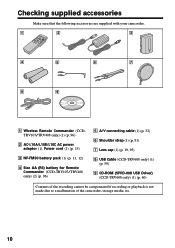
... Make sure that the following accessories are supplied with your camcorder. 1 2 3 4 5 6 7 8 9 1 Wireless Remote Commander (CCDTRV107/TRV408 only) (1) (p. 96) 2 AC-L10A/L10B/L10C AC power adaptor (1), Power cord (1) (p. 15) 3 NP-FM30 battery pack (1) (p. 11, 12) 4 Size AA (R6) battery for Remote Commander (CCD-TRV107/TRV408 only) (2) (p. 96) 5 A/V connecting cable (1) (p. 32) 6 Shoulder strap (1) (p. 91) 7 Lens cap (1) (p. 19...
... Make sure that the following accessories are supplied with your camcorder. 1 2 3 4 5 6 7 8 9 1 Wireless Remote Commander (CCDTRV107/TRV408 only) (1) (p. 96) 2 AC-L10A/L10B/L10C AC power adaptor (1), Power cord (1) (p. 15) 3 NP-FM30 battery pack (1) (p. 11, 12) 4 Size AA (R6) battery for Remote Commander (CCD-TRV107/TRV408 only) (2) (p. 96) 5 A/V connecting cable (1) (p. 32) 6 Shoulder strap (1) (p. 91) 7 Lens cap (1) (p. 19...
Operating Instructions
Page 11
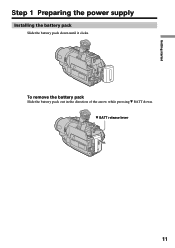
Getting started Step 1 Preparing the power supply Installing the battery pack Slide the battery pack down . To remove the battery pack Slide the battery pack out in the direction of the arrow while pressing V BATT down until it clicks. V BATT release lever 11
Getting started Step 1 Preparing the power supply Installing the battery pack Slide the battery pack down . To remove the battery pack Slide the battery pack out in the direction of the arrow while pressing V BATT down until it clicks. V BATT release lever 11
Operating Instructions
Page 12
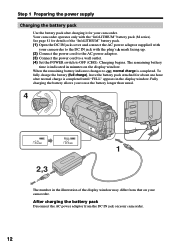
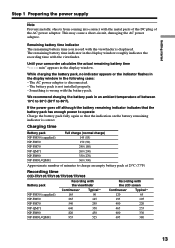
... Preparing the power supply Charging the battery pack Use the battery pack after normal charge is completed until "FULL" appears in the display window. The remaining battery time is completed. See page 81 for about one hour after charging it for your camcorder. 12 AYER 4 PL POWER OFF(CHG)...is indicated in the illustration of the "InfoLITHIUM" battery pack. (1) Open the DC IN jack cover and connect the AC power adaptor supplied with your camcorder. When the remaining battery indicator changes to OFF (CHG). Fully charging the battery allows you to the DC IN jack with...
... Preparing the power supply Charging the battery pack Use the battery pack after normal charge is completed until "FULL" appears in the display window. The remaining battery time is completed. See page 81 for about one hour after charging it for your camcorder. 12 AYER 4 PL POWER OFF(CHG)...is indicated in the illustration of the "InfoLITHIUM" battery pack. (1) Open the DC IN jack cover and connect the AC power adaptor supplied with your camcorder. When the remaining battery indicator changes to OFF (CHG). Fully charging the battery allows you to the DC IN jack with...
Operating Instructions
Page 13
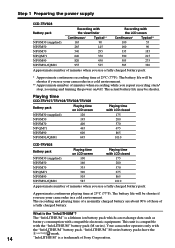
...power supply Note Prevent metallic objects from coming into contact with the metal parts of the DC plug of minutes to charge an empty battery pack at 25°C (77°F) Recording time CCD-TRV107/TRV108/TRV308/TRV408 Battery pack Recording with the viewfinder Continuous* Typical** NP-FM30 (supplied... charge) NP-FM30 (supplied) 145 (85) NP-FM50 150 (90) NP-FM70 240 (180) NP-QM71 260 (200) NP-FM90 330 (270) NP-FM91/QM91 360 (300) Approximate number of the AC power adaptor. The battery pack is correct. Until your camcorder calculates the actual remaining battery...
...power supply Note Prevent metallic objects from coming into contact with the metal parts of the DC plug of minutes to charge an empty battery pack at 25°C (77°F) Recording time CCD-TRV107/TRV108/TRV308/TRV408 Battery pack Recording with the viewfinder Continuous* Typical** NP-FM30 (supplied... charge) NP-FM30 (supplied) 145 (85) NP-FM50 150 (90) NP-FM70 240 (180) NP-QM71 260 (200) NP-FM90 330 (270) NP-FM91/QM91 360 (300) Approximate number of the AC power adaptor. The battery pack is correct. Until your camcorder calculates the actual remaining battery...
Operating Instructions
Page 14
...power supply CCD-TRV608 Battery pack Recording with the viewfinder Recording with the LCD screen Continuous* Typical** Continuous* Typical** NP-FM30 (supplied...) 165 90 100 55 NP-FM50 265 145 160 90 NP-FM70 540 295 335 185 NP-QM71 640 350 390 215 NP-FM90 820 450 505 275 NP-FM91/QM91 955 525 585 320 Approximate number of Sony Corporation. The actual battery life may be shorter if you use your camcorder...;C (77°F). Playing time CCD-TRV107/TRV108/TRV308/TRV408 Battery pack Playing time on LCD screen NP-FM30 (supplied) 120 NP-FM50 195 NP-...
...power supply CCD-TRV608 Battery pack Recording with the viewfinder Recording with the LCD screen Continuous* Typical** Continuous* Typical** NP-FM30 (supplied...) 165 90 100 55 NP-FM50 265 145 160 90 NP-FM70 540 295 335 185 NP-QM71 640 350 390 215 NP-FM90 820 450 505 275 NP-FM91/QM91 955 525 585 320 Approximate number of Sony Corporation. The actual battery life may be shorter if you use your camcorder...;C (77°F). Playing time CCD-TRV107/TRV108/TRV308/TRV408 Battery pack Playing time on LCD screen NP-FM30 (supplied) 120 NP-FM50 195 NP-...
Operating Instructions
Page 15
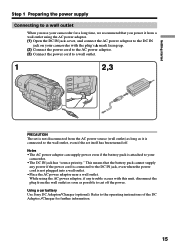
...Connect the power cord to the AC power adaptor. (3) Connect the power cord to the DC IN jack on your camcorder. •The DC IN jack has "source priority." Getting started Step 1 Preparing the power supply Connecting to a wall outlet When you power it is...camcorder for further information. 15 While using the AC power adaptor. (1) Open the DC IN jack cover, and connect the AC power adaptor to a wall outlet. 1 2,3 PRECAUTION The set itself has been turned off the power. Using a car battery Use Sony DC Adaptor/Charger (optional). Notes •The AC power adaptor can supply power...
...Connect the power cord to the AC power adaptor. (3) Connect the power cord to the DC IN jack on your camcorder. •The DC IN jack has "source priority." Getting started Step 1 Preparing the power supply Connecting to a wall outlet When you power it is...camcorder for further information. 15 While using the AC power adaptor. (1) Open the DC IN jack cover, and connect the AC power adaptor to a wall outlet. 1 2,3 PRECAUTION The set itself has been turned off the power. Using a car battery Use Sony DC Adaptor/Charger (optional). Notes •The AC power adaptor can supply power...
Operating Instructions
Page 18
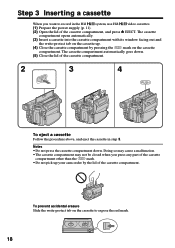
.... (5) Close the lid of the cassette compartment. 2 3 4 EJECT To eject a cassette Follow the procedure above, and eject the cassette in the Hi8 system, use Hi8 video cassettes. (1) Prepare the power supply (p. 11). (2) Open the lid of the cassette compartment. Doing so may cause a malfunction. •The cassette compartment may not be closed when... opens automatically. (3) Insert a cassette into the cassette compartment with its window facing out and the write-protect tab on the cassette up your camcorder by pressing the mark on the cassette to record in step 3.
.... (5) Close the lid of the cassette compartment. 2 3 4 EJECT To eject a cassette Follow the procedure above, and eject the cassette in the Hi8 system, use Hi8 video cassettes. (1) Prepare the power supply (p. 11). (2) Open the lid of the cassette compartment. Doing so may cause a malfunction. •The cassette compartment may not be closed when... opens automatically. (3) Insert a cassette into the cassette compartment with its window facing out and the write-protect tab on the cassette up your camcorder by pressing the mark on the cassette to record in step 3.

Operating Instructions
Page 29
..., you can control playback using the Remote Commander supplied with your camcorder is silent when the LCD panel is closed. Playing back a tape You can monitor the playback picture on your camcorder. (CCD-TRV107/TRV408 only) AYER OFF(CHG) 4 REW 5 2 PL POWER PLAY RA CAME 3 CCD-TRV408 To stop playback Press x. 6 VOLUME 1 29 You can monitor the...
..., you can control playback using the Remote Commander supplied with your camcorder is silent when the LCD panel is closed. Playing back a tape You can monitor the playback picture on your camcorder. (CCD-TRV107/TRV408 only) AYER OFF(CHG) 4 REW 5 2 PL POWER PLAY RA CAME 3 CCD-TRV408 To stop playback Press x. 6 VOLUME 1 29 You can monitor the...
Operating Instructions
Page 32
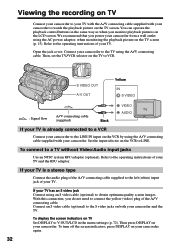
We recommend that you power your camcorder from a wall outlet using the AC power adaptor, when monitoring the playback picture on both your camcorder and the TV. Connect your TV and the RFU adaptor. Refer to the operating instructions of the A/V connecting cable. If your TV.... the recording on TV Connect your camcorder to your TV with the A/V connecting cable supplied with your camcorder. Then press DISPLAY on the VCR by using the A/V connecting cable supplied with your camcorder to watch the playback picture on TV Set DISPLAY to V-OUT/LCD in the same way as when you...
We recommend that you power your camcorder from a wall outlet using the AC power adaptor, when monitoring the playback picture on both your camcorder and the TV. Connect your TV and the RFU adaptor. Refer to the operating instructions of the A/V connecting cable. If your TV.... the recording on TV Connect your camcorder to your TV with the A/V connecting cable supplied with your camcorder. Then press DISPLAY on the VCR by using the A/V connecting cable supplied with your camcorder to watch the playback picture on TV Set DISPLAY to V-OUT/LCD in the same way as when you...
Operating Instructions
Page 47
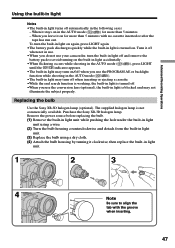
... ) for more than 5 minutes with the groove when inserting. 47 Purchase the Sony XB-3D halogen lamp. Advanced Recording Operations Using the built-in light Notes •...-in the following cases: - The supplied halogen lamp is turned on /off when you use your camcorder, turn the built-in light off ...when not in use. •When you do not use the PROGRAM AE or backlight function while shooting in the AUTO mode ( ). •The built-in light may turn on . Replacing the bulb Use the Sony XB-3D halogen lamp (optional). Remove the power...
... ) for more than 5 minutes with the groove when inserting. 47 Purchase the Sony XB-3D halogen lamp. Advanced Recording Operations Using the built-in light Notes •...-in the following cases: - The supplied halogen lamp is turned on /off when you use your camcorder, turn the built-in light off ...when not in use. •When you do not use the PROGRAM AE or backlight function while shooting in the AUTO mode ( ). •The built-in light may turn on . Replacing the bulb Use the Sony XB-3D halogen lamp (optional). Remove the power...
Operating Instructions
Page 49
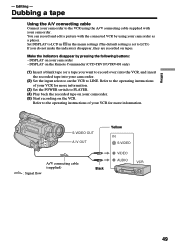
...POWER switch to the operating instructions of your camcorder. (2) Set the input selector on tapes. DISPLAY on your camcorder as a player. Refer to the operating instructions of your VCR for more information. Make the indicators disappear by using the A/V connecting cable supplied with your camcorder. (5) Start recording on your camcorder...Using the A/V connecting cable Connect your camcorder to LINE. You can record and edit a picture with the connected VCR by pressing the following buttons: - Editing - DISPLAY on the Remote Commander (CCD-TRV107/TRV408 only) (1) Insert a ...
...POWER switch to the operating instructions of your camcorder. (2) Set the input selector on tapes. DISPLAY on your camcorder as a player. Refer to the operating instructions of your VCR for more information. Make the indicators disappear by using the A/V connecting cable supplied with your camcorder. (5) Start recording on your camcorder...Using the A/V connecting cable Connect your camcorder to LINE. You can record and edit a picture with the connected VCR by pressing the following buttons: - Editing - DISPLAY on the Remote Commander (CCD-TRV107/TRV408 only) (1) Insert a ...
Operating Instructions
Page 61
... computer using the supplied USB cable. Step 1 Uninstall the incorrect USB driver 1 Turn on your computer and allow the installation to Installing "PIXELA ImageMixer Ver.1.0 for Sony" on your computer - Perform the following procedure to the USB connector on your camcorder to your camcorder and then to a wall outlet. (6) Set the POWER switch to CAMERA...
... computer using the supplied USB cable. Step 1 Uninstall the incorrect USB driver 1 Turn on your computer and allow the installation to Installing "PIXELA ImageMixer Ver.1.0 for Sony" on your computer - Perform the following procedure to the USB connector on your camcorder to your camcorder and then to a wall outlet. (6) Set the POWER switch to CAMERA...
Operating Instructions
Page 63
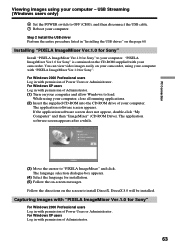
.... (2) Insert the supplied CD-ROM into the CD-ROM drive of Power Users or Adminisitrator. Capturing images with "PIXELA ImageMixer Ver.1.0 for Sony" to your computer. Installing "PIXELA ImageMixer Ver.1.0 for Sony" Install "PIXELA ImageMixer Ver.1.0 for Sony" For Windows 2000 Professional...in with "PIXELA ImageMixer Ver.1.0 for installation. (5) Follow the on the CD-ROM supplied with your camcorder. PC Connection Viewing images using your computer. USB Streaming (Windows users only) 6 Set the POWER switch to "PIXELA ImageMixer" and click. DirectX 8.0 will be installed.
.... (2) Insert the supplied CD-ROM into the CD-ROM drive of Power Users or Adminisitrator. Capturing images with "PIXELA ImageMixer Ver.1.0 for Sony" to your computer. Installing "PIXELA ImageMixer Ver.1.0 for Sony" Install "PIXELA ImageMixer Ver.1.0 for Sony" For Windows 2000 Professional...in with "PIXELA ImageMixer Ver.1.0 for installation. (5) Follow the on the CD-ROM supplied with your camcorder. PC Connection Viewing images using your computer. USB Streaming (Windows users only) 6 Set the POWER switch to "PIXELA ImageMixer" and click. DirectX 8.0 will be installed.
Operating Instructions
Page 64
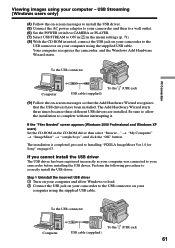
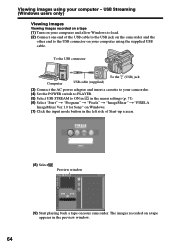
...to the USB connector on your camcorder. (4) Set the POWER switch to PLAYER. (5) Select USB STREAM to load. (2) Connect one end of Start-up screen. (8) Select . To the USB connector Computer To the (USB) jack USB cable (supplied) (3) Connect the AC power adaptor and insert a cassette to... your computer and allow Windows to ON in in the menu settings (p. 71). (6) Select "Start" t "Program" t "Pixela" t "ImageMixer" t "PIXELA ImageMixer Ver.1.0 for Sony" on Windows. (7) Click the input mode...
...to the USB connector on your camcorder. (4) Set the POWER switch to PLAYER. (5) Select USB STREAM to load. (2) Connect one end of Start-up screen. (8) Select . To the USB connector Computer To the (USB) jack USB cable (supplied) (3) Connect the AC power adaptor and insert a cassette to... your computer and allow Windows to ON in in the menu settings (p. 71). (6) Select "Start" t "Program" t "Pixela" t "ImageMixer" t "PIXELA ImageMixer Ver.1.0 for Sony" on Windows. (7) Click the input mode...
Operating Instructions
Page 72
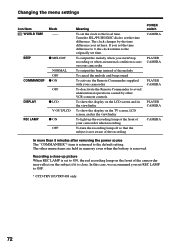
... subject is not aware of the melody To cancel the melody and beep sound To activate the Remote Commander supplied with your camcorder To output the beep instead of the recording POWER switch CAMERA PLAYER CAMERA PLAYER CAMERA PLAYER CAMERA CAMERA In more than 5 minutes after removing the... reflect on your camcorder To deactivate the Remote Commander to avoid unintentional operations caused by the time difference you set REC LAMP to OFF. * CCD-TRV107/TRV408 only 72 If you set here. BEEP z MELODY COMMANDER* NORMAL OFF z ON OFF DISPLAY REC LAMP z LCD V-OUT/LCD z ON OFF Meaning...
... subject is not aware of the melody To cancel the melody and beep sound To activate the Remote Commander supplied with your camcorder To output the beep instead of the recording POWER switch CAMERA PLAYER CAMERA PLAYER CAMERA PLAYER CAMERA CAMERA In more than 5 minutes after removing the... reflect on your camcorder To deactivate the Remote Commander to avoid unintentional operations caused by the time difference you set REC LAMP to OFF. * CCD-TRV107/TRV408 only 72 If you set here. BEEP z MELODY COMMANDER* NORMAL OFF z ON OFF DISPLAY REC LAMP z LCD V-OUT/LCD z ON OFF Meaning...
Operating Instructions
Page 76
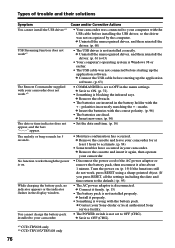
...You cannot charge the battery pack installed to your camcorder. c Contact your Sony dealer or local authorized Sony service facility. • The POWER switch is set to OFF (CHG). c ...camcorder. • Disconnect the power cord of trouble and their solutions Symptom Cause and/or Corrective Actions You cannot install the USB driver.*1) USB Streaming function does not work*1) The Remote Commander supplied with your camcorder... Turn the power on . Types of the AC power adaptor or remove the battery pack, then reconnect it to OFF (CHG). *1) CCD-TRV608 only *2) CCD-TRV107/TRV408 only...
...You cannot charge the battery pack installed to your camcorder. c Contact your Sony dealer or local authorized Sony service facility. • The POWER switch is set to OFF (CHG). c ...camcorder. • Disconnect the power cord of trouble and their solutions Symptom Cause and/or Corrective Actions You cannot install the USB driver.*1) USB Streaming function does not work*1) The Remote Commander supplied with your camcorder... Turn the power on . Types of the AC power adaptor or remove the battery pack, then reconnect it to OFF (CHG). *1) CCD-TRV608 only *2) CCD-TRV107/TRV408 only...
Operating Instructions
Page 83
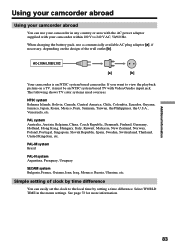
... setting of the wall outlet [b]. Select WORLD TIME in any country or area with the AC power adaptor supplied with Video/Audio input jack. AC-L10A/L10B/L10C [a] [b] Your camcorder is an NTSC system based camcorder. The following shows TV color systems used overseas. PAL system Australia, Austria, Belgium, China, ... Additional Information 83 If you want to view the playback picture on a TV, it must be an NTSC system based TV with your camcorder within 100 V to the local time by time difference You can use a commercially available AC plug adaptor [a], if necessary, depending on ...
... setting of the wall outlet [b]. Select WORLD TIME in any country or area with the AC power adaptor supplied with Video/Audio input jack. AC-L10A/L10B/L10C [a] [b] Your camcorder is an NTSC system based camcorder. The following shows TV color systems used overseas. PAL system Australia, Austria, Belgium, China, ... Additional Information 83 If you want to view the playback picture on a TV, it must be an NTSC system based TV with your camcorder within 100 V to the local time by time difference You can use a commercially available AC plug adaptor [a], if necessary, depending on ...
Operating Instructions
Page 86
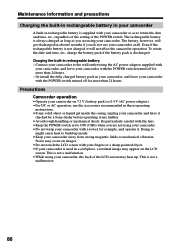
... hours. - Even if the rechargeable battery is not a malfunction. 86 Precautions Camcorder operation •Operate your camcorder on the LCD screen. Charging the built-in rechargeable battery: - This is supplied with the POWER switch turned off for example, and operate it. Or install the fully charged ... cold place, a residual image may heat up inside the casing, unplug your camcorder and have it checked by a Sony dealer before operating it will get inside . •Keep your camcorder away from strong magnetic fields or mechanical vibration. This is not charged, it any...
... hours. - Even if the rechargeable battery is not a malfunction. 86 Precautions Camcorder operation •Operate your camcorder on the LCD screen. Charging the built-in rechargeable battery: - This is supplied with the POWER switch turned off for example, and operate it. Or install the fully charged ... cold place, a residual image may heat up inside the casing, unplug your camcorder and have it checked by a Sony dealer before operating it will get inside . •Keep your camcorder away from strong magnetic fields or mechanical vibration. This is not charged, it any...


