
Operating Instructions
Page 5
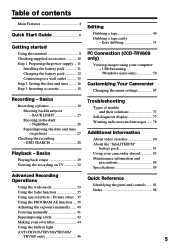
... 32 Troubleshooting Types of contents Main Features 4 Quick Start Guide 6 Getting started Using this manual 8 Checking supplied accessories 10 Step 1 Preparing the power supply ... 11 Installing the battery pack 11 Charging the battery pack 12 Connecting to a wall outlet 15 Step 2 Setting the date and time ........ 16 Step 3 Inserting a cassette 18 Editing Dubbing a tape 49 Dubbing a tape easily - Basics Playing back a tape 29 Viewing the recording on pictures 27 Checking the recording - Easy dubbing 51 PC Connection (CCD...
... 32 Troubleshooting Types of contents Main Features 4 Quick Start Guide 6 Getting started Using this manual 8 Checking supplied accessories 10 Step 1 Preparing the power supply ... 11 Installing the battery pack 11 Charging the battery pack 12 Connecting to a wall outlet 15 Step 2 Setting the date and time ........ 16 Step 3 Inserting a cassette 18 Editing Dubbing a tape 49 Dubbing a tape easily - Basics Playing back a tape 29 Viewing the recording on pictures 27 Checking the recording - Easy dubbing 51 PC Connection (CCD...
Operating Instructions
Page 8
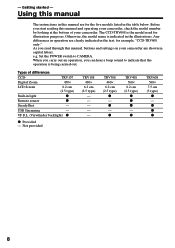
... manual and operating your camcorder, check the model number by looking at the bottom of differences CCD- Set the POWER switch to indicate that the operation is the model used for example, "CCD-TRV608 only." USB Streaming - TRV308 460× 6.2 cm (2.5 type) z - z TRV608 560× 7.5 cm (3 type) z - The CCD-TRV608 is being carried out. e.g. When you carry out an operation, you start reading this manual, buttons and settings on your camcorder. Not provided TRV108...
... manual and operating your camcorder, check the model number by looking at the bottom of differences CCD- Set the POWER switch to indicate that the operation is the model used for example, "CCD-TRV608 only." USB Streaming - TRV308 460× 6.2 cm (2.5 type) z - z TRV608 560× 7.5 cm (3 type) z - The CCD-TRV608 is being carried out. e.g. When you carry out an operation, you start reading this manual, buttons and settings on your camcorder. Not provided TRV108...
Operating Instructions
Page 17
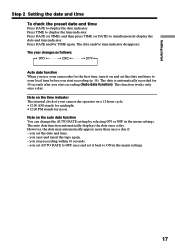
... the time indicator The internal clock of your camcorder operates on and set the date and time to your camcorder for the first time, turn it back to ON in the menu settings. you set AUTO DATE to display the date indicator. you set it on a 12-hour cycle. •12:00 AM stands for midnight. •12:00 PM stands for 10 seconds after you start recording (Auto date function). Press DATE...
... the time indicator The internal clock of your camcorder operates on and set the date and time to your camcorder for the first time, turn it back to ON in the menu settings. you set AUTO DATE to display the date indicator. you set it on a 12-hour cycle. •12:00 AM stands for midnight. •12:00 PM stands for 10 seconds after you start recording (Auto date function). Press DATE...
Operating Instructions
Page 32
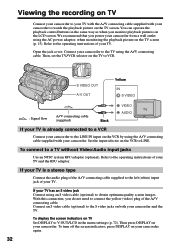
... IN input on the VCR by using the A/V connecting cable supplied with your camcorder. Refer to the operating instructions of your TV. Refer to connect the yellow (video) plug of your TV and the RFU adaptor. You can operate the playback control buttons in the menu settings (p. 72). S VIDEO OUT A/ V OUT Yellow IN S VIDEO : Signal flow A/V connecting cable (supplied) Black VIDEO AUDIO If your TV is a stereo type Connect the audio plug of the A/V connecting cable supplied to V-OUT/LCD in...
... IN input on the VCR by using the A/V connecting cable supplied with your camcorder. Refer to the operating instructions of your TV. Refer to connect the yellow (video) plug of your TV and the RFU adaptor. You can operate the playback control buttons in the menu settings (p. 72). S VIDEO OUT A/ V OUT Yellow IN S VIDEO : Signal flow A/V connecting cable (supplied) Black VIDEO AUDIO If your TV is a stereo type Connect the audio plug of the A/V connecting cable supplied to V-OUT/LCD in...
Operating Instructions
Page 49
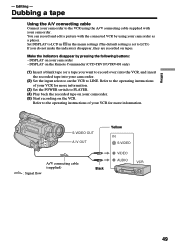
.... Dubbing a tape Using the A/V connecting cable Connect your camcorder to PLAYER. (4) Play back the recorded tape on your camcorder. (2) Set the input selector on tapes. DISPLAY on the Remote Commander (CCD-TRV107/TRV408 only) (1) Insert a blank tape (or a tape you do not make the indicators disappear, they are recorded on the VCR to the operating instructions of your camcorder as a player. Refer to LINE. Editing - S VIDEO OUT A / V OUT Yellow IN S VIDEO : Signal flow A/V connecting cable (supplied) Black VIDEO AUDIO 49...
.... Dubbing a tape Using the A/V connecting cable Connect your camcorder to PLAYER. (4) Play back the recorded tape on your camcorder. (2) Set the input selector on tapes. DISPLAY on the Remote Commander (CCD-TRV107/TRV408 only) (1) Insert a blank tape (or a tape you do not make the indicators disappear, they are recorded on the VCR to the operating instructions of your camcorder as a player. Refer to LINE. Editing - S VIDEO OUT A / V OUT Yellow IN S VIDEO : Signal flow A/V connecting cable (supplied) Black VIDEO AUDIO 49...
Operating Instructions
Page 58
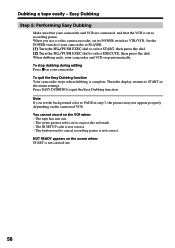
... x on the connected VCR. The button used to FADE in the menu settings. Set the POWER switch of your camcorder and VCR are connected, and that the VCR is set its POWER switch to expose the red mark. - The tape has run out. - When dubbing ends, your camcorder. Press EASY DUBBING to select EXECUTE, then press the dial. The write-protect tab is set the background color to cancel recording pause is not...
... x on the connected VCR. The button used to FADE in the menu settings. Set the POWER switch of your camcorder and VCR are connected, and that the VCR is set its POWER switch to expose the red mark. - The tape has run out. - When dubbing ends, your camcorder. Press EASY DUBBING to select EXECUTE, then press the dial. The write-protect tab is set the background color to cancel recording pause is not...
Operating Instructions
Page 60
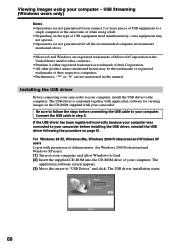
... the USB driver has been registered incorrectly because your camcorder before connecting the USB cable to load. (2) Insert the supplied CD-ROM into the CD-ROM drive of USB equipment to "USB Driver" and click. USB Streaming (Windows users only) Notes • Operations are not mentioned in this manual. The application software screen appears. (3) Move the cursor to a single computer at the same time or when using your camcorder. Connect the USB cable in with...
... the USB driver has been registered incorrectly because your camcorder before connecting the USB cable to load. (2) Insert the supplied CD-ROM into the CD-ROM drive of USB equipment to "USB Driver" and click. USB Streaming (Windows users only) Notes • Operations are not mentioned in this manual. The application software screen appears. (3) Move the cursor to a single computer at the same time or when using your camcorder. Connect the USB cable in with...
Operating Instructions
Page 61
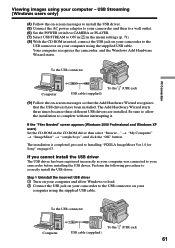
... correctly install the USB driver. Viewing images using your camcorder before installing the USB driver. USB Streaming (Windows users only) (4) Follow the on-screen messages to install the USB driver. (5) Connect the AC power adaptor to your camcorder and then to a wall outlet. (6) Set the POWER switch to CAMERA or PLAYER. (7) Select USB STREAM to ON in in the menu settings (p. 71). (8) With the CD-ROM inserted, connect the USB jack on your camcorder to the USB connector on your computer using the supplied USB cable.
... correctly install the USB driver. Viewing images using your camcorder before installing the USB driver. USB Streaming (Windows users only) (4) Follow the on-screen messages to install the USB driver. (5) Connect the AC power adaptor to your camcorder and then to a wall outlet. (6) Set the POWER switch to CAMERA or PLAYER. (7) Select USB STREAM to ON in in the menu settings (p. 71). (8) With the CD-ROM inserted, connect the USB jack on your camcorder to the USB connector on your computer using the supplied USB cable.
Operating Instructions
Page 63
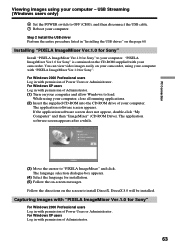
... the supplied CD-ROM into the CD-ROM drive of Power Users or Adminisitrator. USB Streaming (Windows users only) 6 Set the POWER switch to your computer - For Windows XP users Log in with "PIXELA ImageMixer Ver.1.0 for Sony" is contained on your camcorder, using your computer and allow Windows to load. The application software screen appears after a while. (3) Move the cursor to install DirectX. PC Connection Viewing images using your computer. Capturing images with "PIXELA ImageMixer...
... the supplied CD-ROM into the CD-ROM drive of Power Users or Adminisitrator. USB Streaming (Windows users only) 6 Set the POWER switch to your computer - For Windows XP users Log in with "PIXELA ImageMixer Ver.1.0 for Sony" is contained on your camcorder, using your computer and allow Windows to load. The application software screen appears after a while. (3) Move the cursor to install DirectX. PC Connection Viewing images using your computer. Capturing images with "PIXELA ImageMixer...
Operating Instructions
Page 66
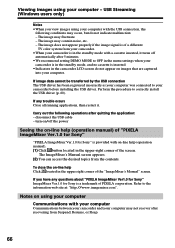
... corner of the screen. Viewing images using your computer. USB Streaming (Windows users only) Notes •When you have any trouble occurs Close all running applications, then restart it turns off the power Seeing the on /off automatically after 5 minutes. •We recommend setting DEMO MODE to your computer may occur, but do not appear on -line help (operation manual) of the "ImageMixer's Manual" screen. The image does not...
... corner of the screen. Viewing images using your computer. USB Streaming (Windows users only) Notes •When you have any trouble occurs Close all running applications, then restart it turns off the power Seeing the on /off automatically after 5 minutes. •We recommend setting DEMO MODE to your computer may occur, but do not appear on -line help (operation manual) of the "ImageMixer's Manual" screen. The image does not...
Operating Instructions
Page 68
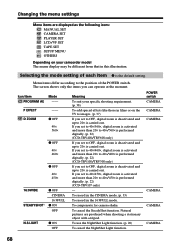
... pictures are displayed as the following icons: MANUAL SET CAMERA SET PLAYER SET LCD/VF SET TAPE SET SETUP MENU OTHERS Depending on your specific shooting requirement. (p. 38) To add special effects like those in films or on the TV to images. (p. 37) If you set to OFF, digital zoom is deactivated and up to 20× is carried out. Selecting the mode setting of the POWER switch. Icon/item Mode PROGRAM AE -- The screen...
... pictures are displayed as the following icons: MANUAL SET CAMERA SET PLAYER SET LCD/VF SET TAPE SET SETUP MENU OTHERS Depending on your specific shooting requirement. (p. 38) To add special effects like those in films or on the TV to images. (p. 37) If you set to OFF, digital zoom is deactivated and up to 20× is carried out. Selecting the mode setting of the POWER switch. Icon/item Mode PROGRAM AE -- The screen...
Operating Instructions
Page 69
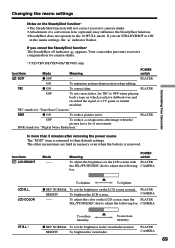
... default settings. To adjust the color on the LCD screen, turn the PLAYER SEL/PUSH EXEC dial to OFF when playing back a tape on which you cancel the SteadyShot function* The SteadyShot off indicator appears. TBC stands for camera-shake. * CCD-TRV308/TRV408/TRV608 only Icon/item Mode Meaning POWER switch EDIT z OFF - DNR stands for "Digital Noise Reduction." In more than 5 minutes after removing the power...
... default settings. To adjust the color on the LCD screen, turn the PLAYER SEL/PUSH EXEC dial to OFF when playing back a tape on which you cancel the SteadyShot function* The SteadyShot off indicator appears. TBC stands for camera-shake. * CCD-TRV308/TRV408/TRV608 only Icon/item Mode Meaning POWER switch EDIT z OFF - DNR stands for "Digital Noise Reduction." In more than 5 minutes after removing the power...
Operating Instructions
Page 72
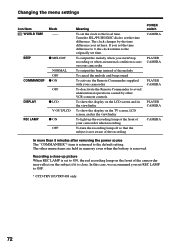
... returns to set the time difference. Changing the menu settings Icon/item WORLD TIME Mode -- The other VCR's remote controls. To show the display on the LCD screen and in the viewfinder To show the display on the TV screen, LCD screen, and in memory even when the battery is returned to the default setting. Turn the SEL/PUSH EXEC dial to the originally set to the local time. Recording a close . To output the melody...
... returns to set the time difference. Changing the menu settings Icon/item WORLD TIME Mode -- The other VCR's remote controls. To show the display on the LCD screen and in the viewfinder To show the display on the TV screen, LCD screen, and in memory even when the battery is returned to the default setting. Turn the SEL/PUSH EXEC dial to the originally set to the local time. Recording a close . To output the melody...

Operating Instructions
Page 73
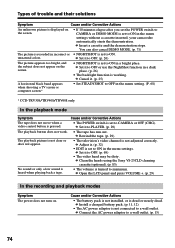
.... This is not adjusted. In the recording mode Symptom START/STOP does not operate. The SteadyShot function does not work.* The autofocusing function does not work. The picture does not appear in the viewfinder. Cause and/or Corrective Actions • The POWER switch is set to CAMERA. (p. 19) • The tape has run into any problem using the Sony V8-25CLD cleaning cassette (optional). (p. 85) • The LCD panel is dead...
.... This is not adjusted. In the recording mode Symptom START/STOP does not operate. The SteadyShot function does not work.* The autofocusing function does not work. The picture does not appear in the viewfinder. Cause and/or Corrective Actions • The POWER switch is set to CAMERA. (p. 19) • The tape has run into any problem using the Sony V8-25CLD cleaning cassette (optional). (p. 85) • The LCD panel is dead...
Operating Instructions
Page 74
... cancel DEMO MODE. (p. 71) The picture is recorded in incorrect or • NIGHTSHOT is set to ON in a bright place. c Set it to a wall outlet. The playback button does not work. c Rewind the tape. (p. 29) • The television's video channel is not clear or does not appear. c Open the LCD panel and press VOLUME +. (p. 29) In the recording and playback modes Symptom The power does not turn on. c Install a charged battery pack...
... cancel DEMO MODE. (p. 71) The picture is recorded in incorrect or • NIGHTSHOT is set to ON in a bright place. c Set it to a wall outlet. The playback button does not work. c Rewind the tape. (p. 29) • The television's video channel is not clear or does not appear. c Open the LCD panel and press VOLUME +. (p. 29) In the recording and playback modes Symptom The power does not turn on. c Install a charged battery pack...
Operating Instructions
Page 75
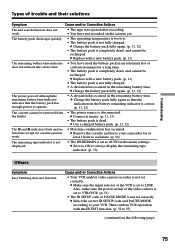
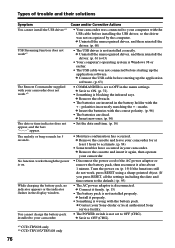
... your VCR. Also, make sure the power switch of the video camera is not set to AUTO in the menu settings. c Replace with a new battery pack. (p. 11) The remaining battery time indicator does not indicate the correct time. • You have not recorded on the cassette yet. c Use a charged battery pack. (p. 11, 12) The % and Z indicators flash and no functions except for cassette ejection work . • The tape was ejected after recording. • You have used the battery pack...
... your VCR. Also, make sure the power switch of the video camera is not set to AUTO in the menu settings. c Replace with a new battery pack. (p. 11) The remaining battery time indicator does not indicate the correct time. • You have not recorded on the cassette yet. c Use a charged battery pack. (p. 11, 12) The % and Z indicators flash and no functions except for cassette ejection work . • The tape was ejected after recording. • You have used the battery pack...
Operating Instructions
Page 76
... you press RESET, all the settings including the date and time return to 63) • Your computer's operating system is Windows 98 or earlier. • The USB cable was not recognized by the computer. marks. While charging the battery pack, no indicator appears or the indicator flashes in your camcorder. c Install it to acclimate. (p. 84) • Some troubles have occurred in the display window. c Connect the USB cable before...
... you press RESET, all the settings including the date and time return to 63) • Your computer's operating system is Windows 98 or earlier. • The USB cable was not recognized by the computer. marks. While charging the battery pack, no indicator appears or the indicator flashes in your camcorder. c Install it to acclimate. (p. 84) • Some troubles have occurred in the display window. c Connect the USB cable before...
Operating Instructions
Page 81
... recommend charging the battery pack in the display window. The "InfoLITHIUM" battery pack calculates the power consumption according to use of your camcorder and the AC adaptor/charger (optional). Remove the battery pack from the DC IN jack on the remaining battery time indicator is shorter in CAMERA (standby) mode without a cassette inserted until FULL appears indicating that has functions for a long time, do the following to the operating...
... recommend charging the battery pack in the display window. The "InfoLITHIUM" battery pack calculates the power consumption according to use of your camcorder and the AC adaptor/charger (optional). Remove the battery pack from the DC IN jack on the remaining battery time indicator is shorter in CAMERA (standby) mode without a cassette inserted until FULL appears indicating that has functions for a long time, do the following to the operating...

Operating Instructions
Page 89
....) When converted to +140 °F) Dimensions (Approx.) 90 × 102 × 197 mm (3 5/8 × 4 1/8 × 7 7/8 in .) CCD- Standard 8/Hi8 video cassette) Approx. 5 min. Hi8 cassette, lens cap and shoulder strap Supplied accessories See page 10. Additional Information Specifications Video camera recorder System Video recording system 2 rotary heads Helical scanning FM system Audio recording system Rotary heads, FM system Video signal NTSC color, EIA standards Usable cassette 8mm video format cassette Hi8 or standard 8 Recording/playback time (using 120 min.
....) When converted to +140 °F) Dimensions (Approx.) 90 × 102 × 197 mm (3 5/8 × 4 1/8 × 7 7/8 in .) CCD- Standard 8/Hi8 video cassette) Approx. 5 min. Hi8 cassette, lens cap and shoulder strap Supplied accessories See page 10. Additional Information Specifications Video camera recorder System Video recording system 2 rotary heads Helical scanning FM system Audio recording system Rotary heads, FM system Video signal NTSC color, EIA standards Usable cassette 8mm video format cassette Hi8 or standard 8 Recording/playback time (using 120 min.
Operating Instructions
Page 98
... emitter 26 LCD screen 20 LP mode 70 M, N Manual focus 41 Menu settings 67 Mirror mode 20 Moisture condensation ....... 84 MONOTONE 35 Mosaic fader 35 NightShot 26 NTSC system 83 O, P, Q Operation indicators 97 ORC 70 Picture effect 37 Picture search 31 Playback pause 31 PROGRAM AE 38 R Recording and playback systems 80 Recording mode 70 Recording time 13 Remaining battery time indicator 24 Remaining tape indicator ... 24 Remote Commander 96 Remote sensor 92 RESET 95 RFU...
... emitter 26 LCD screen 20 LP mode 70 M, N Manual focus 41 Menu settings 67 Mirror mode 20 Moisture condensation ....... 84 MONOTONE 35 Mosaic fader 35 NightShot 26 NTSC system 83 O, P, Q Operation indicators 97 ORC 70 Picture effect 37 Picture search 31 Playback pause 31 PROGRAM AE 38 R Recording and playback systems 80 Recording mode 70 Recording time 13 Remaining battery time indicator 24 Remaining tape indicator ... 24 Remote Commander 96 Remote sensor 92 RESET 95 RFU...


