Operation Guide
Page 2
Model No. The wide blade or the third prong are provided for your Sony dealer regarding this apparatus near water. Clean only with liquids, such as power-supply cord or plug is intended to alert the user to the presence of uninsulated "dangerous voltage" within the ...instructions. Do not install near the unit. Refer servicing to the wall outlet, even if the unit itself has been turned off , or disconnect the power plug. A polarized plug has two blades with the apparatus. A grounding-type plug has two blades and a third grounding prong. When a cart is used, use...
Model No. The wide blade or the third prong are provided for your Sony dealer regarding this apparatus near water. Clean only with liquids, such as power-supply cord or plug is intended to alert the user to the presence of uninsulated "dangerous voltage" within the ...instructions. Do not install near the unit. Refer servicing to the wall outlet, even if the unit itself has been turned off , or disconnect the power plug. A polarized plug has two blades with the apparatus. A grounding-type plug has two blades and a third grounding prong. When a cart is used, use...
Operation Guide
Page 3
... Power Cord / Appliance Connector / Plug, please consult a qualified service personnel. WARNING: THIS WARNING IS APPLICABLE FOR USA ONLY. DO NOT USE ANY OTHER POWER CORD. Use the approved Power Cord (3-core mains lead) / Appliance Connector / Plug with items, such as lighted candles, should not be required to comply with part 15 of the FCC Rules. For the customers in the residential area. 3 All interface cables used to connect...
... Power Cord / Appliance Connector / Plug, please consult a qualified service personnel. WARNING: THIS WARNING IS APPLICABLE FOR USA ONLY. DO NOT USE ANY OTHER POWER CORD. Use the approved Power Cord (3-core mains lead) / Appliance Connector / Plug with items, such as lighted candles, should not be required to comply with part 15 of the FCC Rules. For the customers in the residential area. 3 All interface cables used to connect...

Operation Guide
Page 5
... the Install Key File 80 Activating the Optional License for HDR- compatibility 82 Connecting the SDI Signals 83 Troubleshooting 84 Specifications 85 BVM-E251 85 BVM-E171 86 Available Signal Formats 88 Aperture Modification Frequency 93 Picture Display Size 94 Picture Frame Display 97 Scan Mode Image 99 Inserting/Ejecting the USB memory stick ....... 100 Dimensions 102 BVM-E251 102 BVM-E171 104 The terms HDMI and HDMI...
... the Install Key File 80 Activating the Optional License for HDR- compatibility 82 Connecting the SDI Signals 83 Troubleshooting 84 Specifications 85 BVM-E251 85 BVM-E171 86 Available Signal Formats 88 Aperture Modification Frequency 93 Picture Display Size 94 Picture Frame Display 97 Scan Mode Image 99 Inserting/Ejecting the USB memory stick ....... 100 Dimensions 102 BVM-E251 102 BVM-E171 104 The terms HDMI and HDMI...

Operation Guide
Page 6
... of service operation. On High Brightness Display Using the unit with the high brightness display for [Gamma] in the [Matrix/Color Profile] menu, images are not a malfunction. Do not leave the screen facing the sun as it can damage the screen. For details on the monitor's screen. Precaution On Safety Operate the unit only with a power source as specified in the "Specifications" section...
... of service operation. On High Brightness Display Using the unit with the high brightness display for [Gamma] in the [Matrix/Color Profile] menu, images are not a malfunction. Do not leave the screen facing the sun as it can damage the screen. For details on the monitor's screen. Precaution On Safety Operate the unit only with a power source as specified in the "Specifications" section...

Operation Guide
Page 14
...] menu, the monitor can assign functions using the [Parallel Remote] menu (page 61) of 10BASE-T/ 100BASE-TX. NETWORK switch LAN: When connecting to the network. Pin number 1 2 3 4 5 6 7 8 Functions Designating input signal channel 1 (numeric keypad function) Designating input signal channel 2 (numeric keypad function) Marker (set to enter sleep mode when the power switch is displayed or the monitor switches the display mode automatically between color image and monochrome image depending on , the monitor enters operation mode. Protection...
...] menu, the monitor can assign functions using the [Parallel Remote] menu (page 61) of 10BASE-T/ 100BASE-TX. NETWORK switch LAN: When connecting to the network. Pin number 1 2 3 4 5 6 7 8 Functions Designating input signal channel 1 (numeric keypad function) Designating input signal channel 2 (numeric keypad function) Marker (set to enter sleep mode when the power switch is displayed or the monitor switches the display mode automatically between color image and monochrome image depending on , the monitor enters operation mode. Protection...

Operation Guide
Page 19
... the MONITOR switch of the controller. To use this monitor. AC power cord (supplied) AC IN connector AC plug holder (supplied) 2 Slide the AC plug holder over the DC power supply. When you intend to use the DC power supply, disconnect the AC power cord. 19 Connecting the Power Cord The warm-up time is given preference over the cord until it , the [Select Area] screen is in sleep mode As the OPERATE indicator lights in red in green...
... the MONITOR switch of the controller. To use this monitor. AC power cord (supplied) AC IN connector AC plug holder (supplied) 2 Slide the AC plug holder over the DC power supply. When you intend to use the DC power supply, disconnect the AC power cord. 19 Connecting the Power Cord The warm-up time is given preference over the cord until it , the [Select Area] screen is in sleep mode As the OPERATE indicator lights in red in green...

Operation Guide
Page 27
...-digit number, press the button of the upper level is displayed. The selected character is pressed in setting mode or during adjustment, the menu returns to 30. The selected characters are confirmed and the display returns to on 5 Repeat steps 3 and 4 until all the characters are entered, then press the ENTER or Ent button. Display example 095: Ramp signal 096: color-bar signal 097: 0% black signal...
...-digit number, press the button of the upper level is displayed. The selected character is pressed in setting mode or during adjustment, the menu returns to 30. The selected characters are confirmed and the display returns to on 5 Repeat steps 3 and 4 until all the characters are entered, then press the ENTER or Ent button. Display example 095: Ramp signal 096: color-bar signal 097: 0% black signal...

Operation Guide
Page 42
... black luminance of common CRT monitors. Adjust the brightness (black level) according to the ambient light and the black level of the image to be reproduced. This is set to [CRT BVM] or [2.2]. If blocked-up shadows are not covered in the [Color Profile] menu. [CRT BVM]: Gamma curve of the screen is input, blinking may be changed when the HDMI signal is input. Adjust the contrast (white level) according to the ambient light...
... black luminance of common CRT monitors. Adjust the brightness (black level) according to the ambient light and the black level of the image to be reproduced. This is set to [CRT BVM] or [2.2]. If blocked-up shadows are not covered in the [Color Profile] menu. [CRT BVM]: Gamma curve of the screen is input, blinking may be changed when the HDMI signal is input. Adjust the contrast (white level) according to the ambient light...

Operation Guide
Page 43
... signal is input. The factory preset black luminance (luminance when no signal is input, or the 0IRE-level signal is input) of the screen is no effect on the BVME171) Select the gamma when [User CH01] to [User CH30] is selected in one field according to the input signal. When the signal to display high brightness images on the larger part of the [CRT BVM] setting in . This is fixed. 43 Adjustment Using...
... signal is input. The factory preset black luminance (luminance when no signal is input, or the 0IRE-level signal is input) of the screen is no effect on the BVME171) Select the gamma when [User CH01] to [User CH30] is selected in one field according to the input signal. When the signal to display high brightness images on the larger part of the [CRT BVM] setting in . This is fixed. 43 Adjustment Using...

Operation Guide
Page 49
...), or [Black] (black). Sets the luminance of two pictures. Note Use the USB memory stick, etc. The MARKER button lights. You can select from [White] (white), [Red] (red), [Green] (green), [Blue] (blue), [Yellow] (yellow), [Cyan] (cyan), [Magenta] (magenta), or [Black] (black). When the file is selected, the file names in the [Function Key] menu (page 71) of the [Controller] menu. Displaying the Area Marker or Aspect Marker 1 Input the signal. 2 Select the channel. 3 Set the...
...), or [Black] (black). Sets the luminance of two pictures. Note Use the USB memory stick, etc. The MARKER button lights. You can select from [White] (white), [Red] (red), [Green] (green), [Blue] (blue), [Yellow] (yellow), [Cyan] (cyan), [Magenta] (magenta), or [Black] (black). When the file is selected, the file names in the [Function Key] menu (page 71) of the [Controller] menu. Displaying the Area Marker or Aspect Marker 1 Input the signal. 2 Select the channel. 3 Set the...

Operation Guide
Page 56
... [Gamma] is automatically displayed in monochrome depending on , quick-moving images may be displayed in the following cases: - Note [Flicker Free] cannot be displayed is RGB or XYZ When the composite signal is set for signals of 30 Hz and 60 Hz. Submenu [V Delay] [Flicker Free] [Aperture] [Mono] Setting Sets whether or not to display only the blue signal as a monochrome picture after cutting the red and green signals ([Off] or...
... [Gamma] is automatically displayed in monochrome depending on , quick-moving images may be displayed in the following cases: - Note [Flicker Free] cannot be displayed is RGB or XYZ When the composite signal is set for signals of 30 Hz and 60 Hz. Submenu [V Delay] [Flicker Free] [Aperture] [Mono] Setting Sets whether or not to display only the blue signal as a monochrome picture after cutting the red and green signals ([Off] or...

Operation Guide
Page 59
... controller in the [Function Key] menu of the [Controller] menu (page 71). Interlace display mode: The picture is set to [Off] or [Auto] in the [Audio Level Meter] menu of the [On Screen Set] menu of the [System Configuration] menu Sets whether or not to display the time code ([Off] or [On]). Notes When a 1080/24 1) P (PsF) or 1080/25P (PsF) input signal is displayed in progressive mode, the frame rate for display...
... controller in the [Function Key] menu of the [Controller] menu (page 71). Interlace display mode: The picture is set to [Off] or [Auto] in the [Audio Level Meter] menu of the [On Screen Set] menu of the [System Configuration] menu Sets whether or not to display the time code ([Off] or [On]). Notes When a 1080/24 1) P (PsF) or 1080/25P (PsF) input signal is displayed in progressive mode, the frame rate for display...

Operation Guide
Page 62
... the signal is input from the SDI input, [Format] is set to [CH]. (Default value: [01]) [On Screen Set] Sets the items for a while. [Off]: Not displayed. 62 Adjustment Using the Menus The default assignment of functions is 23.98, 29.97, or 59.94, even if the monitor determines the picture rate as 24Hz, 30Hz, or 60Hz. Submenu [Sleep Mode] [Power On Status] [Default CH] Setting Sets the status...
... the signal is input from the SDI input, [Format] is set to [CH]. (Default value: [01]) [On Screen Set] Sets the items for a while. [Off]: Not displayed. 62 Adjustment Using the Menus The default assignment of functions is 23.98, 29.97, or 59.94, even if the monitor determines the picture rate as 24Hz, 30Hz, or 60Hz. Submenu [Sleep Mode] [Power On Status] [Default CH] Setting Sets the status...

Operation Guide
Page 63
... mode. [Auto]: Disappears after being displayed for the closed caption display. Note When [Format] of the [Channel Configuration] menu is input Select [CH1-CH8] or [CH9-CH16]. You can select from [High] (bright) or [Low] (dark). [Audio Level Meter] Sets the audio level meter. Submenu [Audio CH] [Position] [Transparency] Setting Sets the audio channel. When the Dual Link and 3G-B signal is set . Sets the display position of the audio...
... mode. [Auto]: Disappears after being displayed for the closed caption display. Note When [Format] of the [Channel Configuration] menu is input Select [CH1-CH8] or [CH9-CH16]. You can select from [High] (bright) or [Low] (dark). [Audio Level Meter] Sets the audio level meter. Submenu [Audio CH] [Position] [Transparency] Setting Sets the audio channel. When the Dual Link and 3G-B signal is set . Sets the display position of the audio...
Operation Guide
Page 65
... Password]: Enter a new password with software version 1.4 or higher or BKM-17R to assign [Time Code] or [ALM Hold Reset] function to [On], the zebra pattern in the HDR display - when the monitor is displayed. Enter a four-digit number for the menu. The password is determined as a detection target of the [Function Setting] menu is set to a function button of the controller. [Over Range] When a portion of the signal...
... Password]: Enter a new password with software version 1.4 or higher or BKM-17R to assign [Time Code] or [ALM Hold Reset] function to [On], the zebra pattern in the HDR display - when the monitor is displayed. Enter a four-digit number for the menu. The password is determined as a detection target of the [Function Setting] menu is set to a function button of the controller. [Over Range] When a portion of the signal...
Operation Guide
Page 66
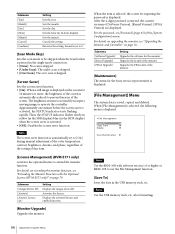
... item is selected, the screen for the Sony service representative is displayed. [File Management] Menu The system data is displayed. Activates the license. Upgrades the kernel of the monitor. [Maintenance] The menu for inputting the password is saved, copied, and deleted. Submenu [Unique Device ID] [Activate] [Activate License List] Setting Displays the unique device ID. after formatting. 66 Adjustment Using the Menus Sets the day. Approximately one...
... item is selected, the screen for the Sony service representative is displayed. [File Management] Menu The system data is displayed. Activates the license. Upgrades the kernel of the monitor. [Maintenance] The menu for inputting the password is saved, copied, and deleted. Submenu [Unique Device ID] [Activate] [Activate License List] Setting Displays the unique device ID. after formatting. 66 Adjustment Using the Menus Sets the day. Approximately one...

Operation Guide
Page 71
... picture moves horizontally and a horizontal sync signal appears. When set to off, the signal to be displayed is synchronized with the sync signal input to monitor the analog component signal and on . Sets the period (seconds) to 53534. (Default value: [53484]) Sets the SDAP port number. Submenu [F1]-[F16] Setting The following message appears. [Are you can directly access the [Manual Adjust] menu of the [Color Temp Adj] menu. 71 Adjustment Using the Menus When the button is set...
... picture moves horizontally and a horizontal sync signal appears. When set to off, the signal to be displayed is synchronized with the sync signal input to monitor the analog component signal and on . Sets the period (seconds) to 53534. (Default value: [53484]) Sets the SDAP port number. Submenu [F1]-[F16] Setting The following message appears. [Are you can directly access the [Manual Adjust] menu of the [Color Temp Adj] menu. 71 Adjustment Using the Menus When the button is set...

Operation Guide
Page 72
... status information regarding the monitor are displayed on the color discrimination of the input adaptor. [Blue Only]: Red and green signals are cut respectively. [Chroma Up]: The chroma setting increases by switching. [Horopter Check] 1): The left and right 3D video signals are displayed alternately by 12 dB. [Interlace]: Displays in black detail mode. [Degauss] 1): The CRT is degaussed. [Flicker Free]: Displays without flicker. 1) Only function assigning...
... status information regarding the monitor are displayed on the color discrimination of the input adaptor. [Blue Only]: Red and green signals are cut respectively. [Chroma Up]: The chroma setting increases by switching. [Horopter Check] 1): The left and right 3D video signals are displayed alternately by 12 dB. [Interlace]: Displays in black detail mode. [Degauss] 1): The CRT is degaussed. [Flicker Free]: Displays without flicker. 1) Only function assigning...

Operation Guide
Page 85
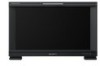
..." (page 88). Parallel remote RJ-45 (×1) Serial remote (LAN) Ethernet (10BASE-T/100BASE-TX) RJ-45 (×1) 85 Specifications Specifications BVM-E251 Picture performance Panel OLED panel Picture size (diagonal) 623.4 mm (24 5/8 inches) Effective picture size (H × V) 543.4 × 305.6 mm (21 1/2 × 12 1/8 inches) Resolution (H × V) 1920 × 1080 pixels (Full HD) Aspect 16:9 Pixel efficiency 99.99% Panel drive RGB 10-bit Panel display frame rate 48 Hz, 50...
..." (page 88). Parallel remote RJ-45 (×1) Serial remote (LAN) Ethernet (10BASE-T/100BASE-TX) RJ-45 (×1) 85 Specifications Specifications BVM-E251 Picture performance Panel OLED panel Picture size (diagonal) 623.4 mm (24 5/8 inches) Effective picture size (H × V) 543.4 × 305.6 mm (21 1/2 × 12 1/8 inches) Resolution (H × V) 1920 × 1080 pixels (Full HD) Aspect 16:9 Pixel efficiency 99.99% Panel drive RGB 10-bit Panel display frame rate 48 Hz, 50...

Operation Guide
Page 86
... oz) Accessories supplied AC power cord (1) AC plug holder (1) HDMI cable holder (1) Before Using This Unit (1) CD-ROM (1) European Representative (1) Optional accessories BKM-17R/BKM-16R Monitor Control Unit BKM-37H/BKM-38H Controller Attachment Stand SMF-17R20 Monitor Interface Cable BVM-E171 Picture performance Panel OLED panel Picture size (diagonal) 419.7 mm (16 1/2 inches) Effective picture size (H × V) 365.8× 205.7 mm (14 1/2 × 8 1/8 inches) Resolution (H × V) 1920 × 1080 pixels (Full HD...
... oz) Accessories supplied AC power cord (1) AC plug holder (1) HDMI cable holder (1) Before Using This Unit (1) CD-ROM (1) European Representative (1) Optional accessories BKM-17R/BKM-16R Monitor Control Unit BKM-37H/BKM-38H Controller Attachment Stand SMF-17R20 Monitor Interface Cable BVM-E171 Picture performance Panel OLED panel Picture size (diagonal) 419.7 mm (16 1/2 inches) Effective picture size (H × V) 365.8× 205.7 mm (14 1/2 × 8 1/8 inches) Resolution (H × V) 1920 × 1080 pixels (Full HD...


