

Operating Instructions
Page 5
Table of Contents WARNING 2 Precautions 3 Guide to Parts and Controls 6 Hookups and Settings Step 1: Connecting the Player 9 Step 2: Easy Setup 11 Connecting to the Network 11 Playback Playing a Disc 12 Playing from a USB Device 13 Playing via a Network 13 Available Options 14 Settings and Adjustments ... [Network Update 15 [Screen Settings 15 [Audio Settings 16 [BD/DVD Viewing Settings 17 [Parental Control Settings 17 [System Settings 18 [Network Settings 18 [Easy Setup 18 [Resetting 18 Additional Information Troubleshooting 19 Specifications 21 Index 26 5
Table of Contents WARNING 2 Precautions 3 Guide to Parts and Controls 6 Hookups and Settings Step 1: Connecting the Player 9 Step 2: Easy Setup 11 Connecting to the Network 11 Playback Playing a Disc 12 Playing from a USB Device 13 Playing via a Network 13 Available Options 14 Settings and Adjustments ... [Network Update 15 [Screen Settings 15 [Audio Settings 16 [BD/DVD Viewing Settings 17 [Parental Control Settings 17 [System Settings 18 [Network Settings 18 [Easy Setup 18 [Resetting 18 Additional Information Troubleshooting 19 Specifications 21 Index 26 5
Operating Instructions
Page 8
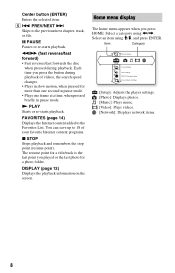
Center button (ENTER) Enters the selected item. m/M (fast reverse/fast forward) • Fast reverses/fast forwards the disc when pressed during playback of your favorite Internet content programs. x STOP Stops playback and remembers the stop point (resume point). N PLAY Starts or re-starts playback. DISPLAY (page 12) Displays the playback information on the screen. PREV/NEXT > Skips to the Favorites List. Select a category using Each time you press the button during playback. The resume point for a title/track is the last point you press HOME. X PAUSE Pauses or re-...
Center button (ENTER) Enters the selected item. m/M (fast reverse/fast forward) • Fast reverses/fast forwards the disc when pressed during playback of your favorite Internet content programs. x STOP Stops playback and remembers the stop point (resume point). N PLAY Starts or re-starts playback. DISPLAY (page 12) Displays the playback information on the screen. PREV/NEXT > Skips to the Favorites List. Select a category using Each time you press the button during playback. The resume point for a title/track is the last point you press HOME. X PAUSE Pauses or re-...
Operating Instructions
Page 10
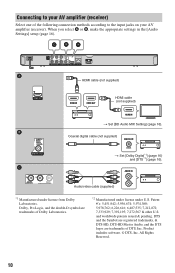
... amplifier (receiver). Connecting to your AV amplifier (receiver) Select one of DTS, Inc. When you select A or B, make the appropriate settings in the [Audio Settings] setup (page 16).
... amplifier (receiver). Connecting to your AV amplifier (receiver) Select one of DTS, Inc. When you select A or B, make the appropriate settings in the [Audio Settings] setup (page 16).
Operating Instructions
Page 11
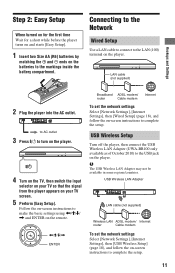
Follow the on the player. Connecting to the Network Wired Setup Use a LAN cable to connect to the LAN (100) terminal on -screen instructions to the markings inside the battery compartment. to AC outlet 3 Press [/1 to ... on your TV so that the signal from the player appears on the batteries to make the basic settings using Hookups and Settings Step 2: Easy Setup When turned on for the first time Wait for a short while before the player turns on and starts [Easy...
Follow the on the player. Connecting to the Network Wired Setup Use a LAN cable to connect to the LAN (100) terminal on -screen instructions to the markings inside the battery compartment. to AC outlet 3 Press [/1 to ... on your TV so that the signal from the player appears on the batteries to make the basic settings using Hookups and Settings Step 2: Easy Setup When turned on for the first time Wait for a short while before the player turns on and starts [Easy...
Operating Instructions
Page 15
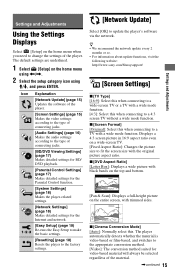
The default settings are underlined. 1 Select [Setup] on the home menu when you need to change the settings of the player. Settings and Adjustments Using the Settings Displays Select [Setup] on the home menu using
The default settings are underlined. 1 Select [Setup] on the home menu when you need to change the settings of the player. Settings and Adjustments Using the Settings Displays Select [Setup] on the home menu using
Operating Instructions
Page 18
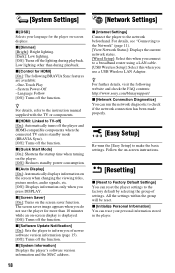
...[Initialize Personal Information] You can run the network diagnostic to check if the network connection has been made properly. [Easy Setup] Re-runs the [Easy Setup] to inform you press DISPLAY. z For further details, visit the following BRAVIA Sync features are available: -One-Touch Play... manual supplied with the TV or components. x [Control for HDMI] [On]: The following website and check the FAQ contents: http://www.sony.com/bluraysupport/ x [Network Connection Diagnostics] You can erase your language for more than during playback. x [Auto Display] [On]: Automatically ...
...[Initialize Personal Information] You can run the network diagnostic to check if the network connection has been made properly. [Easy Setup] Re-runs the [Easy Setup] to inform you press DISPLAY. z For further details, visit the following BRAVIA Sync features are available: -One-Touch Play... manual supplied with the TV or components. x [Control for HDMI] [On]: The following website and check the FAQ contents: http://www.sony.com/bluraysupport/ x [Network Connection Diagnostics] You can erase your language for more than during playback. x [Auto Display] [On]: Automatically ...
Operating Instructions
Page 19
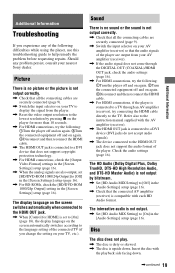
...a DVI device that does not support copyright protection technology. , For HDMI connections, check the [Output Video Format] settings in the [Screen Settings] setup (page 16). , When the analog signals are also output, set to [On] (page 18), the display language on the screen automatically switches ...(if you experience any problem persist, consult your TV to display the signal from your TV, etc.). The display language on your nearest Sony dealer. Refer also to the instruction manual supplied with the playback side facing down . Insert the disc with the AV amplifier (receiver). ...
...a DVI device that does not support copyright protection technology. , For HDMI connections, check the [Output Video Format] settings in the [Screen Settings] setup (page 16). , When the analog signals are also output, set to [On] (page 18), the display language on the screen automatically switches ...(if you experience any problem persist, consult your TV to display the signal from your TV, etc.). The display language on your nearest Sony dealer. Refer also to the instruction manual supplied with the playback side facing down . Insert the disc with the AV amplifier (receiver). ...
Operating Instructions
Page 20
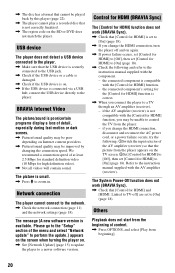
... HDMI connection, disconnect and reconnect the AC power cord, or a power failure occurs, try the following and refer to the player. Please go to the "Setup" section of the AV amplifier (receiver) so that the picture from the player. - if the AV amplifier (receiver) is not compatible with the AV amplifier...
... HDMI connection, disconnect and reconnect the AC power cord, or a power failure occurs, try the following and refer to the player. Please go to the "Setup" section of the AV amplifier (receiver) so that the picture from the player. - if the AV amplifier (receiver) is not compatible with the AV amplifier...
Operating Instructions
Page 26
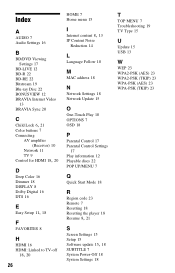
... 7 Connecting AV amplifier (Receiver) 10 Network 11 TV 9 Control for HDMI 18, 20 D Deep Color 16 Dimmer 18 DISPLAY 8 Dolby Digital 16 DTS 16 E Easy Setup 11, 18 F FAVORITES 8 H HDMI 16 HDMI: Linked to TV-off 18, 20 26 HOME 7 Home menu 15 I Internet content 8, 13 IP Content Noise Reduction 14... Playable discs 22 POP UP/MENU 7 Q Quick Start Mode 18 R Region code 23 Remote 7 Resetting 18 Resetting the player 18 Resume 8, 21 S Screen Settings 15 Setup 15 Software update 15, 18 SUBTITLE 7 System Power-Off 18 System Settings 18 T TOP MENU 7 Troubleshooting 19 TV Type 15 U Update 15 USB 13 W WEP...
... 7 Connecting AV amplifier (Receiver) 10 Network 11 TV 9 Control for HDMI 18, 20 D Deep Color 16 Dimmer 18 DISPLAY 8 Dolby Digital 16 DTS 16 E Easy Setup 11, 18 F FAVORITES 8 H HDMI 16 HDMI: Linked to TV-off 18, 20 26 HOME 7 Home menu 15 I Internet content 8, 13 IP Content Noise Reduction 14... Playable discs 22 POP UP/MENU 7 Q Quick Start Mode 18 R Region code 23 Remote 7 Resetting 18 Resetting the player 18 Resume 8, 21 S Screen Settings 15 Setup 15 Software update 15, 18 SUBTITLE 7 System Power-Off 18 System Settings 18 T TOP MENU 7 Troubleshooting 19 TV Type 15 U Update 15 USB 13 W WEP...


