
Instruction Manual
Page 6
... Attaching embroidery unit 62 - 63 Removing embroidery unit 62 - 63 Securing material in embroidery hoop 64 - 65 Using the material and stabilizer 66 - 69 Preparing the machine before installing the hoop ------- 70 - 71 Attaching and removing embroidery hoop 70 - 71 Installation of the equipment: 10 kg Embroidery unit For European version Rated Voltage...
... Attaching embroidery unit 62 - 63 Removing embroidery unit 62 - 63 Securing material in embroidery hoop 64 - 65 Using the material and stabilizer 66 - 69 Preparing the machine before installing the hoop ------- 70 - 71 Attaching and removing embroidery hoop 70 - 71 Installation of the equipment: 10 kg Embroidery unit For European version Rated Voltage...
Instruction Manual
Page 10
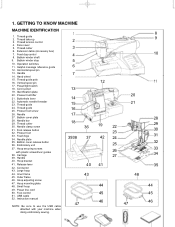
... Operation switches 11. Cord socket 19. Buttonhole lever 22. Presser foot screw 26. Foot release button 32. Release lever 42. Large hoop 44. Small hoop 49. Foot control 51. Thread cutter 6. Feed dog control 8. Vertical spool pin 17. Thread cutter 30. Feed dogs 34. Connector... MACHINE MACHINE IDENTIFICATION 1. Face cover 5. Bobbin winder stop 10. Helpful message reference guide 12. Hand wheel 15. Needle 27. Needle plate 35. Hoop securing screws with your machine when doing embroidery sewing. 1 2 3 4 5 6 7 13 14 15 16 17 18 3938 47 36 37 ...
... Operation switches 11. Cord socket 19. Buttonhole lever 22. Presser foot screw 26. Foot release button 32. Release lever 42. Large hoop 44. Small hoop 49. Foot control 51. Thread cutter 6. Feed dog control 8. Vertical spool pin 17. Thread cutter 30. Feed dogs 34. Connector... MACHINE MACHINE IDENTIFICATION 1. Face cover 5. Bobbin winder stop 10. Helpful message reference guide 12. Hand wheel 15. Needle 27. Needle plate 35. Hoop securing screws with your machine when doing embroidery sewing. 1 2 3 4 5 6 7 13 14 15 16 17 18 3938 47 36 37 ...
Instruction Manual
Page 66
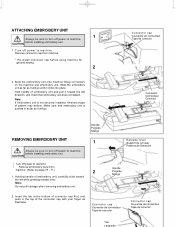
...;e Mango 2. Remove connector cap from machine. (Refer to machine before using machine for general sewing. 2 3. CAUTION ∗ Turn off power to machine. ∗ Remove embroidery hoop from machine. * Re-install connector cap before installing embroidery unit. Slide the embroidery unit as far as illustrated. Hold handle of pattern may deform. Connector...
...;e Mango 2. Remove connector cap from machine. (Refer to machine before using machine for general sewing. 2 3. CAUTION ∗ Turn off power to machine. ∗ Remove embroidery hoop from machine. * Re-install connector cap before installing embroidery unit. Slide the embroidery unit as far as illustrated. Hold handle of pattern may deform. Connector...

Instruction Manual
Page 68
... frame. 2. Fit the two frames together by pressing down on the inner frame to remove slack. Press down on outer frame and remove 1 inner frame. Hoop adjusting screw Vis de réglage de cerceau Tornillo de ajuste de aro c. b. Once material is properly positioned in the frames so that it makes... a sound like a drum when the tightened surface is tapped with no slack, securely tighten the screw. Slightly tighten the hoop adjusting screw and pull material 2 edges to stretch the material into the outer frame, and then re-tighten the screw.
... frame. 2. Fit the two frames together by pressing down on the inner frame to remove slack. Press down on outer frame and remove 1 inner frame. Hoop adjusting screw Vis de réglage de cerceau Tornillo de ajuste de aro c. b. Once material is properly positioned in the frames so that it makes... a sound like a drum when the tightened surface is tapped with no slack, securely tighten the screw. Slightly tighten the hoop adjusting screw and pull material 2 edges to stretch the material into the outer frame, and then re-tighten the screw.
Instruction Manual
Page 70
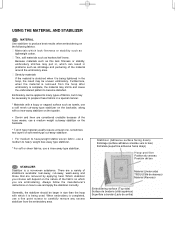
.... Stabilizer (Adhesive surface facing down) Entoilage (surface adhésive orientée vers le bas) Entretela (superficie adhesiva hacia abajo) Hoop position Position du cerceau Posición del aro STABILIZER Stabilizer is being used. Thin, soft materials such as ligthweight cotton. There are ... weight tear-away type stabilizer. * For soft or sheer fabrics, use a rinse-away type stabilizer. Embroidery can result in size than the hoop with a rinse-away stabilizer on the topside. ∗ Denim and linen are a variety of the material around the embroidery area. Generally, ...
.... Stabilizer (Adhesive surface facing down) Entoilage (surface adhésive orientée vers le bas) Entretela (superficie adhesiva hacia abajo) Hoop position Position du cerceau Posición del aro STABILIZER Stabilizer is being used. Thin, soft materials such as ligthweight cotton. There are ... weight tear-away type stabilizer. * For soft or sheer fabrics, use a rinse-away type stabilizer. Embroidery can result in size than the hoop with a rinse-away stabilizer on the topside. ∗ Denim and linen are a variety of the material around the embroidery area. Generally, ...

Instruction Manual
Page 72
...borde del material Stabilizer (Adhesive surface facing) Entoilage (face à la surface adhésive) Estabilizador (cara de la superficie adhesiva) Hoop inner frame Cadre intérieur du cerceau Interior del marco del aro Stabilizer Entoilage Estabilizador Ribbon tape Ruban Cinta Use two layers of ...interfacing if required by the hoop together with the material being used. (The stabilizer will not work properly unless it is generally recommended that the weight of the...
...borde del material Stabilizer (Adhesive surface facing) Entoilage (face à la surface adhésive) Estabilizador (cara de la superficie adhesiva) Hoop inner frame Cadre intérieur du cerceau Interior del marco del aro Stabilizer Entoilage Estabilizador Ribbon tape Ruban Cinta Use two layers of ...interfacing if required by the hoop together with the material being used. (The stabilizer will not work properly unless it is generally recommended that the weight of the...

Instruction Manual
Page 74
.... Raise presser foot and needle, and push up lever (A) of embroidery foot with screwdriver. To remove, loosen hoop mounting screws (D) and remove the hoop from underneath the embroidery foot. 2 (C) (D) 3. ATTACHING AND REMOVING EMBROIDERY HOOP 1 (A) 1. NOTE: Before attaching small hoop, turn on hoop bracket into square holes (B) in hoop mounting plate. PREPARING THE MACHINE BEFORE INSTALLING THE...
.... Raise presser foot and needle, and push up lever (A) of embroidery foot with screwdriver. To remove, loosen hoop mounting screws (D) and remove the hoop from underneath the embroidery foot. 2 (C) (D) 3. ATTACHING AND REMOVING EMBROIDERY HOOP 1 (A) 1. NOTE: Before attaching small hoop, turn on hoop bracket into square holes (B) in hoop mounting plate. PREPARING THE MACHINE BEFORE INSTALLING THE...
Instruction Manual
Page 78
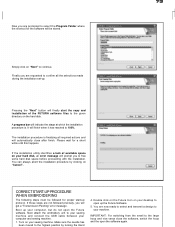
...with the installation. Please wait for proper start the copy and installation of available space on your computer, but do not open up the Futura Software. 5. Turn on the hard disk. Pressing the "Next" button will indicate the stage at which the installation procedure is finalizing ... the installation set-up protocol. If the installation utility identifies a lack of the FUTURA software files to the given directory on your machine. Finally you will automatically close the software, switch the hoop and the open the software again. Make sure the needle has been moved to ...
...with the installation. Please wait for proper start the copy and installation of available space on your computer, but do not open up the Futura Software. 5. Turn on the hard disk. Pressing the "Next" button will indicate the stage at which the installation procedure is finalizing ... the installation set-up protocol. If the installation utility identifies a lack of the FUTURA software files to the given directory on your machine. Finally you will automatically close the software, switch the hoop and the open the software again. Make sure the needle has been moved to ...
Instruction Manual
Page 80
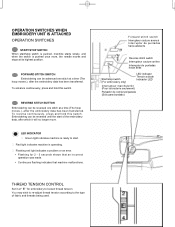
Embroidering can be reversed one stitch at a time (The hoop moves.), after the embroidery data has been transferred. Flashing red light indicates a problem or an error. ∗ Flashing for embroidery to loosen thread tension. Forward ... Embroidering can be reversed until the start of fabric and threads being used. REVERSE STITCH BUTTON Embroidering can be advanced one stitch at a time (The hoop moves.), after which it at " E " for 2 - 3 seconds shows that an incorrect operation was made. ∗ Continuous flashing indicates that machine malfunctions...
Embroidering can be reversed one stitch at a time (The hoop moves.), after the embroidery data has been transferred. Flashing red light indicates a problem or an error. ∗ Flashing for embroidery to loosen thread tension. Forward ... Embroidering can be reversed until the start of fabric and threads being used. REVERSE STITCH BUTTON Embroidering can be advanced one stitch at a time (The hoop moves.), after which it at " E " for 2 - 3 seconds shows that an incorrect operation was made. ∗ Continuous flashing indicates that machine malfunctions...
Instruction Manual
Page 84
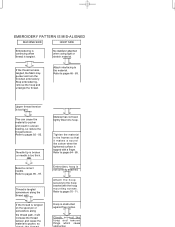
...Refer to pages 66 - 69. Tighten the material in uneven feeding, so reduce the thread tension. Embroidery hoop is too tight. Select a correct needle. Attach the hoop securely to pucker and result in the frames so that it will increase the thread tension and cause the material...thread remains tangled, the fabric may pucker and ruin the finished embroidery. Stop embroidering, remove the hoop and untangle the thread. Refer to the material. Check around the hoop and remove things which cause No stabilizer attached when using light or stretch material. If the thread...
...Refer to pages 66 - 69. Tighten the material in uneven feeding, so reduce the thread tension. Embroidery hoop is too tight. Select a correct needle. Attach the hoop securely to pucker and result in the frames so that it will increase the thread tension and cause the material...thread remains tangled, the fabric may pucker and ruin the finished embroidery. Stop embroidering, remove the hoop and untangle the thread. Refer to the material. Check around the hoop and remove things which cause No stabilizer attached when using light or stretch material. If the thread...
Instruction Manual
Page 86
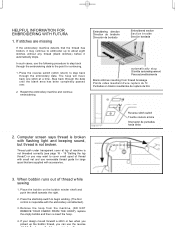
...automáticamente Blank stitches resulting from the machine, (DO NOT REMOVE YOUR FABRIC FROM THE HOOP), replace the empty bobbin and then re-insert the hoop. 4. HELPFUL INFORMATION FOR EMBROIDERING WITH FUTURA 1. The hoop will move back one stitch at top of machine is not threaded correctly (see page 18...small spool of thread while sewing 1. Place the bobbin on the bobbin winder shaft and push the shaft towards the right. 2. Remove the hoop from thread breakage Points vides résultant d'une rupture du fil Puntadas en blanco resultantes de ruptura de hilo 2. In such cases, use...
...automáticamente Blank stitches resulting from the machine, (DO NOT REMOVE YOUR FABRIC FROM THE HOOP), replace the empty bobbin and then re-insert the hoop. 4. HELPFUL INFORMATION FOR EMBROIDERING WITH FUTURA 1. The hoop will move back one stitch at top of machine is not threaded correctly (see page 18...small spool of thread while sewing 1. Place the bobbin on the bobbin winder shaft and push the shaft towards the right. 2. Remove the hoop from thread breakage Points vides résultant d'une rupture du fil Puntadas en blanco resultantes de ruptura de hilo 2. In such cases, use...
Instruction Manual
Page 90
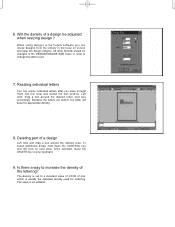
... key on next area. The density is set to a standard value of 4/10th of a design be changed in the DESIGN/CHANGE SIZE menu in the hoop on screen and keep the appropriate density. 8. Resizing individual letters You can resize individual letters after you can resize designs from the Library in order... the CONTROL key and left click on your keyboard. 9. Will the density of mm, which is not editable. Because the letters are built-in the Futura software you have brought them into the hoop and exited the text window. 6.
... key on next area. The density is set to a standard value of 4/10th of a design be changed in the DESIGN/CHANGE SIZE menu in the hoop on screen and keep the appropriate density. 8. Resizing individual letters You can resize individual letters after you can resize designs from the Library in order... the CONTROL key and left click on your keyboard. 9. Will the density of mm, which is not editable. Because the letters are built-in the Futura software you have brought them into the hoop and exited the text window. 6.
Instruction Manual
Page 112
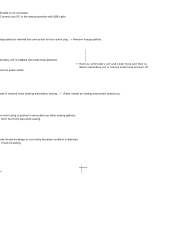
... then re- edle thread breakage or incorrectly threaded condition is pushed in and pulled out while sewing patterns. attach embroidery unit or remove small hoop and turn off edle is inserted into cord socket for foot control plug. → Remove foreign particle. eign particle is lowered when starting embroidery sewing. &#... hand wheel toward you. Don't touch the plug while sewing. B cable is installed with USB cable. Connect your PC to the sewing machine with small hoop attached.
... then re- edle thread breakage or incorrectly threaded condition is pushed in and pulled out while sewing patterns. attach embroidery unit or remove small hoop and turn off edle is inserted into cord socket for foot control plug. → Remove foreign particle. eign particle is lowered when starting embroidery sewing. &#... hand wheel toward you. Don't touch the plug while sewing. B cable is installed with USB cable. Connect your PC to the sewing machine with small hoop attached.
Instruction Manual
Page 115
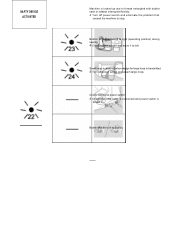
Bobbin winder is turned on. Check cable and power switch. 4 Check that caused the machine to stop. Bobbin winder is moved to right (operating position) during sewing. 4 Check bobbin winder and move it to left. Small hoop is attached when design for large hoop is transmitted. 4 Turn off power switch and eliminate the problem that USB cable is connected and power switch is in operation. SAFTY DEVICE ACTIVATED Machine is locked up due to thread entangled with bobbin case or rotation interrupted forcibly. 4 Turn off power switch and attach large hoop.
Bobbin winder is turned on. Check cable and power switch. 4 Check that caused the machine to stop. Bobbin winder is moved to right (operating position) during sewing. 4 Check bobbin winder and move it to left. Small hoop is attached when design for large hoop is transmitted. 4 Turn off power switch and eliminate the problem that USB cable is connected and power switch is in operation. SAFTY DEVICE ACTIVATED Machine is locked up due to thread entangled with bobbin case or rotation interrupted forcibly. 4 Turn off power switch and attach large hoop.


