Get support for Singer XL-420 FUTURA

Singer XL-420 FUTURA Support Question

Singer XL-420 FUTURA Support Question

Find answers below for this question about Singer XL-420 FUTURA.
Need a Singer XL-420 FUTURA manual? We have 1 online manual for this item!
Question posted by mumshearer on June 11th, 2020
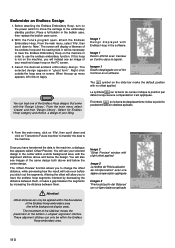
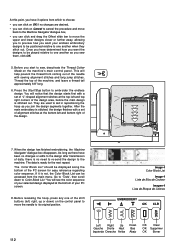
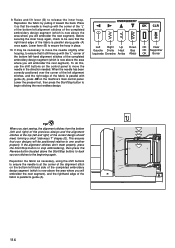
Hooping Alingment

hi when I go to put the big hoop on or the small hoop on my machine tells me I have to a just alingment A.before I contine. Look in the manual .But I have looked in the manual and cant find how to sort this problem.

Current Answers

Answer #1: Posted by Odin on June 11th, 2020 2:59 PM
This answer was accepted by the poster of the original question.
Odin

Member since:
April 10th, 2010

Points: 41,236,690
1,100
points
See the instructions at https://www.manualslib.com/manual/780326/Singer-Xl-420.html?page=90&term=align&selected=5.


If the issue persists or if you require further advice (or if these instructions don't seem to apply to your model), you'll have to consult the manufacturer, for which use the contact information at https://www.contacthelp.com/singer/customer-service.


Hope this is useful. Please don't forget to click the Accept This Answer button if you do accept it. My aim is to provide reliable helpful answers, not just a lot of them. See https://www.helpowl.com/profile/Odin.
Answer #2: Posted by INIMITABLE on June 11th, 2020 2:58 PM
INIMITABLE

Member since:
April 3rd, 2020

Points: 2,082,030
110
points
You might be setting it wrongly;

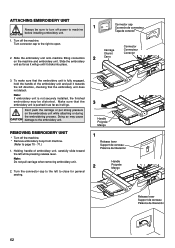
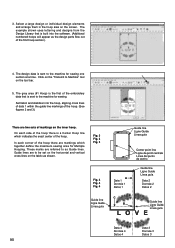
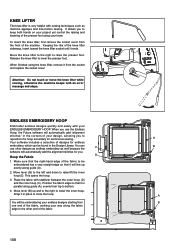
The proper way to set up for embroidery on the SINGER® FuturaT82; machines is as follows:
1. Turn the SINGER® FuturaT82; machine on, without the hoop attached.
2. Attach the hoop that you intend to use.
3. Now open the SINGER® FuturaT82; program. The system detects which hoop is on the machine.
4. If the Large Hoop is on the SINGER® FuturaT82; machine, but it is desired to change to the Small Hoop, remove the Large Hoop and replace with Small Hoop.

Please refer to this site; https://jennys-sewing-studio.com/singer-futura-hints-and-tips/

Or download manual here

http://www.futura-support.com/sites/default/files/XL-420.pdf&ved=2ahUKEwijo5Hn3vrpAhVuTRUIHaAVDMgQFjAAegQIAhAC&usg=AOvVaw0CR7bb573hM2oDZrIQkUI7


I hope this is helpful? PLEASE "ACCEPT" and mark it "HELPFUL" to complement my little effort. Hope to bring you more detailed answers

-INIMITABLE

Related Singer XL-420 FUTURA Manual Pages

Instruction Manual - Page 2

³,03257$176$)(7
Instruction Manual - Page 5

... 48 - 49 Continuous patterns 50 - 51 Sewing on a button 50 - 51 Buttonholes 52 - 57 Using buttonhole foot, Corded buttonholes Buttonholing with Futura 0XOWL+RRS 88 - 95 Helpful messages when ...105 Special accessories 106 - 107 Knee lifter 108 Endless embroidery hoop 108 - 117 Helpful messages 118 - 119 For European version Sewing machine Dimensions: 567 mm × 240 mm × 317 mm...
Instruction Manual - Page 8

...;FDWLRQSODWH 20. Needle bar 26. Feed dogs 26 31. Needle plate 32. Carriage 36. Accessory drawer 38. Small hoop 47. USB cable 42 42 43 50. Instruction manual 43 44 NOTE: B e s u r e t h e U S B c a b l e i s attached to your machine when doing embroidery. 45 44 45 47 48 49 50 6 Pre-tension guide  %REELQZLQGLQJWHQVLRQGLVN 3 9 3. Horizontal...
Instruction Manual - Page 10

...Spool pin cap (large) 8. Screwdriver (small) 12. Satin foot 15. Scissors 22. Spool pin cap (small) 7. Zipper foot 13. To install the FUTURA software, refer to the CD insert for... for most decorative sewing. Thread spool net (short) The Foot that comes on your sewing. Embroidery software CD 19 FUTURA embroidery is "system" of your 7 Sewing machine is another 12...
Instruction Manual - Page 12

.../LIGHT SWITCH NOTE: In sewing mode, the machine can be operated either with or without the foot control (see page 28 - 29). SETTING UP YOUR MACHINE Be sure to wipe off any surplus oil from the walloutlet. Always disconnect the machine from power supply by removing...\RXUZDOORXWOHW  DVLOOXVWUDWHG &RQQHFWWKHIRRWFRQWUROSOXJLQWRWKHPDFKLQHVRFNHW   when using sewing machine only.
Instruction Manual - Page 24

..., thread tension should be accomplished with the word "S" exposed on the tension control dial on top of the machine. ADJUSTING TOP THREAD TENSION 90% of your stitching is usually only desirable for straight stitch sewing. The WHQVLRQ LV ZHOO EDODQFHG ZKHQ WKHVH WZR WKUHDGV µORFN¶ LQ WKH middle of layers...
Instruction Manual - Page 34

... tension control  % 7DFNLQJVWLWFKPRGHEXWWRQ C. Start/stop the sewing machine. Guide the fabric gently with the thread cutter located on the bottom of the fabric, slight ³¿QHWXQLQJ´RIWKHWHQVLRQPD\EHGHVLUHG 1 A B C D E A. When reaching the edge of sewing. Power/light switch F G 2 H I . NOTE: The Needle Plate has both...
Instruction Manual - Page 64

ATTACHING EMBROIDERY UNIT 1 Always be sure to turn off the machine. * Remove embroidery hoop from machine. (Refer to page 70 - 71.) 1. Slide the embroidery XQLW...: Do not pull carriage when removing embroidery unit. 2. Doing so may cause CAUTION damage to close for general sewing. 3 Handle Poignée 0DQJR 1 Release lever Support de cerceau Palanca de liberación Handle 2 Poigné...
Instruction Manual - Page 74

.... After some seconds the step-by-step installation of the software will start the installation procedure manually by going to your PC. INSTALLATION OF SOFTWARE ,Q RUGHU WR VWDUW XVLQJ WKH...in the /LFHQVH$JUHHPHQWSOHDVHFOLFNRQ³ The software for your FUTURA sewing & embroidery machine FRPHVRQD&'520GLVF In most personal computers the default drive setting for...
Instruction Manual - Page 76

... and installation of available space on your hard disk, an error message will automatically close after finish. If the installation utility identifies a lack of the FUTURA software files to the given GLUHFWRU\RQWKHKDUGGLVN A progress bar will indicate the stage at which the installation SURFHGXUHLV,WZLOO¿QLVK...
Instruction Manual - Page 78

...hoop will stop the machine, push the button again and the machine will move as it at its highest position. To advance continuously, press and hold this button. To stop sewing and the needle stops at "E" for 2 - 3 seconds shows that an incorrect operation was made. * Continuous flashing indicates that the machine... . ¿ Red light indicates machine is operating. ¿ Flashing red...
Instruction Manual - Page 90

...different parts; When these points are input, they inform the machine exactly as the"cross lines". Select Tools from the horizontal tool bar, select Hoop and then select Multiple.  $ VLQJOH KRRS DSSHDUV... in the upper left corner. 88 Please note: Up to three additional hoops will therefore sew the design to the alignment of cross lines must be referred to as to how ...
Instruction Manual - Page 92

... are two sets of the embroidery data that is sent to the machine for sewing. The grey area (#1 Hoop) is sent to be set on the horizontal and vertical cross lines on the inner hoop. The design data is built into the hoop, aligning cross lines RIGDWDZLWKLQWKHJXLGHOLQHPDUNLQJVRIWKH...
Instruction Manual - Page 104

... the essential parts clean at all times. (1) 1. CLEANING HOOK AREA AND FEED DOGS 1 Always disconnect the machine from power CAUTION supply by the arrows. (A, B) NOTE: Singer Brand Sewing Machine Oil is necessary to its highest position. 2 2. Cleaning the sewing machine and footcontroller $IWHU XVLQJ NHHS VHZLQJ PDFKLQH DQG IRRWFRQWUROOHU FOHDQ Use dry rags to remove...
Instruction Manual - Page 106

... the dust and lint before it is used. Use of sewing machine oil to your machine. Put one drop of oil other than Sewing Machine Oil will cause damage to the points indicated by arrows. 1 Face cover Plaque frontale Cubierta frontal Helpful Hints : For the machine used after a long interval : It should be oiled before oiling...
Instruction Manual - Page 110

ENDLESS EMBROIDERY HOOP (PEURLGHU HQGOHVV GHVLJQV TXLFNO\ DQG HDVLO\ ZLWK \RXU (1'/(66(0%52,'(5 KNEE LIFTER 7KHNQHHOLIWHULVYHU\KHOSIXOZLWKVHZLQJWHFKQLTXHVVXFKDV machine applique and free-motion sewing. It allows you to NHHS ERWK KDQGV RQ \RXU SURMHFW \HW FRQWURO WKH UDLVLQJ DQG ORZHULQJRIWKHSUHVVHUIRRWXVLQJ\RXU...
Instruction Manual - Page 112

...With the Futura program open, attach the Endless Embroidery Hoop. It will instead see an image of your liking. You can load one of your machine's large hoop on the power switch to move the carriage to use the endless embroidery function. Select 'for Endless Hoop' category...to have transferred the data to 'New'7KHVFUHHQZLOOGLVSOD\DOLNHQHVVRI the endless hoop and the sewing feld.
Instruction Manual - Page 114

... from coming out of the machine, and leave a thread tail approximately 6-8" long. 6. Press the Start/Stop button to sew, deactivate the Thread Cutter Mode on the machine's main control panel. Thread the top of the needle with sewing alignment stitches and long jump ...WR PRYH WKH upper and lower designs closer or further away, allowing you to preview how you sew WKHPFOLFNOK. 5.
Instruction Manual - Page 116

It may be necessary to secure the hoop in the direction needed. When you start sewing, the alignment stitches from the bottom (left and right) of the previous design and the alignment stitches at the corner of the alignment... design segment (which is lined up your designs will embroider the next segment). To do this, use the shift buttons on the machine's main control panel.
Instruction Manual - Page 118

... Tips: ‡ When embroidering larger or heavier pieces of the needle when sewing the alignment stitches and long jump stitches. ‡ To change a bobbin ... embroidery speed. ‡ Be sure to another area that the hoop will allow you are embroidering, remove the presser foot and needle to remove the hoop from the machine. Remove the bobbin cover plate and empty bobbin. When the bobbin...

Similar Questions

Trouble With Thread Breaking Often When Embroidering A Design.2.i Choose A Desig
When I choose a design for a small hoop I keep getting the window telling me the design is too large...
(Posted by ksendles02 2 years ago)
Stitching Incomplete Design
please my singer future xl-420 is not stitching the design I transmitted to the machine rather it st...
(Posted by Oliviasommy 3 years ago)
Sewing Machine Will Not Work Right.
I am trying to embroider on fleece. The machine goes along fine foe a couple of minutes and then it ...
(Posted by purplelily55 7 years ago)
Sewing Machine Model 5523 Page 53 In Manual Does Not Show Me How To Attach Pres
The page in your instructions I had and was reading it when it deleted
(Posted by ramseyrobert 7 years ago)
Beeping From Singer Sewing Machine Stylist Ii 5625
My sewing machine will beep and stop sewing after three inches of sewing. I have taken it to be repa...
(Posted by arusheria 9 years ago)
Ask a New Question
Use the box below to post a new question about this Singer product .
Points & Prizes
  • You can earn points for nearly everything you do on HelpOwl.com
  • You can trade in those points for gift cards at leading retailers such as Amazon.com and Walmart
  • It's that simple!
See How it Works
Create a Free Account

Singer Manuals

Find free Singer XL-420 FUTURA manuals and user guides available at ManualOwl.com. Try out our unique manual viewer allowing you to interact with manuals from directly within your browser!

Singer Reviews

View thousands of Singer user reviews and customer ratings available at ReviewOwl.com.

Contact Information

Complete Singer customer service contact information including steps to reach representatives, hours of operation, customer support links and more from ContactHelp.com.

Scoreboard Ratings

See detailed Singer customer service rankings, employee comments and much more from our sister site.