Singer XL-420 FUTURA Support Question
Singer XL-420 FUTURA Support Question
Find answers below for this question about Singer XL-420 FUTURA.Need a Singer XL-420 FUTURA manual? We have 1 online manual for this item!
Question posted by purplelily55 on November 17th, 2016
Sewing Machine Will Not Work Right.
I am trying to embroider on fleece. The machine goes along fine foe a couple of minutes and then it starts pulling the fleece into the bobbin case. I am using a good stabilizer and pulling the fleece tight in the hoop but everything I try does not work. Took the bobbin case out and cleaned it and put it back in.There was a lot of pieces of thread in the bobbin case. I have a singer futura xl 420. Can anyone help wiyh this?
Current Answers
Answer #1: Posted by Troubleshooter101 on January 23rd, 2017 11:16 AM
Troubleshooter101

Member since:
September 30th, 2015 Points: 2,927,030

Member since:
September 30th, 2015 Points: 2,927,030
Check this link below for the official faq link for singer website
they have all the answers for the common questions
http://www.singerco.com/support/frequently-asked-questions
Thanks
Please respond to my effort to provide you with the best possible solution by using the "Acceptable Solution" and/or the "Helpful" buttons when the answer has proven to be helpful. Please feel free to submit further info for your question, if a solution was not provided. I appreciate the opportunity to serve you!
Troublshooter101
Related Singer XL-420 FUTURA Manual Pages
Instruction Manual - Page 2

³,03257$176$)(7
Instruction Manual - Page 5
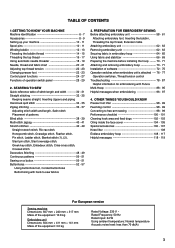
... patterns 50 - 51 Sewing on a button 50 - 51 Buttonholes 52 - 57
Using buttonhole foot, Corded buttonholes Buttonholing with Futura 0XOWL+RRS 88 - 95 Helpful messages when embroidering 96 - 97
4. TABLE OF CONTENTS
1.GETTING TO KNOW YOUR MACHINE 0DFKLQHLGHQWL¿FDWLRQ 6 - 7 Accessories 8 - 9 Setting up your machine 10 - 11 Spool pins 10 - 11 Winding bobbin 12 - 13 Threading...
Instruction Manual - Page 10
...
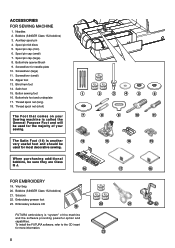
2. Embroidery software CD
19
FUTURA embroidery is another
12
very useful foot and should be sure they are Class I5 J.
16
)25(0%52,'(5<
19. Spool pin cap (small)
7. The Satin Foot (14) is "system" of your
7
Sewing machine is called the
General Purpose Foot and will
be used for most decorative sewing. Thread spool net (short...
Instruction Manual - Page 12
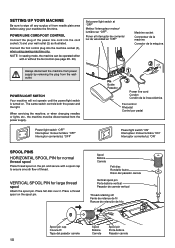
Always disconnect the machine from power supply by removing the plug from needle plate area EHIRUHXVLQJ\RXU...RQQHFWWKHIRRWFRQWUROSOXJLQWRWKHPDFKLQHVRFNHW
when using sewing machine only. POWER/LIGHT SWITCH
SETTING UP YOUR MACHINE
Be sure to wipe off any surplus oil from the walloutlet. NOTE: In sewing mode, the machine can be operated either
with or without the foot control...
Instruction Manual - Page 20

...enfileur lorsque la machine est en marche car le crochet de l'enfileur pourrait se casser. Pull thread loop away...opération depuis le niveau 1.
Pull down the threading lever to its highest position before threading.
Don't pull thread with your right hand. +RRN WKUHDG WR ....
5. Make sure that the
machine be set for the needle being used, then manually thread the needle after ...
Instruction Manual - Page 24
...sewing.
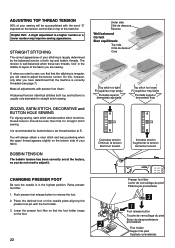
Under side Côté de dessous Reverso
Well balanced Correct Bien equilibrada
Top side Côté de dessus Cara
Top stitch too tight...sewing.
,IZKHQ\RXVWDUWWRVHZ\RX¿QGWKDWWKHVWLWFKLQJLVLUUHJXODU you have determined that for straight stitch sewing...The correct appearance of your sewing will be less than that the machine is correctly threaded (see ...
Instruction Manual - Page 30
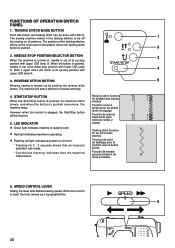
...sets desired sewing speed. When the button is pushed,
needle is set at its down-stop .
4. REVERSE STITCH BUTTON
5
Reverse sewing is ...machine stops. START/STOP BUTTON
When the Start/Stop button is pushed, the machine starts slowly, and when the button is used, the lever serves as a top speed limiter.
6
28 The machine will return to start.
¿ Red light indicates machine...
Instruction Manual - Page 34
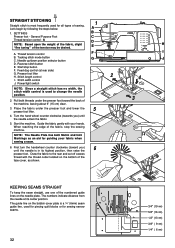
... QXPEHUHG JXLGH lines on the bobbin cover plate is most frequently used to the rear and cut off excess
thread with your fabric when sewing a seam.
)LUVW WXUQ...light switch
F G
2
H I . Let's begin by following the steps below.
1. Start/stop the sewing machine. Start the machine. When reaching the edge of the fabric, slight ³¿QHWXQLQJ´RIWKHWHQVLRQ...
Instruction Manual - Page 36

... ZIPPERS AND PIPING
Use the zipper foot to sew to the right or left of foot Aiguille à gauche du pied presseur Aguja a la izquierda del prensatelas
Needle to right of foot Aiguille ...so it doesn't show.
3.
Thread bobbin with the Stitch Width Control.
Increase thread tension toward 6 or higher until you achieve the desired appearance.
4. Start to the piping may be accomplished with...
Instruction Manual - Page 60
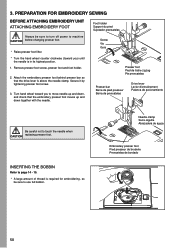
PREPARATION FOR EMBROIDERY SEWING
BEFORE ATTACHING EMBROIDERY UNIT $77$&+,1*(0%52,'(5 3.
Instruction Manual - Page 64
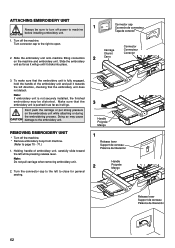
...unit while attaching or during the embroidering process. Turn the connector cap to the left while pressing release lever. Turn connector cap to the right to machine CAUTION before installing embroidery unit.
... pressure on the machine and embroidery unit. Holding handle of the embroidery unit and pull it will go. Turn off the machine.
Note: Do not pull carriage when removing embroidery...
Instruction Manual - Page 76
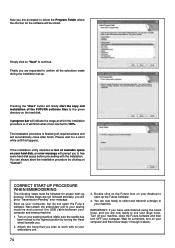
...EHIRUHSURFHHGLQJZLWKWKHLQVWDOODWLRQ
Pressing the ³1H[W´ button will finally start the copy and installation of available space on your hard disk, an error message will...the shortcut for a short while until this happens. If the installation utility identifies a lack of the FUTURA software files to the given GLUHFWRU\RQWKHKDUGGLVN
A progress bar will indicate the stage at...
Instruction Manual - Page 90
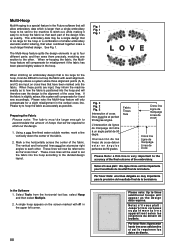
...WKH 0XOWL hoop feature will now be required to as possible.
Please try to the DFFXUDF\RIWKH¿QDORXWFRPHRIWKHHPEURLGHU\
Notez s'... therefore sew the design to the divided design layout.
When these points are input, they inform the machine exactly ...and horizontal lines must be used to set the fabric into the hoop and will be at precise right angles to re-hoop the...
Instruction Manual - Page 102
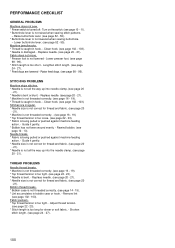
... pulled or pushed against machine feeding
action. - Lower buttonhole lever. (see page 102 - 103). )DEULFSXFNHUV * Top thread tension is not raised when sewing stitch patterns.
- Lengthen stitch length. (see page
24 - 27). * Feed dogs are irregular. * Needle size is not correct for thread and fabric. (see page 20
- 21). %REELQWKUHDGEUHDNV * Bobbin case...
Instruction Manual - Page 104
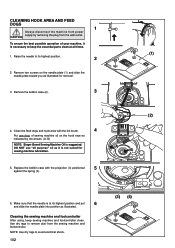
... NHHS VHZLQJ PDFKLQH DQG IRRWFRQWUROOHU FOHDQ Use dry rags to remove dust from the wall-outlet. CLEANING HOOK AREA AND FEED DOGS
1
Always disconnect the machine from power
CAUTION supply by the arrows. (A, B)
NOTE: Singer Brand Sewing Machine Oil is necessary to its highest position.
2
2.
Remove the bobbin case (2).
3
&OHDQWKHIHHGGRJVDQGKRRNDUHD...
Instruction Manual - Page 106
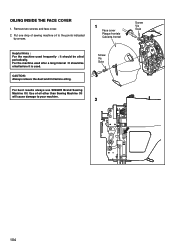
... the points indicated
by arrows.
1
Face cover Plaque frontale Cubierta frontal
Helpful Hints : For the machine used frequently : It should be oiled periodically. For best results always use SINGER Brand Sewing Machine Oil.
Remove two screws and face cover. 2. For the machine used . Use of sewing machine oil to your machine. CAUTION: Always remove the dust and lint before it is...
Instruction Manual - Page 112
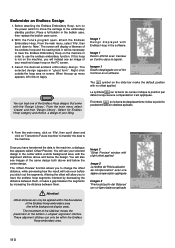
...GLVSOD\DOLNHQHVVRI the endless hoop and the sewing feld.
You can load one of your machine's large hoop on screen. Embroider an Endless Design
1.
The VHOHFWHG GHVLJQ DSSHDUV LQ ³JKRVW IRUP´ 5LJKW FOLFN outside the hoop area on the PC screen.
3. Place a full bobbin in the software. Le symbole sur la...
Instruction Manual - Page 114
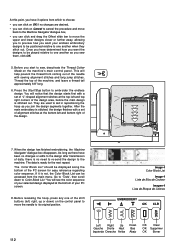
... 3 options from coming out of the machine, and leave a thread tail approximately 6-8" long.
6. Press the Start/Stop button to sew, deactivate the Thread Cutter Mode on the machine's main control panel. Thread the top of the needle with sewing alignment stitches and long jump stitches. Before you start to embroider the endless GHVLJQ At this point, you...
Instruction Manual - Page 116
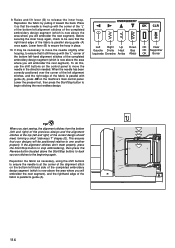
... stitch on the machine's main control panel.
It may be necessary to one another
properly. When you start sewing, the alignment stitches from the bottom
(left and right) of the previous...the bottom left and right) of the current design should
meet properly, press
the Start/Stop button to stop embroidering, then press the
Reverse button (located above the Start/Stop button) to ensure...
Instruction Manual - Page 118
...PHWDOOLF threads) or designs with dense stitch areas, it into the bobbin case and replace the bobbin FRYHU SODWH 3ODFH WKH KRRS EDFN RQWR WKH PDFKLQH Lower the presser foot lifter. Helpful Tips: ‡ When embroidering larger or heavier pieces of the needle when sewing the alignment stitches and long jump stitches. ‡ To change...
Similar Questions

Trouble With Thread Breaking Often When Embroidering A Design.2.i Choose A Desig
When I choose a design for a small hoop I keep getting the window telling me the design is too large...
When I choose a design for a small hoop I keep getting the window telling me the design is too large...
(Posted by ksendles02 2 years ago)

Machine Goes To Beeping And Lights Start Flashing
When needle bar reaches top position machine has to be reset, and have to lower needle bar from top ...
When needle bar reaches top position machine has to be reset, and have to lower needle bar from top ...
(Posted by cory61tx 3 years ago)
Stitching Incomplete Design
please my singer future xl-420 is not stitching the design I transmitted to the machine rather it st...
please my singer future xl-420 is not stitching the design I transmitted to the machine rather it st...
(Posted by Oliviasommy 3 years ago)

Singer Futura 420 Straight Sewing. While I Am Sewing The Stitch Pattern Changes
the stitch pattern changes from straight to a scalloped pattern and won't sew for me... Wait a few s...
the stitch pattern changes from straight to a scalloped pattern and won't sew for me... Wait a few s...
(Posted by Stevie9963 9 years ago)

I Have A Heavy Duty Singer Sewing Machine (model 4432)
stopped sewing after bobbin replacement?
stopped sewing after bobbin replacement?
(Posted by sueisforme 9 years ago)