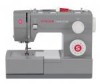
Singer 4432 Heavy Duty Support Question
Singer 4432 Heavy Duty Support Question
Find answers below for this question about Singer 4432 Heavy Duty.Need a Singer 4432 Heavy Duty manual? We have 1 online manual for this item!
Question posted by sueisforme on August 31st, 2014
I Have A Heavy Duty Singer Sewing Machine (model 4432)
stopped sewing after bobbin replacement?
Current Answers
Answer #1: Posted by TechSupport101 on September 1st, 2014 1:12 AM
TechSupport101

Member since:
May 24th, 2013 Points: 12,171,305

Member since:
May 24th, 2013 Points: 12,171,305
Hi. Do ensure that the bobbin case is threaded properly - in any event, the tutorials below should help greatly.
http://www.ehow.com/how_7382446_troubleshoot-bobbin-singer-machine.html
http://crafts.creativebug.com/troubleshoot-sewing-machine-bobbin-problems-1349.html
Related Singer 4432 Heavy Duty Manual Pages
Instruction Manual - Page 2
..., if it to SINGER or a service agent to the nearest authorized dealer or service center for their safety. 21. Return the appliance to repair or replace at once. Never ... appliance by the manufacturer as threading needle, changing needle, threading bobbin, or changing presser foot, and the like.
10. Use this sewing machine. Special care is DC
9V. Use only attachments recommended by ...
Instruction Manual - Page 6

... Source...6 Two Step Presser Foot Lifter/ Adjusting Presser Foot Pressure...8 Accessories...10
Threading the Machine Winding the Bobbin...12 Inserting the Bobbin ...14 Threading the Upper Thread...16 Automatic Needle Threader ...18 Raising the Bobbin Thread ...20 Thread Tension ...22
Sewing How to Choose Your Pattern...24 Three Needle Position Dial ...26 Stitch Width Dial...
Instruction Manual - Page 9

Stitch width dial
7
12. Automatic threader 15. EN Principal Parts of the Machine
1. Reverse sewing lever
11
3
5. Stitch length dial
13. Bobbin stopper
11. Pattern selector dial
8
14. Thread take-up lever 2
10
4. Needle plate cover
8. One step buttonhole lever
14
15
2 Three needle position dial
6
10. ...
Instruction Manual - Page 13

..., reverse the plug.
IMPORTANT NOTICE
1
For appliance with a polarized plug (one blade is
intended to fit in use . Sewing light Press main switch (A) to be grounded
b
2
6
A 3 EN Connecting Machine to Power Source
Connect the machine to a power source as illustrated. (1) This appliance is equipped with a polarized plug which must be used with the...
Instruction Manual - Page 15
... adjusting screw with a coin.
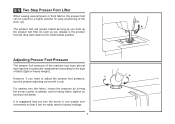
However, if you need to the type of fabric (light-or-heavy weight). For sewing very thin fabric, loosen the pressure by turning the screw counter clockwise, and for easy positioning of the machine has been pre-set and requires no particular readjustment according to adjust the presser foot...
Instruction Manual - Page 17

... (These 10 accessories are , however, available for purchase from your authorized retailer.) n. Buttonhole foot d. Button sewing foot e. Hemmer foot q. Cording foot r. Seam ripper/ brush f. Pack of needles h. Overcasting foot p. Even Feed foot w. Bobbin (3x) j. Quilting/ straight stitch foot t. Auxiliary Spool Pin l. Gathering foot u. Twin needle
2 Optional accessories...
Instruction Manual - Page 19

... discs. (4)
- Place thread and corresponding spool holder on to the bobbin & then continue winding
until bobbin is in "bobbin winding" position, the machine will not sew and the handwheel turn. Trim thread close to spool pin. (1/2)
-
Snap thread into thread guide. (3)
- Please Note: When the bobbin winder spindle is full. (9)
2
- Hold thread end securily. (7) 1
- Cut...
Instruction Manual - Page 23

... holder next to the needle which should be disrupted. Thread tension module by leading thread down
1
to the spool. Start by not doing so several sewing problems could result.
- For small thread spools, place small side of the take-up the spool pin. Trim thread to release the tension discs. You...
Instruction Manual - Page 29

... next number down.
There is an indication that the bobbin thread has not been
threaded correctly. If the thread is looping or birdnesting on the underside of the fabric, this is an indication that the upper machine tension is important for straight stitch construction sewing. - 90% of the fabric,
this is no single...
Instruction Manual - Page 31

... between 1 and 5. - To obtain the other patterns, turn the stitch length dial to make it longer. The pattern selector dial may be found on the machine. Reverse sewing lever b.
This will give you the widest stitch. Pattern selector dial
24
a
b
c d e
ABCDE FGH I JK
ABCDE FGH I JK
S1
ABCDE FGH I , J, and K follow these...
Instruction Manual - Page 33
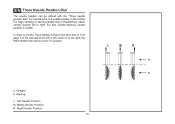
... twin needle stitching, needle position is middle. In order to set to the left or right. Left Needle Position M. Zig-zag L. For edge stitching or sewing parallel lines of the manual) to "0" position. EN Three Needle Position Dial
The needle position can be set the Three Needle Position Dial (See item...
Instruction Manual - Page 37

EN Sewing Straight Stitch
To begin sewing, set the machine for straight stitch. (1)
Set the stitch length to start sewing. (3)
1
2
3
30 Place the fabric under the presser foot with the fabric edge lined up with the desired seam guide line on the needle plate. (2)
Lower the presser foot lifter, and then step on the foot controller to between 2 and 3.
Instruction Manual - Page 39
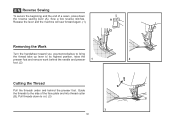
A
Release the lever and the machine will sew forward again. (1)
Removing the Work
Turn the handwheel toward you (counterclockwise) to bring
the thread take up lever to cut. (3)
32
B 3 Sew a few reverse stitches.
Pull threads down
the reverse sewing lever (A). Guide the threads to the side of a seam, press down to its highest position, raise...
Instruction Manual - Page 41
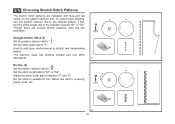
... "S2". Adjust the stitch width dial to the indicator marked "S1" or "S2". Then, turn the pattern selector dial to stretch and hardwearing seams. The machine sews two stitches forward and one stitch backwards.
M
1 M
2 34 Ric Rac (2) Set the pattern selector dial to " ". EN Choosing Stretch Stitch Patterns
The stretch stitch patterns...
Instruction Manual - Page 43

...needle drops through the edge of the folded fabric.
1
Start to make blind hem sewing even easier, use a blind hem
foot, available from your SINGER® retailer. (See page 10
for firm fabrics. Blind hem for the weight... dial with a longer stitch length setting. Note:
2
To make sure the machine settings are normally sewn
with the range shown on curtains, trousers, skirts, etc.
Instruction Manual - Page 45

... stretch fabric, hook heavy thread or
cord under & to
E
remove any slack, then trim off the excess.
38
3 4
2
1
D Using tailor's chalk, mark the position of the buttonhole on the fabric with the mark on your
garment. Set the stitch width at "6". Stop the machine when the buttonhole cycle has completed.
Sew a test first to...
Instruction Manual - Page 49

... the handwheel to the distance
a
2
between the holes of the button and sew. Adjust the stitch width, as illustrated in (3). Set the machine for straight
stitch again, then sew a few securing stitches to "0". "6".
Slowly sew on top of the button.
EN Sewing on Buttons
Move the drop feed control to right side to lower the...
Instruction Manual - Page 55

... double knits.
For best sewing results always use the same...Replace needle often (approximately every other garment ) and/ or at first thread breakage or skipped stitches.
48
Always use genuine SINGER...SINGER® 2032 Leather needles. 12 (80) to 18 (110). Set stitch length
to medium).
18 (110)
Heavy woolen, overcoat fabrics, upholstery fabrics, some Heavy duty thread in the bobbin...
Instruction Manual - Page 60

... as follows:
A. Needles must be towards the back. Bent needles B. Damaged points C. The flat side of wear and causing problems. For best sewing results always use SINGER® needles. Blunt needles
Replace your needle after inserting the new needle. (1)
B.
Attention:
Turn power switch to off ("O") before inserting or removing
1
the needle. Insert the...
Instruction Manual - Page 62
... Select a better quality thread. 2. Remove bobbin case, thread and insert correctly. 3. Do not pull on the hook or needle bar. 2. Replace the needle. The machine is damaged.
1. The needle is not threaded...1. Lint or oil have collected on the fabric while sewing, let the feed dogs pull
the fabric under the foot.
1. Correction
1. Replace the needle.
1. Remove and reinsert needle. (flat ...
Similar Questions

Service Manual For Singer Heavy Duty 4432
is there anywhere I can get a service manual for my machine. I've had issues with it since I bought ...
is there anywhere I can get a service manual for my machine. I've had issues with it since I bought ...
(Posted by jv1construction 2 years ago)

Singer 44s Heavy Duty Sewing Machine
can this machine be installed in a sewing machine cabine
can this machine be installed in a sewing machine cabine
(Posted by Lhcajun2004 3 years ago)

Does My 44s Classic Heavy Duty Sewing Machine Need Oiling?
Can not find in manual.
Can not find in manual.
(Posted by alicegreen35160 7 years ago)

Do Model 4432 And 4452 Have Free Arms?
Do Model 4432 And 4452 Have Free Arms?
Do Model 4432 And 4452 Have Free Arms?
(Posted by Iamsuebee2 7 years ago)

Singer Heavy Duty 4432
I am unable to keep the bobbin spinner engaged to the right hand side so that i can use the bobbin.
I am unable to keep the bobbin spinner engaged to the right hand side so that i can use the bobbin.
(Posted by garner6389 8 years ago)