Singer XL-420 FUTURA Support Question
Singer XL-420 FUTURA Support Question
Find answers below for this question about Singer XL-420 FUTURA.Need a Singer XL-420 FUTURA manual? We have 1 online manual for this item!
Question posted by ksendles02 on June 17th, 2021
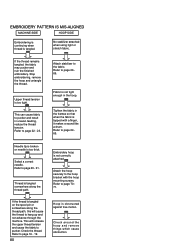
Trouble With Thread Breaking Often When Embroidering A Design.2.i Choose A Desig
Current Answers
Answer #1: Posted by SonuKumar on June 17th, 2021 8:24 PM

Member since:
May 9th, 2021 Points: 16,623,780

Why does my Singer sewing machine keep breaking the thread?
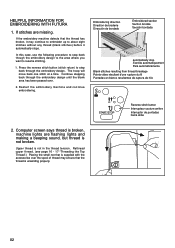
The upper thread tension could be set too tight. Set the tension to the best thread tension setting or less. Make sure the spool of thread is installed correctly using the correct size spool cap for the size of spool. ... Check that the bobbin is wound so that it about 80% full and that the thread is evenly wound
Why does my thread keep shredding?
The most common reason why thread shreds, frays, or breaks at the needle is because the eye is too small to accommodate the thread, causing stress and friction, which results in shredding or breaking the top thread.
What to do if your thread keeps breaking?
The upper thread tension could be set too tight. Set the tension to the best thread tension setting or less. 3. Make sure the spool of thread is installed correctly using the correct size spool cap for the size of spool.
Why does my bobbin thread keep breaking?
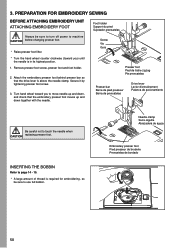
Sewing Machine: Bobbin thread breaks. A dirty shuttle race, improper thread routing or incorrect thread tension can break the bobbin thread. Unplug the sewing machine and check thread routing according to guidelines in your owner's manual. Reroute the thread correctly if necessary
What tension should my sewing machine be on?
The dial settings run from 0 to 9, so 4.5 is generally the 'default' position for normal straight-stitch sewing. This should be suitable for most fabrics. If you are doing a zig-zag stitch, or another stitch that has width, then you may find that the bobbin thread is pulled through to the top.
Please respond to my effort to provide you with the best possible solution by using the "Acceptable Solution" and/or the "Helpful" buttons when the answer has proven to be helpful.
Regards,
Sonu
Your search handyman for all e-support needs!!
Related Singer XL-420 FUTURA Manual Pages

Similar Questions

My machine will sew for less than a minute and the thread breaks and the needle becomes unthreaded b...

I want to quilter a quilt using different embroidery designs designed for this purpose. I broke thre...

I'm using sulky embroidery thread and bobbin fill , I have tried loosening tension but thread contin...

I have thread wound around the hand wheel on the inside of the my Futura XL-420. How can i get it ou...
cannot find information on how to thread the serger that ispart of the sewing machine