XVZ9000U Operation Manual
Page 3
... not defeat the safety purpose of power supply to defeat the safeguards incorporated into this Projector, observe the following conditions: a. Damage Requiring Service Unplug this product on the marking label. b. d. Wall or Ceiling Mounting This product should be mounted to qualified service personnel under the following basic rules for example, near a swimming pool; Heat...
... not defeat the safety purpose of power supply to defeat the safeguards incorporated into this Projector, observe the following conditions: a. Damage Requiring Service Unplug this product on the marking label. b. d. Wall or Ceiling Mounting This product should be mounted to qualified service personnel under the following basic rules for example, near a swimming pool; Heat...
XVZ9000U Operation Manual
Page 5
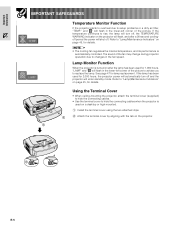
... used on a desktop or high mounted. 1 Install the terminal cover using the two attached clips. 2 Attach the terminal cover by aligning with the tab on after a 90-second coolingoff period the power will shut off and the projector will flash in the lower-left... Important Information IMPORTANT SAFEGUARDS Temperature Monitor Function If the projector starts to overheat due to changes in the fan speed. Refer to "Lamp/Maintenance Indicators" on page 45, for details. 2 1 Using the Terminal Cover • When ceiling-mounting the projector, attach the terminal cover (supplied) to hide the...
... used on a desktop or high mounted. 1 Install the terminal cover using the two attached clips. 2 Attach the terminal cover by aligning with the tab on after a 90-second coolingoff period the power will shut off and the projector will flash in the lower-left... Important Information IMPORTANT SAFEGUARDS Temperature Monitor Function If the projector starts to overheat due to changes in the fan speed. Refer to "Lamp/Maintenance Indicators" on page 45, for details. 2 1 Using the Terminal Cover • When ceiling-mounting the projector, attach the terminal cover (supplied) to hide the...

XVZ9000U Operation Manual
Page 8
... Feet 18 Using the Lens Shift 18 Keystone Correction 19 Adjusting the Projection Distance 20 Image Projection 22 Rear Projection 22 Projection Using a Mirror 22 Ceiling-mount Projection 22 Menu Bars 27 Adjusting the Picture 29 Adjusting the Computer Images (RGB menu only 32 Reducing Image Noise (VIDEO menu only 36 Turning... Maintenance 46 Confirming the Lamp Usage Time 46 Replacing the Lamp 47 Cleaning the Air Filters 49 Using the Kensington Lock 49 Troubleshooting 50 For SHARP Assistance (U.S.A.
... Feet 18 Using the Lens Shift 18 Keystone Correction 19 Adjusting the Projection Distance 20 Image Projection 22 Rear Projection 22 Projection Using a Mirror 22 Ceiling-mount Projection 22 Menu Bars 27 Adjusting the Picture 29 Adjusting the Computer Images (RGB menu only 32 Reducing Image Noise (VIDEO menu only 36 Turning... Maintenance 46 Confirming the Lamp Usage Time 46 Replacing the Lamp 47 Cleaning the Air Filters 49 Using the Kensington Lock 49 Troubleshooting 50 For SHARP Assistance (U.S.A.
XVZ9000U Operation Manual
Page 21
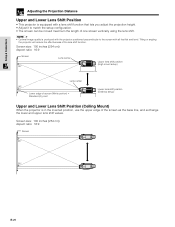
... screen (White portion) = Standard (0) point Lower lens shift position (Desktop setup) Upper and Lower Lens Shift Position (Ceiling Mount) When the projector is produced with the projector positioned perpendicular to the screen with a lens shift function that lets you adjust the projection height. • Adjust it to...function. Screen size: 100 inches (254 cm) Aspect ratio: 16:9 Screen 90° 90° E-21 Tilting or angling the projector will reduce the effectiveness of the screen as the base line, and exchange the lower and upper lens shift values. Setup & Connections ...
... screen (White portion) = Standard (0) point Lower lens shift position (Desktop setup) Upper and Lower Lens Shift Position (Ceiling Mount) When the projector is produced with the projector positioned perpendicular to the screen with a lens shift function that lets you adjust the projection height. • Adjust it to...function. Screen size: 100 inches (254 cm) Aspect ratio: 16:9 Screen 90° 90° E-21 Tilting or angling the projector will reduce the effectiveness of the screen as the base line, and exchange the lower and upper lens shift values. Setup & Connections ...

XVZ9000U Operation Manual
Page 22
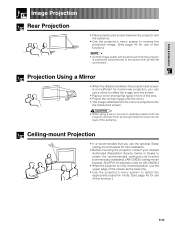
... for normal rear projection, you use the optional Sharp ceiling-mount bracket for this installation. • Before mounting the projector, contact your nearest Authorized SharpVision Service Center or Dealer to obtain the recommended ceiling-mount bracket (commercially available). (AN-CM230 ceiling-mount bracket, AN-EP101A extension tube for AN-CM230.) • When the projector is in front of the lens. •...
... for normal rear projection, you use the optional Sharp ceiling-mount bracket for this installation. • Before mounting the projector, contact your nearest Authorized SharpVision Service Center or Dealer to obtain the recommended ceiling-mount bracket (commercially available). (AN-CM230 ceiling-mount bracket, AN-EP101A extension tube for AN-CM230.) • When the projector is in front of the lens. •...

XVZ9000U Operation Manual
Page 60
... 18 Air filters 49 Aspect ratio 23 Automatic power shutoff function 41 Auto sync adjustment 35 AUTO SYNC button 35 B Background 39 BACKLIGHT button 16 C Ceiling-mount 22 Ceiling+Rear 43 CINEMA ZOOM 23 Clock 32 CLR TEMP (Color Temperature) buttons 30 COMPONENT/RGB terminals 14 COMPUTER-RGB port 15 D Digital shift 40...
... 18 Air filters 49 Aspect ratio 23 Automatic power shutoff function 41 Auto sync adjustment 35 AUTO SYNC button 35 B Background 39 BACKLIGHT button 16 C Ceiling-mount 22 Ceiling+Rear 43 CINEMA ZOOM 23 Clock 32 CLR TEMP (Color Temperature) buttons 30 COMPONENT/RGB terminals 14 COMPUTER-RGB port 15 D Digital shift 40...

XVZ9000U Operation Manual
Page 3
...as recommended by following conditions: a. Unauthorized substitutions may fall, causing serious injury to a child or adult, and serious damage to ensure your Projector, please be placed in a built-in performance, this product yourself as they may cause hazards. 7. In order not to qualified service ... voltage or other controls may expose you to . 11. If the product does not operate normally by the manufacturer. 22. Wall or Ceiling Mounting This product should be moved with a three-wire grounding-type plug, a plug having a third (grounding) pin. Attachments Do not use...
...as recommended by following conditions: a. Unauthorized substitutions may fall, causing serious injury to a child or adult, and serious damage to ensure your Projector, please be placed in a built-in performance, this product yourself as they may cause hazards. 7. In order not to qualified service ... voltage or other controls may expose you to . 11. If the product does not operate normally by the manufacturer. 22. Wall or Ceiling Mounting This product should be moved with a three-wire grounding-type plug, a plug having a third (grounding) pin. Attachments Do not use...

XVZ9000U Operation Manual
Page 5
...temperature continues to rise, the lamp will flash, and after the lamp has been used for details. 2 1 Using the Terminal Cover • When ceiling-mounting the projector, attach the terminal cover (supplied) to hide the connecting cables. • Use the terminal cover to changes in the lower-left corner of the... clips. 2 Attach the terminal cover by aligning with the tab on after a 90-second coolingoff period the power will shut off and the projector will flash in the lower-left corner of the picture to advise you to setup problems or a dirty air filter, "TEMP." Lamp Monitor ...
...temperature continues to rise, the lamp will flash, and after the lamp has been used for details. 2 1 Using the Terminal Cover • When ceiling-mounting the projector, attach the terminal cover (supplied) to hide the connecting cables. • Use the terminal cover to changes in the lower-left corner of the... clips. 2 Attach the terminal cover by aligning with the tab on after a 90-second coolingoff period the power will shut off and the projector will flash in the lower-left corner of the picture to advise you to setup problems or a dirty air filter, "TEMP." Lamp Monitor ...
XVZ9000U Operation Manual
Page 8
... Feet 18 Using the Lens Shift 18 Keystone Correction 19 Adjusting the Projection Distance 20 Image Projection 22 Rear Projection 22 Projection Using a Mirror 22 Ceiling-mount Projection 22 Menu Bars 27 Adjusting the Picture 29 Adjusting the Computer Images (RGB menu only 32 Reducing Image Noise (VIDEO menu only 36 Turning... Maintenance 46 Confirming the Lamp Usage Time 46 Replacing the Lamp 47 Cleaning the Air Filters 49 Using the Kensington Lock 49 Troubleshooting 50 For SHARP Assistance (U.S.A.
... Feet 18 Using the Lens Shift 18 Keystone Correction 19 Adjusting the Projection Distance 20 Image Projection 22 Rear Projection 22 Projection Using a Mirror 22 Ceiling-mount Projection 22 Menu Bars 27 Adjusting the Picture 29 Adjusting the Computer Images (RGB menu only 32 Reducing Image Noise (VIDEO menu only 36 Turning... Maintenance 46 Confirming the Lamp Usage Time 46 Replacing the Lamp 47 Cleaning the Air Filters 49 Using the Kensington Lock 49 Troubleshooting 50 For SHARP Assistance (U.S.A.

XVZ9000U Operation Manual
Page 21
... (White portion) = Standard (0) point Lower lens shift position (Desktop setup) Upper and Lower Lens Shift Position (Ceiling Mount) When the projector is produced with the projector positioned perpendicular to the screen with a lens shift function that lets you adjust the projection height. • Adjust it... Setup & Connections Adjusting the Projection Distance Upper and Lower Lens Shift Position • This projector is equipped with all feet flat and level. Tilting or angling the projector will reduce the effectiveness of the screen as the base line, and exchange the lower and...
... (White portion) = Standard (0) point Lower lens shift position (Desktop setup) Upper and Lower Lens Shift Position (Ceiling Mount) When the projector is produced with the projector positioned perpendicular to the screen with a lens shift function that lets you adjust the projection height. • Adjust it... Setup & Connections Adjusting the Projection Distance Upper and Lower Lens Shift Position • This projector is equipped with all feet flat and level. Tilting or angling the projector will reduce the effectiveness of the screen as the base line, and exchange the lower and...

XVZ9000U Operation Manual
Page 22
... the appropriate projection mode. (See page 43 for normal rear projection, you use the optional Sharp ceiling-mount bracket for this installation. • Before mounting the projector, contact your nearest Authorized SharpVision Service Center or Dealer to obtain the recommended ceiling-mount bracket (commercially available). (AN-CM230 ceiling-mount bracket, AN-EP101A extension tube for AN-CM230.) • When the...
... the appropriate projection mode. (See page 43 for normal rear projection, you use the optional Sharp ceiling-mount bracket for this installation. • Before mounting the projector, contact your nearest Authorized SharpVision Service Center or Dealer to obtain the recommended ceiling-mount bracket (commercially available). (AN-CM230 ceiling-mount bracket, AN-EP101A extension tube for AN-CM230.) • When the...

XVZ9000U Operation Manual
Page 60
... 18 Air filters 49 Aspect ratio 23 Automatic power shutoff function 41 Auto sync adjustment 35 AUTO SYNC button 35 B Background 39 BACKLIGHT button 16 C Ceiling-mount 22 Ceiling+Rear 43 CINEMA ZOOM 23 Clock 32 CLR TEMP (Color Temperature) buttons 30 COMPONENT/RGB terminals 14 COMPUTER-RGB port 15 D Digital shift 40...
... 18 Air filters 49 Aspect ratio 23 Automatic power shutoff function 41 Auto sync adjustment 35 AUTO SYNC button 35 B Background 39 BACKLIGHT button 16 C Ceiling-mount 22 Ceiling+Rear 43 CINEMA ZOOM 23 Clock 32 CLR TEMP (Color Temperature) buttons 30 COMPONENT/RGB terminals 14 COMPUTER-RGB port 15 D Digital shift 40...

XV-Z9000U Operation Manual
Page 3
...technician to perform safety checks to overturn. 10. If the product exhibits a distinct change in proper operating condition. 21. For your Projector, please be placed in a built-in damage and will often require extensive work by the operating instructions, as this...POTENTIAL ELECTRICAL SHOCK OR FIRE HAZARD. for cleaning. 6. Refer all servicing to rain or water. If you are provided for service. 19. Wall or Ceiling Mounting This product should never be retained for its installation, use . 1. In order not to operate from overheating. Use only with a cart, stand, ...
...technician to perform safety checks to overturn. 10. If the product exhibits a distinct change in proper operating condition. 21. For your Projector, please be placed in a built-in damage and will often require extensive work by the operating instructions, as this...POTENTIAL ELECTRICAL SHOCK OR FIRE HAZARD. for cleaning. 6. Refer all servicing to rain or water. If you are provided for service. 19. Wall or Ceiling Mounting This product should never be retained for its installation, use . 1. In order not to operate from overheating. Use only with a cart, stand, ...

XV-Z9000U Operation Manual
Page 5
... the terminal cover using the two attached clips. 2 Attach the terminal cover by aligning with the tab on the projector. 1 2 PUSH 1 E-5 See page 47 for details. 2 1 Using the Terminal Cover • When ceiling-mounting the projector, attach the terminal cover (supplied) to hide the connecting cables. • Use the terminal cover to setup problems...
... the terminal cover using the two attached clips. 2 Attach the terminal cover by aligning with the tab on the projector. 1 2 PUSH 1 E-5 See page 47 for details. 2 1 Using the Terminal Cover • When ceiling-mounting the projector, attach the terminal cover (supplied) to hide the connecting cables. • Use the terminal cover to setup problems...

XV-Z9000U Operation Manual
Page 8
... Lens Shift 18 Keystone Correction 19 Adjusting the Projection Distance 20 Image Projection 22 Rear Projection 22 Projection Using a Mirror 22 Ceiling-mount Projection 22 Menu Bars 27 Adjusting the Picture 29 Adjusting the Computer Images (RGB menu only 32 Reducing Image Noise (VIDEO ...Confirming the Lamp Usage Time 46 Replacing the Lamp 47 Cleaning the Air Filters 49 Using the Kensington Lock 49 Troubleshooting 50 For SHARP Assistance (U.S.A. only) ..... 50 Appendix Operation Buttons Using the Operation Buttons 23 Selecting the Input Signal Source 23 Adjusting the Picture...
... Lens Shift 18 Keystone Correction 19 Adjusting the Projection Distance 20 Image Projection 22 Rear Projection 22 Projection Using a Mirror 22 Ceiling-mount Projection 22 Menu Bars 27 Adjusting the Picture 29 Adjusting the Computer Images (RGB menu only 32 Reducing Image Noise (VIDEO ...Confirming the Lamp Usage Time 46 Replacing the Lamp 47 Cleaning the Air Filters 49 Using the Kensington Lock 49 Troubleshooting 50 For SHARP Assistance (U.S.A. only) ..... 50 Appendix Operation Buttons Using the Operation Buttons 23 Selecting the Input Signal Source 23 Adjusting the Picture...

XV-Z9000U Operation Manual
Page 21
...of screen (White portion) = Standard (0) point Lower lens shift position (Desktop setup) Upper and Lower Lens Shift Position (Ceiling Mount) When the projector is produced with the projector positioned perpendicular to the screen with a lens shift function that lets you adjust the projection height. • Adjust it to...8226; Optimal image quality is in the inverted position, use the upper edge of the lens shift function. Tilting or angling the projector will reduce the effectiveness of the screen as the base line, and exchange the lower and upper lens shift values. Setup & Connections...
...of screen (White portion) = Standard (0) point Lower lens shift position (Desktop setup) Upper and Lower Lens Shift Position (Ceiling Mount) When the projector is produced with the projector positioned perpendicular to the screen with a lens shift function that lets you adjust the projection height. • Adjust it to...8226; Optimal image quality is in the inverted position, use the upper edge of the lens shift function. Tilting or angling the projector will reduce the effectiveness of the screen as the base line, and exchange the lower and upper lens shift values. Setup & Connections...
XV-Z9000U Operation Manual
Page 22
... the screen with all feet flat and leveled. Ceiling-mount Projection • It is recommended that you use the optional Sharp ceiling-mount bracket for this installation. • Before mounting the projector, contact your nearest Authorized SharpVision Service Center or Dealer to obtain the recommended ceiling-mount bracket (commercially available). (AN-CM230 ceiling-mount bracket, AN-EP101A extension tube for AN-CM230...
... the screen with all feet flat and leveled. Ceiling-mount Projection • It is recommended that you use the optional Sharp ceiling-mount bracket for this installation. • Before mounting the projector, contact your nearest Authorized SharpVision Service Center or Dealer to obtain the recommended ceiling-mount bracket (commercially available). (AN-CM230 ceiling-mount bracket, AN-EP101A extension tube for AN-CM230...

XV-Z9000U Operation Manual
Page 60
... 18 Air filters 49 Aspect ratio 23 Automatic power shutoff function 41 Auto sync adjustment 35 AUTO SYNC button 35 B Background 39 BACKLIGHT button 16 C Ceiling-mount 22 Ceiling+Rear 43 CINEMA ZOOM 23 Clock 32 CLR TEMP (Color Temperature) buttons 30 COMPONENT/RGB terminals 14 COMPUTER-RGB port 15 D Digital shift 40...
... 18 Air filters 49 Aspect ratio 23 Automatic power shutoff function 41 Auto sync adjustment 35 AUTO SYNC button 35 B Background 39 BACKLIGHT button 16 C Ceiling-mount 22 Ceiling+Rear 43 CINEMA ZOOM 23 Clock 32 CLR TEMP (Color Temperature) buttons 30 COMPONENT/RGB terminals 14 COMPUTER-RGB port 15 D Digital shift 40...


