
XV-Z3000 Operation Manual
Page 2
... the carton thoroughly against the list of fire or electric shock, do not stare directly into the beam of light. Model No.: XV-Z3000U Serial No.: WARNING: High brightness light source. CAUTION: TO REDUCE THE RISK OF ELECTRIC SHOCK, DO NOT REMOVE COVER. CAUTION... magnitude to constitute a risk or electric shock to operate this operation manual carefully. WARNING: FCC Regulations state that may be of projector. The exclamation point within the product's enclosure that any unauthorized changes or modifications to this equipment not expressly approved by the manufacturer ...
... the carton thoroughly against the list of fire or electric shock, do not stare directly into the beam of light. Model No.: XV-Z3000U Serial No.: WARNING: High brightness light source. CAUTION: TO REDUCE THE RISK OF ELECTRIC SHOCK, DO NOT REMOVE COVER. CAUTION... magnitude to constitute a risk or electric shock to operate this operation manual carefully. WARNING: FCC Regulations state that may be of projector. The exclamation point within the product's enclosure that any unauthorized changes or modifications to this equipment not expressly approved by the manufacturer ...

XV-Z3000 Operation Manual
Page 3
This equipment generates, uses, and can be regulated due to environmental considerations. U.S.A. ONLY Declaration of conformity SHARP PROJECTOR, MODEL XV-Z3000U This device complies with the operation manual, may not cause harmful interference, and (2) this device must conform to. Operation is ... the STANDBY button on page 54. Caution Concerning Lamp Replacement See "Replacing the Lamp" on the remote control. This SHARP projector uses a DMD panel. This will not occur in a particular installation. Ensure the cooling fan has stopped before disconnecting the power cord. ...
This equipment generates, uses, and can be regulated due to environmental considerations. U.S.A. ONLY Declaration of conformity SHARP PROJECTOR, MODEL XV-Z3000U This device complies with the operation manual, may not cause harmful interference, and (2) this device must conform to. Operation is ... the STANDBY button on page 54. Caution Concerning Lamp Replacement See "Replacing the Lamp" on the remote control. This SHARP projector uses a DMD panel. This will not occur in a particular installation. Ensure the cooling fan has stopped before disconnecting the power cord. ...
XV-Z3000 Operation Manual
Page 4
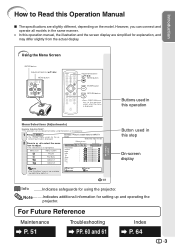
...Indicates safeguards for explanation, and may differ slightly from the actual display. However, you can also be performed by using the projector. Menu icon Menu screen Picture Fine Sync Options1 Options2 Example: "Picture" screen menu for INPUT 1 mode Selected input mode Menu... icons Picture Picture Mode Contrast Bright Color Tint Sharp Red Blue INPUT 1 Standard 0 0 0 0 0 0 0 Note • The "Fine Sync" menu is not available for the selected input mode ...
...Indicates safeguards for explanation, and may differ slightly from the actual display. However, you can also be performed by using the projector. Menu icon Menu screen Picture Fine Sync Options1 Options2 Example: "Picture" screen menu for INPUT 1 mode Selected input mode Menu... icons Picture Picture Mode Contrast Bright Color Tint Sharp Red Blue INPUT 1 Standard 0 0 0 0 0 0 0 Note • The "Fine Sync" menu is not available for the selected input mode ...
XV-Z3000 Operation Manual
Page 5
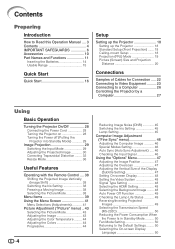
...10 Part Names and Functions 11 Inserting the Batteries 14 Usable Range 15 Quick Start Quick Start 16 Setup Setting up the Projector 18 Setting up the Projector 18 Standard Setup (Front Projection) ....... 18 Ceiling-mount Setup 18 Projection (PRJ) Mode 19 Picture (Screen) Size ...Equipment ......... 23 Connecting to a Computer 26 Controlling the Projector by a Computer 27 Using Basic Operation Turning the Projector On/Off 28 Connecting the Power Cord 28 Turning the Projector on 28 Turning the Power off (Putting the Projector into Standby Mode 29 Image Projection 29 Switching the ...
...10 Part Names and Functions 11 Inserting the Batteries 14 Usable Range 15 Quick Start Quick Start 16 Setup Setting up the Projector 18 Setting up the Projector 18 Standard Setup (Front Projection) ....... 18 Ceiling-mount Setup 18 Projection (PRJ) Mode 19 Picture (Screen) Size ...Equipment ......... 23 Connecting to a Computer 26 Controlling the Projector by a Computer 27 Using Basic Operation Turning the Projector On/Off 28 Connecting the Power Cord 28 Turning the Projector on 28 Turning the Power off (Putting the Projector into Standby Mode 29 Image Projection 29 Switching the ...

XV-Z3000 Operation Manual
Page 9
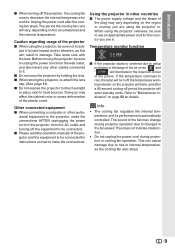
... to occasionally rest your nearest Authorized SharpVision Service Center or Dealer for a while. 8 Avoid locations with thin air, set up the projector in an area free from -4°F to 140°F (-20°C to maintain high image quality, SHARP recommends that the intake vent and ...avoid personal injury caused by an Authorized SharpVision Service Center or Dealer. I For minimal servicing and to +60°C). Caution concerning the setup of the projector I Allow at least 11 13/16 inches (30 cm) of the projector I When placing the projector in direct sunlight or room light....
... to occasionally rest your nearest Authorized SharpVision Service Center or Dealer for a while. 8 Avoid locations with thin air, set up the projector in an area free from -4°F to 140°F (-20°C to maintain high image quality, SHARP recommends that the intake vent and ...avoid personal injury caused by an Authorized SharpVision Service Center or Dealer. I For minimal servicing and to +60°C). Caution concerning the setup of the projector I Allow at least 11 13/16 inches (30 cm) of the projector I When placing the projector in direct sunlight or room light....
XV-Z3000 Operation Manual
Page 10
...from the AC outlet and turning off the equipment to be connected. visual equipment to the projector, make the connections. Info • The cooling fan regulates the internal temperature, and its...the temperature warn- This does not indicate malfunction. • Do not unplug the power cord during projector operation due to changes in damage. This can result in the fan speed. dicators" on the region or... fan also stops. 9 ject it . Take extra care with the lens. I When storing the projector, re-attach the lens cap. (See page 11). Doing so may vary depending on page 52 for...
...from the AC outlet and turning off the equipment to be connected. visual equipment to the projector, make the connections. Info • The cooling fan regulates the internal temperature, and its...the temperature warn- This does not indicate malfunction. • Do not unplug the power cord during projector operation due to changes in damage. This can result in the fan speed. dicators" on the region or... fan also stops. 9 ject it . Take extra care with the lens. I When storing the projector, re-attach the lens cap. (See page 11). Doing so may vary depending on page 52 for...
XV-Z3000 Operation Manual
Page 12
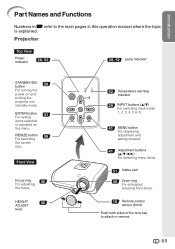
... indicator STANDBY/ON button 28 For turning the power on the menu. ENTER button 41 For setting items selected or adjusted on and putting the projector into standby mode. RESIZE button 36 For switching the screen size. HEIGHT 30 ADJUST lever 52 Temperature warning indicator 29 INPUT buttons (P/R) For switching input...
... indicator STANDBY/ON button 28 For turning the power on the menu. ENTER button 41 For setting items selected or adjusted on and putting the projector into standby mode. RESIZE button 36 For switching the screen size. HEIGHT 30 ADJUST lever 52 Temperature warning indicator 29 INPUT buttons (P/R) For switching input...
XV-Z3000 Operation Manual
Page 13
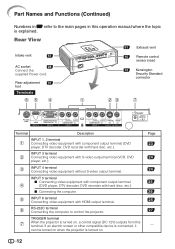
...decoder, DVD recorder with hard disc, etc.). If an electric screen or other compatible device is connected, it can be turned on when the projector is turned on , a control signal (DC 12V) outputs from this operation manual where the topic is turned on . TRIGGER terminal 7 When the... projector is explained. Page 23 24 24 25 26 25 27 - 12 INPUT 5 terminal I Connecting the computer. 5 INPUT 6 terminal Connecting video equipment with S-video ...
...decoder, DVD recorder with hard disc, etc.). If an electric screen or other compatible device is connected, it can be turned on when the projector is turned on , a control signal (DC 12V) outputs from this operation manual where the topic is turned on . TRIGGER terminal 7 When the... projector is explained. Page 23 24 24 25 26 25 27 - 12 INPUT 5 terminal I Connecting the computer. 5 INPUT 6 terminal Connecting video equipment with S-video ...

XV-Z3000 Operation Manual
Page 14
... a Kensington MicroSaver Security System. Using the Kensington Lock on how to use with the system for instructions on the projector • This projector has a Kensington Security Standard connector for use it to secure the projector. 13 Introduction Numbers in Z refer to the main pages in the Keystone Correction mode. 41 ENTER button For... returning to the respective input signal type. AUTO SYNC button 46 For automatically adjusting images when connected to a computer. STANDBY button 29 For putting the projector into the standby mode.
... a Kensington MicroSaver Security System. Using the Kensington Lock on how to use with the system for instructions on the projector • This projector has a Kensington Security Standard connector for use it to secure the projector. 13 Introduction Numbers in Z refer to the main pages in the Keystone Correction mode. 41 ENTER button For... returning to the respective input signal type. AUTO SYNC button 46 For automatically adjusting images when connected to a computer. STANDBY button 29 For putting the projector into the standby mode.

XV-Z3000 Operation Manual
Page 15
Incorrect use of the batteries may cause them to skin, therefore ensure that you will not be using a cloth. • The batteries included with this projector may run out, as possible with new batteries. • Remove the batteries from the remote control if you first wipe them and then remove them ...
Incorrect use of the batteries may cause them to skin, therefore ensure that you will not be using a cloth. • The batteries included with this projector may run out, as possible with new batteries. • Remove the batteries from the remote control if you first wipe them and then remove them ...

XV-Z3000 Operation Manual
Page 16
... the ranges shown in the illustration. However, the effective distance of the signal may malfunction under a fluorescent lamp. In this case, move the projector away from the remote control can be reflected off a screen for easy operation. Introduction Usable Range The remote control can be used to moisture or ...
... the ranges shown in the illustration. However, the effective distance of the signal may malfunction under a fluorescent lamp. In this case, move the projector away from the remote control can be reflected off a screen for easy operation. Introduction Usable Range The remote control can be used to moisture or ...

XV-Z3000 Operation Manual
Page 17
... the video equipment). For details, see the page described below for each step. Connect the projector to an appropriate audio device. 3. Remove the lens cap and turn the projector on _P. 28 On the On the remote projector control 16 ample. 3 STANDBY/ON 8 button 8 STANDBY button 5 INPUT buttons 3 ON button 5 INPUT 4 button 7 KEYSTONE... and Projection In this section, connection of any video devices to the video equipment and plug the power cord into the AC socket of the projector _PP. 22-28 To INPUT 4 terminal AC socket Connect the audio output of the...
... the video equipment). For details, see the page described below for each step. Connect the projector to an appropriate audio device. 3. Remove the lens cap and turn the projector on _P. 28 On the On the remote projector control 16 ample. 3 STANDBY/ON 8 button 8 STANDBY button 5 INPUT buttons 3 ON button 5 INPUT 4 button 7 KEYSTONE... and Projection In this section, connection of any video devices to the video equipment and plug the power cord into the AC socket of the projector _PP. 22-28 To INPUT 4 terminal AC socket Connect the audio output of the...

XV-Z3000 Operation Manual
Page 18
... Zoom ring 3. Press i ENTER on the remote control also allows you confirm the lower left positions of the projected image. 3. On the On the remote projector control On-screen Display • Unplug the power cord from the AC outlet after the cooling fan stops. 17 Adjust the focus, image size, and... projector angle _PP. 30, 31 1. Follow steps 2 and 3 to also set the upper-right, lower-right, and lower-left position, the screen adjustments will be...
... Zoom ring 3. Press i ENTER on the remote control also allows you confirm the lower left positions of the projected image. 3. On the On the remote projector control On-screen Display • Unplug the power cord from the AC outlet after the cooling fan stops. 17 Adjust the focus, image size, and... projector angle _PP. 30, 31 1. Follow steps 2 and 3 to also set the upper-right, lower-right, and lower-left position, the screen adjustments will be...
XV-Z3000 Operation Manual
Page 19
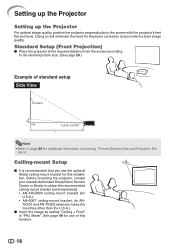
... for additional information concerning "Picture (Screen) Size and Projection Dis- Doing so will eliminate the need for use the optional Sharp ceiling-mount bracket for countries other than the U.S.A.). Ceiling-mount Setup I It is recommended that you use of standard setup...Refer to the desired picture size. (See page 20.) Example of this installation. Before mounting the projector, contact your nearest Authorized SharpVision Service Center or Dealer to the screen with the projector's feet flat and level. Standard Setup (Front Projection) I Invert the image by setting "Ceiling +...
... for additional information concerning "Picture (Screen) Size and Projection Dis- Doing so will eliminate the need for use the optional Sharp ceiling-mount bracket for countries other than the U.S.A.). Ceiling-mount Setup I It is recommended that you use of standard setup...Refer to the desired picture size. (See page 20.) Example of this installation. Before mounting the projector, contact your nearest Authorized SharpVision Service Center or Dealer to the screen with the projector's feet flat and level. Standard Setup (Front Projection) I Invert the image by setting "Ceiling +...

XV-Z3000 Operation Manual
Page 20
... a translucent screen) Menu item © "Rear" Menu item © "Ceiling + Rear" Indication of the 4 projection modes, shown in the diagram below. Projection (PRJ) Mode The projector can set the PRJ Mode in "Options2" menu.
... a translucent screen) Menu item © "Rear" Menu item © "Ceiling + Rear" Indication of the 4 projection modes, shown in the diagram below. Projection (PRJ) Mode The projector can set the PRJ Mode in "Options2" menu.

XV-Z3000 Operation Manual
Page 21
Install the projector so that projected images are projected onto the screen at the optimum size by referring to the bottom of the.../64Љ (ע2.0 cm) χ: Picture (Screen) size (diag.) (in the table as a reference when installing the projector. Setting up the Projector (Continued) Picture (Screen) Size and Projection Distance The projection screen size varies according to the distance from the lens of image position (in... distance (ft/m) H: Distance from the lens center to the bottom of the image (in/cm) S: Adjustable range of the projector to the screen.
Install the projector so that projected images are projected onto the screen at the optimum size by referring to the bottom of the.../64Љ (ע2.0 cm) χ: Picture (Screen) size (diag.) (in the table as a reference when installing the projector. Setting up the Projector (Continued) Picture (Screen) Size and Projection Distance The projection screen size varies according to the distance from the lens of image position (in... distance (ft/m) H: Distance from the lens center to the bottom of the image (in/cm) S: Adjustable range of the projector to the screen.

XV-Z3000 Operation Manual
Page 23
Equipment Input Signal Cable Terminal on the projector Audio-visual equipment HDMI video HDMI cable (commercially available) INPUT6 Component video Component cable (commercially available) Component video 3 RCA to 15-pin D-sub INPUT5 Cables ...
Equipment Input Signal Cable Terminal on the projector Audio-visual equipment HDMI video HDMI cable (commercially available) INPUT6 Component video Component cable (commercially available) Component video 3 RCA to 15-pin D-sub INPUT5 Cables ...

XV-Z3000 Operation Manual
Page 24
After making all connections, turn off the devices to the component input terminal on the projector first and then the other devices. Connecting to Video Equipment Before connecting, ensure that the power cord of the projector is unplugged from the AC outlet and turn on the projector (INPUT1 or INPUT2) To component output (Y, CB/PB, CR/PR) terminal DVD, etc. To INPUT1 terminal Component cable (commercially available) Connections 23 When connecting the component video equipment to be connected.
After making all connections, turn off the devices to the component input terminal on the projector first and then the other devices. Connecting to Video Equipment Before connecting, ensure that the power cord of the projector is unplugged from the AC outlet and turn on the projector (INPUT1 or INPUT2) To component output (Y, CB/PB, CR/PR) terminal DVD, etc. To INPUT1 terminal Component cable (commercially available) Connections 23 When connecting the component video equipment to be connected.

XV-Z3000 Operation Manual
Page 26
... enjoyed. • When a DVI to HDMI conversion cable is a digital AV interface that conforms to the computer-RGB/ component input terminal on the projector (INPUT5) To component output (Y, CB/PB, CR/PR) terminal DVD, etc. Using cables that do not conform to the terminal using just one... the digital video signal does not degrade when transmitted, and a high-quality image with a simple connection can deliver a high-defini- Since this projector does not support an audio signal by itself, use a cable that can be displayable. 25 tion video signal, multi-channel audio signal, and bi...
... enjoyed. • When a DVI to HDMI conversion cable is a digital AV interface that conforms to the computer-RGB/ component input terminal on the projector (INPUT5) To component output (Y, CB/PB, CR/PR) terminal DVD, etc. Using cables that do not conform to the terminal using just one... the digital video signal does not degrade when transmitted, and a high-quality image with a simple connection can deliver a high-defini- Since this projector does not support an audio signal by itself, use a cable that can be displayable. 25 tion video signal, multi-channel audio signal, and bi...
XV-Z3000 Operation Manual
Page 28
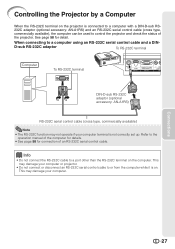
... not connect or disconnect an RS-232C serial control cable to or from the computer while it is on. Controlling the Projector by a Computer When the RS-232C terminal on the projector is not correctly set up. When connecting to a port other than the RS-232C terminal on the computer. This may...) RS-232C serial control cable (cross type, commercially available) Note • The RS-232C function may not operate if your computer. Refer to control the projector and check the status of an RS-232C serial control cable. Connections 27 See page 58 for connection of the...
... not connect or disconnect an RS-232C serial control cable to or from the computer while it is on. Controlling the Projector by a Computer When the RS-232C terminal on the projector is not correctly set up. When connecting to a port other than the RS-232C terminal on the computer. This may...) RS-232C serial control cable (cross type, commercially available) Note • The RS-232C function may not operate if your computer. Refer to control the projector and check the status of an RS-232C serial control cable. Connections 27 See page 58 for connection of the...


