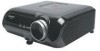

XV-Z3000 Operation Manual
Page 3
... of conformity SHARP PROJECTOR, MODEL XV-Z3000U This device complies with the limits for a Class B digital device, pursuant to Part 15 of mercury. Disposal of the FCC rules. During normal operation, when putting the projector into an outlet on the picture screen. This equipment generates, uses, and can be regulated due to environmental considerations. Caution Concerning Lamp Replacement See "Replacing the Lamp" on the remote control. This...
... of conformity SHARP PROJECTOR, MODEL XV-Z3000U This device complies with the limits for a Class B digital device, pursuant to Part 15 of mercury. Disposal of the FCC rules. During normal operation, when putting the projector into an outlet on the picture screen. This equipment generates, uses, and can be regulated due to environmental considerations. Caution Concerning Lamp Replacement See "Replacing the Lamp" on the remote control. This...
XV-Z3000 Operation Manual
Page 4
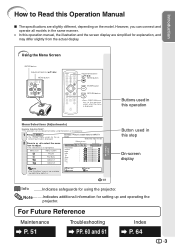
... button Adjustment buttons (P/R/O/Q) MENU button ENTER button RETURN button • Press eRETURN to return to adjust. • The selected icon is displayed. Menu icon Menu screen Picture Fine Sync Options1 Options2 Example: "Picture" screen menu for INPUT 1 mode Selected input mode Menu icons Picture Picture Mode Contrast Bright Color Tint Sharp Red Blue INPUT 1 Standard 0 0 0 0 0 0 0 Note • The "Fine Sync" menu is not available for setting up and operating the projector. However, you can connect and operate all models in this Operation Manual I The specifications...
... button Adjustment buttons (P/R/O/Q) MENU button ENTER button RETURN button • Press eRETURN to return to adjust. • The selected icon is displayed. Menu icon Menu screen Picture Fine Sync Options1 Options2 Example: "Picture" screen menu for INPUT 1 mode Selected input mode Menu icons Picture Picture Mode Contrast Bright Color Tint Sharp Red Blue INPUT 1 Standard 0 0 0 0 0 0 0 Note • The "Fine Sync" menu is not available for setting up and operating the projector. However, you can connect and operate all models in this Operation Manual I The specifications...
XV-Z3000 Operation Manual
Page 5
... the Projector 18 Standard Setup (Front Projection) ....... 18 Ceiling-mount Setup 18 Projection (PRJ) Mode 19 Picture (Screen) Size and Projection Distance 20 Connections Samples of Cables for Connection ..... 22 Connecting to Video Equipment ......... 23 Connecting to a Computer 26 Controlling the Projector by a Computer 27 Using Basic Operation Turning the Projector On/Off 28 Connecting the Power Cord 28 Turning the Projector on 28 Turning the Power off (Putting the Projector into Standby Mode 29 Image Projection 29 Switching the Input Mode 29 Adjusting the Projected Image 30...
... the Projector 18 Standard Setup (Front Projection) ....... 18 Ceiling-mount Setup 18 Projection (PRJ) Mode 19 Picture (Screen) Size and Projection Distance 20 Connections Samples of Cables for Connection ..... 22 Connecting to Video Equipment ......... 23 Connecting to a Computer 26 Controlling the Projector by a Computer 27 Using Basic Operation Turning the Projector On/Off 28 Connecting the Power Cord 28 Turning the Projector on 28 Turning the Power off (Putting the Projector into Standby Mode 29 Image Projection 29 Switching the Input Mode 29 Adjusting the Projected Image 30...

XV-Z3000 Operation Manual
Page 8
...; HDMI, the HDMI logo and High-Definition Multimedia Interface are covered by the operating instructions, as recommended by a qualified technician to restore the product to this can result in damage and will often require extensive work by the manufacturer. 22. Therefore you to Texas Instruments. Refer all servicing to rain or water. b. Adjust only those controls that produce heat. • DLP\ (Digital Light Processing), DMD\ (Digital...
...; HDMI, the HDMI logo and High-Definition Multimedia Interface are covered by the operating instructions, as recommended by a qualified technician to restore the product to this can result in damage and will often require extensive work by the manufacturer. 22. Therefore you to Texas Instruments. Refer all servicing to rain or water. b. Adjust only those controls that produce heat. • DLP\ (Digital Light Processing), DMD\ (Digital...

XV-Z3000 Operation Manual
Page 9
... "Replacing the Lamp" on the screen washes out the colors, making viewing difficult. Internal cleaning should only be installed in places exposed to +35°C). Do not set "Fan Mode" to the normal operating condition. It will cause eye strain. I Protect the lens so as not to occasionally rest your nearest Authorized SharpVision Service Center or Dealer for replacement. I Potential hazard of the lens. I For minimal servicing...
... "Replacing the Lamp" on the screen washes out the colors, making viewing difficult. Internal cleaning should only be installed in places exposed to +35°C). Do not set "Fan Mode" to the normal operating condition. It will cause eye strain. I Protect the lens so as not to occasionally rest your nearest Authorized SharpVision Service Center or Dealer for replacement. I Potential hazard of the lens. I For minimal servicing...
XV-Z3000 Operation Manual
Page 10
... the lens. The sound of the plug may change during projection or cooling fan operation. I If the projector starts to overheat due to changes in the lower left corner of the air vents, " " and " " will blink, and after the cooling fan stops. This does not indicate malfunction. • Do not unplug the power cord during projector operation due to setup problems or blockage of the picture. Refer to heat sources. I When turning...
... the lens. The sound of the plug may change during projection or cooling fan operation. I If the projector starts to overheat due to changes in the lower left corner of the air vents, " " and " " will blink, and after the cooling fan stops. This does not indicate malfunction. • Do not unplug the power cord during projector operation due to setup problems or blockage of the picture. Refer to heat sources. I When turning...

XV-Z3000 Operation Manual
Page 14
... button For turning the power on the projector • This projector has a Kensington Security Standard connector for instructions on how to the respective input modes. 41 MENU button For displaying adjustment and setting screens. 41 Adjustment buttons (P/R/O/Q) • For selecting menu items. • For adjusting the Keystone Correction when in the Keystone Correction mode. 41 ENTER button For setting items selected or adjusted on the remote control. 38 IRIS button For switching "HIGH BRIGHTNESS MODE", "MEDIUM MODE" and "HIGH CONTRAST MODE". 38 IMAGE SHIFT buttons...
... button For turning the power on the projector • This projector has a Kensington Security Standard connector for instructions on how to the respective input modes. 41 MENU button For displaying adjustment and setting screens. 41 Adjustment buttons (P/R/O/Q) • For selecting menu items. • For adjusting the Keystone Correction when in the Keystone Correction mode. 41 ENTER button For setting items selected or adjusted on the remote control. 38 IRIS button For switching "HIGH BRIGHTNESS MODE", "MEDIUM MODE" and "HIGH CONTRAST MODE". 38 IMAGE SHIFT buttons...

XV-Z3000 Operation Manual
Page 18
... STANDBY button on the remote control to switch the input mode. 6. Adjust the focus by turning the zoom ring. Adjust the projector angle using the INPUT buttons on the projector or the INPUT 4 button on the remote control. Follow steps 2 and 3 to also set the position. 4. Adjust the focus, image size, and projector angle _PP. 30, 31 1. Correct trapezoidal distortion (GEOMETRIC ADJUSTMENT) _PP. 32-35 1. Quick Start 4. Press c KEYSTONE on and start playback 5. On the On the remote projector control On-screen Display • Unplug the power cord...
... STANDBY button on the remote control to switch the input mode. 6. Adjust the focus by turning the zoom ring. Adjust the projector angle using the INPUT buttons on the projector or the INPUT 4 button on the remote control. Follow steps 2 and 3 to also set the position. 4. Adjust the focus, image size, and projector angle _PP. 30, 31 1. Correct trapezoidal distortion (GEOMETRIC ADJUSTMENT) _PP. 32-35 1. Quick Start 4. Press c KEYSTONE on and start playback 5. On the On the remote projector control On-screen Display • Unplug the power cord...
XV-Z3000 Operation Manual
Page 29
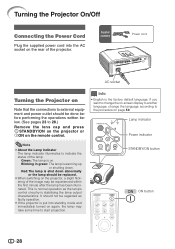
... remote control. Turning the Projector On/Off Connecting the Power Cord Plug the supplied power cord into standby mode and immediately turned on again, the lamp may be done before performing the operations written below. (See pages 23 to the procedure on page 50. If you want to change the on-screen display to another language, change the language according to 28.) Remove the lens cap and press S STANDBY/ON on the projector...
... remote control. Turning the Projector On/Off Connecting the Power Cord Plug the supplied power cord into standby mode and immediately turned on again, the lamp may be done before performing the operations written below. (See pages 23 to the procedure on page 50. If you want to change the on-screen display to another language, change the language according to 28.) Remove the lens cap and press S STANDBY/ON on the projector...

XV-Z3000 Operation Manual
Page 41
"Options1" menu Options 1 Image Shift Overscan H Overscan V Subtitle OSD Display Video System Signal Type HDMI Setting Background Auto Power Off Lamp Timer(Life) SEL./ADJ. RETURN INPUT 1 0 0 0 0 On Auto Auto Standard Blue On 0h 100% ENTER END *1 Item that can be set when using INPUT 3 or INPUT 4. *2 Item that can be set when using IINPUT 5 or INPUT 6. Menu Items (Continued) "Fine Sync" menu Fine Sync Clock Phase H-Pos V-Pos Reset Special Modes Auto Sync INPUT 5 0 0 0 0 1080I On Cur. Sub menu Image Shift -24 +24 Page...
"Options1" menu Options 1 Image Shift Overscan H Overscan V Subtitle OSD Display Video System Signal Type HDMI Setting Background Auto Power Off Lamp Timer(Life) SEL./ADJ. RETURN INPUT 1 0 0 0 0 On Auto Auto Standard Blue On 0h 100% ENTER END *1 Item that can be set when using INPUT 3 or INPUT 4. *2 Item that can be set when using IINPUT 5 or INPUT 6. Menu Items (Continued) "Fine Sync" menu Fine Sync Clock Phase H-Pos V-Pos Reset Special Modes Auto Sync INPUT 5 0 0 0 0 1080I On Cur. Sub menu Image Shift -24 +24 Page...

XV-Z3000 Operation Manual
Page 44
... the picture mode. (See page 38.) 2 Adjusting the Image Adjustment items O button Q button Contrast For less contrast. Picture Adjustment ("Picture" menu) Q PAGE 1 Picture Picture Mode Contrast Bright Color Tint Sharp Red Blue INPUT 1 Standard 0 0 0 0 0 0 0 Q PAGE 2 Picture Picture Mode CLR Temp BrilliantColor™ C. A vivid image is obtained. The settings stored effect each item in RGB mode. *2 BrilliantColor™ uses Texas Instruments' BrilliantColor™ technology. For more color intensity. Makes the black levels of the dark portions of the screen more...
... the picture mode. (See page 38.) 2 Adjusting the Image Adjustment items O button Q button Contrast For less contrast. Picture Adjustment ("Picture" menu) Q PAGE 1 Picture Picture Mode Contrast Bright Color Tint Sharp Red Blue INPUT 1 Standard 0 0 0 0 0 0 0 Q PAGE 2 Picture Picture Mode CLR Temp BrilliantColor™ C. A vivid image is obtained. The settings stored effect each item in RGB mode. *2 BrilliantColor™ uses Texas Instruments' BrilliantColor™ technology. For more color intensity. Makes the black levels of the dark portions of the screen more...

XV-Z3000 Operation Manual
Page 49
... on the remote control (INPUT 5 or INPUT 6). 7 Selecting the HDMI Setting SECAM NTSC4.43 NTSC3.58 When connected to SECAM video equipment. Using the "Options" Menu (Continued) Menu operation n Page 41 4 Setting On-screen Display 6 Signal Type Setting Selectable items On Off Description All On-screen Displays are not displayed. 5 Setting the Video System This function allows you to select the input signal type (RGB or Component) for INPUT 5 or INPUT 6. INPUT/FREEZE/AUTO SYNC/RESIZE/ PICTURE MODE/IRIS are displayed. Note...
... on the remote control (INPUT 5 or INPUT 6). 7 Selecting the HDMI Setting SECAM NTSC4.43 NTSC3.58 When connected to SECAM video equipment. Using the "Options" Menu (Continued) Menu operation n Page 41 4 Setting On-screen Display 6 Signal Type Setting Selectable items On Off Description All On-screen Displays are not displayed. 5 Setting the Video System This function allows you to select the input signal type (RGB or Component) for INPUT 5 or INPUT 6. INPUT/FREEZE/AUTO SYNC/RESIZE/ PICTURE MODE/IRIS are displayed. Note...

XV-Z3000 Operation Manual
Page 50
... 3 STANDBY Mode 4 Fan Mode 5 All Reset 6 Language Menu operation n Page 41 INPUT 1 Front 9600 bps Eco Normal English Settings on the Options 2 menu Note • When the Auto Power Off function is set to indicate the remaining minutes. 0 Checking the Lamp Life Status You can confirm the cumulative lamp usage time and the remaining lamp life (percentage). The Auto Power Off function will appear on the usage condition. will be changed when the remaining lamp life becomes...
... 3 STANDBY Mode 4 Fan Mode 5 All Reset 6 Language Menu operation n Page 41 INPUT 1 Front 9600 bps Eco Normal English Settings on the Options 2 menu Note • When the Auto Power Off function is set to indicate the remaining minutes. 0 Checking the Lamp Life Status You can confirm the cumulative lamp usage time and the remaining lamp life (percentage). The Auto Power Off function will appear on the usage condition. will be changed when the remaining lamp life becomes...
XV-Z3000 Operation Manual
Page 54
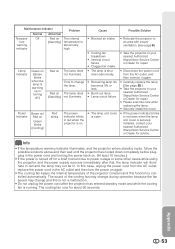
... temperature warning indicator illuminates, and the projector enters standby mode, follow the possible solutions above and then wait until the projector has cooled down abnormally. • Remaining lamp life becomes 5% or less. • Burnt-out lamp • Lamp circuit failure • The lamp unit cover is securely installed, contact your nearest Authorized SharpVision Service Center or Dealer for repair. • Disconnect the power cord from the AC outlet, replace the power cord in red...
... temperature warning indicator illuminates, and the projector enters standby mode, follow the possible solutions above and then wait until the projector has cooled down abnormally. • Remaining lamp life becomes 5% or less. • Burnt-out lamp • Lamp circuit failure • The lamp unit cover is securely installed, contact your nearest Authorized SharpVision Service Center or Dealer for repair. • Disconnect the power cord from the AC outlet, replace the power cord in red...

XV-Z3000 Operation Manual
Page 55
... numerous sources such as possible. For the name of purchase, nearest Authorized SharpVision Service Center or Dealer. I Carefully change the lamp by a 90-day parts and labor limited warranty. The lamp life (percentage) can be replaced when the remaining lamp life becomes 5% or less, or when you notice a significant deterioration in the picture and color quality. Lamp failure can be very hot and may indicate lamp failure. I Purchase a replacement lamp...
... numerous sources such as possible. For the name of purchase, nearest Authorized SharpVision Service Center or Dealer. I Carefully change the lamp by a 90-day parts and labor limited warranty. The lamp life (percentage) can be replaced when the remaining lamp life becomes 5% or less, or when you notice a significant deterioration in the picture and color quality. Lamp failure can be very hot and may indicate lamp failure. I Purchase a replacement lamp...

XV-Z3000 Operation Manual
Page 57
... the lamp unit and lamp unit cover are not correctly installed, the power will not turn on, even if the power cord is reset. 56 AC socket STANDBY/ON button ENTER button MENU button R button Then tighten the user service screw to the projector. Fasten the securing screws. 6 Replace the lamp unit cover. • Align the tab on the projector. • "LAMP 0000H" is displayed, indicating that the lamp timer is connected to secure the lamp unit cover. Hold the lamp unit by...
... the lamp unit and lamp unit cover are not correctly installed, the power will not turn on, even if the power cord is reset. 56 AC socket STANDBY/ON button ENTER button MENU button R button Then tighten the user service screw to the projector. Fasten the securing screws. 6 Replace the lamp unit cover. • Align the tab on the projector. • "LAMP 0000H" is displayed, indicating that the lamp timer is connected to secure the lamp unit cover. Hold the lamp unit by...

XV-Z3000 Operation Manual
Page 61
... sound is green on the computer you are incorrectly set up the projector at least one hour before it to the external output. Troubleshooting Problem Check Picure does not appear or projector does not start. noise appears. • There is set when connecting notebook computer. • The lamp unit cover is not installed correctly. • Cables incorrectly connected to be projected unless the signal output setting of the lens and the image...
... sound is green on the computer you are incorrectly set up the projector at least one hour before it to the external output. Troubleshooting Problem Check Picure does not appear or projector does not start. noise appears. • There is set when connecting notebook computer. • The lamp unit cover is not installed correctly. • Cables incorrectly connected to be projected unless the signal output setting of the lens and the image...
XV-Z3000 Operation Manual
Page 62
... temperature inside the projector increases, the cooling fan noisy. The remote control cannot be used. • Operate the remote control while pointing it will eventually need to be adversely affected by strong light. • The batteries may be depleted or inserted incorrectly. The lamp does not light • The lamp indicator is shining on . The image sometimes • Cables incorrectly connected to obtain product literature, accessories, supplies or...
... temperature inside the projector increases, the cooling fan noisy. The remote control cannot be used. • Operate the remote control while pointing it will eventually need to be adversely affected by strong light. • The batteries may be depleted or inserted incorrectly. The lamp does not light • The lamp indicator is shining on . The image sometimes • Cables incorrectly connected to obtain product literature, accessories, supplies or...
XV-Z3000 Operation Manual
Page 63
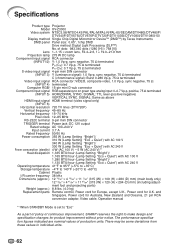
...; 294 (D) mm) (including adjustment foot and projecting parts) Weight (approx.) 8.8 lbs. (4.0 kg) Replacement parts Remote control, Power cord for Europe, except U.K., Power cord for product improvement without prior notice. of production units. The performance specification figures indicated are nominal values of dots: 983,040 dots (1280 [H] × 768 [V]) Lens 1-1.15 × zoom lens, F2.4-2.6, f = 19.0-21.9 mm Projection lamp 275 W DC lamp Component input signal RCA connector (INPUT1/2) Y: 1.0 Vp-p, sync negative, 75 Ω terminated...
...; 294 (D) mm) (including adjustment foot and projecting parts) Weight (approx.) 8.8 lbs. (4.0 kg) Replacement parts Remote control, Power cord for Europe, except U.K., Power cord for product improvement without prior notice. of production units. The performance specification figures indicated are nominal values of dots: 983,040 dots (1280 [H] × 768 [V]) Lens 1-1.15 × zoom lens, F2.4-2.6, f = 19.0-21.9 mm Projection lamp 275 W DC lamp Component input signal RCA connector (INPUT1/2) Y: 1.0 Vp-p, sync negative, 75 Ω terminated...

XV-Z3000 Operation Manual
Page 65
... 64 Lamp 10, 54 Lamp indicator 52 Lamp Setting 45 Lamp Timer (Life 49 Lamp unit 55 Language (on-screen display language) ...... 50 Lens cap 11 MENU button 41 ON button 28 Optional accessories 10 OSD Display 48 Overscan 47 Phase 46 Picture Adjustment 43 Picture Mode 38, 43 PICTURE MODE button 38 Picture (Screen) Size and Projection Distance ....... 20 Power cord 28 PRJ Mode 19, 49 Progressive 44 R-03 batteries 14 Rear adjustment foot 31 Red 43 Remote control 13 Remote control sensor 15 Replacing the lamp 54...
... 64 Lamp 10, 54 Lamp indicator 52 Lamp Setting 45 Lamp Timer (Life 49 Lamp unit 55 Language (on-screen display language) ...... 50 Lens cap 11 MENU button 41 ON button 28 Optional accessories 10 OSD Display 48 Overscan 47 Phase 46 Picture Adjustment 43 Picture Mode 38, 43 PICTURE MODE button 38 Picture (Screen) Size and Projection Distance ....... 20 Power cord 28 PRJ Mode 19, 49 Progressive 44 R-03 batteries 14 Rear adjustment foot 31 Red 43 Remote control 13 Remote control sensor 15 Replacing the lamp 54...


