PG-MB56X , PG-MB66X Operation Manual
Page 3
... NOT REMOVE SCREWS EXCEPT SPECIFIED USER SERVICE SCREW. The lightning flash with the projector. 1. U.S.A. Introduction ENGLISH There are two important reasons for about 90 seconds after the projector enters standby mode. CONSUMER PRODUCT SAFETY ACT To ensure that SHARP may be required to rain or moisture. ONLY WARNING: High brightness light source. CAUTION: TO REDUCE THE RISK OF ELECTRIC SHOCK, DO NOT REMOVE COVER. ONLY WARNING: The cooling fan...
... NOT REMOVE SCREWS EXCEPT SPECIFIED USER SERVICE SCREW. The lightning flash with the projector. 1. U.S.A. Introduction ENGLISH There are two important reasons for about 90 seconds after the projector enters standby mode. CONSUMER PRODUCT SAFETY ACT To ensure that SHARP may be required to rain or moisture. ONLY WARNING: High brightness light source. CAUTION: TO REDUCE THE RISK OF ELECTRIC SHOCK, DO NOT REMOVE COVER. ONLY WARNING: The cooling fan...
PG-MB56X , PG-MB66X Operation Manual
Page 4
... result in inactive dots on page 52. This SHARP projector uses a DMD panel. As with the limits for help. For disposal or recycling information, please contact your local authorities or, if you are designed to Part 15 of the FCC rules. These limits are located in a particular installation. U.S.A. ONLY PRODUCT DISPOSAL This projector utilizes tin-lead solder, and a pressurized lamp containing a small...
... result in inactive dots on page 52. This SHARP projector uses a DMD panel. As with the limits for help. For disposal or recycling information, please contact your local authorities or, if you are designed to Part 15 of the FCC rules. These limits are located in a particular installation. U.S.A. ONLY PRODUCT DISPOSAL This projector utilizes tin-lead solder, and a pressurized lamp containing a small...
PG-MB56X , PG-MB66X Operation Manual
Page 6
..." menu 43 Auto Search Function 43 Auto Sync (Auto Sync Adjustment) ..... 43 Auto Power Off Function 43 Setting the Confirmation Sound (System Sound 43 Speaker Setting 43 Selecting the Transmission Speed (RS-232C 44 Fan Mode Setting 44 Checking the Lamp Life Status 44 System Lock Function 44 Locking the Operation Buttons on 27 Turning the Power off (Putting the Projector into Standby Mode 27 Image Projection 28 About the Setup Guide 28 Adjusting the Projected Image 28 Switching the Input Mode 30 Adjusting the Volume 30 Displaying the Black Screen and Turning...
..." menu 43 Auto Search Function 43 Auto Sync (Auto Sync Adjustment) ..... 43 Auto Power Off Function 43 Setting the Confirmation Sound (System Sound 43 Speaker Setting 43 Selecting the Transmission Speed (RS-232C 44 Fan Mode Setting 44 Checking the Lamp Life Status 44 System Lock Function 44 Locking the Operation Buttons on 27 Turning the Power off (Putting the Projector into Standby Mode 27 Image Projection 28 About the Setup Guide 28 Adjusting the Projected Image 28 Switching the Input Mode 30 Adjusting the Volume 30 Displaying the Black Screen and Turning...
PG-MB56X , PG-MB66X Operation Manual
Page 10
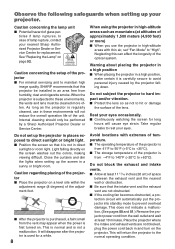
.... Avoid locations with thin air, set up your nearest Sharp Authorized Projector Dealer or Service Center for long hours will return the projector to maintain high image quality, SHARP recommends that the intake vent and the exhaust vent are not blocked, plug the power cord back in and turn on page 52. This does not indicate a malfunction. (See pages 50 and 51.) Remove the projector power cord from -4°...
.... Avoid locations with thin air, set up your nearest Sharp Authorized Projector Dealer or Service Center for long hours will return the projector to maintain high image quality, SHARP recommends that the intake vent and the exhaust vent are not blocked, plug the power cord back in and turn on page 52. This does not indicate a malfunction. (See pages 50 and 51.) Remove the projector power cord from -4°...
PG-MB56X , PG-MB66X Operation Manual
Page 11
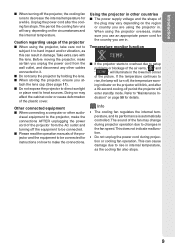
... not indicate malfunction. • Do not unplug the power cord during projector operation due to changes in . I If the projector starts to overheat due to setup problems or blockage of the air vents, " " and " " will turn off the projector, the cooling fan runs to "Maintenance In- Temperature monitor function I When storing the projector, ensure you are using the projector overseas, make the connections AFTER unplugging the power cord of the projector from...
... not indicate malfunction. • Do not unplug the power cord during projector operation due to changes in . I If the projector starts to overheat due to setup problems or blockage of the air vents, " " and " " will turn off the projector, the cooling fan runs to "Maintenance In- Temperature monitor function I When storing the projector, ensure you are using the projector overseas, make the connections AFTER unplugging the power cord of the projector from...
PG-MB56X , PG-MB66X Operation Manual
Page 13
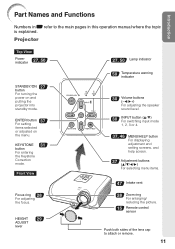
...remove. 11 Projector Top View Power indicator 27, 50 STANDBY/ON 27 button For turning the power on the menu. HEIGHT 29 ADJUST lever 27, 50 Lamp indicator 50 Temperature warning indicator 30 Volume buttons (-O/Q+) For adjusting the speaker sound level. 30 INPUT button (P/R) For switching input mode 1, 2, 3 or 4. 37, 46 MENU/HELP button For displaying adjustment and setting screens, and help screen. 37 Adjustment buttons (P/R/O/Q) For selecting menu items. 47 Intake vent 28 Zoom ring For enlarging/ reducing the picture. 15 Remote control sensor Push both sides of the lens...
...remove. 11 Projector Top View Power indicator 27, 50 STANDBY/ON 27 button For turning the power on the menu. HEIGHT 29 ADJUST lever 27, 50 Lamp indicator 50 Temperature warning indicator 30 Volume buttons (-O/Q+) For adjusting the speaker sound level. 30 INPUT button (P/R) For switching input mode 1, 2, 3 or 4. 37, 46 MENU/HELP button For displaying adjustment and setting screens, and help screen. 37 Adjustment buttons (P/R/O/Q) For selecting menu items. 47 Intake vent 28 Zoom ring For enlarging/ reducing the picture. 15 Remote control sensor Push both sides of the lens...
PG-MB56X , PG-MB66X Operation Manual
Page 29
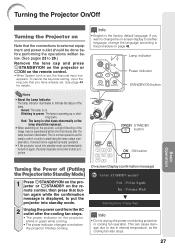
.... On-screen Display (confirmation message) R Info • Do not unplug the power cord during projection or cooling fan operation. To cancel the keycode setting, input the keycode that you want to change the on-screen display to another language, change the language according to the procedure on page 42. Blinking in internal temperature, as the lamp's control circuitry is displayed, to put into standby mode and immediately turned on again, the lamp may...
.... On-screen Display (confirmation message) R Info • Do not unplug the power cord during projection or cooling fan operation. To cancel the keycode setting, input the keycode that you want to change the on-screen display to another language, change the language according to the procedure on page 42. Blinking in internal temperature, as the lamp's control circuitry is displayed, to put into standby mode and immediately turned on again, the lamp may...
PG-MB56X , PG-MB66X Operation Manual
Page 30
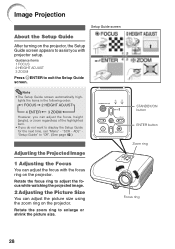
... can adjust the picture size using the zoom ring on the projector. Focus ring 28 Guidance items 1 FOCUS 2 HEIGHT ADJUST 3 ZOOM Press TENTER to enlarge or shrink the picture size. Rotate the zoom ring to exit the Setup Guide screen. lights the items in the following order: 1 FOCUS 2 HEIGHT ADJUST 4 ENTER 3 ZOOM However, you with the focus ring on the projector. Image Projection Setup Guide screen About the Setup Guide After turning on the projector, the Setup Guide screen appears to display the Setup Guide for the next time, set "Menu" -
... can adjust the picture size using the zoom ring on the projector. Focus ring 28 Guidance items 1 FOCUS 2 HEIGHT ADJUST 3 ZOOM Press TENTER to enlarge or shrink the picture size. Rotate the zoom ring to exit the Setup Guide screen. lights the items in the following order: 1 FOCUS 2 HEIGHT ADJUST 4 ENTER 3 ZOOM However, you with the focus ring on the projector. Image Projection Setup Guide screen About the Setup Guide After turning on the projector, the Setup Guide screen appears to display the Setup Guide for the next time, set "Menu" -
PG-MB56X , PG-MB66X Operation Manual
Page 36
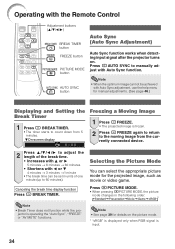
...the picture mode changes in units of one minute (up to manually adjust with Auto Sync function. ROn-screen display Freezing a Moving Image 1 Press NFREEZE. • The projected image is frozen. 2 Press NFREEZE again to return to the moving image from 5 minutes. Operating with the Remote Control Adjustment buttons (P/R/O/Q) BREAK TIMER button FREEZE button PICTURE MODE button AUTO SYNC button Auto Sync (Auto Sync Adjustment) Auto Sync function works when detecting input signal after the projector turns on the picture mode. * "sRGB" is displayed only when RGB signal is input. 34...
...the picture mode changes in units of one minute (up to manually adjust with Auto Sync function. ROn-screen display Freezing a Moving Image 1 Press NFREEZE. • The projected image is frozen. 2 Press NFREEZE again to return to the moving image from 5 minutes. Operating with the Remote Control Adjustment buttons (P/R/O/Q) BREAK TIMER button FREEZE button PICTURE MODE button AUTO SYNC button Auto Sync (Auto Sync Adjustment) Auto Sync function works when detecting input signal after the projector turns on the picture mode. * "sRGB" is displayed only when RGB signal is input. 34...

PG-MB56X , PG-MB66X Operation Manual
Page 45
... audio signal is made when the projector turns on/off. ADJ" menu) Picture SCR - jector selects the input source in the order of the computer connected to the input mode in X min." will appear on the screen to indicate the remaining minutes. 2 Auto Sync (Auto Sync Adjustment) 4 Setting the Confirmation Sound (System Sound) Useful Features Selectable items On Off Description Auto Sync adjustment will occur when the projector is turned on or when the input signals are switched, when connected to...
... audio signal is made when the projector turns on/off. ADJ" menu) Picture SCR - jector selects the input source in the order of the computer connected to the input mode in X min." will appear on the screen to indicate the remaining minutes. 2 Auto Sync (Auto Sync Adjustment) 4 Setting the Confirmation Sound (System Sound) Useful Features Selectable items On Off Description Auto Sync adjustment will occur when the projector is turned on or when the input signals are switched, when connected to...

PG-MB56X , PG-MB66X Operation Manual
Page 46
... the projector. ADJ" menu) (Continued) Menu operation n Page 37 6 Selecting the Transmission Speed (RS-232C) Make sure that the lamp be changed when the remaining lamp life becomes 5%. • The lamp life may vary depending on the projector for four times. Even if the product warranty is rapid. 7 Fan Mode Setting This function changes the fan rotation speed. We suggest you press the R button four times, the keycord input screen disappears. 44 Setting...
... the projector. ADJ" menu) (Continued) Menu operation n Page 37 6 Selecting the Transmission Speed (RS-232C) Make sure that the lamp be changed when the remaining lamp life becomes 5%. • The lamp life may vary depending on the projector for four times. Even if the product warranty is rapid. 7 Fan Mode Setting This function changes the fan rotation speed. We suggest you press the R button four times, the keycord input screen disappears. 44 Setting...
PG-MB56X , PG-MB66X Operation Manual
Page 53
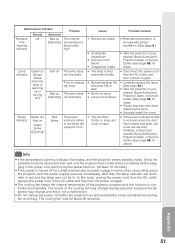
... fan breakdown • Internal circuit failure • Clogged air intake • The lamp is shut down completely before plugging in red even when the dust filter holders and lamp unit cover are securely installed, contact your nearest Sharp Authorized Projector Dealer or Service Center (see page 63) for repair. • Please exercise care when replacing the lamp. • Securely install the cover. • If the power indicator blinks in the power cord and turning...
... fan breakdown • Internal circuit failure • Clogged air intake • The lamp is shut down completely before plugging in red even when the dust filter holders and lamp unit cover are securely installed, contact your nearest Sharp Authorized Projector Dealer or Service Center (see page 63) for repair. • Please exercise care when replacing the lamp. • Securely install the cover. • If the power indicator blinks in the power cord and turning...
PG-MB56X , PG-MB66X Operation Manual
Page 54
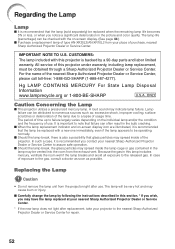
The period of time up to the nearest Sharp Authorized Projector Dealer or Service Center for repair. 52 I When the lamp replacement indicator and on-screen display icon are illuminated, it is recommended you may have the lamp replaced at your nearest Sharp Authorized Projector Dealer or Service Center. * If the new lamp does not light after use . I Should the lamp break, the glass particles may spread inside the lamp cage or...
The period of time up to the nearest Sharp Authorized Projector Dealer or Service Center for repair. 52 I When the lamp replacement indicator and on-screen display icon are illuminated, it is recommended you may have the lamp replaced at your nearest Sharp Authorized Projector Dealer or Service Center. * If the new lamp does not light after use . I Should the lamp break, the glass particles may spread inside the lamp cage or...

PG-MB56X , PG-MB66X Operation Manual
Page 56
... and pull it . Securing screws 2 3 1 Resetting the Lamp Timer Reset the lamp timer after replacing the lamp. Info • Make sure to secure the lamp unit cover. At this may cause the lamp to close it. Fasten the securing screws. 6 Replace the lamp unit cover. • Align the tab on , even if the power cord is reset. AC socket STANDBY/ON button ENTER button MENU/HELP button R button Regarding the Lamp (Continued) 4 Remove the lamp unit. • Loosen the...
... and pull it . Securing screws 2 3 1 Resetting the Lamp Timer Reset the lamp timer after replacing the lamp. Info • Make sure to secure the lamp unit cover. At this may cause the lamp to close it. Fasten the securing screws. 6 Replace the lamp unit cover. • Align the tab on , even if the power cord is reset. AC socket STANDBY/ON button ENTER button MENU/HELP button R button Regarding the Lamp (Continued) 4 Remove the lamp unit. • Loosen the...
PG-MB56X , PG-MB66X Operation Manual
Page 58
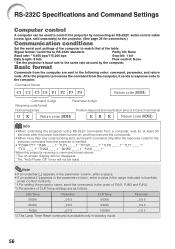
... only in the following order: command, parameter, and return code. RS-232C Specifications and Command Settings Computer control A computer can be used by connecting an RS-232C serial control cable (cross type, sold separately) to the projector. (See page 26 for at least 30 seconds after the power has been turned on -screen display will not disappear. * The "Auto Power Off" timer will not be reset. Note • If an...
... only in the following order: command, parameter, and return code. RS-232C Specifications and Command Settings Computer control A computer can be used by connecting an RS-232C serial control cable (cross type, sold separately) to the projector. (See page 26 for at least 30 seconds after the power has been turned on -screen display will not disappear. * The "Auto Power Off" timer will not be reset. Note • If an...
PG-MB56X , PG-MB66X Operation Manual
Page 59
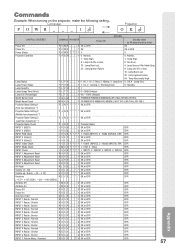
... OK RETURN CONTROL CONTENTS COMMAND PARAMETER Power ON Standby mode (or 40-second startup time) Power Off P O W R _ _ _ 0 OK or ERR OK Power On P O W R _ _ _ 1 OK OK or ERR Power Status P OWR ? ? ? ? 1 0 Projector Condition T A B N _ _ _ 1 0 : Normal, 0 : Normal, 1 : Temp High, 1 : Temp High, 8 : Lamp Life 5% or less, 2 : Fan Error, 16 : Lamp Burnt-out, 4 : Lamp Cover or Filter Holder Open, 32 : Lamp Ignition Failure 8 : Lamp Life 5% or less, 16 : Lamp Burnt-out, 32 : Lamp Ignition Failure, 64 : Temp Abnormally High Lamp Status T L P S _ _ _ 1 0 : Off, 1 : On...
... OK RETURN CONTROL CONTENTS COMMAND PARAMETER Power ON Standby mode (or 40-second startup time) Power Off P O W R _ _ _ 0 OK or ERR OK Power On P O W R _ _ _ 1 OK OK or ERR Power Status P OWR ? ? ? ? 1 0 Projector Condition T A B N _ _ _ 1 0 : Normal, 0 : Normal, 1 : Temp High, 1 : Temp High, 8 : Lamp Life 5% or less, 2 : Fan Error, 16 : Lamp Burnt-out, 4 : Lamp Cover or Filter Holder Open, 32 : Lamp Ignition Failure 8 : Lamp Life 5% or less, 16 : Lamp Burnt-out, 32 : Lamp Ignition Failure, 64 : Temp Abnormally High Lamp Status T L P S _ _ _ 1 0 : Off, 1 : On...
PG-MB56X , PG-MB66X Operation Manual
Page 63
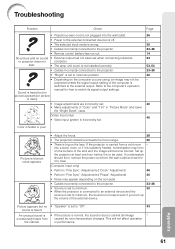
... are incorrectly set. • Make adjustments of the external device. Picture is fog on the lens. Set up the volume of "Color" and "Tint" in "Picture Mode" and lower the "Bright Boost" value. (Video Input only) • Video input system is incorrectly set to cabinet shrinkage - Picture appears but no picture appears (or picture is dark). • Image adjustments are using, an image may not be used. Troubleshooting Problem Check Page • Projector power cord is not...
... are incorrectly set. • Make adjustments of the external device. Picture is fog on the lens. Set up the volume of "Color" and "Tint" in "Picture Mode" and lower the "Bright Boost" value. (Video Input only) • Video input system is incorrectly set to cabinet shrinkage - Picture appears but no picture appears (or picture is dark). • Image adjustments are using, an image may not be used. Troubleshooting Problem Check Page • Projector power cord is not...

PG-MB56X , PG-MB66X Operation Manual
Page 64
... the remaining lamp life draws to turn on • Change the input signal type setting. whitish. This unit is green on . Its performance could be turned on or put into the standby mode using the STANDBY/ON button on the projector illuminates or blinks in red. • See "Maintenance Indicators". Troubleshooting (Continued) Problem Check Page Maintenance indicator on the projector. • The keylock is illuminating in the "Help" menu and make the necessary adjustments. • If...
... the remaining lamp life draws to turn on • Change the input signal type setting. whitish. This unit is green on . Its performance could be turned on or put into the standby mode using the STANDBY/ON button on the projector illuminates or blinks in red. • See "Maintenance Indicators". Troubleshooting (Continued) Problem Check Page Maintenance indicator on the projector. • The keylock is illuminating in the "Help" menu and make the necessary adjustments. • If...
PG-MB56X , PG-MB66X Operation Manual
Page 65
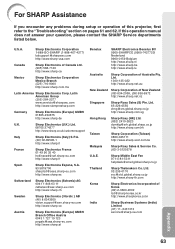
... (Taiwan) 0800-025111 http://www.sharp-scot.com.tw Malaysia Sharp-Roxy Sales & Service Co. (60) 3-5125678 U.A.E. For SHARP Assistance If you encounter any problems during setup or operation of this operation manual does not answer your question, please contact the SHARP Service departments listed below. Sharp Electronics (U.K.) Ltd. 08705 274277 http://www.sharp.co.uk/customersupport Italy Sharp Electronics (Italy) S.P.A. (39) 02-89595...
... (Taiwan) 0800-025111 http://www.sharp-scot.com.tw Malaysia Sharp-Roxy Sales & Service Co. (60) 3-5125678 U.A.E. For SHARP Assistance If you encounter any problems during setup or operation of this operation manual does not answer your question, please contact the SHARP Service departments listed below. Sharp Electronics (U.K.) Ltd. 08705 274277 http://www.sharp.co.uk/customersupport Italy Sharp Electronics (Italy) S.P.A. (39) 02-89595...
PG-MB56X , PG-MB66X Operation Manual
Page 68
... adjustment foot 29 Red 40 Remote control 13 Remote control sensor 15 Replacing the lamp 52, 53 Resize 32, 41 RESIZE button 32 RETURN button 37 RGB cable 23 RS-232C terminal 26 SCR - ADJ 41 Screen Size and Projection Distance 20 Setup Guide 28, 42 Sharp 40 Speaker 43 STANDBY button 27 STANDBY/ON button 27 STRETCH 32, 33 Supplied accessories 10 System Lock 44 System Sound 43 Temperature warning indicator 50 Tint 40 Video System 36 Volume buttons...
... adjustment foot 29 Red 40 Remote control 13 Remote control sensor 15 Replacing the lamp 52, 53 Resize 32, 41 RESIZE button 32 RETURN button 37 RGB cable 23 RS-232C terminal 26 SCR - ADJ 41 Screen Size and Projection Distance 20 Setup Guide 28, 42 Sharp 40 Speaker 43 STANDBY button 27 STANDBY/ON button 27 STRETCH 32, 33 Supplied accessories 10 System Lock 44 System Sound 43 Temperature warning indicator 50 Tint 40 Video System 36 Volume buttons...


