
XR-32S | XR-32X Operation Manual
Page 6
... correct the interference by turning the equipment off and on page 52. ONLY Declaration of conformity SHARP PROJECTOR, MODEL XR-32X-L/XR-32S-L This device complies with any interference received, including interference that interference will not affect the picture quality or the life expectancy of these materials may result in inactive dots on the picture screen. U.S.A. This SHARP projector uses a DLP® chip. However, there is...
... correct the interference by turning the equipment off and on page 52. ONLY Declaration of conformity SHARP PROJECTOR, MODEL XR-32X-L/XR-32S-L This device complies with any interference received, including interference that interference will not affect the picture quality or the life expectancy of these materials may result in inactive dots on the picture screen. U.S.A. This SHARP projector uses a DLP® chip. However, there is...
XR-32S | XR-32X Operation Manual
Page 7
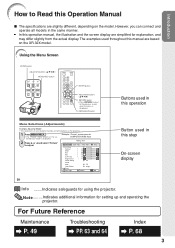
... this Operation Manual ■ The specifications are based on the XR-32X model. The examples used in the same manner. • In this step On-screen display 38 Info ........Indicates safeguards for using the buttons on the projector. 1 Press MENU/HELP. • The "Picture" menu screen for explanation, and may differ slightly from the actual display. ADJ Help Picture Mode Contrast Bright Red Blue CLR Temp Bright Boost C.M.S. Setting C.M.S. For Future Reference Maintenance P. 49 Troubleshooting PP...
... this Operation Manual ■ The specifications are based on the XR-32X model. The examples used in the same manner. • In this step On-screen display 38 Info ........Indicates safeguards for using the buttons on the projector. 1 Press MENU/HELP. • The "Picture" menu screen for explanation, and may differ slightly from the actual display. ADJ Help Picture Mode Contrast Bright Red Blue CLR Temp Bright Boost C.M.S. Setting C.M.S. For Future Reference Maintenance P. 49 Troubleshooting PP...
XR-32S | XR-32X Operation Manual
Page 8
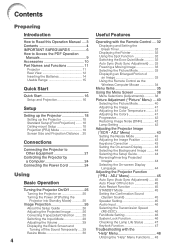
... Setup 18 Projection (PRJ) Mode 19 Screen Size and Projection Distance .. 20 Connections Connecting the Projector to Other Equipment 21 Controlling the Projector by a Computer 24 Connecting the Power Cord 24 Using Basic Operation Turning the Projector On/Off 25 Turning the Projector on 25 Turning the Power off (Putting the Projector into Standby Mode 25 Image Projection 26 About the Setup Guide 26 Adjusting the Projected Image 26 Correcting Trapezoidal Distortion ........ 28 Switching the Input Mode 29 Adjusting the Volume 29 Displaying the Black Screen and Turning off the Sound...
... Setup 18 Projection (PRJ) Mode 19 Screen Size and Projection Distance .. 20 Connections Connecting the Projector to Other Equipment 21 Controlling the Projector by a Computer 24 Connecting the Power Cord 24 Using Basic Operation Turning the Projector On/Off 25 Turning the Projector on 25 Turning the Power off (Putting the Projector into Standby Mode 25 Image Projection 26 About the Setup Guide 26 Adjusting the Projected Image 26 Correcting Trapezoidal Distortion ........ 28 Switching the Input Mode 29 Adjusting the Volume 29 Displaying the Black Screen and Turning off the Sound...
XR-32S | XR-32X Operation Manual
Page 12
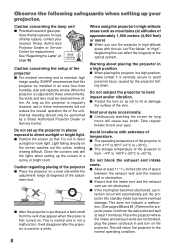
... overall operation life of the projector is used for a while. Observe the following safeguards when setting up the screen in and turn on the projector. Internal cleaning should only be performed by the projector falling down. Light falling directly on page 52. It will cause eye strain. Avoid locations with thin air, set up the projector in these environments, the vents and lens must be installed in...
... overall operation life of the projector is used for a while. Observe the following safeguards when setting up the screen in and turn on the projector. Internal cleaning should only be performed by the projector falling down. Light falling directly on page 52. It will cause eye strain. Avoid locations with thin air, set up the projector in these environments, the vents and lens must be installed in...
XR-32S | XR-32X Operation Manual
Page 13
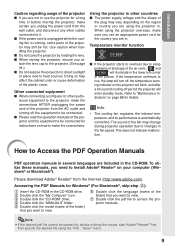
... cables connected to rise, the lamp will turn off, the temperature warn- When using the projector in the lower left corner of the picture. Please download Adobe® Reader® from the AC outlet and turning off period the projector will enter standby mode. The sound of the fan may vary depending on your computer (Windows® or Macintosh®). This does not indicate malfunction. Accessing the PDF Manuals for Windows...
... cables connected to rise, the lamp will turn off, the temperature warn- When using the projector in the lower left corner of the picture. Please download Adobe® Reader® from the AC outlet and turning off period the projector will enter standby mode. The sound of the fan may vary depending on your computer (Windows® or Macintosh®). This does not indicate malfunction. Accessing the PDF Manuals for Windows...
XR-32S | XR-32X Operation Manual
Page 14
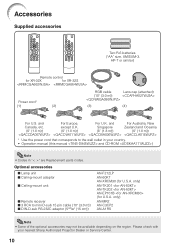
... Two R-6 batteries ("AA" size, UM/SUM-3, HP-7 or similar) Remote control for XR-32X for U.S.A. and For Australia, New Canada, etc. Singapore Zealand and Oceania (6' (1.8 m)) (6' (1.8 m)) (6' (1.8 m)) (6' (1.8 m)) * Use the power cord that corresponds to mini D-sub 15 pin cable (10n (3.0 m)) I 3 RCA to the wall outlet in "< >" are Replacement parts codes. Optional accessories I Lamp unit I Ceiling-mount adaptor I Ceiling-mount unit I Remote receiver I DIN-D-sub RS-232C adaptor (5 57/64" (15...
... Two R-6 batteries ("AA" size, UM/SUM-3, HP-7 or similar) Remote control for XR-32X for U.S.A. and For Australia, New Canada, etc. Singapore Zealand and Oceania (6' (1.8 m)) (6' (1.8 m)) (6' (1.8 m)) (6' (1.8 m)) * Use the power cord that corresponds to mini D-sub 15 pin cable (10n (3.0 m)) I 3 RCA to the wall outlet in "< >" are Replacement parts codes. Optional accessories I Lamp unit I Ceiling-mount adaptor I Ceiling-mount unit I Remote receiver I DIN-D-sub RS-232C adaptor (5 57/64" (15...

XR-32S | XR-32X Operation Manual
Page 15
... menu. Remote control 15 sensor Exhaust vent 49 25, 50 Lamp indicator 50 Temperature warning indicator 32 ECO+QUIET button For lowering the noise of the lens cap to the main pages in Z refer to attach or remove. 11 Push both sides of the cooling fan and extending the lamp life. 29 VOL (Volume) buttons (-O/Q+) For adjusting the speaker sound level. 29 INPUT buttons (P/R) For switching input mode. 38, 48 MENU/HELP button For displaying adjustment and setting screens...
... menu. Remote control 15 sensor Exhaust vent 49 25, 50 Lamp indicator 50 Temperature warning indicator 32 ECO+QUIET button For lowering the noise of the lens cap to the main pages in Z refer to attach or remove. 11 Push both sides of the cooling fan and extending the lamp life. 29 VOL (Volume) buttons (-O/Q+) For adjusting the speaker sound level. 29 INPUT buttons (P/R) For switching input mode. 38, 48 MENU/HELP button For displaying adjustment and setting screens...

XR-32S | XR-32X Operation Manual
Page 17
... MENU/HELP button 48 For displaying adjustment and setting screens, and help screen. 30 RESIZE button For switching the picture size (NORMAL, BORDER, etc.). 33 PICTURE MODE button For selecting the appropriate picture. * XR-32X only 13 Introduction COMPUTER, *DVI, 29 S-VIDEO, VIDEO buttons For switching to a computer. POINTER button 32 For displaying the pointer. KEYSTONE button 28 For entering the Keystone Correction mode. AUTO SYNC button 33 For automatically adjusting images when connected to the respective input modes. STANDBY button 25 For putting the projector into...
... MENU/HELP button 48 For displaying adjustment and setting screens, and help screen. 30 RESIZE button For switching the picture size (NORMAL, BORDER, etc.). 33 PICTURE MODE button For selecting the appropriate picture. * XR-32X only 13 Introduction COMPUTER, *DVI, 29 S-VIDEO, VIDEO buttons For switching to a computer. POINTER button 32 For displaying the pointer. KEYSTONE button 28 For entering the Keystone Correction mode. AUTO SYNC button 33 For automatically adjusting images when connected to the respective input modes. STANDBY button 25 For putting the projector into...
XR-32S | XR-32X Operation Manual
Page 29
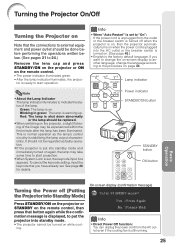
... factory default language. It should not be regarded as the lamp's control circuitry is set . Red: The lamp is put the projector into standby mode and immediately turned on again, the lamp may be done before performing the operations written below. (See pages 21 to start operation. Blinking in green: The lamp is on the remote control. • The power indicator illuminates green. • After the lamp indicator illuminates, the projec- Power indicator STANDBY/ON button STANDBY button ON button Basic Operation On-screen display...
... factory default language. It should not be regarded as the lamp's control circuitry is set . Red: The lamp is put the projector into standby mode and immediately turned on again, the lamp may be done before performing the operations written below. (See pages 21 to start operation. Blinking in green: The lamp is on the remote control. • The power indicator illuminates green. • After the lamp indicator illuminates, the projec- Power indicator STANDBY/ON button STANDBY button ON button Basic Operation On-screen display...
XR-32S | XR-32X Operation Manual
Page 49
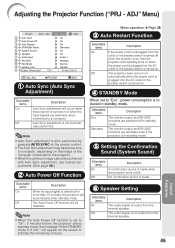
... no input signal is turned on /off. The projector does not turn on automatically when the power cord is plugged into the AC outlet or the breaker switch is detected for more than 15 minutes, the projector will appear on the screen to the projector. • When the optimum image cannot be disabled. ADJ Help 1 Auto Sync 2 Auto Power Off 3 Auto Restart 4 STANDBY Mode 5 System Sound 6 Speaker 7 Audio Input 8 RS-232C 9 Fan Mode 0 System Lock Lamp Timer(Life) 0h...
... no input signal is turned on /off. The projector does not turn on automatically when the power cord is plugged into the AC outlet or the breaker switch is detected for more than 15 minutes, the projector will appear on the screen to the projector. • When the optimum image cannot be disabled. ADJ Help 1 Auto Sync 2 Auto Power Off 3 Auto Restart 4 STANDBY Mode 5 System Sound 6 Speaker 7 Audio Input 8 RS-232C 9 Fan Mode 0 System Lock Lamp Timer(Life) 0h...
XR-32S | XR-32X Operation Manual
Page 51
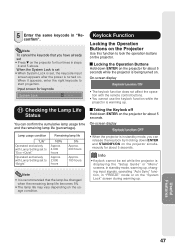
... remote control buttons. • You cannot use the keylock function while the projector is being turned on the projector for keycode System Lock ---- a Locking the Operation Buttons Hold down ENTER on the projector for about 5 seconds while the projector is warming up . 5 Enter the same keycode in steps 4 and 5 above. When the System Lock is set • When System Lock is : displaying the "Setup Guide" or "Menu" screens, in standby mode, warming up, changing input signals, operating "Auto Sync...
... remote control buttons. • You cannot use the keylock function while the projector is being turned on the projector for keycode System Lock ---- a Locking the Operation Buttons Hold down ENTER on the projector for about 5 seconds while the projector is warming up . 5 Enter the same keycode in steps 4 and 5 above. When the System Lock is set • When System Lock is : displaying the "Setup Guide" or "Menu" screens, in standby mode, warming up, changing input signals, operating "Auto Sync...
XR-32S | XR-32X Operation Manual
Page 55
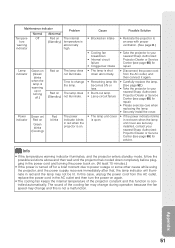
... power indicator blinks in red even when the lamp unit cover are securely installed, contact your nearest Sharp Authorized Projector Dealer or Service Center (see page 65) for a brief moment due to your nearest Sharp Authorized Projector Dealer or Service Center (see page 65) for repair. • Disconnect the power cord from the AC outlet, replace the power cord in red and the lamp may change and this function is controlled automatically. Lamp indicator Green on (Green blinks...
... power indicator blinks in red even when the lamp unit cover are securely installed, contact your nearest Sharp Authorized Projector Dealer or Service Center (see page 65) for a brief moment due to your nearest Sharp Authorized Projector Dealer or Service Center (see page 65) for repair. • Disconnect the power cord from the AC outlet, replace the power cord in red and the lamp may change and this function is controlled automatically. Lamp indicator Green on (Green blinks...
XR-32S | XR-32X Operation Manual
Page 56
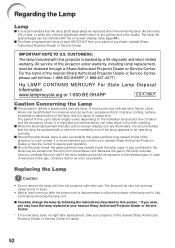
... the lamp replacement indicator and on the individual lamp and/or the condition and the frequency of use . Lamp failure can be checked with this projector is backed by following the instructions described in this projector under warranty, including lamp replacement, must be obtained through a Sharp Authorized Projector Dealer or Service Center. In such a case, it is recommended that the lamp be replaced with a new one hour after use . Regarding the Lamp Lamp...
... the lamp replacement indicator and on the individual lamp and/or the condition and the frequency of use . Lamp failure can be checked with this projector is backed by following the instructions described in this projector under warranty, including lamp replacement, must be obtained through a Sharp Authorized Projector Dealer or Service Center. In such a case, it is recommended that the lamp be replaced with a new one hour after use . Regarding the Lamp Lamp...
XR-32S | XR-32X Operation Manual
Page 58
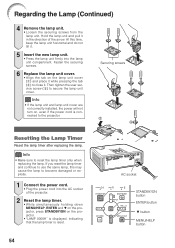
... the power cord is reset. 54 AC socket STANDBY/ON button ENTER button R button MENU/HELP button Info • Make sure to secure the lamp unit cover. Info • If the lamp unit and lamp unit cover are not correctly installed, the power will not turn on the projector. • "LAMP 0000H" is displayed, indicating that the lamp timer is connected to close it while pressing the tab (2) to the projector. Fasten the securing screws. 6 Replace the lamp unit cover...
... the power cord is reset. 54 AC socket STANDBY/ON button ENTER button R button MENU/HELP button Info • Make sure to secure the lamp unit cover. Info • If the lamp unit and lamp unit cover are not correctly installed, the power will not turn on the projector. • "LAMP 0000H" is displayed, indicating that the lamp timer is connected to close it while pressing the tab (2) to the projector. Fasten the securing screws. 6 Replace the lamp unit cover...
XR-32S | XR-32X Operation Manual
Page 61
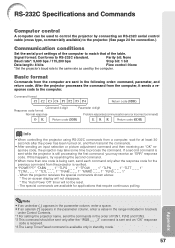
... Specifications and Commands Computer control A computer can be used by connecting an RS-232C serial control cable (cross type, commercially available) to the projector. (See page 24 for at least 30 seconds after the "IRGB _ _ _ 2" command is sent and an "OK" response code is received. *3 The Lamp Timer Reset command is available only in standby mode. 57 Basic format Commands from the computer are available for the previous command...
... Specifications and Commands Computer control A computer can be used by connecting an RS-232C serial control cable (cross type, commercially available) to the projector. (See page 24 for at least 30 seconds after the "IRGB _ _ _ 2" command is sent and an "OK" response code is received. *3 The Lamp Timer Reset command is available only in standby mode. 57 Basic format Commands from the computer are available for the previous command...
XR-32S | XR-32X Operation Manual
Page 62
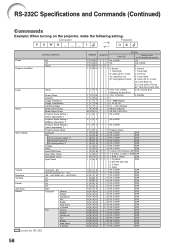
...; ← Projector OK Power Projector Condition CONTROL CONTENTS On Off Status Lamp Name Input Change Status Power Status Quantity Usage Time(Hour) Usage Time(Minute) Life(Percentage) Model Name Check Model Name Check Projector Name Setting 1 (First 4 characters) *1 Projector Name Setting 2 (Middle 4 characters) *1 Projector Name Setting 3 (Last 4 characters) *1 Projector Name Check Computer DVI DVI-D-Computer select *2 DVI-D-Video select *2 DVI-Analog select *2 S-Video Video Input RGB Check Input Video Check Input Mode Check Input Check Volume Keystone AV Mute Freeze Auto Sync Resize...
...; ← Projector OK Power Projector Condition CONTROL CONTENTS On Off Status Lamp Name Input Change Status Power Status Quantity Usage Time(Hour) Usage Time(Minute) Life(Percentage) Model Name Check Model Name Check Projector Name Setting 1 (First 4 characters) *1 Projector Name Setting 2 (Middle 4 characters) *1 Projector Name Setting 3 (Last 4 characters) *1 Projector Name Check Computer DVI DVI-D-Computer select *2 DVI-D-Video select *2 DVI-Analog select *2 S-Video Video Input RGB Check Input Video Check Input Mode Check Input Check Volume Keystone AV Mute Freeze Auto Sync Resize...
XR-32S | XR-32X Operation Manual
Page 67
.... • Cables are incorrectly connected to the operation manual of the lens and the image will become blurred. For details, refer to the projector. • Remote control battery has run out. • External output has not been set when connecting notebook computer. • The lamp unit cover is not installed correctly. • XR-32X only: If the connected DVI digital equipment is turned on before the "DVI-D" input mode is...
.... • Cables are incorrectly connected to the operation manual of the lens and the image will become blurred. For details, refer to the projector. • Remote control battery has run out. • External output has not been set when connecting notebook computer. • The lamp unit cover is not installed correctly. • XR-32X only: If the connected DVI digital equipment is turned on before the "DVI-D" input mode is...

XR-32S | XR-32X Operation Manual
Page 68
... standby mode using STANDBY/ON on . 50, 53 The lamp suddenly turns off during projection. runs faster. 8, 9 49, 50, 51 The lamp does not light • The lamp indicator is set. 47 be depleted or inserted incorrectly. While the remaining lamp life draws to "ON", all the buttons are locked. Picture is due to the projector or the connected equipment works improperly. • Select "Vertical stripes or flickering image appear" in the "Help" menu...
... standby mode using STANDBY/ON on . 50, 53 The lamp suddenly turns off during projection. runs faster. 8, 9 49, 50, 51 The lamp does not light • The lamp indicator is set. 47 be depleted or inserted incorrectly. While the remaining lamp life draws to "ON", all the buttons are locked. Picture is due to the projector or the connected equipment works improperly. • Select "Vertical stripes or flickering image appear" in the "Help" menu...
XR-32S | XR-32X Operation Manual
Page 69
... 01805-234675 http://www.sharp.de U.K. For SHARP Assistance If you encounter any problems during setup or operation of this operation manual does not answer your question, please contact the SHARP Service departments listed below. Sharp Electronics (U.K.) Ltd. 08705 274277 http://www.sharp.co.uk/customersupport Italy Sharp Electronics (Italy) S.P.A. (39) 02-89595-1 http://www.sharp.it France Sharp Electronics France 01 49 90...
... 01805-234675 http://www.sharp.de U.K. For SHARP Assistance If you encounter any problems during setup or operation of this operation manual does not answer your question, please contact the SHARP Service departments listed below. Sharp Electronics (U.K.) Ltd. 08705 274277 http://www.sharp.co.uk/customersupport Italy Sharp Electronics (Italy) S.P.A. (39) 02-89595-1 http://www.sharp.it France Sharp Electronics France 01 49 90...
XR-32S | XR-32X Operation Manual
Page 72
... button 34, 38 Rear adjustment foot 27 Red 41 Remote control 13 Remote control sensor 15 Replacing the lamp 52, 53 Resize 30, 43 RESIZE button 30 RGB cable 21 RS-232C terminal 24 SCR - ADJ 43 Screen Size and Projection Distance 20 Setup Guide 26, 44 Sharp 41 Speaker 45 SPOT button 32 STANDBY button 25 STANDBY Mode 45 STANDBY/ON button 25 STRETCH 30, 31 Supplied accessories 10 S-VIDEO button 29 S-VIDEO terminal 22 System Lock 46 System Sound 45 Temperature warning indicator...
... button 34, 38 Rear adjustment foot 27 Red 41 Remote control 13 Remote control sensor 15 Replacing the lamp 52, 53 Resize 30, 43 RESIZE button 30 RGB cable 21 RS-232C terminal 24 SCR - ADJ 43 Screen Size and Projection Distance 20 Setup Guide 26, 44 Sharp 41 Speaker 45 SPOT button 32 STANDBY button 25 STANDBY Mode 45 STANDBY/ON button 25 STRETCH 30, 31 Supplied accessories 10 S-VIDEO button 29 S-VIDEO terminal 22 System Lock 46 System Sound 45 Temperature warning indicator...


