
XR-32S | XR-32X Operation Manual
Page 1
MULTIMEDIA PROJECTOR MODEL XR-32X-L XR-32S-L OPERATION MANUAL XR-32X-L Introduction Quick Start Setup Connections Basic Operation Useful Features Appendix
MULTIMEDIA PROJECTOR MODEL XR-32X-L XR-32S-L OPERATION MANUAL XR-32X-L Introduction Quick Start Setup Connections Basic Operation Useful Features Appendix
XR-32S | XR-32X Operation Manual
Page 2
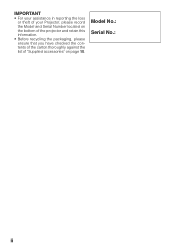
IMPORTANT • For your assistance in reporting the loss or theft of your Projector, please record the Model and Serial Number located on the bottom of the projector and retain this information. • Before recycling the packaging, please ensure that you have checked the contents of the carton thoroughly against the list of "Supplied accessories" on page 10. Model No.: Serial No.: ii
IMPORTANT • For your assistance in reporting the loss or theft of your Projector, please record the Model and Serial Number located on the bottom of the projector and retain this information. • Before recycling the packaging, please ensure that you have checked the contents of the carton thoroughly against the list of "Supplied accessories" on page 10. Model No.: Serial No.: ii
XR-32S | XR-32X Operation Manual
Page 4
... lesen Sie die Bedienungsanleitung vor der Verwendung des Projektors sorgfältig durch. Lees de handleiding zorgvuldig door voor u de projector in het Engels, Duits, Frans, Spaans, Italiaans, Nederlands, Zweeds, Portugees, Chinees, Koreaans en Arabisch. iv Lea cuidadosamente las instrucciones de operación antes de utilizar ...
... lesen Sie die Bedienungsanleitung vor der Verwendung des Projektors sorgfältig durch. Lees de handleiding zorgvuldig door voor u de projector in het Engels, Duits, Frans, Spaans, Italiaans, Nederlands, Zweeds, Portugees, Chinees, Koreaans en Arabisch. iv Lea cuidadosamente las instrucciones de operación antes de utilizar ...
XR-32S | XR-32X Operation Manual
Page 5
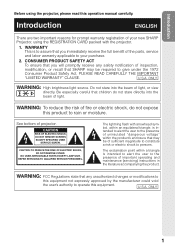
...directly into the beam of light, or view directly. WARRANTY This is intended to alert the user to your new SHARP Projector, using the projector, please read this operation manual carefully. Introduction Before using the REGISTRATION CARD packed with arrowhead symbol, within an equilateral ...this equipment. NO USER-SERVICEABLE PARTS EXCEPT LAMP UNIT. WARNING: FCC Regulations state that SHARP may be required to persons. Be especially careful that may be of projector. The exclamation point within the product's enclosure that children do not expose this product ...
...directly into the beam of light, or view directly. WARRANTY This is intended to alert the user to your new SHARP Projector, using the projector, please read this operation manual carefully. Introduction Before using the REGISTRATION CARD packed with arrowhead symbol, within an equilateral ...this equipment. NO USER-SERVICEABLE PARTS EXCEPT LAMP UNIT. WARNING: FCC Regulations state that SHARP may be required to persons. Be especially careful that may be of projector. The exclamation point within the product's enclosure that children do not expose this product ...
XR-32S | XR-32X Operation Manual
Page 6
...www.lamprecycle.org, or Sharp at 1-800-BE-SHARP. This SHARP projector uses a DLP® chip. Responsible Party: SHARP ELECTRONICS CORPORATION Sharp Plaza, Mahwah, New Jersey 07495-1163 TEL: 1-800-BE-SHARP (1-800-237-4277) U.S.A. As with Part 15 of conformity SHARP PROJECTOR, MODEL XR-32X-L/XR-32S-L This device .... However, there is encouraged to try to environmental considerations. This very sophisticated panel contains 786,432 (XR32X)/480,000 (XR-32S) pixels (micromirrors). This equipment generates, uses, and can be determined by turning the equipment off and on, the...
...www.lamprecycle.org, or Sharp at 1-800-BE-SHARP. This SHARP projector uses a DLP® chip. Responsible Party: SHARP ELECTRONICS CORPORATION Sharp Plaza, Mahwah, New Jersey 07495-1163 TEL: 1-800-BE-SHARP (1-800-237-4277) U.S.A. As with Part 15 of conformity SHARP PROJECTOR, MODEL XR-32X-L/XR-32S-L This device .... However, there is encouraged to try to environmental considerations. This very sophisticated panel contains 786,432 (XR32X)/480,000 (XR-32S) pixels (micromirrors). This equipment generates, uses, and can be determined by turning the equipment off and on, the...
XR-32S | XR-32X Operation Manual
Page 7
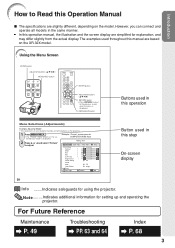
...is displayed. 2 Press Q or O and select "Picture" to Read this Operation Manual ■ The specifications are slightly different, depending on the XR-32X model. ADJ Help Picture Mode Contrast Bright Red Blue CLR Temp Bright Boost C.M.S. DNR Lamp Setting Reset Standard 0 0 0 0 0 1 On... C.M.S. Note .........Indicates additional information for the selected input mode is displayed. However, you can also be performed by using the projector. ADJ PRJ - ENTER END Button used throughout this step On-screen display 38 Info ........Indicates safeguards for explanation, and may ...
...is displayed. 2 Press Q or O and select "Picture" to Read this Operation Manual ■ The specifications are slightly different, depending on the XR-32X model. ADJ Help Picture Mode Contrast Bright Red Blue CLR Temp Bright Boost C.M.S. DNR Lamp Setting Reset Standard 0 0 0 0 0 1 On... C.M.S. Note .........Indicates additional information for the selected input mode is displayed. However, you can also be performed by using the projector. ADJ PRJ - ENTER END Button used throughout this step On-screen display 38 Info ........Indicates safeguards for explanation, and may ...
XR-32S | XR-32X Operation Manual
Page 8
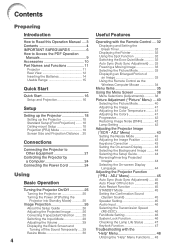
... View 12 Inserting the Batteries 14 Usable Range 15 Quick Start Quick Start 16 Setup and Projection 16 Setup Setting up the Projector 18 Setting up the Projector 18 Standard Setup (Front Projection) ....... 18 Ceiling-mount Setup 18 Projection (PRJ) Mode 19 Screen Size and Projection Distance ... 41 Adjusting the Color Temperature ......... 41 Adjusting the Colors 41 Progressive 42 Reducing Image Noise (DNR 42 Lamp Setting 42 Adjusting the Projector Image ("SCR - ADJ" Menu 43 Setting the Resize Mode 43 Adjusting the Image Position 43 Keystone Correction 43 Setting the On-screen...
... View 12 Inserting the Batteries 14 Usable Range 15 Quick Start Quick Start 16 Setup and Projection 16 Setup Setting up the Projector 18 Setting up the Projector 18 Standard Setup (Front Projection) ....... 18 Ceiling-mount Setup 18 Projection (PRJ) Mode 19 Screen Size and Projection Distance ... 41 Adjusting the Color Temperature ......... 41 Adjusting the Colors 41 Progressive 42 Reducing Image Noise (DNR 42 Lamp Setting 42 Adjusting the Projector Image ("SCR - ADJ" Menu 43 Setting the Resize Mode 43 Adjusting the Image Position 43 Keystone Correction 43 Setting the On-screen...
XR-32S | XR-32X Operation Manual
Page 12
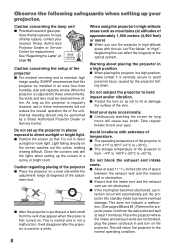
... concerning the setup of the optical system. Do not set "Fan Mode" to maintain high image quality, SHARP recommends that this can affect the longevity of the projector ■ For minimal servicing and to "High". Light falling directly on page 52. This is normal and... obstruction. ■ Ensure that it is first turned on. When the projector is subjected to these environments will automatically put the projector into standby mode to rest your projector. Rest your nearest Sharp Authorized Projector Dealer or Service Center for replacement. Avoid locations with thin air, set...
... concerning the setup of the optical system. Do not set "Fan Mode" to maintain high image quality, SHARP recommends that this can affect the longevity of the projector ■ For minimal servicing and to "High". Light falling directly on page 52. This is normal and... obstruction. ■ Ensure that it is first turned on. When the projector is subjected to these environments will automatically put the projector into standby mode to rest your projector. Rest your nearest Sharp Authorized Projector Dealer or Service Center for replacement. Avoid locations with thin air, set...
XR-32S | XR-32X Operation Manual
Page 13
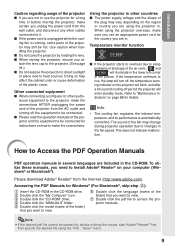
...depending on page 50 for the country you are in . Doing so may still be opened by holding the lens. ■ When storing the projector, ensure you need to install Adobe® Reader® on how to make the connections. Other connected equipment ■ When connecting a computer or... other countries ■ The power supply voltage and the shape of the plug may change during projector operation due to changes in the CD-ROM. How to Access the PDF Operation Manuals PDF operation manuals in several languages are included in the...
...depending on page 50 for the country you are in . Doing so may still be opened by holding the lens. ■ When storing the projector, ensure you need to install Adobe® Reader® on how to make the connections. Other connected equipment ■ When connecting a computer or... other countries ■ The power supply voltage and the shape of the plug may change during projector operation due to changes in the CD-ROM. How to Access the PDF Operation Manuals PDF operation manuals in several languages are included in the...
XR-32S | XR-32X Operation Manual
Page 14
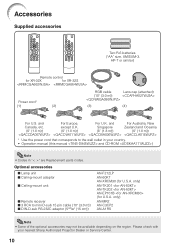
...-mount adaptor I Ceiling-mount unit I Remote receiver I DIN-D-sub RS-232C adaptor (5 57/64" (15 cm)) AN-F212LP AN-60KT AN-XRCM30 (for XR-32S Power cord* (1) (2) RGB cable Lens cap (attached) (10' (3.0 m)) (3) (4) For U.S. Accessories Supplied accessories Two R-6 batteries ("AA" size, UM...SUM-3, HP-7 or similar) Remote control for XR-32X for U.S.A. and For Australia, New Canada, etc. Please check with your country. • Operation manual (this manual and CD-ROM ) Note • Codes in your nearest Sharp Authorized Projector Dealer or Service Center. 10 only) AN...
...-mount adaptor I Ceiling-mount unit I Remote receiver I DIN-D-sub RS-232C adaptor (5 57/64" (15 cm)) AN-F212LP AN-60KT AN-XRCM30 (for XR-32S Power cord* (1) (2) RGB cable Lens cap (attached) (10' (3.0 m)) (3) (4) For U.S. Accessories Supplied accessories Two R-6 batteries ("AA" size, UM...SUM-3, HP-7 or similar) Remote control for XR-32X for U.S.A. and For Australia, New Canada, etc. Please check with your country. • Operation manual (this manual and CD-ROM ) Note • Codes in your nearest Sharp Authorized Projector Dealer or Service Center. 10 only) AN...

XR-32S | XR-32X Operation Manual
Page 15
...32 ECO+QUIET button For lowering the noise of the lens cap to the main pages in this operation manual where the topic is explained. Projector Top View Power indicator 25, 50 STANDBY/ON 25 button For turning the power on the menu. ENTER button For setting 38 items selected... or adjusted on and putting the projector into standby mode. KEYSTONE 28 button For entering the Keystone Correction mode. Front View Zoom ring 26 For enlarging/ reducing the picture. Push both...
...32 ECO+QUIET button For lowering the noise of the lens cap to the main pages in this operation manual where the topic is explained. Projector Top View Power indicator 25, 50 STANDBY/ON 25 button For turning the power on the menu. ENTER button For setting 38 items selected... or adjusted on and putting the projector into standby mode. KEYSTONE 28 button For entering the Keystone Correction mode. Front View Zoom ring 26 For enlarging/ reducing the picture. Push both...

XR-32S | XR-32X Operation Manual
Page 16
...System. Shared for COMPUTER/COMPONENT) Terminal for connecting a monitor. * XR-32X only 22 S-VIDEO input terminal Terminal for connecting video equipment with an S-video terminal. 24 RS-232C terminal Terminal for controlling the projector using a computer. 34 USB terminal Terminal connecting with the USB ...terminal on the computer for using the supplied remote control as the computer mouse. 23 AUDIO 2 input terminal (AUDIO input terminal for XR-32S) 22 VIDEO input terminal...
...System. Shared for COMPUTER/COMPONENT) Terminal for connecting a monitor. * XR-32X only 22 S-VIDEO input terminal Terminal for connecting video equipment with an S-video terminal. 24 RS-232C terminal Terminal for controlling the projector using a computer. 34 USB terminal Terminal connecting with the USB ...terminal on the computer for using the supplied remote control as the computer mouse. 23 AUDIO 2 input terminal (AUDIO input terminal for XR-32S) 22 VIDEO input terminal...

XR-32S | XR-32X Operation Manual
Page 17
...help screen. 30 RESIZE button For switching the picture size (NORMAL, BORDER, etc.). 33 PICTURE MODE button For selecting the appropriate picture. * XR-32X only 13 Introduction MOUSE/Adjustment 34 buttons (P/R/O/Q) • For moving the 38 computer cursor when with the USB connection (using a USB ... 32 For displaying the pointer. ECO+QUIET button 32 For lowering the noise of the image. STANDBY button 25 For putting the projector into the standby mode. BREAK TIMER button 32 For displaying the break time. KEYSTONE button 28 For entering the Keystone Correction mode....
...help screen. 30 RESIZE button For switching the picture size (NORMAL, BORDER, etc.). 33 PICTURE MODE button For selecting the appropriate picture. * XR-32X only 13 Introduction MOUSE/Adjustment 34 buttons (P/R/O/Q) • For moving the 38 computer cursor when with the USB connection (using a USB ... 32 For displaying the pointer. ECO+QUIET button 32 For lowering the noise of the image. STANDBY button 25 For putting the projector into the standby mode. BREAK TIMER button 32 For displaying the break time. KEYSTONE button 28 For entering the Keystone Correction mode....
XR-32S | XR-32X Operation Manual
Page 18
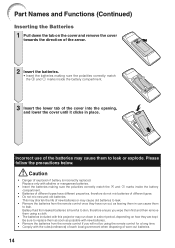
... batteries from the remote control if you wipe them first and then remove them using the remote control for a long time. • Comply with this projector may cause them to leak or explode. Be sure to replace them as soon as leaving them in can cause them to leak.
... batteries from the remote control if you wipe them first and then remove them using the remote control for a long time. • Comply with this projector may cause them to leak or explode. Be sure to replace them as soon as leaving them in can cause them to leak.
XR-32S | XR-32X Operation Manual
Page 19
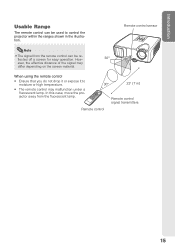
... reflected off a screen for easy operation. When using the remote control • Ensure that you do not drop it or expose it to control the projector within the ranges shown in the illustration. Remote control sensor Note • The signal from the fluorescent lamp. 30° 23n (7 m) Remote control signal transmitters...
... reflected off a screen for easy operation. When using the remote control • Ensure that you do not drop it or expose it to control the projector within the ranges shown in the illustration. Remote control sensor Note • The signal from the fluorescent lamp. 30° 23n (7 m) Remote control signal transmitters...
XR-32S | XR-32X Operation Manual
Page 20
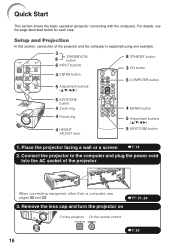
... connecting equipment other than a computer, see the page described below for each step. Connect the projector to the computer and plug the power cord into the AC socket of the projector and the computer is explained using one example. 3 8 STANDBY/ON button 6 INPUT buttons 8 ... ring 4 HEIGHT ADJUST lever 4 ENTER button 5 Adjustment buttons (P/R/O/Q) 5 KEYSTONE button 1. Quick Start This section shows the basic operation (projector connecting with the computer). Place the projector facing a wall or a screen _P. 18 2. For details, see pages 22 and 23. _PP. 21, 24 3. Remove the...
... connecting equipment other than a computer, see the page described below for each step. Connect the projector to the computer and plug the power cord into the AC socket of the projector and the computer is explained using one example. 3 8 STANDBY/ON button 6 INPUT buttons 8 ... ring 4 HEIGHT ADJUST lever 4 ENTER button 5 Adjustment buttons (P/R/O/Q) 5 KEYSTONE button 1. Quick Start This section shows the basic operation (projector connecting with the computer). Place the projector facing a wall or a screen _P. 18 2. For details, see pages 22 and 23. _PP. 21, 24 3. Remove the...

XR-32S | XR-32X Operation Manual
Page 21
...28 6. On the On the remote projector control INPUT list INPUT COMPUTER D DVI-D Computer On-screen display (RGB) COMPUTER RGB * 1024 × 768 D DVI-D Video *XR-32X only • When you press INPUT on the remote control. On the On the remote projector control On-screen display _P. 25 17... Turn the power off Press STANDBY/ON on the projector or STANDBY on the remote control, and then press...
...28 6. On the On the remote projector control INPUT list INPUT COMPUTER D DVI-D Computer On-screen display (RGB) COMPUTER RGB * 1024 × 768 D DVI-D Video *XR-32X only • When you press INPUT on the remote control. On the On the remote projector control On-screen display _P. 25 17... Turn the power off Press STANDBY/ON on the projector or STANDBY on the remote control, and then press...
XR-32S | XR-32X Operation Manual
Page 22
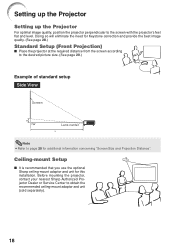
... • Refer to the screen with the projector's feet flat and level. Setting up the Projector Setting up the Projector For optimal image quality, position the projector perpendicular to page 20 for additional information concerning "Screen Size and Projection Distance". Before mounting the projector, contact your nearest Sharp Authorized Projector Dealer or Service Center to obtain the...
... • Refer to the screen with the projector's feet flat and level. Setting up the Projector Setting up the Projector For optimal image quality, position the projector perpendicular to page 20 for additional information concerning "Screen Size and Projection Distance". Before mounting the projector, contact your nearest Sharp Authorized Projector Dealer or Service Center to obtain the...

XR-32S | XR-32X Operation Manual
Page 23
... mounted, rear projection (with a translucent screen) [Menu item ➞ "Ceiling + Rear"] Indication of the 4 projection modes shown in the diagram below. Projection (PRJ) Mode The projector can use . (You can set the PRJ mode in "SCR-ADJ" menu. Select the mode most appropriate for the projection setting in use any of...
... mounted, rear projection (with a translucent screen) [Menu item ➞ "Ceiling + Rear"] Indication of the 4 projection modes shown in the diagram below. Projection (PRJ) Mode The projector can use . (You can set the PRJ mode in "SCR-ADJ" menu. Select the mode most appropriate for the projection setting in use any of...
XR-32S | XR-32X Operation Manual
Page 24
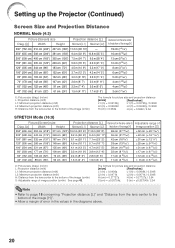
Setting up the Projector (Continued) Screen Size and Projection Distance NORMAL Mode (4:3) Picture (Screen) size Projection distance [L] Diag. [χ] Width Height Minimum [L1] Maximum [L2] 300Љ (762 cm) ...
Setting up the Projector (Continued) Screen Size and Projection Distance NORMAL Mode (4:3) Picture (Screen) size Projection distance [L] Diag. [χ] Width Height Minimum [L1] Maximum [L2] 300Љ (762 cm) ...


