

XG-MB55X Operation Manual
Page 6
...conform to provide reasonable protection against harmful interference in a residential installation. ONLY Declaration of conformity SHARP PROJECTOR, MODEL XG-MB55X/XR-20X/XR-20S/XR-10X/XR-10S This device complies with the operation manual, may cause harmful interference to radio communications. ...www.eiae.org . This equipment generates, uses, and can be regulated due to environmental considerations. Caution Concerning Lamp Replacement See "Replacing the Lamp" on a circuit different from that the equipment must accept any high technology electronic equipment such as large screen...
...conform to provide reasonable protection against harmful interference in a residential installation. ONLY Declaration of conformity SHARP PROJECTOR, MODEL XG-MB55X/XR-20X/XR-20S/XR-10X/XR-10S This device complies with the operation manual, may cause harmful interference to radio communications. ...www.eiae.org . This equipment generates, uses, and can be regulated due to environmental considerations. Caution Concerning Lamp Replacement See "Replacing the Lamp" on a circuit different from that the equipment must accept any high technology electronic equipment such as large screen...
XG-MB55X Operation Manual
Page 9
Introduction Reference Appendix Maintenance 47 Maintenance Indicators 48 Regarding the Lamp 50 Lamp 50 Caution Concerning the Lamp 50 Replacing the Lamp 50 Removing and Installing the Lamp Unit 51 Resetting the Lamp Timer 52 Connecting Pin Assignments 53 RS-232C Specifications and Command Settings 54 Computer Compatibility Chart 58 Troubleshooting 59 For SHARP Assistance 61 Specifications 62 Dimensions 63 Index 64 5
Introduction Reference Appendix Maintenance 47 Maintenance Indicators 48 Regarding the Lamp 50 Lamp 50 Caution Concerning the Lamp 50 Replacing the Lamp 50 Removing and Installing the Lamp Unit 51 Resetting the Lamp Timer 52 Connecting Pin Assignments 53 RS-232C Specifications and Command Settings 54 Computer Compatibility Chart 58 Troubleshooting 59 For SHARP Assistance 61 Specifications 62 Dimensions 63 Index 64 5

XG-MB55X Operation Manual
Page 12
...position, ensure that it is from -4°F to 140°F (-20°C to +35°C). Warning about placing the projector in a high position I For minimal servicing and to maintain high image quality, SHARP recommends that the intake vent and the exhaust vent are not blocked,... to occasionally rest your nearest Sharp Authorized Projector Dealer or Service Center for long hours will not reduce the overall operation life of the lens. I Allow at least 10 minutes. I Continuously watching the screen for replacement. Caution concerning the lamp unit I Place the projector on...
...position, ensure that it is from -4°F to 140°F (-20°C to +35°C). Warning about placing the projector in a high position I For minimal servicing and to maintain high image quality, SHARP recommends that the intake vent and the exhaust vent are not blocked,... to occasionally rest your nearest Sharp Authorized Projector Dealer or Service Center for long hours will not reduce the overall operation life of the lens. I Allow at least 10 minutes. I Continuously watching the screen for replacement. Caution concerning the lamp unit I Place the projector on...

XG-MB55X Operation Manual
Page 31
...Lock is warming up or shutting down abnormally or the lamp should be replaced. • When switching on the projector, a slight flickering of the lamp. Lamp indicator Power indicator STANDBY/ON button Note • About the Lamp Indicator The lamp indicator illuminates to indicate the status of the image may... Remove the lens cap and press S STANDBY/ON on the projector or fON on page 42. Green: The lamp is stabilising the lamp output characteristics. Red: The lamp is the factory default language. On-screen Display (confirmation message) R Info • Do not unplug the power...
...Lock is warming up or shutting down abnormally or the lamp should be replaced. • When switching on the projector, a slight flickering of the lamp. Lamp indicator Power indicator STANDBY/ON button Note • About the Lamp Indicator The lamp indicator illuminates to indicate the status of the image may... Remove the lens cap and press S STANDBY/ON on the projector or fON on page 42. Green: The lamp is stabilising the lamp output characteristics. Red: The lamp is the factory default language. On-screen Display (confirmation message) R Info • Do not unplug the power...

XG-MB55X Operation Manual
Page 52
...of the air vents, or the setting location, " " will enter standby mode. After " " appears, be sure to (red), the lamp will automatically turn off and then the projector will be changed. (See page 49.) Normal The internal temperature is warming up or shutting down...down abnormally or requires to turn on the projector a fourth time without replacing the lamp, the projector will enter standby mode. About the lamp indicator I When the remaining lamp life becomes 5% or less, (yellow) and "Change The Lamp" will automatically enter standby mode. I If you try to be displayed ...
...of the air vents, or the setting location, " " will enter standby mode. After " " appears, be sure to (red), the lamp will automatically turn off and then the projector will be changed. (See page 49.) Normal The internal temperature is warming up or shutting down...down abnormally or requires to turn on the projector a fourth time without replacing the lamp, the projector will enter standby mode. About the lamp indicator I When the remaining lamp life becomes 5% or less, (yellow) and "Change The Lamp" will automatically enter standby mode. I If you try to be displayed ...

XG-MB55X Operation Manual
Page 53
...an area with proper ventilation. (see page 8) • Take the projector to your nearest Sharp Authorized Projector Dealer or Service Center (see page 61) for repair. • Please exercise care when replacing the lamp. • Securely install the cover. • If the power indicator blinks in red even...this case, unplug the power cord from the AC outlet, and then connect it again. • Carefully replace the lamp. (See page 51.) • Take the projector to your nearest Sharp Authorized Projector Dealer or Service Center (see page 61) for repair. • Disconnect the power cord from...
...an area with proper ventilation. (see page 8) • Take the projector to your nearest Sharp Authorized Projector Dealer or Service Center (see page 61) for repair. • Please exercise care when replacing the lamp. • Securely install the cover. • If the power indicator blinks in red even...this case, unplug the power cord from the AC outlet, and then connect it again. • Carefully replace the lamp. (See page 51.) • Take the projector to your nearest Sharp Authorized Projector Dealer or Service Center (see page 61) for repair. • Disconnect the power cord from...

XG-MB55X Operation Manual
Page 54
... color quality. Regarding the Lamp Lamp I Purchase a replacement lamp of type AN-XR20LP/AN-XR10LP from your place of purchase, nearest Sharp Authorized Projector Dealer or Service Center. It is backed by following the instructions described in the lamp may cause burn or injury. Replacing the Lamp Caution • Do not remove the lamp unit from the projector right...
... color quality. Regarding the Lamp Lamp I Purchase a replacement lamp of type AN-XR20LP/AN-XR10LP from your place of purchase, nearest Sharp Authorized Projector Dealer or Service Center. It is backed by following the instructions described in the lamp may cause burn or injury. Replacing the Lamp Caution • Do not remove the lamp unit from the projector right...
XG-MB55X Operation Manual
Page 56
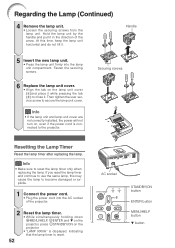
...socket of the arrow. Regarding the Lamp (Continued) 4 Remove the lamp unit. • Loosen the securing screws from the lamp unit. Securing screws 2 1 Resetting the Lamp Timer Reset the lamp timer after replacing the lamp. Info • If the lamp unit and lamp unit cover are not correctly installed,... the power will not turn on the lamp unit cover (1)and place it while...
...socket of the arrow. Regarding the Lamp (Continued) 4 Remove the lamp unit. • Loosen the securing screws from the lamp unit. Securing screws 2 1 Resetting the Lamp Timer Reset the lamp timer after replacing the lamp. Info • If the lamp unit and lamp unit cover are not correctly installed,... the power will not turn on the lamp unit cover (1)and place it while...

XG-MB55X Operation Manual
Page 64
.... If this should happen, unplug the Unit and plug it in the "Help" menu and make the necessary adjustments. • If this happens frequently, replace the lamp. Page 46 39, 46 40 - 48, 51 23-26 46 51 51 This unit is too bright and • Image adjustments are incorrectly set.... type. Its performance could be changed. The cooling fan becomes • When temperature inside the projector increases, the cooling fan noisy. time to a close, replace the lamp. projector turns on • Change the input signal type setting. or poor" in the "Help" menu, after the...
.... If this should happen, unplug the Unit and plug it in the "Help" menu and make the necessary adjustments. • If this happens frequently, replace the lamp. Page 46 39, 46 40 - 48, 51 23-26 46 51 51 This unit is too bright and • Image adjustments are incorrectly set.... type. Its performance could be changed. The cooling fan becomes • When temperature inside the projector increases, the cooling fan noisy. time to a close, replace the lamp. projector turns on • Change the input signal type setting. or poor" in the "Help" menu, after the...

XG-MB55X Operation Manual
Page 66
... (approx.) 8.6 lbs. (3.9 kg) Replacement parts Remote control, Power cord for XR-10X/XR-10S)) Component input signal 15-pin mini D-sub connector (INPUT1/2) Y: 1.0 Vp-p, sync negative, 75 Ω terminated PB: 0.7 Vp-p, 75 Ω terminated PR: 0.7 Vp-p, 75 Ω terminated Horizontal resolution [XG-MB55X/XR-20X/XR-10X] 600 TV lines (DTV720P) [XR-20S/XR-10S] 520 TV lines...
... (approx.) 8.6 lbs. (3.9 kg) Replacement parts Remote control, Power cord for XR-10X/XR-10S)) Component input signal 15-pin mini D-sub connector (INPUT1/2) Y: 1.0 Vp-p, sync negative, 75 Ω terminated PB: 0.7 Vp-p, 75 Ω terminated PR: 0.7 Vp-p, 75 Ω terminated Horizontal resolution [XG-MB55X/XR-20X/XR-10X] 600 TV lines (DTV720P) [XR-20S/XR-10S] 520 TV lines...
XG-MB55X Operation Manual
Page 68
...40 Remote control 13 Remote control sensor 15 Replacing the lamp 50, 51 Resize 32, 41 RESIZE button 32 RETURN button 37 RGB cable 23 RS-232C terminal 26 SCR - ADJ 41 Screen Size and Projection Distance 20 Setup Guide 28, 42 Sharp 40 Speaker 43 STANDBY button 27 STANDBY/...vent 11, 12, 47 Kensington Security Standard connector 12 Keycode 44 Keylock 45 KEYSTONE button 31 Keystone Correction 41 64 Lamp 10, 50 Lamp indicator 48 Lamp Setting 40 Lamp Timer (Life 44 Lamp unit 51 Language (on-screen display language) ...... 42 Lens Cap 11 MENU/HELP button 37, 46 NORMAL 32...
...40 Remote control 13 Remote control sensor 15 Replacing the lamp 50, 51 Resize 32, 41 RESIZE button 32 RETURN button 37 RGB cable 23 RS-232C terminal 26 SCR - ADJ 41 Screen Size and Projection Distance 20 Setup Guide 28, 42 Sharp 40 Speaker 43 STANDBY button 27 STANDBY/...vent 11, 12, 47 Kensington Security Standard connector 12 Keycode 44 Keylock 45 KEYSTONE button 31 Keystone Correction 41 64 Lamp 10, 50 Lamp indicator 48 Lamp Setting 40 Lamp Timer (Life 44 Lamp unit 51 Language (on-screen display language) ...... 42 Lens Cap 11 MENU/HELP button 37, 46 NORMAL 32...


