
XG-MB55X Operation Manual
Page 1
MULTIMEDIA PROJECTOR MODEL XG-MB55X XR-20X/XR-20S XR-10X/XR-10S OPERATION MANUAL Introduction Quick Start Setup Connections Basic Operation Useful Features Appendix
MULTIMEDIA PROJECTOR MODEL XG-MB55X XR-20X/XR-20S XR-10X/XR-10S OPERATION MANUAL Introduction Quick Start Setup Connections Basic Operation Useful Features Appendix
XG-MB55X Operation Manual
Page 2
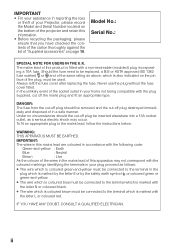
... and disposed of in a safe manner. IMPORTANT • For your assistance in reporting the loss or theft of your Projector, please record the Model and Serial Number located on the bottom of the projector and retain this product is fitted with a non-rewireable (moulded) plug incorporating a 10A fuse. IMPORTANT: The wires in...
... and disposed of in a safe manner. IMPORTANT • For your assistance in reporting the loss or theft of your Projector, please record the Model and Serial Number located on the bottom of the projector and retain this product is fitted with a non-rewireable (moulded) plug incorporating a 10A fuse. IMPORTANT: The wires in...
XG-MB55X Operation Manual
Page 5
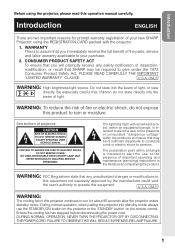
...the user's authority to your new SHARP Projector, using the projector, please read this equipment. DURING NORMAL OPERATION, NEVER TURN THE PROJECTOR OFF BY DISCONNECTING THE POWER CORD. WARNING: To reduce the risk of projector. The lightning flash with the projector. 1. U.S.A. ONLY WARNING: High ...is intended to alert the user to the presence of inspection, modification, or recall that children do not expose this projector continues to the presence of uninsulated "dangerous voltage" within a triangle is to persons. Introduction ENGLISH There are two...
...the user's authority to your new SHARP Projector, using the projector, please read this equipment. DURING NORMAL OPERATION, NEVER TURN THE PROJECTOR OFF BY DISCONNECTING THE POWER CORD. WARNING: To reduce the risk of projector. The lightning flash with the projector. 1. U.S.A. ONLY WARNING: High ...is intended to alert the user to the presence of inspection, modification, or recall that children do not expose this projector continues to the presence of uninsulated "dangerous voltage" within a triangle is to persons. Introduction ENGLISH There are two...

XG-MB55X Operation Manual
Page 6
... separation between the equipment and the receiver. • Connect the equipment into an outlet on the picture screen. This SHARP projector uses a DMD panel. As with the limits for help. These limits are designed to provide reasonable protection against harmful interference...panel contains 786,432 (XGMB55X/XR-20X/XR-10X) / 480,000 (XR-20S/XR-10S) pixels (micromirrors). ONLY PRODUCT DISPOSAL This projector utilizes tin-lead solder, and a pressurized lamp containing a small amount of conformity SHARP PROJECTOR, MODEL XG-MB55X/XR-20X/XR-20S/XR-10X/XR-10S This device complies with ...
... separation between the equipment and the receiver. • Connect the equipment into an outlet on the picture screen. This SHARP projector uses a DMD panel. As with the limits for help. These limits are designed to provide reasonable protection against harmful interference...panel contains 786,432 (XGMB55X/XR-20X/XR-10X) / 480,000 (XR-20S/XR-10S) pixels (micromirrors). ONLY PRODUCT DISPOSAL This projector utilizes tin-lead solder, and a pressurized lamp containing a small amount of conformity SHARP PROJECTOR, MODEL XG-MB55X/XR-20X/XR-20S/XR-10X/XR-10S This device complies with ...

XG-MB55X Operation Manual
Page 7
...operation can connect and operate all models in this operation manual, the illustration and the screen display are slightly different, depending on the projector. 1 Press BMENU. • The "Picture" menu screen for explanation, and may differ slightly from the actual display. Note .........Indicates...using the buttons on the model. Example: "Picture" screen menu for setting up and operating the projector. However, you can also be performed by using the projector. Picture SCR - Using the Menu Screen ENTER button Adjustment buttons (P/R/O/Q) MENU/HELP button Adjustment buttons...
...operation can connect and operate all models in this operation manual, the illustration and the screen display are slightly different, depending on the projector. 1 Press BMENU. • The "Picture" menu screen for explanation, and may differ slightly from the actual display. Note .........Indicates...using the buttons on the model. Example: "Picture" screen menu for setting up and operating the projector. However, you can also be performed by using the projector. Picture SCR - Using the Menu Screen ENTER button Adjustment buttons (P/R/O/Q) MENU/HELP button Adjustment buttons...

XG-MB55X Operation Manual
Page 8
...Checking the Lamp Life Status 44 System Lock Function 44 Locking the Operation Buttons on 27 Turning the Power off (Putting the Projector into Standby Mode 27 Image Projection 28 About the Setup Guide 28 Adjusting the Projected Image 28 Switching the Input Mode 30...PRJ) Mode 19 Screen Size and Projection Distance .. 20 Connections Connections 21 Samples of Cables for Connection ..... 22 Connecting to a Computer 23 Connecting to Video Equipment ......... 24 Connecting to a Monitor with RGB Input Terminal 25 Controlling the Projector by a Computer 26 Connecting the Power Cord 26 ...
...Checking the Lamp Life Status 44 System Lock Function 44 Locking the Operation Buttons on 27 Turning the Power off (Putting the Projector into Standby Mode 27 Image Projection 28 About the Setup Guide 28 Adjusting the Projected Image 28 Switching the Input Mode 30...PRJ) Mode 19 Screen Size and Projection Distance .. 20 Connections Connections 21 Samples of Cables for Connection ..... 22 Connecting to a Computer 23 Connecting to Video Equipment ......... 24 Connecting to a Monitor with RGB Input Terminal 25 Controlling the Projector by a Computer 26 Connecting the Power Cord 26 ...

XG-MB55X Operation Manual
Page 12
... vents. This does not indicate a malfunction. (See pages 48 and 49.) Remove the projector power cord from -4°F to 140°F (-20°C to avoid personal injury caused by a Sharp Authorized Projector Dealer or Service Center. Warning about placing the projector in high-altitude areas with extremes of approximately 1,500 meters (4,900 feet) or more...
... vents. This does not indicate a malfunction. (See pages 48 and 49.) Remove the projector power cord from -4°F to 140°F (-20°C to avoid personal injury caused by a Sharp Authorized Projector Dealer or Service Center. Warning about placing the projector in high-altitude areas with extremes of approximately 1,500 meters (4,900 feet) or more...

XG-MB55X Operation Manual
Page 13
... PDF operation manuals in several languages are in internal temperature, as this manual. visual equipment to the projector, make the connections. Temperature monitor function I If the projector starts to overheat due to rise in . dicators" on the circumstances and the internal temperature. This ...equipment to hard impact and/or vibration, as the cooling fan also stops. Before moving the projector, be sure not to "Maintenance In- Caution regarding usage of the projector and the equipment to be connected. This does not indicate malfunction. • Do not ...
... PDF operation manuals in several languages are in internal temperature, as this manual. visual equipment to the projector, make the connections. Temperature monitor function I If the projector starts to overheat due to rise in . dicators" on the circumstances and the internal temperature. This ...equipment to hard impact and/or vibration, as the cooling fan also stops. Before moving the projector, be sure not to "Maintenance In- Caution regarding usage of the projector and the equipment to be connected. This does not indicate malfunction. • Do not ...

XG-MB55X Operation Manual
Page 14
... (1.8 m)) QACCBA036WJPZ For Australia, New Zealand and Oceania (6' (1.8 m)) QACCLA018WJPZ * Use the power cord that corresponds to the wall outlet in your nearest Sharp Authorized Projector Dealer or Service Center. 10 Accessories Supplied accessories Remote control Two R-6 batteries RGB cable RRMCGA398WJSA ("AA" size, UM/SUM-3, (10' (3.0 m)) HP-7... (5 57/64o (15 cm)) I Remote receiver I Lamp unit AN-C3CP2 AN-A1RS AN-MR2 AN-XR20LP (for XG-MB55X/XR-20X/XR-20S) AN-XR10LP (for XR-10X/XR-10S) Note • Some of the optional accessories may not be available depending on the region.
... (1.8 m)) QACCBA036WJPZ For Australia, New Zealand and Oceania (6' (1.8 m)) QACCLA018WJPZ * Use the power cord that corresponds to the wall outlet in your nearest Sharp Authorized Projector Dealer or Service Center. 10 Accessories Supplied accessories Remote control Two R-6 batteries RGB cable RRMCGA398WJSA ("AA" size, UM/SUM-3, (10' (3.0 m)) HP-7... (5 57/64o (15 cm)) I Remote receiver I Lamp unit AN-C3CP2 AN-A1RS AN-MR2 AN-XR20LP (for XG-MB55X/XR-20X/XR-20S) AN-XR10LP (for XR-10X/XR-10S) Note • Some of the optional accessories may not be available depending on the region.
XG-MB55X Operation Manual
Page 15
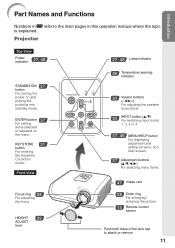
... picture. 15 Remote control sensor Push both sides of the lens cap to the main pages in this operation manual where the topic is explained. Projector Top View Power indicator 27, 48 STANDBY/ON 27 button For turning the power on the menu. Front View Focus ring 28 For adjusting the... focus. ENTER button 37 For setting items selected or adjusted on and putting the projector into standby mode. Introduction Part Names and Functions Numbers in Z refer to attach or remove. 11
... picture. 15 Remote control sensor Push both sides of the lens cap to the main pages in this operation manual where the topic is explained. Projector Top View Power indicator 27, 48 STANDBY/ON 27 button For turning the power on the menu. Front View Focus ring 28 For adjusting the... focus. ENTER button 37 For setting items selected or adjusted on and putting the projector into standby mode. Introduction Part Names and Functions Numbers in Z refer to attach or remove. 11
XG-MB55X Operation Manual
Page 16
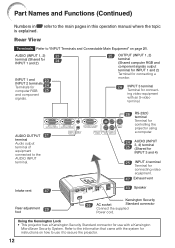
...of equipment connected to the main pages in Z refer to the AUDIO INPUT terminal. Using the Kensington Lock • This projector has a Kensington Security Standard connector for connecting video equipment with a Kensington MicroSaver Security System. Intake vent 47 26 RS-...232C terminal Terminal for controlling the projector using a computer. 24 AUDIO (INPUT 25 3, 4) terminal (Shared for INPUT 3 and 4) 25 INPUT 4 terminal Terminal for instructions ...
...of equipment connected to the main pages in Z refer to the AUDIO INPUT terminal. Using the Kensington Lock • This projector has a Kensington Security Standard connector for connecting video equipment with a Kensington MicroSaver Security System. Intake vent 47 26 RS-...232C terminal Terminal for controlling the projector using a computer. 24 AUDIO (INPUT 25 3, 4) terminal (Shared for INPUT 3 and 4) 25 INPUT 4 terminal Terminal for instructions ...
XG-MB55X Operation Manual
Page 17
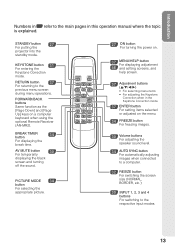
... selecting menu items. • For adjusting the Keystone Correction when in this operation manual where the topic is explained. STANDBY button 27 For putting the projector into the standby mode. KEYSTONE button 31 For entering the Keystone Correction mode. FORWARD/BACK buttons Same function as the [Page Down] and [Page Up...
... selecting menu items. • For adjusting the Keystone Correction when in this operation manual where the topic is explained. STANDBY button 27 For putting the projector into the standby mode. KEYSTONE button 31 For entering the Keystone Correction mode. FORWARD/BACK buttons Same function as the [Page Down] and [Page Up...
XG-MB55X Operation Manual
Page 18
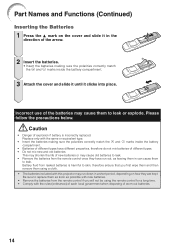
Please follow the precautions below. Caution • Danger of explosion if battery is harmful to replace them as soon as possible with this projector may run out, as leaving them in can cause them to leak. This may shorten the life of new batteries or may cause them to ...
Please follow the precautions below. Caution • Danger of explosion if battery is harmful to replace them as soon as possible with this projector may run out, as leaving them in can cause them to leak. This may shorten the life of new batteries or may cause them to ...

XG-MB55X Operation Manual
Page 19
When using the remote control • Ensure that you do not drop, expose to control the projector within the ranges shown in the illustration. In this case, move the projector away from the remote control can be re- Introduction Usable Range The remote control can be used to mois- flected off a screen for...
When using the remote control • Ensure that you do not drop, expose to control the projector within the ranges shown in the illustration. In this case, move the projector away from the remote control can be re- Introduction Usable Range The remote control can be used to mois- flected off a screen for...

XG-MB55X Operation Manual
Page 20
... described below for each step. Remove the lens cap and turn the projector on On the projector On the remote control _P. 27 16 Connect the projector to the computer and plug the power cord into the AC socket of the projector and the computer is explained using one example. 3 8 STANDBY/ON button ... button 3 ON button 7 KEYSTONE button 7 KEYSTONE button 4 ENTER button 4 Focus ring 4 HEIGHT ADJUST lever 6 INPUT 1 button 1. Quick Start This section shows the basic operation (projector connecting with the computer). For details, see pages 24 and 25. _PP. 21-26 3. Place the...
... described below for each step. Remove the lens cap and turn the projector on On the projector On the remote control _P. 27 16 Connect the projector to the computer and plug the power cord into the AC socket of the projector and the computer is explained using one example. 3 8 STANDBY/ON button ... button 3 ON button 7 KEYSTONE button 7 KEYSTONE button 4 ENTER button 4 Focus ring 4 HEIGHT ADJUST lever 6 INPUT 1 button 1. Quick Start This section shows the basic operation (projector connecting with the computer). For details, see pages 24 and 25. _PP. 21-26 3. Place the...

XG-MB55X Operation Manual
Page 21
...set to finish the Setup Guide. _P. 28 5. Correct trapezoidal distortion Correcting trapezoidal distortion using the INPUT button on the projector or C INPUT 1 on the projector, input mode switches in the Setup Guide and adjust the focus, screen size, and height (angle). 3 After adjusting ..., press the CINPUT 1/CINPUT 2/DINPUT 3/EINPUT 4 button to put the projector into standby mode. Adjust the projected image with the Setup Guide 1 After the projector turns on XG-MB55X/XR-20X.) On the projector Shrinks upper side. Quick Start 4. Select the INPUT mode Select the "INPUT...
...set to finish the Setup Guide. _P. 28 5. Correct trapezoidal distortion Correcting trapezoidal distortion using the INPUT button on the projector or C INPUT 1 on the projector, input mode switches in the Setup Guide and adjust the focus, screen size, and height (angle). 3 After adjusting ..., press the CINPUT 1/CINPUT 2/DINPUT 3/EINPUT 4 button to put the projector into standby mode. Adjust the projected image with the Setup Guide 1 After the projector turns on XG-MB55X/XR-20X.) On the projector Shrinks upper side. Quick Start 4. Select the INPUT mode Select the "INPUT...

XG-MB55X Operation Manual
Page 22
... center L Note • Refer to page 20 for countries other than the U.S.A.). Before mounting the projector, contact your nearest Sharp Authorized Projector Dealer or Service Center to the screen with the projector's feet flat and level. Setting up the Projector Setting up the Projector For optimal image quality, position the projector perpendicular to obtain the recommended ceiling-mount...
... center L Note • Refer to page 20 for countries other than the U.S.A.). Before mounting the projector, contact your nearest Sharp Authorized Projector Dealer or Service Center to the screen with the projector's feet flat and level. Setting up the Projector Setting up the Projector For optimal image quality, position the projector perpendicular to obtain the recommended ceiling-mount...

XG-MB55X Operation Manual
Page 23
Projection (PRJ) Mode The projector can use . (You can set the PRJ mode in "SCR-ADJ" menu. Select the mode most appropriate for the projection setting in the diagram below. ...
Projection (PRJ) Mode The projector can use . (You can set the PRJ mode in "SCR-ADJ" menu. Select the mode most appropriate for the projection setting in the diagram below. ...

XG-MB55X Operation Manual
Page 24
Setting up the Projector (Continued) Screen Size and Projection Distance NORMAL Mode (4:3) Picture (...minus (-) sign indicate the distance from the lens center to the bottom of the image (H)". • Allow a margin of the image. 20 The formula for picture size and projection distance [m/cm] L1 (m) = 0.03482χ L2 (m) = 0.04029χ [Feet/inches]...(52Љ) 125 cm (49Љ) 115 cm (45Љ) 105 cm (41Љ) 90 cm (35Љ) 75 cm (29Љ) 50 cm (20Љ) 9.5 m (31Ј 1Љ) 11.0 m (36Ј 0Љ) 8.5 m (28Ј 0Љ) 9.9 m (32Ј 5Љ) ...
Setting up the Projector (Continued) Screen Size and Projection Distance NORMAL Mode (4:3) Picture (...minus (-) sign indicate the distance from the lens center to the bottom of the image (H)". • Allow a margin of the image. 20 The formula for picture size and projection distance [m/cm] L1 (m) = 0.03482χ L2 (m) = 0.04029χ [Feet/inches]...(52Љ) 125 cm (49Љ) 115 cm (45Љ) 105 cm (41Љ) 90 cm (35Љ) 75 cm (29Љ) 50 cm (20Љ) 9.5 m (31Ј 1Љ) 11.0 m (36Ј 0Љ) 8.5 m (28Ј 0Љ) 9.9 m (32Ј 5Љ) ...

XG-MB55X Operation Manual
Page 25
... page 23.) I Connecting video equipment with S-video output terminal (VCR, DVD player, etc.). (See page 24.) RS-232C terminal Connecting the computer to control the projector. (See page 26.) AUDIO OUTPUT terminal Connecting to this terminal.
... page 23.) I Connecting video equipment with S-video output terminal (VCR, DVD player, etc.). (See page 24.) RS-232C terminal Connecting the computer to control the projector. (See page 26.) AUDIO OUTPUT terminal Connecting to this terminal.


