
XG-MB55X Operation Manual
Page 1
MULTIMEDIA PROJECTOR MODEL XG-MB55X XR-20X/XR-20S XR-10X/XR-10S OPERATION MANUAL Introduction Quick Start Setup Connections Basic Operation Useful Features Appendix
MULTIMEDIA PROJECTOR MODEL XG-MB55X XR-20X/XR-20S XR-10X/XR-10S OPERATION MANUAL Introduction Quick Start Setup Connections Basic Operation Useful Features Appendix
XG-MB55X Operation Manual
Page 2
... (moulded) plug incorporating a 10A fuse. IMPORTANT • For your assistance in reporting the loss or theft of your Projector, please record the Model and Serial Number located on the bottom of the projector and retain this information. • Before recycling the packaging, please ensure that you have checked the contents of the...
... (moulded) plug incorporating a 10A fuse. IMPORTANT • For your assistance in reporting the loss or theft of your Projector, please record the Model and Serial Number located on the bottom of the projector and retain this information. • Before recycling the packaging, please ensure that you have checked the contents of the...
XG-MB55X Operation Manual
Page 5
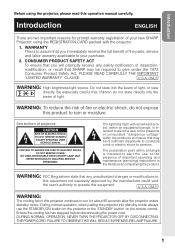
...that you immediately receive the full benefit of the parts, service and labor warranty applicable to your new SHARP Projector, using the projector, please read this projector continues to run for prompt warranty registration of your purchase. 2. Introduction ENGLISH There are two important ...reasons for about 90 seconds after the projector enters standby mode. WARNING: FCC Regulations state that any safety notification of inspection, modification, or recall that SHARP may be required to give under the 1972 Consumer Product Safety Act...
...that you immediately receive the full benefit of the parts, service and labor warranty applicable to your new SHARP Projector, using the projector, please read this projector continues to run for prompt warranty registration of your purchase. 2. Introduction ENGLISH There are two important ...reasons for about 90 seconds after the projector enters standby mode. WARNING: FCC Regulations state that any safety notification of inspection, modification, or recall that SHARP may be required to give under the 1972 Consumer Product Safety Act...

XG-MB55X Operation Manual
Page 6
...that interference will not affect the picture quality or the life expectancy of the unit. 2 This SHARP projector uses a DMD panel. Responsible Party: SHARP ELECTRONICS CORPORATION Sharp Plaza, Mahwah, New Jersey 07430-2135 TEL: 1-800-BE-SHARP (1-800-237-4277) U.S.A. Caution Concerning Lamp Replacement See "Replacing the Lamp" on the picture.... INFORMATION This equipment has been tested and found to comply with Part 15 of the FCC rules. ONLY Declaration of conformity SHARP PROJECTOR, MODEL XG-MB55X/XR-20X/XR-20S/XR-10X/XR-10S This device complies with the limits for help.
...that interference will not affect the picture quality or the life expectancy of the unit. 2 This SHARP projector uses a DMD panel. Responsible Party: SHARP ELECTRONICS CORPORATION Sharp Plaza, Mahwah, New Jersey 07430-2135 TEL: 1-800-BE-SHARP (1-800-237-4277) U.S.A. Caution Concerning Lamp Replacement See "Replacing the Lamp" on the picture.... INFORMATION This equipment has been tested and found to comply with Part 15 of the FCC rules. ONLY Declaration of conformity SHARP PROJECTOR, MODEL XG-MB55X/XR-20X/XR-20S/XR-10X/XR-10S This device complies with the limits for help.

XG-MB55X Operation Manual
Page 7
... operate all models in this operation manual, the illustration and the screen display are slightly different, depending on the projector. 1 Press BMENU. • The "Picture" menu screen for setting up and operating the projector. Picture SCR - For Future Reference Maintenance P. 47 Troubleshooting PP. 59 and 60 Index P. 64 3 Note .........Indicates additional information... RETURN button • Press l RETURN to return to the previous screen when the menu is displayed. However, you can also be performed by using the projector.
... operate all models in this operation manual, the illustration and the screen display are slightly different, depending on the projector. 1 Press BMENU. • The "Picture" menu screen for setting up and operating the projector. Picture SCR - For Future Reference Maintenance P. 47 Troubleshooting PP. 59 and 60 Index P. 64 3 Note .........Indicates additional information... RETURN button • Press l RETURN to return to the previous screen when the menu is displayed. However, you can also be performed by using the projector.

XG-MB55X Operation Manual
Page 8
... Image ........ 42 Selecting the Setup Guide 42 Reversing/Inverting Projected Images 42 Selecting the On-screen Display Language 42 Adjusting the Projector Function ("PRJ - ADJ" menu 43 Auto Search Function 43 Auto Sync (Auto Sync Adjustment) ..... 43 Auto Power Off Function...Mode 19 Screen Size and Projection Distance .. 20 Connections Connections 21 Samples of Cables for Connection ..... 22 Connecting to a Computer 23 Connecting to Video Equipment ......... 24 Connecting to a Monitor with RGB Input Terminal 25 Controlling the Projector by a Computer 26 Connecting the Power ...
... Image ........ 42 Selecting the Setup Guide 42 Reversing/Inverting Projected Images 42 Selecting the On-screen Display Language 42 Adjusting the Projector Function ("PRJ - ADJ" menu 43 Auto Search Function 43 Auto Sync (Auto Sync Adjustment) ..... 43 Auto Power Off Function...Mode 19 Screen Size and Projection Distance .. 20 Connections Connections 21 Samples of Cables for Connection ..... 22 Connecting to a Computer 23 Connecting to Video Equipment ......... 24 Connecting to a Monitor with RGB Input Terminal 25 Controlling the Projector by a Computer 26 Connecting the Power ...

XG-MB55X Operation Manual
Page 12
... long as not to avoid personal injury caused by a Sharp Authorized Projector Dealer or Service Center. Neglecting this projector be performed by the projector falling down. This does not indicate a malfunction. (See pages 48 and 49.) Remove the projector power cord from -4°F to 140°F (-20°C to the normal operating condition. ticles if lamp...
... long as not to avoid personal injury caused by a Sharp Authorized Projector Dealer or Service Center. Neglecting this projector be performed by the projector falling down. This does not indicate a malfunction. (See pages 48 and 49.) Remove the projector power cord from -4°F to 140°F (-20°C to the normal operating condition. ticles if lamp...

XG-MB55X Operation Manual
Page 13
...click the "My Computer" icon. 3 Double click the "CD-ROM" drive. 4 Double click the language (name of the projector I When using the projector in internal temperature, as this manual. Info • The cooling fan regulates the internal temperature, and its performance is automatically ...controlled. This does not indicate malfunction. • Do not unplug the power cord during projector operation due to changes in . Accessing the PDF Manuals for instructions on the circumstances and the internal temperature. Caution regarding usage...
...click the "My Computer" icon. 3 Double click the "CD-ROM" drive. 4 Double click the language (name of the projector I When using the projector in internal temperature, as this manual. Info • The cooling fan regulates the internal temperature, and its performance is automatically ...controlled. This does not indicate malfunction. • Do not unplug the power cord during projector operation due to changes in . Accessing the PDF Manuals for instructions on the circumstances and the internal temperature. Caution regarding usage...

XG-MB55X Operation Manual
Page 14
.... • Operation manual (this manual (TINS-C220WJZZ) and CD-ROM (UDSKAA074WJZZ)) Optional accessories I 3 RCA to the wall outlet in your nearest Sharp Authorized Projector Dealer or Service Center. 10 and Singapore (6' (1.8 m)) QACCBA036WJPZ For Australia, New Zealand and Oceania (6' (1.8 m)) QACCLA018WJPZ * Use the power cord ...(5 57/64o (15 cm)) I Remote receiver I Lamp unit AN-C3CP2 AN-A1RS AN-MR2 AN-XR20LP (for XG-MB55X/XR-20X/XR-20S) AN-XR10LP (for XR-10X/XR-10S) Note • Some of the optional accessories may not be available depending on the region. and Canada, etc. (6' ...
.... • Operation manual (this manual (TINS-C220WJZZ) and CD-ROM (UDSKAA074WJZZ)) Optional accessories I 3 RCA to the wall outlet in your nearest Sharp Authorized Projector Dealer or Service Center. 10 and Singapore (6' (1.8 m)) QACCBA036WJPZ For Australia, New Zealand and Oceania (6' (1.8 m)) QACCLA018WJPZ * Use the power cord ...(5 57/64o (15 cm)) I Remote receiver I Lamp unit AN-C3CP2 AN-A1RS AN-MR2 AN-XR20LP (for XG-MB55X/XR-20X/XR-20S) AN-XR10LP (for XR-10X/XR-10S) Note • Some of the optional accessories may not be available depending on the region. and Canada, etc. (6' ...
XG-MB55X Operation Manual
Page 15
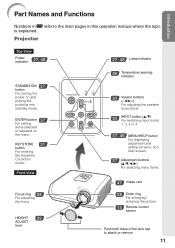
Projector Top View Power indicator 27, 48 STANDBY/ON 27 button For turning the power on the menu. Introduction Part Names and Functions Numbers in this ... topic is explained. Front View Focus ring 28 For adjusting the focus. ENTER button 37 For setting items selected or adjusted on and putting the projector into standby mode. HEIGHT 29 ADJUST lever 27, 48 Lamp indicator 48 Temperature warning indicator 30 Volume buttons (-O/Q+) For adjusting the speaker sound level. 30...
Projector Top View Power indicator 27, 48 STANDBY/ON 27 button For turning the power on the menu. Introduction Part Names and Functions Numbers in this ... topic is explained. Front View Focus ring 28 For adjusting the focus. ENTER button 37 For setting items selected or adjusted on and putting the projector into standby mode. HEIGHT 29 ADJUST lever 27, 48 Lamp indicator 48 Temperature warning indicator 30 Volume buttons (-O/Q+) For adjusting the speaker sound level. 30...
XG-MB55X Operation Manual
Page 16
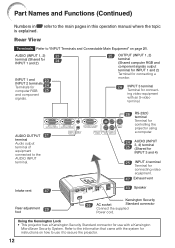
Intake vent 47 26 RS-232C terminal Terminal for controlling the projector using a computer. 24 AUDIO (INPUT 25 3, 4) terminal (Shared for INPUT 3 and 4) 25 INPUT 4 terminal Terminal for instructions on page 21. Rear ...signals output terminal for INPUT 1 and 2) Terminal for connecting a monitor. 24 INPUT 3 terminal Terminal for use it to secure the projector. 12 Using the Kensington Lock • This projector has a Kensington Security Standard connector for connecting video equipment with a Kensington MicroSaver Security System. Part Names and Functions (Continued) Numbers ...
Intake vent 47 26 RS-232C terminal Terminal for controlling the projector using a computer. 24 AUDIO (INPUT 25 3, 4) terminal (Shared for INPUT 3 and 4) 25 INPUT 4 terminal Terminal for instructions on page 21. Rear ...signals output terminal for INPUT 1 and 2) Terminal for connecting a monitor. 24 INPUT 3 terminal Terminal for use it to secure the projector. 12 Using the Kensington Lock • This projector has a Kensington Security Standard connector for connecting video equipment with a Kensington MicroSaver Security System. Part Names and Functions (Continued) Numbers ...
XG-MB55X Operation Manual
Page 17
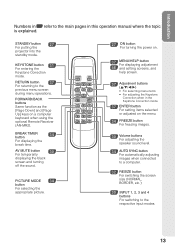
... selecting menu items. • For adjusting the Keystone Correction when in this operation manual where the topic is explained. STANDBY button 27 For putting the projector into the standby mode. FORWARD/BACK buttons Same function as the [Page Down] and [Page Up] keys on a computer keyboard when using the optional Remote...
... selecting menu items. • For adjusting the Keystone Correction when in this operation manual where the topic is explained. STANDBY button 27 For putting the projector into the standby mode. FORWARD/BACK buttons Same function as the [Page Down] and [Page Up] keys on a computer keyboard when using the optional Remote...
XG-MB55X Operation Manual
Page 18
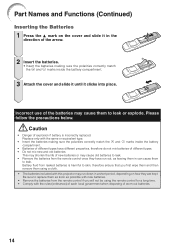
... batteries from the remote control if you first wipe them and then remove them using the remote control for a long time. • Comply with this projector may shorten the life of different types. • Do not mix new and old batteries. Battery fluid from the remote control once they are kept...
... batteries from the remote control if you first wipe them and then remove them using the remote control for a long time. • Comply with this projector may shorten the life of different types. • Do not mix new and old batteries. Battery fluid from the remote control once they are kept...

XG-MB55X Operation Manual
Page 19
In this case, move the projector away from the remote control can be re- Note • The signal from the fluorescent lamp. 30° Remote control signal transmitters 30° Remote ...control sensor 23n (7 m) Remote control 15 When using the remote control • Ensure that you do not drop, expose to control the projector within the ranges shown in the illustration. flected off a screen for easy operation. Introduction Usable Range The remote control can be used to mois- However...
In this case, move the projector away from the remote control can be re- Note • The signal from the fluorescent lamp. 30° Remote control signal transmitters 30° Remote ...control sensor 23n (7 m) Remote control 15 When using the remote control • Ensure that you do not drop, expose to control the projector within the ranges shown in the illustration. flected off a screen for easy operation. Introduction Usable Range The remote control can be used to mois- However...

XG-MB55X Operation Manual
Page 20
... This section shows the basic operation (projector connecting with the computer). Remove the lens cap and turn the projector on On the projector On the remote control _P. 27 16 Setup and Projection In this section, connection of the projector When connecting equipment other than the computer..., see the page described below for each step. Connect the projector to the computer and plug the power cord into the AC socket of the projector and the computer is explained using one example. 3 8 STANDBY/ON button 8 STANDBY button 6 INPUT button...
... This section shows the basic operation (projector connecting with the computer). Remove the lens cap and turn the projector on On the projector On the remote control _P. 27 16 Setup and Projection In this section, connection of the projector When connecting equipment other than the computer..., see the page described below for each step. Connect the projector to the computer and plug the power cord into the AC socket of the projector and the computer is explained using one example. 3 8 STANDBY/ON button 8 STANDBY button 6 INPUT button...

XG-MB55X Operation Manual
Page 21
...On". Turn the computer on the remote control. On the On the remote On-screen display (RGB) projector control • When pressing the INPUT button on XG-MB55X/XR-20X.) On the projector Shrinks upper side. n page 42) 2 Follow the steps in the following order: INPUT1 INPUT2 INPUT3... INPUT4 • When using the Keystone Correction. (Keystone Correction functions automatically on the projector, input mode switches in the Setup...
...On". Turn the computer on the remote control. On the On the remote On-screen display (RGB) projector control • When pressing the INPUT button on XG-MB55X/XR-20X.) On the projector Shrinks upper side. n page 42) 2 Follow the steps in the following order: INPUT1 INPUT2 INPUT3... INPUT4 • When using the Keystone Correction. (Keystone Correction functions automatically on the projector, input mode switches in the Setup...

XG-MB55X Operation Manual
Page 22
... best image quality. (See page 31.) Standard Setup (Front Projection) I Place the projector at the required distance from the screen according to the desired picture size. (See page 20.) Example of this installation. See page 42 for use the optional Sharp ceiling-mount bracket for additional information concerning "Screen Size and Projection Distance".
... best image quality. (See page 31.) Standard Setup (Front Projection) I Place the projector at the required distance from the screen according to the desired picture size. (See page 20.) Example of this installation. See page 42 for use the optional Sharp ceiling-mount bracket for additional information concerning "Screen Size and Projection Distance".

XG-MB55X Operation Manual
Page 23
...;"60" 6'1(02."1-7m'1-129".4'7m("2-).191m'1-"3.41m1)'(53."5-1m3-'34".0 m2)2'(17.00"m-2-68'5.1"3m4)'(310"-.43m9'8-"12.1 m) Projection Distance 19 Projection (PRJ) Mode The projector can use . (You can set the PRJ mode in "SCR-ADJ" menu.
...;"60" 6'1(02."1-7m'1-129".4'7m("2-).191m'1-"3.41m1)'(53."5-1m3-'34".0 m2)2'(17.00"m-2-68'5.1"3m4)'(310"-.43m9'8-"12.1 m) Projection Distance 19 Projection (PRJ) Mode The projector can use . (You can set the PRJ mode in "SCR-ADJ" menu.

XG-MB55X Operation Manual
Page 24
... cm (52Љ) 125 cm (49Љ) 115 cm (45Љ) 105 cm (41Љ) 90 cm (35Љ) 75 cm (29Љ) 50 cm (20Љ) 9.5 m (31Ј 1Љ) 11.0 m (36Ј 0Љ) 8.5 m (28Ј 0Љ) 9.9 m (32Ј 5Љ) 7.6 m (24Ј 11Љ) 8.8 m (28Ј 10...1506;4 29/32 8 cm (ע3 17/64Љ) χ: Picture size (diag.) (in ) See page 41. Setting up the Projector (Continued) Screen Size and Projection Distance NORMAL Mode (4:3) Picture (Screen) size Diag. [χ] Width Height Projection distance [L] Minimum [L1] Maximum [L2] 300...
... cm (52Љ) 125 cm (49Љ) 115 cm (45Љ) 105 cm (41Љ) 90 cm (35Љ) 75 cm (29Љ) 50 cm (20Љ) 9.5 m (31Ј 1Љ) 11.0 m (36Ј 0Љ) 8.5 m (28Ј 0Љ) 9.9 m (32Ј 5Љ) 7.6 m (24Ј 11Љ) 8.8 m (28Ј 10...1506;4 29/32 8 cm (ע3 17/64Љ) χ: Picture size (diag.) (in ) See page 41. Setting up the Projector (Continued) Screen Size and Projection Distance NORMAL Mode (4:3) Picture (Screen) size Diag. [χ] Width Height Projection distance [L] Minimum [L1] Maximum [L2] 300...

XG-MB55X Operation Manual
Page 25
... INPUT 3 terminal Connecting video equipment with S-video output terminal (VCR, DVD player, etc.). (See page 24.) RS-232C terminal Connecting the computer to control the projector. (See page 26.) AUDIO OUTPUT terminal Connecting to an amplifier or other audio equipment with ø3.5 mm minijack plug to connect to this terminal. Connections...
... INPUT 3 terminal Connecting video equipment with S-video output terminal (VCR, DVD player, etc.). (See page 24.) RS-232C terminal Connecting the computer to control the projector. (See page 26.) AUDIO OUTPUT terminal Connecting to an amplifier or other audio equipment with ø3.5 mm minijack plug to connect to this terminal. Connections...


