
XG-MB55X Operation Manual
Page 5
... projector. 1. During normal operation, when putting the projector into standby mode always use the STANDBY/ON button on the projector or the STANDBY button on the remote control. WARNING: FCC Regulations state that any safety notification of inspection, modification, or recall that you immediately receive the full benefit of projector. U.S.A. See bottom of the parts, service and labor warranty applicable to your new SHARP Projector, using the projector, please read this equipment. FAILURE...
... projector. 1. During normal operation, when putting the projector into standby mode always use the STANDBY/ON button on the projector or the STANDBY button on the remote control. WARNING: FCC Regulations state that any safety notification of inspection, modification, or recall that you immediately receive the full benefit of projector. U.S.A. See bottom of the parts, service and labor warranty applicable to your new SHARP Projector, using the projector, please read this equipment. FAILURE...

XG-MB55X Operation Manual
Page 8
...) Mode 19 Screen Size and Projection Distance .. 20 Connections Connections 21 Samples of Cables for Connection ..... 22 Connecting to a Computer 23 Connecting to Video Equipment ......... 24 Connecting to a Monitor with RGB Input Terminal 25 Controlling the Projector by a Computer 26 Connecting the Power Cord 26 Using Basic Operation Turning the Projector On/Off 27 Turning the Projector on the Projector (Keylock Function 45 Troubleshooting with the Remote Control .... 34 Displaying and Setting the Break Timer 34 Auto Sync (Auto Sync Adjustment) ..... 34 Freezing a Moving Image 34...
...) Mode 19 Screen Size and Projection Distance .. 20 Connections Connections 21 Samples of Cables for Connection ..... 22 Connecting to a Computer 23 Connecting to Video Equipment ......... 24 Connecting to a Monitor with RGB Input Terminal 25 Controlling the Projector by a Computer 26 Connecting the Power Cord 26 Using Basic Operation Turning the Projector On/Off 27 Turning the Projector on the Projector (Keylock Function 45 Troubleshooting with the Remote Control .... 34 Displaying and Setting the Break Timer 34 Auto Sync (Auto Sync Adjustment) ..... 34 Freezing a Moving Image 34...

XG-MB55X Operation Manual
Page 11
... for service. 19. e. Replacement Parts When replacement parts are registered trademarks of Microsoft Corporation in the United States and/or other countries. • PC/AT is a registered trademark of other hazards. Adjust only those controls that produce heat. • DLP\ (Digital Light Processing) and DMD\ (Digital Micromirror Device) are trademarks of Texas Instruments, Inc. • Microsoft® and Windows® are required, be mounted...
... for service. 19. e. Replacement Parts When replacement parts are registered trademarks of Microsoft Corporation in the United States and/or other countries. • PC/AT is a registered trademark of other hazards. Adjust only those controls that produce heat. • DLP\ (Digital Light Processing) and DMD\ (Digital Micromirror Device) are trademarks of Texas Instruments, Inc. • Microsoft® and Windows® are required, be mounted...

XG-MB55X Operation Manual
Page 12
.... I The operating temperature of approximately 1,500 meters (4,900 feet) or more often. Do not block the exhaust and intake vents. I When you use in and turn on page 50. I Continuously watching the screen for replacement. This does not indicate a malfunction. (See pages 48 and 49.) Remove the projector power cord from 41°F to 95°F (+5°C to maintain high image quality, SHARP recommends...
.... I The operating temperature of approximately 1,500 meters (4,900 feet) or more often. Do not block the exhaust and intake vents. I When you use in and turn on page 50. I Continuously watching the screen for replacement. This does not indicate a malfunction. (See pages 48 and 49.) Remove the projector power cord from 41°F to 95°F (+5°C to maintain high image quality, SHARP recommends...

XG-MB55X Operation Manual
Page 13
... these manuals, you can work with the lens. ject it . If the temperature continues to Access the PDF Operation Manuals PDF operation manuals in several languages are included in the fan speed. How to rise, the lamp will turn off, the temperature warn- Other connected equipment I When storing the projector, re-attach the lens cap. (See page 11). I Please read the operation manuals of the fan may change during projection or cooling fan operation. ing indicator...
... these manuals, you can work with the lens. ject it . If the temperature continues to Access the PDF Operation Manuals PDF operation manuals in several languages are included in the fan speed. How to rise, the lamp will turn off, the temperature warn- Other connected equipment I When storing the projector, re-attach the lens cap. (See page 11). I Please read the operation manuals of the fan may change during projection or cooling fan operation. ing indicator...
XG-MB55X Operation Manual
Page 15
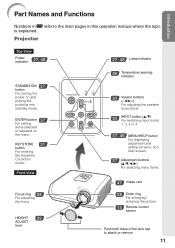
Front View Focus ring 28 For adjusting the focus. HEIGHT 29 ADJUST lever 27, 48 Lamp indicator 48 Temperature warning indicator 30 Volume buttons (-O/Q+) For adjusting the speaker sound level. 30 INPUT button (P/R) For switching input mode 1, 2, 3 or 4. 37, 46 MENU/HELP button For displaying adjustment and setting screens, and help screen. 37 Adjustment buttons (P/R/O/Q) For selecting menu items. 47 Intake vent 28 Zoom ring For enlarging/ reducing the picture. 15 Remote control sensor Push both sides of the lens cap to the main pages in...
Front View Focus ring 28 For adjusting the focus. HEIGHT 29 ADJUST lever 27, 48 Lamp indicator 48 Temperature warning indicator 30 Volume buttons (-O/Q+) For adjusting the speaker sound level. 30 INPUT button (P/R) For switching input mode 1, 2, 3 or 4. 37, 46 MENU/HELP button For displaying adjustment and setting screens, and help screen. 37 Adjustment buttons (P/R/O/Q) For selecting menu items. 47 Intake vent 28 Zoom ring For enlarging/ reducing the picture. 15 Remote control sensor Push both sides of the lens cap to the main pages in...

XG-MB55X Operation Manual
Page 21
... the projector into standby mode. On the On the remote projector control On-screen Display • Unplug the power cord from the AC outlet after the cooling fan stops. _P. 27 17 On the remote control _P. 31 8. Select the INPUT mode Select the "INPUT 1" using the Keystone Correction. (Keystone Correction functions automatically on , the Setup Guide appears. (When "Setup Guide" is displayed, to "On". Shrinks lower side. Adjust the projected image with the Setup Guide 1 After the projector turns on...
... the projector into standby mode. On the On the remote projector control On-screen Display • Unplug the power cord from the AC outlet after the cooling fan stops. _P. 27 17 On the remote control _P. 31 8. Select the INPUT mode Select the "INPUT 1" using the Keystone Correction. (Keystone Correction functions automatically on , the Setup Guide appears. (When "Setup Guide" is displayed, to "On". Shrinks lower side. Adjust the projected image with the Setup Guide 1 After the projector turns on...

XG-MB55X Operation Manual
Page 31
... power indicator changes to red when the projector finishes cooling. STANDBY button ON button Turning the Power off (Putting the Projector into Standby Mode) 1 Press SSTANDBY/ON on the projector or eSTANDBY on the remote control, then press that you want to change the on-screen display to another language, change the language according to the procedure on page 42. This is normal operation as the lamp's control circuitry is the factory default language. Blinking in green...
... power indicator changes to red when the projector finishes cooling. STANDBY button ON button Turning the Power off (Putting the Projector into Standby Mode) 1 Press SSTANDBY/ON on the projector or eSTANDBY on the remote control, then press that you want to change the on-screen display to another language, change the language according to the procedure on page 42. This is normal operation as the lamp's control circuitry is the factory default language. Blinking in green...
XG-MB55X Operation Manual
Page 38
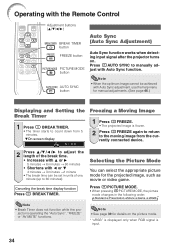
...picture mode for the projected image, such as movie or video game. Press FAUTO SYNC to the moving image from 5 minutes. Canceling the break time display function Press k BREAK TIMER. Note • Break Timer does not function while the pro- Selecting the Picture Mode You can be achieved with the Remote Control Adjustment buttons (P/R/O/Q) BREAK TIMER button FREEZE button PICTURE MODE button AUTO SYNC button Auto Sync (Auto Sync Adjustment) Auto Sync function works when detecting input signal after the projector turns on the picture mode. * "sRGB" is displayed only when RGB signal...
...picture mode for the projected image, such as movie or video game. Press FAUTO SYNC to the moving image from 5 minutes. Canceling the break time display function Press k BREAK TIMER. Note • Break Timer does not function while the pro- Selecting the Picture Mode You can be achieved with the Remote Control Adjustment buttons (P/R/O/Q) BREAK TIMER button FREEZE button PICTURE MODE button AUTO SYNC button Auto Sync (Auto Sync Adjustment) Auto Sync function works when detecting input signal after the projector turns on the picture mode. * "sRGB" is displayed only when RGB signal...

XG-MB55X Operation Manual
Page 44
... progressive mode images. * The film source is a digital video recording with PAL50Hz and SECAM to those input signals). For stronger blue. For making skin tones purplish. For less color intensity. Note • Values on the menu screen only when PAL or SECAM signals are input (including when forcibly changed to play back a high-definition image. For more contrast. The projector can adjust the picture tone with this film source to display...
... progressive mode images. * The film source is a digital video recording with PAL50Hz and SECAM to those input signals). For stronger blue. For making skin tones purplish. For less color intensity. Note • Values on the menu screen only when PAL or SECAM signals are input (including when forcibly changed to play back a high-definition image. For more contrast. The projector can adjust the picture tone with this film source to display...
XG-MB55X Operation Manual
Page 47
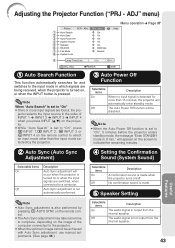
... more input signals are switched, when connected to "On", 5 minutes before the projector enters standby mode, the message "Enter STANDBY mode in the order of the computer connected to indicate the remaining minutes. 2 Auto Sync (Auto Sync Adjustment) 4 Setting the Confirmation Sound (System Sound) Useful Features Selectable items On Off Description Auto Sync adjustment will automatically enter standby mode. ADJ On On On On On 9600 bps Normal Menu operation n Page 37 Help Lamp Timer(Life) 0h 100% SEL./ADJ. The Auto Power Off...
... more input signals are switched, when connected to "On", 5 minutes before the projector enters standby mode, the message "Enter STANDBY mode in the order of the computer connected to indicate the remaining minutes. 2 Auto Sync (Auto Sync Adjustment) 4 Setting the Confirmation Sound (System Sound) Useful Features Selectable items On Off Description Auto Sync adjustment will automatically enter standby mode. ADJ On On On On On 9600 bps Normal Menu operation n Page 37 Help Lamp Timer(Life) 0h 100% SEL./ADJ. The Auto Power Off...

XG-MB55X Operation Manual
Page 48
... keycode reset will incur a charge. Info • If you press the R button four times, the keycord input screen disappears. Select this function is activated, users must enter the correct keycode each time the projector is recommended that both the projector and computer are set to "Bright" Remaining lamp life 100% Approx. 3,000 hours Approx. 2,000 hours 5% Approx. 150 hours Approx. 100 hours 1 Press the 4 buttons on the remote control...
... keycode reset will incur a charge. Info • If you press the R button four times, the keycord input screen disappears. Select this function is activated, users must enter the correct keycode each time the projector is recommended that both the projector and computer are set to "Bright" Remaining lamp life 100% Approx. 3,000 hours Approx. 2,000 hours 5% Approx. 150 hours Approx. 100 hours 1 Press the 4 buttons on the remote control...

XG-MB55X Operation Manual
Page 53
...; Lamp circuit failure • The lamp unit cover is securely installed, contact your nearest Sharp Authorized Projector Dealer or Service Center (see page 61) for repair. • Please exercise care when replacing the lamp. • Securely install the cover. • If the power indicator blinks in red even when the lamp unit cover is open. The power indicator blinks in red when the projector is turned off .) Red on Red on (Standby) Power indicator Green on/ Red on Green blinks (Cooling) Red blinks Problem The internal temperature is abnormally high...
...; Lamp circuit failure • The lamp unit cover is securely installed, contact your nearest Sharp Authorized Projector Dealer or Service Center (see page 61) for repair. • Please exercise care when replacing the lamp. • Securely install the cover. • If the power indicator blinks in red even when the lamp unit cover is open. The power indicator blinks in red when the projector is turned off .) Red on Red on (Standby) Power indicator Green on/ Red on Green blinks (Cooling) Red blinks Problem The internal temperature is abnormally high...

XG-MB55X Operation Manual
Page 54
... nearest Sharp Authorized Projector Dealer or Service Center for repair. 50 For the name of exposure to the released gas. A loud sound may have the lamp replaced at your nearest Sharp Authorized Projector Dealer or Service Center. * If the new lamp does not light after use . It is important to a lapse of the projector. The lamp will be obtained through a Sharp Authorized Projector Dealer or Service Center. Lamp failure can be operating...
... nearest Sharp Authorized Projector Dealer or Service Center for repair. 50 For the name of exposure to the released gas. A loud sound may have the lamp replaced at your nearest Sharp Authorized Projector Dealer or Service Center. * If the new lamp does not light after use . It is important to a lapse of the projector. The lamp will be obtained through a Sharp Authorized Projector Dealer or Service Center. Lamp failure can be operating...
XG-MB55X Operation Manual
Page 56
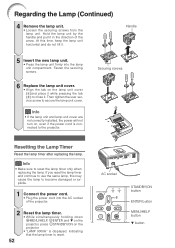
... securing screws. 6 Replace the lamp unit cover. • Align the tab on the lamp unit cover (1)and place it while pressing the tab (2) to use the same lamp, this time, keep the lamp unit horizontal and do not tilt it. Info • If the lamp unit and lamp unit cover are not correctly installed, the power will not turn on the projector. • "LAMP 0000H" is displayed, indicating that the lamp timer is connected...
... securing screws. 6 Replace the lamp unit cover. • Align the tab on the lamp unit cover (1)and place it while pressing the tab (2) to use the same lamp, this time, keep the lamp unit horizontal and do not tilt it. Info • If the lamp unit and lamp unit cover are not correctly installed, the power will not turn on the projector. • "LAMP 0000H" is displayed, indicating that the lamp timer is connected...

XG-MB55X Operation Manual
Page 59
... : Lamp Burnt-out, 32 : Lamp Ignition Failure, 64 : Temp Abnormally High Lamp Status T L P S _ _ _ 1 0 : Off, 1 : On, 2 : Retry, 3 : Waiting, 4 : Lamp Error 0 : Off, 4 : Lamp Error Lamp Power Status T P O W _ _ _ 1 1 : On, 2 : Cooling, 3 : Shutting Down 0 : Standby Lamp Quantity TLPN___1 1 Lamp Usage Time (Hour) T L T T _ _ _ 1 0 - 9999 (Integer) Lamp Life (Percentage) T L T L _ _ _ 1 0% - 100% (Integer) Model Name Check T N A M _ _ _ 1 XGMB55X / XR10S / XR10X / XR20S / XR20X Model Name Check M N R D _ _ _ 1 XG-MB55X / XR-10S / XR-10X / XR-20S / XR-20X Projector Name Setting...
... : Lamp Burnt-out, 32 : Lamp Ignition Failure, 64 : Temp Abnormally High Lamp Status T L P S _ _ _ 1 0 : Off, 1 : On, 2 : Retry, 3 : Waiting, 4 : Lamp Error 0 : Off, 4 : Lamp Error Lamp Power Status T P O W _ _ _ 1 1 : On, 2 : Cooling, 3 : Shutting Down 0 : Standby Lamp Quantity TLPN___1 1 Lamp Usage Time (Hour) T L T T _ _ _ 1 0 - 9999 (Integer) Lamp Life (Percentage) T L T L _ _ _ 1 0% - 100% (Integer) Model Name Check T N A M _ _ _ 1 XGMB55X / XR10S / XR10X / XR20S / XR20X Model Name Check M N R D _ _ _ 1 XG-MB55X / XR-10S / XR-10X / XR-20S / XR-20X Projector Name Setting...

XG-MB55X Operation Manual
Page 63
... Picture appears but no sound • External output has not been set when connecting notebook or projector does not computer. Maintenance indicator on the computer you turn up the volume of "Color" and "Tint" in red. Troubleshooting Problem Check Page • Projector power cord is not plugged into the If the keylock is set to the external output. start. • The lamp unit cover is not installed correctly. • Cables incorrectly connected...
... Picture appears but no sound • External output has not been set when connecting notebook or projector does not computer. Maintenance indicator on the computer you turn up the volume of "Color" and "Tint" in red. Troubleshooting Problem Check Page • Projector power cord is not plugged into the If the keylock is set to the external output. start. • The lamp unit cover is not installed correctly. • Cables incorrectly connected...

XG-MB55X Operation Manual
Page 64
... green) "sRGB" in "Picture Mode", and then select an input signal type. or poor" in the "Help" menu, after selecting an item other than 5 minutes. 60 projector turns on . While the remaining lamp life draws to be adversely affected by incorrect operation or interference. runs faster. Troubleshooting (Continued) Problem Check Picture is illuminating in red. time to the projector or the connected equipment works improperly. • Select "Vertical stripes or flickering image appear...
... green) "sRGB" in "Picture Mode", and then select an input signal type. or poor" in the "Help" menu, after selecting an item other than 5 minutes. 60 projector turns on . While the remaining lamp life draws to be adversely affected by incorrect operation or interference. runs faster. Troubleshooting (Continued) Problem Check Picture is illuminating in red. time to the projector or the connected equipment works improperly. • Select "Vertical stripes or flickering image appear...
XG-MB55X Operation Manual
Page 65
...://www.sharp-th.com Korea Sharp Electronics Incorporated of Canada Ltd. (905) 568-7140 http://www.sharp.ca Mexico Sharp Electronics Corporation Mexico Branch (525) 716-9000 http://www.sharp.com.mx Latin America Sharp Electronics Corp. For SHARP Assistance If you encounter any problems during setup or operation of this operation manual does not answer your question, please contact the SHARP Service departments...
...://www.sharp-th.com Korea Sharp Electronics Incorporated of Canada Ltd. (905) 568-7140 http://www.sharp.ca Mexico Sharp Electronics Corporation Mexico Branch (525) 716-9000 http://www.sharp.com.mx Latin America Sharp Electronics Corp. For SHARP Assistance If you encounter any problems during setup or operation of this operation manual does not answer your question, please contact the SHARP Service departments...
XG-MB55X Operation Manual
Page 68
... adjustment foot 29 Red 40 Remote control 13 Remote control sensor 15 Replacing the lamp 50, 51 Resize 32, 41 RESIZE button 32 RETURN button 37 RGB cable 23 RS-232C terminal 26 SCR - ADJ 41 Screen Size and Projection Distance 20 Setup Guide 28, 42 Sharp 40 Speaker 43 STANDBY button 27 STANDBY/ON button 27 STRETCH 32, 33 Supplied accessories 10 System Lock 44 System Sound 43 Temperature warning indicator 48 Tint 40 Video System 36 Volume buttons...
... adjustment foot 29 Red 40 Remote control 13 Remote control sensor 15 Replacing the lamp 50, 51 Resize 32, 41 RESIZE button 32 RETURN button 37 RGB cable 23 RS-232C terminal 26 SCR - ADJ 41 Screen Size and Projection Distance 20 Setup Guide 28, 42 Sharp 40 Speaker 43 STANDBY button 27 STANDBY/ON button 27 STRETCH 32, 33 Supplied accessories 10 System Lock 44 System Sound 43 Temperature warning indicator 48 Tint 40 Video System 36 Volume buttons...


