
XR10S|XR10X|XR20S|XR20X Operation Manual
Page 5
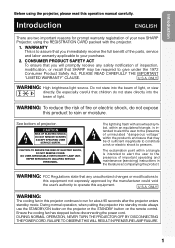
... WARNING: High brightness light source. REFER SERVICING TO QUALIFIED SERVICE PERSONNEL. During normal operation, when putting the projector into the beam of light, or view directly. FAILURE TO OBSERVE THIS WILL RESULT IN PREMATURE LAMP FAILURE. 1 Ensure the cooling fan has stopped before disconnecting the power cord. WARNING: To reduce the risk of fire or electric shock, do not stare directly into the beam of light. The lightning flash...
... WARNING: High brightness light source. REFER SERVICING TO QUALIFIED SERVICE PERSONNEL. During normal operation, when putting the projector into the beam of light, or view directly. FAILURE TO OBSERVE THIS WILL RESULT IN PREMATURE LAMP FAILURE. 1 Ensure the cooling fan has stopped before disconnecting the power cord. WARNING: To reduce the risk of fire or electric shock, do not stare directly into the beam of light. The lightning flash...

XR10S|XR10X|XR20S|XR20X Operation Manual
Page 8
...) Mode 19 Screen Size and Projection Distance .. 20 Connections Connections 21 Samples of Cables for Connection ..... 22 Connecting to a Computer 23 Connecting to Video Equipment ......... 24 Connecting to a Monitor with RGB Input Terminal 25 Controlling the Projector by a Computer 26 Connecting the Power Cord 26 Using Basic Operation Turning the Projector On/Off 27 Turning the Projector on the Projector (Keylock Function 45 Troubleshooting with the Remote Control .... 34 Displaying and Setting the Break Timer 34 Auto Sync (Auto Sync Adjustment) ..... 34 Freezing a Moving Image 34...
...) Mode 19 Screen Size and Projection Distance .. 20 Connections Connections 21 Samples of Cables for Connection ..... 22 Connecting to a Computer 23 Connecting to Video Equipment ......... 24 Connecting to a Monitor with RGB Input Terminal 25 Controlling the Projector by a Computer 26 Connecting the Power Cord 26 Using Basic Operation Turning the Projector On/Off 27 Turning the Projector on the Projector (Keylock Function 45 Troubleshooting with the Remote Control .... 34 Displaying and Setting the Break Timer 34 Auto Sync (Auto Sync Adjustment) ..... 34 Freezing a Moving Image 34...

XR10S|XR10X|XR20S|XR20X Operation Manual
Page 11
... to Texas Instruments. Heat This product should be sure the service technician has used replacement parts specified by a qualified technician to restore the product to determine that produce heat. • DLP\ (Digital Light Processing) and DMD\ (Digital Micromirror Device) are trademarks of Texas Instruments, Inc. • Microsoft® and Windows® are trademarks or registered trademarks of International Business Machines...
... to Texas Instruments. Heat This product should be sure the service technician has used replacement parts specified by a qualified technician to restore the product to determine that produce heat. • DLP\ (Digital Light Processing) and DMD\ (Digital Micromirror Device) are trademarks of Texas Instruments, Inc. • Microsoft® and Windows® are trademarks or registered trademarks of International Business Machines...

XR10S|XR10X|XR20S|XR20X Operation Manual
Page 12
... a Sharp Authorized Projector Dealer or Service Center. Do not set "Fan Mode" to hit or damage the surface of the lens. Close the curtains and dim the lights when setting up your nearest Sharp Authorized Projector Dealer or Service Center for long hours will not reduce the overall operation life of temperature. Do not block the exhaust and intake vents. I Potential hazard of lamp rupture, contact your projector...
... a Sharp Authorized Projector Dealer or Service Center. Do not set "Fan Mode" to hit or damage the surface of the lens. Close the curtains and dim the lights when setting up your nearest Sharp Authorized Projector Dealer or Service Center for long hours will not reduce the overall operation life of temperature. Do not block the exhaust and intake vents. I Potential hazard of lamp rupture, contact your projector...

XR10S|XR10X|XR20S|XR20X Operation Manual
Page 13
... power cord from the wall outlet, and disconnect any other audio- Before moving the projector, be connected. To utilize these manuals, you want to view. 5 Double click the "10_20_" pdf file to setup problems or blockage of the air vents, " " and " " will blink, and after the cooling fan stops. Please download Adobe® Reader® from the AC outlet and turning off the equipment to changes...
... power cord from the wall outlet, and disconnect any other audio- Before moving the projector, be connected. To utilize these manuals, you want to view. 5 Double click the "10_20_" pdf file to setup problems or blockage of the air vents, " " and " " will blink, and after the cooling fan stops. Please download Adobe® Reader® from the AC outlet and turning off the equipment to changes...

XR10S|XR10X|XR20S|XR20X Operation Manual
Page 15
... the Keystone Correction mode. Projector Top View Power indicator 27, 48 STANDBY/ON 27 button For turning the power on the menu. HEIGHT 29 ADJUST lever 27, 48 Lamp indicator 48 Temperature warning indicator 30 Volume buttons (-O/Q+) For adjusting the speaker sound level. 30 INPUT button (P/R) For switching input mode 1, 2, 3 or 4. 37, 46 MENU/HELP button For displaying adjustment and setting screens, and help screen. 37 Adjustment buttons (P/R/O/Q) For selecting menu items. 47 Intake vent 28 Zoom ring For enlarging/ reducing the picture. 15 Remote control sensor...
... the Keystone Correction mode. Projector Top View Power indicator 27, 48 STANDBY/ON 27 button For turning the power on the menu. HEIGHT 29 ADJUST lever 27, 48 Lamp indicator 48 Temperature warning indicator 30 Volume buttons (-O/Q+) For adjusting the speaker sound level. 30 INPUT button (P/R) For switching input mode 1, 2, 3 or 4. 37, 46 MENU/HELP button For displaying adjustment and setting screens, and help screen. 37 Adjustment buttons (P/R/O/Q) For selecting menu items. 47 Intake vent 28 Zoom ring For enlarging/ reducing the picture. 15 Remote control sensor...

XR10S|XR10X|XR20S|XR20X Operation Manual
Page 21
...the remote On-screen display (RGB) projector control • When pressing the INPUT button on , the Setup Guide appears. (When "Setup Guide" is displayed, to finish the Setup Guide. _P. 28 5. Adjust the projected image with the Setup Guide 1 After the projector turns on the projector, input mode switches in the Setup Guide and adjust the focus, screen size, and height (angle). 3 After adjusting the focus, height (angle) and screen size, press TENTER to put the projector into standby mode. On the On the remote projector control On-screen Display • Unplug the power cord...
...the remote On-screen display (RGB) projector control • When pressing the INPUT button on , the Setup Guide appears. (When "Setup Guide" is displayed, to finish the Setup Guide. _P. 28 5. Adjust the projected image with the Setup Guide 1 After the projector turns on the projector, input mode switches in the Setup Guide and adjust the focus, screen size, and height (angle). 3 After adjusting the focus, height (angle) and screen size, press TENTER to put the projector into standby mode. On the On the remote projector control On-screen Display • Unplug the power cord...

XR10S|XR10X|XR20S|XR20X Operation Manual
Page 31
.... Lamp indicator Power indicator STANDBY/ON button Note • About the Lamp Indicator The lamp indicator illuminates to indicate the status of the image may take some time to start projection. This is normal operation as faulty operation. • If the projector is shut down . This can cause damage due to rise in green while cooling. • The power indicator changes to 26.) Remove the lens cap and press S STANDBY/ON on the projector or fON on the remote control...
.... Lamp indicator Power indicator STANDBY/ON button Note • About the Lamp Indicator The lamp indicator illuminates to indicate the status of the image may take some time to start projection. This is normal operation as faulty operation. • If the projector is shut down . This can cause damage due to rise in green while cooling. • The power indicator changes to 26.) Remove the lens cap and press S STANDBY/ON on the projector or fON on the remote control...
XR10S|XR10X|XR20S|XR20X Operation Manual
Page 38
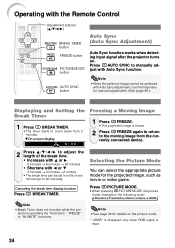
... picture mode for the projected image, such as movie or video game. Press GPICTURE MODE. • When pressing GPICTURE MODE, the picture mode changes in units of the break time. • Increases with P or Q 5 minutes s 6 minutes s 60 minutes • Shortens with the Remote Control Adjustment buttons (P/R/O/Q) BREAK TIMER button FREEZE button PICTURE MODE button AUTO SYNC button Auto Sync (Auto Sync Adjustment) Auto Sync function works when detecting input signal after the projector turns on the picture mode. * "sRGB" is displayed only when RGB signal is operating the "Auto Sync...
... picture mode for the projected image, such as movie or video game. Press GPICTURE MODE. • When pressing GPICTURE MODE, the picture mode changes in units of the break time. • Increases with P or Q 5 minutes s 6 minutes s 60 minutes • Shortens with the Remote Control Adjustment buttons (P/R/O/Q) BREAK TIMER button FREEZE button PICTURE MODE button AUTO SYNC button Auto Sync (Auto Sync Adjustment) Auto Sync function works when detecting input signal after the projector turns on the picture mode. * "sRGB" is displayed only when RGB signal is operating the "Auto Sync...
XR10S|XR10X|XR20S|XR20X Operation Manual
Page 44
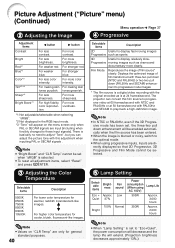
... adjust the picture tone with this adjustment when inputting PAL or SECAM signals . Note • Values on the menu screen only when PAL or SECAM signals are only for general standard purposes. 40 5 Lamp Setting Selectable items Brightness Eco + Approx. For high fidelity color reproduction. For more sharpness. For stronger red. For stronger blue. Picture Adjustment ("Picture" menu) (Continued) Menu operation n Page 37 2 Adjusting the Image 4 Progressive Adjustment Items Contrast Bright Red*1 Blue*1 Color*2 Tint*2 *3 Sharp*2 Bright Boost*1 O button Q button...
... adjust the picture tone with this adjustment when inputting PAL or SECAM signals . Note • Values on the menu screen only when PAL or SECAM signals are only for general standard purposes. 40 5 Lamp Setting Selectable items Brightness Eco + Approx. For high fidelity color reproduction. For more sharpness. For stronger red. For stronger blue. Picture Adjustment ("Picture" menu) (Continued) Menu operation n Page 37 2 Adjusting the Image 4 Progressive Adjustment Items Contrast Bright Red*1 Blue*1 Color*2 Tint*2 *3 Sharp*2 Bright Boost*1 O button Q button...
XR10S|XR10X|XR20S|XR20X Operation Manual
Page 47
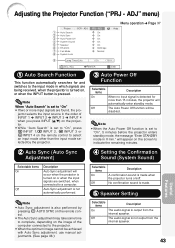
... Lock PRJ - No confirmation sound is made. 5 Speaker Setting Selectable items On Off Description The audio signal is made when the projector turns on the image of INPUT 1 n INPUT 2 n INPUT 3 n INPUT 4 when you press INPUT (P/R) on the projector. • While "Auto Search" is set to "On", press C INPUT 1,C INPUT 2, D INPUT 3 or EINPUT 4 on the remote control to "On", 5 minutes before the projector enters standby mode, the message "Enter STANDBY mode in which signals are found, the pro- Note • Auto Sync adjustment...
... Lock PRJ - No confirmation sound is made. 5 Speaker Setting Selectable items On Off Description The audio signal is made when the projector turns on the image of INPUT 1 n INPUT 2 n INPUT 3 n INPUT 4 when you press INPUT (P/R) on the projector. • While "Auto Search" is set to "On", press C INPUT 1,C INPUT 2, D INPUT 3 or EINPUT 4 on the remote control to "On", 5 minutes before the projector enters standby mode, the message "Enter STANDBY mode in which signals are found, the pro- Note • Auto Sync adjustment...
XR10S|XR10X|XR20S|XR20X Operation Manual
Page 48
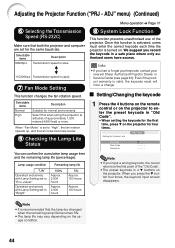
... press the R button four times, the keycord input screen disappears. Lamp usage condition "Life" Operated exclusively with Lamp Setting set to "Eco +Quiet" Operated exclusively with Lamp Setting set to "High", the fan rotation speeds up, and the fan noise becomes louder. 9 Checking the Lamp Life Status You can confirm the cumulative lamp usage time and the remaining lamp life (percentage). Selectable items Description 9600bps Transmission speed is rapid. 7 Fan Mode Setting This function changes the fan rotation speed. 8 System Lock Function This...
... press the R button four times, the keycord input screen disappears. Lamp usage condition "Life" Operated exclusively with Lamp Setting set to "Eco +Quiet" Operated exclusively with Lamp Setting set to "High", the fan rotation speeds up, and the fan noise becomes louder. 9 Checking the Lamp Life Status You can confirm the cumulative lamp usage time and the remaining lamp life (percentage). Selectable items Description 9600bps Transmission speed is rapid. 7 Fan Mode Setting This function changes the fan rotation speed. 8 System Lock Function This...

XR10S|XR10X|XR20S|XR20X Operation Manual
Page 53
... nearest Sharp Authorized Projector Dealer or Service Center (see page 61) for repair. • Please exercise care when replacing the lamp. • Securely install the cover. • If the power indicator blinks in the AC outlet and then turn the power on . (At least 10 minutes.) • If the power is turned off .) Red on Red on (Standby) Power indicator Green on/ Red on . The power indicator blinks in red and the lamp may change the lamp. Maintenance indicator Temperature warning indicator Normal...
... nearest Sharp Authorized Projector Dealer or Service Center (see page 61) for repair. • Please exercise care when replacing the lamp. • Securely install the cover. • If the power indicator blinks in the AC outlet and then turn the power on . (At least 10 minutes.) • If the power is turned off .) Red on Red on (Standby) Power indicator Green on/ Red on . The power indicator blinks in red and the lamp may change the lamp. Maintenance indicator Temperature warning indicator Normal...
XR10S|XR10X|XR20S|XR20X Operation Manual
Page 54
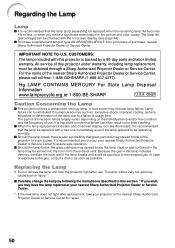
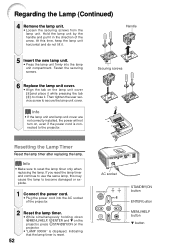
... of purchase, nearest Sharp Authorized Projector Dealer or Service Center. Replacing the Lamp • Do not remove the lamp unit from the exhaust vent. A loud sound may indicate lamp failure. Regarding the Lamp Lamp I It is backed by following the instructions described in this section. * If you wish, you may have the lamp replaced at your nearest Sharp Authorized Projector Dealer or Service Center. * If the new lamp does not light after use .
... of purchase, nearest Sharp Authorized Projector Dealer or Service Center. Replacing the Lamp • Do not remove the lamp unit from the exhaust vent. A loud sound may indicate lamp failure. Regarding the Lamp Lamp I It is backed by following the instructions described in this section. * If you wish, you may have the lamp replaced at your nearest Sharp Authorized Projector Dealer or Service Center. * If the new lamp does not light after use .
XR10S|XR10X|XR20S|XR20X Operation Manual
Page 56
... Lamp Timer Reset the lamp timer after replacing the lamp. AC socket STANDBY/ON button ENTER button MENU/HELP button R button At this may cause the lamp to become damaged or explode. 1 Connect the power cord. • Plug the power cord into the lamp unit compartment. Then tighten the user service screw to reset the lamp timer only when replacing the lamp. Info • Make sure to secure the lamp unit cover. If you reset the lamp timer and continue to use the same lamp, this time, keep...
... Lamp Timer Reset the lamp timer after replacing the lamp. AC socket STANDBY/ON button ENTER button MENU/HELP button R button At this may cause the lamp to become damaged or explode. 1 Connect the power cord. • Plug the power cord into the lamp unit compartment. Then tighten the user service screw to reset the lamp timer only when replacing the lamp. Info • Make sure to secure the lamp unit cover. If you reset the lamp timer and continue to use the same lamp, this time, keep...

XR10S|XR10X|XR20S|XR20X Operation Manual
Page 59
..._ 1 0 : Normal, 1 : Temp High, 8 : Lamp Life 5% or less, 16 : Lamp Burnt-out, 32 : Lamp Ignition Failure RETURN Lamp Status T L P S _ _ _ 1 0 : Off, 1 : On, 2 : Retry, 3 : Waiting, 4 : Lamp Error Lamp Power Status T P O W _ _ _ 1 1 : On, 2 : Cooling, 3 : Shutting Down Lamp Quantity TLPN___1 1 Lamp Usage Time (Hour) T L T T _ _ _ 1 0 - 9999 (Integer) Lamp Life (Percentage) T L T L _ _ _ 1 0% - 100% (Integer) Model Name Check T N A M _ _ _ 1 XR10S / XR10X /XR20S / XR20X Model Name Check M N R D _ _ _ 1 XR-10S / XR-10X / XR-20S / XR-20X Projector Name Setting 1 P J N 1 * * * * OK...
..._ 1 0 : Normal, 1 : Temp High, 8 : Lamp Life 5% or less, 16 : Lamp Burnt-out, 32 : Lamp Ignition Failure RETURN Lamp Status T L P S _ _ _ 1 0 : Off, 1 : On, 2 : Retry, 3 : Waiting, 4 : Lamp Error Lamp Power Status T P O W _ _ _ 1 1 : On, 2 : Cooling, 3 : Shutting Down Lamp Quantity TLPN___1 1 Lamp Usage Time (Hour) T L T T _ _ _ 1 0 - 9999 (Integer) Lamp Life (Percentage) T L T L _ _ _ 1 0% - 100% (Integer) Model Name Check T N A M _ _ _ 1 XR10S / XR10X /XR20S / XR20X Model Name Check M N R D _ _ _ 1 XR-10S / XR-10X / XR-20S / XR-20X Projector Name Setting 1 P J N 1 * * * * OK...

XR10S|XR10X|XR20S|XR20X Operation Manual
Page 63
... selected input mode is wrong. • Cables incorrectly connected to the projector. • Remote control battery has run out. Picture is due to cabinet shrinkage - or performance. Maintenance indicator on the projector. 59 Appendix Troubleshooting Problem Check Page • Projector power cord is not plugged into the If the keylock is set to "ON", all the buttons are locked. 45 standby mode using , an image may appear depending on the computer you turn up...
... selected input mode is wrong. • Cables incorrectly connected to the projector. • Remote control battery has run out. Picture is due to cabinet shrinkage - or performance. Maintenance indicator on the projector. 59 Appendix Troubleshooting Problem Check Page • Projector power cord is not plugged into the If the keylock is set to "ON", all the buttons are locked. 45 standby mode using , an image may appear depending on the computer you turn up...

XR10S|XR10X|XR20S|XR20X Operation Manual
Page 64
... "Picture Mode", and then select an input signal type. Troubleshooting (Continued) Problem Check Picture is green on . up even after selecting an item other than 5 minutes. 60 The image sometimes flickers. • Cables incorrectly connected to be adversely affected by incorrect operation or interference. projector turns on • Change the input signal type setting. on . While the remaining lamp life draws to turn on INPUT 1 (RGB)/INPUT 2 (RGB). The cooling fan becomes • When temperature inside the projector...
... "Picture Mode", and then select an input signal type. Troubleshooting (Continued) Problem Check Picture is green on . up even after selecting an item other than 5 minutes. 60 The image sometimes flickers. • Cables incorrectly connected to be adversely affected by incorrect operation or interference. projector turns on • Change the input signal type setting. on . While the remaining lamp life draws to turn on INPUT 1 (RGB)/INPUT 2 (RGB). The cooling fan becomes • When temperature inside the projector...

XR10S|XR10X|XR20S|XR20X Operation Manual
Page 65
...-0170 [email protected].sharp.co.jp http://www.sharp-th.com Korea Sharp Electronics Incorporated of Australia Pty. For SHARP Assistance If you encounter any problems during setup or operation of this operation manual does not answer your question, please contact the SHARP Service departments listed below. U.S.A. Ltd. 1300-135-022 http://www.sharp.net.au New Zealand Sharp Corporation of Canada Ltd...
...-0170 [email protected].sharp.co.jp http://www.sharp-th.com Korea Sharp Electronics Incorporated of Australia Pty. For SHARP Assistance If you encounter any problems during setup or operation of this operation manual does not answer your question, please contact the SHARP Service departments listed below. U.S.A. Ltd. 1300-135-022 http://www.sharp.net.au New Zealand Sharp Corporation of Canada Ltd...

XR10S|XR10X|XR20S|XR20X Operation Manual
Page 68
ADJ 41 Screen Size and Projection Distance 20 Setup Guide 28, 42 Sharp 40 Speaker 43 STANDBY button 27 STANDBY/ON button 27 STRETCH 32, 33 Supplied accessories 10 System Lock 44 System Sound 43 Temperature warning indicator 48 Tint 40 Video System 36 Volume buttons 30 V-Pos 36, 46 Zoom ring 28 ADJ 43 PRJ Mode 19, 42 Progressive 40 R-6 batteries 14 Rear adjustment foot 29 Red 40 Remote control 13 Remote control sensor 15 Replacing the lamp 50...
ADJ 41 Screen Size and Projection Distance 20 Setup Guide 28, 42 Sharp 40 Speaker 43 STANDBY button 27 STANDBY/ON button 27 STRETCH 32, 33 Supplied accessories 10 System Lock 44 System Sound 43 Temperature warning indicator 48 Tint 40 Video System 36 Volume buttons 30 V-Pos 36, 46 Zoom ring 28 ADJ 43 PRJ Mode 19, 42 Progressive 40 R-6 batteries 14 Rear adjustment foot 29 Red 40 Remote control 13 Remote control sensor 15 Replacing the lamp 50...


