XGP10XU Operation Manual
Page 21
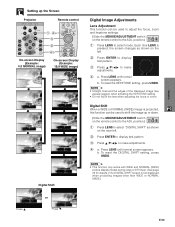
... select "DIGITAL SHIFT" as shown on the near left . 2 Press ENTER to display test pattern. 3 Press to shift the image up the Screen Projector Remote control 1, 4a 3 2 4b On-screen Display (Example: 4:3 NORMAL image) On-screen Display (Example: 16:9 WIDE image) Press ∂.... on the remote control to make adjustments. 4 a. To reset the DIGITAL SHIFT setting, press UNDO. • This function only works with WIDE and NORMAL (WIDE) picture display modes during video or DTV input. (...
... select "DIGITAL SHIFT" as shown on the near left . 2 Press ENTER to display test pattern. 3 Press to shift the image up the Screen Projector Remote control 1, 4a 3 2 4b On-screen Display (Example: 4:3 NORMAL image) On-screen Display (Example: 16:9 WIDE image) Press ∂.... on the remote control to make adjustments. 4 a. To reset the DIGITAL SHIFT setting, press UNDO. • This function only works with WIDE and NORMAL (WIDE) picture display modes during video or DTV input. (...

XGP10XU Operation Manual
Page 25
...8236;30 ם30 מ30 ם30 מ3 ם3 Fine Sync Reset Signal Type I/P Conversion Clock מ150 ם150 Phase מ60 ם60 H-Pos...Mode Front • The resolution, vertical frequency and horizontal frequency figures displayed above are for example purposes only. • "Color", "Tint", and "Sharp" appear only when Component input is selected in INPUT 1 or 2 mode. • Only the items highlighted in the tree charts above can be...
...8236;30 ם30 מ30 ם30 מ3 ם3 Fine Sync Reset Signal Type I/P Conversion Clock מ150 ם150 Phase מ60 ם60 H-Pos...Mode Front • The resolution, vertical frequency and horizontal frequency figures displayed above are for example purposes only. • "Color", "Tint", and "Sharp" appear only when Component input is selected in INPUT 1 or 2 mode. • Only the items highlighted in the tree charts above can be...
XGP10XU Operation Manual
Page 27
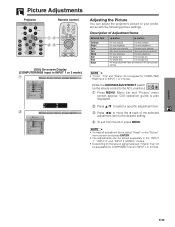
...1 Press MENU. on the "Picture" menu screen and press ENTER. • The adjustments can adjust the projector's picture to your preferences with the following picture settings. Description of signal received, "Sharp" may not be stored separately in the "INPUT 1", "INPUT 2" and "INPUT 3 (VIDEO)" modes.... • Depending on the type of Adjustment Items Selected item Contrast Bright Color Tint Sharp Red Blue Reset ß button © button For less contrast For more contrast For less brightness For more brightness For less color intensity For ...
...1 Press MENU. on the "Picture" menu screen and press ENTER. • The adjustments can adjust the projector's picture to your preferences with the following picture settings. Description of signal received, "Sharp" may not be stored separately in the "INPUT 1", "INPUT 2" and "INPUT 3 (VIDEO)" modes.... • Depending on the type of Adjustment Items Selected item Contrast Bright Color Tint Sharp Red Blue Reset ß button © button For less contrast For more contrast For less brightness For more brightness For less color intensity For ...

XGP10XU Operation Manual
Page 29
...Projector Remote control 1, 5 2, 3, 4 (GUI) On-screen Display 2 3 I /P Conversion", and then press ©. 4 Press ∂/ƒ to select "Interlaced" or "Progressive". 5 Press ENTER to the ADJ. Interlaced mode Interlaced mode creates a single image through the activation of a video signal. Progressive mode Progressive mode creates a single image using all adjustment items, select "Reset...own preferences by adjusting the following audio settings. Use this mode when projecting moving images. This projector's audio is also displayed. 2 Press ß/© to select "Audio". 3 Press ...
...Projector Remote control 1, 5 2, 3, 4 (GUI) On-screen Display 2 3 I /P Conversion", and then press ©. 4 Press ∂/ƒ to select "Interlaced" or "Progressive". 5 Press ENTER to the ADJ. Interlaced mode Interlaced mode creates a single image through the activation of a video signal. Progressive mode Progressive mode creates a single image using all adjustment items, select "Reset...own preferences by adjusting the following audio settings. Use this mode when projecting moving images. This projector's audio is also displayed. 2 Press ß/© to select "Audio". 3 Press ...
XGP10XU Operation Manual
Page 30
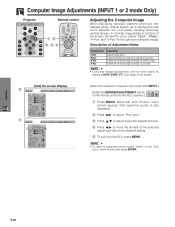
...your VCR). position.) 1 Press MENU. Computer Image Adjustments (INPUT 1 or 2 mode Only) Projector Remote control 1, 5 2, 3, 4 Adjusting the Computer Image When displaying computer patterns which are very detailed (tiling..., vertical stripes, etc.), interference may occur between the LCD pixels, causing flickering, vertical stripes, or contrast irregularities in portions of Adjustment Items Selected .... 5 To exit from the GUI, press MENU. • To reset all adjustment items, select "Reset" on the remote control to the left or right. See page 32...
...your VCR). position.) 1 Press MENU. Computer Image Adjustments (INPUT 1 or 2 mode Only) Projector Remote control 1, 5 2, 3, 4 Adjusting the Computer Image When displaying computer patterns which are very detailed (tiling..., vertical stripes, etc.), interference may occur between the LCD pixels, causing flickering, vertical stripes, or contrast irregularities in portions of Adjustment Items Selected .... 5 To exit from the GUI, press MENU. • To reset all adjustment items, select "Reset" on the remote control to the left or right. See page 32...
XGP10XU Operation Manual
Page 50
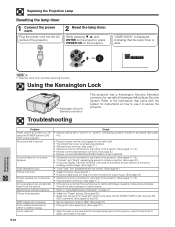
...Noise may appear when used with a Kensington MicroSaver Security System. Replacing the Projection Lamp Resetting the lamp timer 1 Connect the power cord. While pressing ƒ, © and ENTER on the projector, press POWER ON on the projector. "LAMP 0000H" is displayed, indicating that came with the system for INPUT 3... (See page 20.) • Projection distance is too long or too short to allow for use it to rear panel of the projector. 2 Reset the lamp timer. Picture appears but no sound. This will not affect operation or performance. • Refer to the right. Sound is...
...Noise may appear when used with a Kensington MicroSaver Security System. Replacing the Projection Lamp Resetting the lamp timer 1 Connect the power cord. While pressing ƒ, © and ENTER on the projector, press POWER ON on the projector. "LAMP 0000H" is displayed, indicating that came with the system for INPUT 3... (See page 20.) • Projection distance is too long or too short to allow for use it to rear panel of the projector. 2 Reset the lamp timer. Picture appears but no sound. This will not affect operation or performance. • Refer to the right. Sound is...
XGP10XU Operation Manual
Page 53
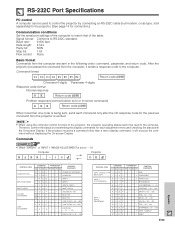
...8236;30) R A S H _ * * * SHARPNESS (מ30 - ם30) R A R E _ _ _ 0 INPUT 1 DISPLAY R A R E _ _ _ 1 RESET E-52 Appendix Therefore, confirm the status by connecting an RS-232C cable (null modem, cross type, sold separately) to the projector. (See page 14 for each command only after the ...ADJUSTMENT is verified. • When using the computer control function of the projector, the projector operating status cannot be used to control the projector by transmitting the display commands for connection.) Communication conditions Set the serial port ...
...8236;30) R A S H _ * * * SHARPNESS (מ30 - ם30) R A R E _ _ _ 0 INPUT 1 DISPLAY R A R E _ _ _ 1 RESET E-52 Appendix Therefore, confirm the status by connecting an RS-232C cable (null modem, cross type, sold separately) to the projector. (See page 14 for each command only after the ...ADJUSTMENT is verified. • When using the computer control function of the projector, the projector operating status cannot be used to control the projector by transmitting the display commands for connection.) Communication conditions Set the serial port ...
XGP10XU Operation Manual
Page 54
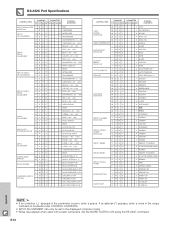
...R B T I _ * * * TINT (מ30 - ם30) R B S H _ * * * SHARPNESS (מ30 - ם30) R B R E _ _ _ 0 INPUT 2 DISPLAY R B R E _ _ _ 1 RESET INPUT 3 (VIDEO) I/P CONVERSION V A I P _ _ _ 0 INTERLACED V A I P _ _ _ 1 PROGRESSIVE V A C ...8236;150) I A V P _ * * * V-POS (מ60 - ם60) I A R E _ _ _ 0 COMPUTER INPUT DISPLAY I A R E _ _ _ 1 RESET SCREEN MODE MEMORY M E M S _ _ _ * SAVE SETTING (1-7) M E M L _ _ _ * SELECT SETTING (1-7) BLACK SCREEN I M B K _ _ _ 0 BLACK SCREEN OFF I M B K...
...R B T I _ * * * TINT (מ30 - ם30) R B S H _ * * * SHARPNESS (מ30 - ם30) R B R E _ _ _ 0 INPUT 2 DISPLAY R B R E _ _ _ 1 RESET INPUT 3 (VIDEO) I/P CONVERSION V A I P _ _ _ 0 INTERLACED V A I P _ _ _ 1 PROGRESSIVE V A C ...8236;150) I A V P _ * * * V-POS (מ60 - ם60) I A R E _ _ _ 0 COMPUTER INPUT DISPLAY I A R E _ _ _ 1 RESET SCREEN MODE MEMORY M E M S _ _ _ * SAVE SETTING (1-7) M E M L _ _ _ * SELECT SETTING (1-7) BLACK SCREEN I M B K _ _ _ 0 BLACK SCREEN OFF I M B K...


