
XG-C435X | XG-C465X Operation Manual
Page 4
... Corporation in inactive dots on the picture screen. DURING NORMAL OPERATION, NEVER TURN THE PROJECTOR OFF BY DISCONNECTING THE POWER CORD. This SHARP projector uses an LCD (Liquid Crystal Display) panel. During normal operation, when putting the projector into standby mode always use the STANDBY button on the projector or on page 60. PRODUCT DISPOSAL This product utilizes tin-lead solder, and lamp containing a small amount of mercury. WARNING: The cooling fan in the United...
... Corporation in inactive dots on the picture screen. DURING NORMAL OPERATION, NEVER TURN THE PROJECTOR OFF BY DISCONNECTING THE POWER CORD. This SHARP projector uses an LCD (Liquid Crystal Display) panel. During normal operation, when putting the projector into standby mode always use the STANDBY button on the projector or on page 60. PRODUCT DISPOSAL This product utilizes tin-lead solder, and lamp containing a small amount of mercury. WARNING: The cooling fan in the United...
XG-C435X | XG-C465X Operation Manual
Page 5
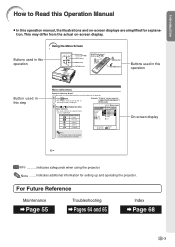
Menu icon Menu screen Picture Fine Sync Menu icons Picture Picture Mode Contrast 0 Bright 0 Red 0 Blue 0 CLR Temp Reset Signal Type COMP.1 Standard 7500K Auto Options1 Options2 Language SEL./ADJ. For Future Reference Maintenance Page 55 Troubleshooting Pages 64 and 65 Index Page 68 -3 Introduction How to display the other menu screens. • The menu icon for the selected menu screen is highlighted. On-screen display -42 Info ...........Indicates safeguards when using the buttons on the projector. 1 Press MENU. •...
Menu icon Menu screen Picture Fine Sync Menu icons Picture Picture Mode Contrast 0 Bright 0 Red 0 Blue 0 CLR Temp Reset Signal Type COMP.1 Standard 7500K Auto Options1 Options2 Language SEL./ADJ. For Future Reference Maintenance Page 55 Troubleshooting Pages 64 and 65 Index Page 68 -3 Introduction How to display the other menu screens. • The menu icon for the selected menu screen is highlighted. On-screen display -42 Info ...........Indicates safeguards when using the buttons on the projector. 1 Press MENU. •...
XG-C435X | XG-C465X Operation Manual
Page 6
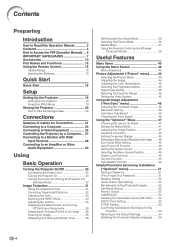
... Using the Menu Screen 42 Menu Selections 42 Picture Adjustment ("Picture" menu) ......... 44 Selecting the Picture Mode 44 Adjusting the Image 44 Adjusting the Color Temperature 45 Selecting the Progressive Mode 45 Signal Type Setting 45 Selecting the Dynamic Range 45 Setting the Video System 45 Computer Image Adjustment ("Fine Sync" menu 46 Adjusting the Computer Image 46 Resolution Setting 46 Auto Sync Adjustment 46 Checking the Input Signal 46 Using the "Options1" Menu 47 Checking the Lamp Life Status 47 Setting the Resize Mode 47 Adjusting the Image Position 47 Keystone...
... Using the Menu Screen 42 Menu Selections 42 Picture Adjustment ("Picture" menu) ......... 44 Selecting the Picture Mode 44 Adjusting the Image 44 Adjusting the Color Temperature 45 Selecting the Progressive Mode 45 Signal Type Setting 45 Selecting the Dynamic Range 45 Setting the Video System 45 Computer Image Adjustment ("Fine Sync" menu 46 Adjusting the Computer Image 46 Resolution Setting 46 Auto Sync Adjustment 46 Checking the Input Signal 46 Using the "Options1" Menu 47 Checking the Lamp Life Status 47 Setting the Resize Mode 47 Adjusting the Image Position 47 Keystone...
XG-C435X | XG-C465X Operation Manual
Page 7
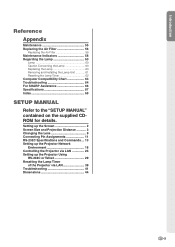
... the Lamp 60 Replacing the Lamp 60 Removing and Installing the Lamp Unit 61 Resetting the Lamp Timer 62 Computer Compatibility Chart 63 Troubleshooting 64 For SHARP Assistance 66 Specifications 67 Index 68 SETUP MANUAL Refer to the "SETUP MANUAL" contained on the supplied CDROM for details. Setting up the Screen 2 Screen Size and Projection Distance 3 Changing the Lens 9 Connecting Pin Assignments 11 RS-232C Specifications and Commands ... 13 Setting up the Projector Network Environment 18 Controlling the Projector via LAN 24 Setting up the Projector Using...
... the Lamp 60 Replacing the Lamp 60 Removing and Installing the Lamp Unit 61 Resetting the Lamp Timer 62 Computer Compatibility Chart 63 Troubleshooting 64 For SHARP Assistance 66 Specifications 67 Index 68 SETUP MANUAL Refer to the "SETUP MANUAL" contained on the supplied CDROM for details. Setting up the Screen 2 Screen Size and Projection Distance 3 Changing the Lens 9 Connecting Pin Assignments 11 RS-232C Specifications and Commands ... 13 Setting up the Projector Network Environment 18 Controlling the Projector via LAN 24 Setting up the Projector Using...
XG-C435X | XG-C465X Operation Manual
Page 8
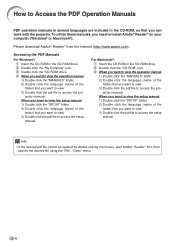
... the projector manuals. Please download Adobe® Reader® from the Internet (http://www.adobe.com). When you want to view the setup manual 1) Double click the "SETUP" folder. 2) Double click the language (name of the folder) that you need to install Adobe® Reader® on your computer (Windows® or Macintosh®). How to Access the PDF Operation Manuals PDF operation manuals in...
... the projector manuals. Please download Adobe® Reader® from the Internet (http://www.adobe.com). When you want to view the setup manual 1) Double click the "SETUP" folder. 2) Double click the language (name of the folder) that you need to install Adobe® Reader® on your computer (Windows® or Macintosh®). How to Access the PDF Operation Manuals PDF operation manuals in...

XG-C435X | XG-C465X Operation Manual
Page 10
... Pro- Remove the projector power cord from humidity, dust and cigarette smoke. See "Replacing the Lamp" on the screen washes out the colors, making viewing difficult. Avoid locations with the lens so as not to hit or damage the surface of the projector is not in direct sunlight or room light. IMPORTANT SAFEGUARDS Ensure that you use in these environments, the vents and lens must be cleaned...
... Pro- Remove the projector power cord from humidity, dust and cigarette smoke. See "Replacing the Lamp" on the screen washes out the colors, making viewing difficult. Avoid locations with the lens so as not to hit or damage the surface of the projector is not in direct sunlight or room light. IMPORTANT SAFEGUARDS Ensure that you use in these environments, the vents and lens must be cleaned...
XG-C435X | XG-C465X Operation Manual
Page 11
... to the projector, make the connections AFTER unplugging the power cord of the projector from the AC outlet and turning off the equipment to be connected. ■ Please read the operation manuals of the projector and the equipment to setup problems or blockage of the picture. heat due to be connected for a while. This does not indicate malfunction. • Even if you are using the projector, take...
... to the projector, make the connections AFTER unplugging the power cord of the projector from the AC outlet and turning off the equipment to be connected. ■ Please read the operation manuals of the projector and the equipment to setup problems or blockage of the picture. heat due to be connected for a while. This does not indicate malfunction. • Even if you are using the projector, take...
XG-C435X | XG-C465X Operation Manual
Page 14
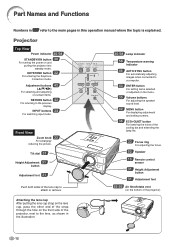
... remove. 30·58 Lamp indicator 58 Temperature warning indicator 46 AUTO SYNC button For automatically adjusting images when connected to a computer. 43 ENTER button For setting items selected or adjusted on the menu. 35 Volume buttons For adjusting the speaker sound level. 42 MENU button For displaying adjustment and setting screens. 36 ECO+QUIET button For lowering the noise of the cooling fan and extending the lamp life. 33 Focus ring For adjusting the focus. 52 Speaker 15 Remote control sensor 31 Height Adjustment button...
... remove. 30·58 Lamp indicator 58 Temperature warning indicator 46 AUTO SYNC button For automatically adjusting images when connected to a computer. 43 ENTER button For setting items selected or adjusted on the menu. 35 Volume buttons For adjusting the speaker sound level. 42 MENU button For displaying adjustment and setting screens. 36 ECO+QUIET button For lowering the noise of the cooling fan and extending the lamp life. 33 Focus ring For adjusting the focus. 52 Speaker 15 Remote control sensor 31 Height Adjustment button...
XG-C435X | XG-C465X Operation Manual
Page 16
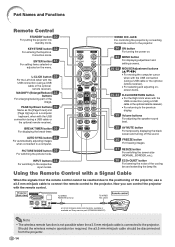
... the USB connection (using a USB cable or the optional remote receiver). Part Names and Functions Remote Control STANDBY button 30 For putting the projector into standby mode. BREAK TIMER button 36 For displaying the break timer. ENTER button 43 For setting items selected or adjusted on . 42 MENU button For displaying adjustment and setting screens. 39·42 MOUSE/Adjustment buttons For moving the computer cursor when with the USB connection (using a USB cable or the optional remote receiver). • For returning to the respective input modes. KEYSTONE button...
... the USB connection (using a USB cable or the optional remote receiver). Part Names and Functions Remote Control STANDBY button 30 For putting the projector into standby mode. BREAK TIMER button 36 For displaying the break timer. ENTER button 43 For setting items selected or adjusted on . 42 MENU button For displaying adjustment and setting screens. 39·42 MOUSE/Adjustment buttons For moving the computer cursor when with the USB connection (using a USB cable or the optional remote receiver). • For returning to the respective input modes. KEYSTONE button...
XG-C435X | XG-C465X Operation Manual
Page 32
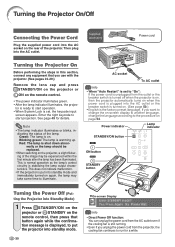
...; The lamp indicator illuminates or blinks, in this section, connect any equipment that button again while the confirmation message is displayed, to put into standby mode and immediately turned on again, the lamp may be replaced. • When switching on the projector, a slight flickering of the image may take some time to the procedure on . dicating the status of the projector. This is normal operation as the lamp's control circuitry is shut down...
...; The lamp indicator illuminates or blinks, in this section, connect any equipment that button again while the confirmation message is displayed, to put into standby mode and immediately turned on again, the lamp may be replaced. • When switching on the projector, a slight flickering of the image may take some time to the procedure on . dicating the status of the projector. This is normal operation as the lamp's control circuitry is shut down...
XG-C435X | XG-C465X Operation Manual
Page 43
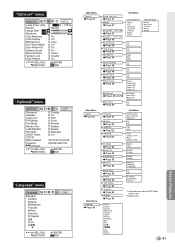
... MAC Address Projector All Reset SEL./ADJ. RETURN ENTER END Main Menu Options1 Page 47 Main Menu Options2 Page 51 Main Menu Language Page 54 Lamp Timer (Life) Page 47 Resize Page 47 Image Shift -96 +96 Page 47 Keystone -127 +127 Page 48 Auto Keystone Page 48 OSD Display Page 48 Background Page 48 Eco+Quiet Mode Page 48 Auto Power Off Page 48 System Sound Page 49 Menu...
... MAC Address Projector All Reset SEL./ADJ. RETURN ENTER END Main Menu Options1 Page 47 Main Menu Options2 Page 51 Main Menu Language Page 54 Lamp Timer (Life) Page 47 Resize Page 47 Image Shift -96 +96 Page 47 Keystone -127 +127 Page 48 Auto Keystone Page 48 OSD Display Page 48 Background Page 48 Eco+Quiet Mode Page 48 Auto Power Off Page 48 System Sound Page 49 Menu...
XG-C435X | XG-C465X Operation Manual
Page 51
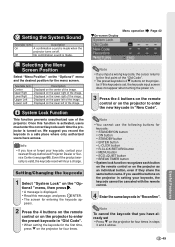
... keycode each button on the remote control or on the projector for keycode: • STANDBY/ON button • ON button • STANDBY button • ENTER button • L-CLICK button • R-CLICK/RETURN button • MENU button • ECO+QUIET button • BREAK TIMER button • System lock function recognizes each time the projector is turned on the center of the image. Note • You cannot use of the image. Useful Features -49 Displayed on the projector. We...
... keycode each button on the remote control or on the projector for keycode: • STANDBY/ON button • ON button • STANDBY button • ENTER button • L-CLICK button • R-CLICK/RETURN button • MENU button • ECO+QUIET button • BREAK TIMER button • System lock function recognizes each time the projector is turned on the center of the image. Note • You cannot use of the image. Useful Features -49 Displayed on the projector. We...
XG-C435X | XG-C465X Operation Manual
Page 54
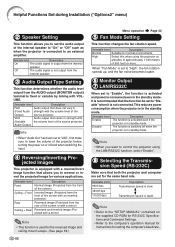
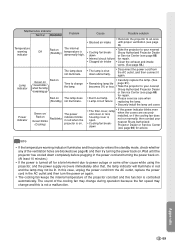
... and power is used for the reversed image and ceiling-mount setups. (See page 19.) -52 Menu operation Page 42 5 Fan Mode Setting This function changes the fan rotation speed. The function is switched off and when switching the input. 4 Reversing/Inverting Projected Images This projector is equipped with (Variable the volume level of approximately 1,500 meters (4,900 feet) or more. Helpful Functions Set during Installation ("Options2" menu) 2 Speaker Setting This function allows you to set the audio...
... and power is used for the reversed image and ceiling-mount setups. (See page 19.) -52 Menu operation Page 42 5 Fan Mode Setting This function changes the fan rotation speed. The function is switched off and when switching the input. 4 Reversing/Inverting Projected Images This projector is equipped with (Variable the volume level of approximately 1,500 meters (4,900 feet) or more. Helpful Functions Set during Installation ("Options2" menu) 2 Speaker Setting This function allows you to set the audio...
XG-C435X | XG-C465X Operation Manual
Page 55
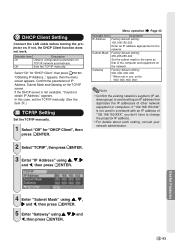
... Client Setting Connect the LAN cable before turning the projector on the network. If the DHCP server is not used in use, set the TCP/IP manually. (See the item 0.) 0 TCP/IP Setting Set the TCP/IP manually. 1 Select "Off" for the network. In this case, set to the same as that duplicates the IP addresses of IP Address, Subnet Mask and Gateway on the TCP/IP screen. Useful Features...
... Client Setting Connect the LAN cable before turning the projector on the network. If the DHCP server is not used in use, set the TCP/IP manually. (See the item 0.) 0 TCP/IP Setting Set the TCP/IP manually. 1 Select "Off" for the network. In this case, set to the same as that duplicates the IP addresses of IP Address, Subnet Mask and Gateway on the TCP/IP screen. Useful Features...
XG-C435X | XG-C465X Operation Manual
Page 61
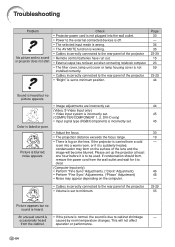
... failure replacing the lamp. • Securely install the lamp unit cover. Sharp Authorized Projector Dealer down or Service Center (see page 66) • Internal circuit failure for repair. • Clogged air intake • Clean the exhaust and intake vents. (See page 55.) The lamp does not illuminate. • The lamp is shut down completely before plugging in the AC outlet and then turn the power on . Power indicator Green on/ Red on Green blinks...
... failure replacing the lamp. • Securely install the lamp unit cover. Sharp Authorized Projector Dealer down or Service Center (see page 66) • Internal circuit failure for repair. • Clogged air intake • Clean the exhaust and intake vents. (See page 55.) The lamp does not illuminate. • The lamp is shut down completely before plugging in the AC outlet and then turn the power on . Power indicator Green on/ Red on Green blinks...
XG-C435X | XG-C465X Operation Manual
Page 64
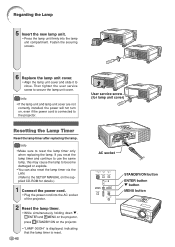
... the projector. • "LAMP 0000H" is displayed, indicating that the lamp timer is connected to the projector. Fasten the securing screws. 6 Replace the lamp unit cover. • Align the lamp unit cover and slide it to secure the lamp unit cover. Then tighten the user service screw to close. Info • Make sure to the SETUP MANUAL on the supplied CD-ROM for lamp unit cover) AC socket STANDBY/ON button ENTER button " button MENU button If you reset the lamp timer and...
... the projector. • "LAMP 0000H" is displayed, indicating that the lamp timer is connected to the projector. Fasten the securing screws. 6 Replace the lamp unit cover. • Align the lamp unit cover and slide it to secure the lamp unit cover. Then tighten the user service screw to close. Info • Make sure to the SETUP MANUAL on the supplied CD-ROM for lamp unit cover) AC socket STANDBY/ON button ENTER button " button MENU button If you reset the lamp timer and...
XG-C435X | XG-C465X Operation Manual
Page 66
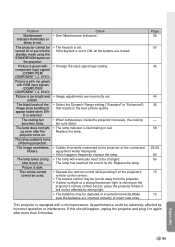
... temperature changes. Picture is fog on the surface of the projector. • Volume is set . • Adjust the focus. • The projection distance exceeds the focus range. • There is blurred; Troubleshooting Problem No picture and no sound is to be used. noise appears. • Image adjustments are incorrectly set. (Video, S-Video Input only) • Video input system is incorrectly set. (COMPUTER/COMPONENT 1, 2, DVI-D only) • Input signal type (RGB/Component) is incorrectly set to clear. (Computer Input...
... temperature changes. Picture is fog on the surface of the projector. • Volume is set . • Adjust the focus. • The projection distance exceeds the focus range. • There is blurred; Troubleshooting Problem No picture and no sound is to be used. noise appears. • Image adjustments are incorrectly set. (Video, S-Video Input only) • Video input system is incorrectly set. (COMPUTER/COMPONENT 1, 2, DVI-D only) • Input signal type (RGB/Component) is incorrectly set to clear. (Computer Input...
XG-C435X | XG-C465X Operation Manual
Page 67
... plug it will eventually need to turn on . Picture is dark. The image sometimes flickers. Replace the lamp. • Cables incorrectly connected to ON, all the buttons are locked. • Change the input signal type setting. • Image adjustments are inserted correctly or insert new ones. Its performance could be changed. Appendix -65 Problem Maintenance indicator illuminates or blinks in again after the projector turns on . Picture is too bright and whitish. If the...
... plug it will eventually need to turn on . Picture is dark. The image sometimes flickers. Replace the lamp. • Cables incorrectly connected to ON, all the buttons are locked. • Change the input signal type setting. • Image adjustments are inserted correctly or insert new ones. Its performance could be changed. Appendix -65 Problem Maintenance indicator illuminates or blinks in again after the projector turns on . Picture is too bright and whitish. If the...

XG-C435X | XG-C465X Operation Manual
Page 68
...://www.sharp.ch Sweden Sharp Electronics ( Nordic ) AB (46) 8 6343600 vision.support@sen.sharp-eu.com http://www.sharp.se Austria Sharp Electronics (Europe) GMBH Branch Office Austria 0043 1 727 19 123 pogats@sea.sharp-eu.com http://www.sharp.at Benelux Australia New Zealand Singapore Hong Kong Taiwan Malaysia U.A.E. For SHARP Assistance If you encounter any problems during setup or operation of...
...://www.sharp.ch Sweden Sharp Electronics ( Nordic ) AB (46) 8 6343600 vision.support@sen.sharp-eu.com http://www.sharp.se Austria Sharp Electronics (Europe) GMBH Branch Office Austria 0043 1 727 19 123 pogats@sea.sharp-eu.com http://www.sharp.at Benelux Australia New Zealand Singapore Hong Kong Taiwan Malaysia U.A.E. For SHARP Assistance If you encounter any problems during setup or operation of...
XG-C435X | XG-C465X Operation Manual
Page 70
... MAC Address 54 MAGNIFY buttons 35 MENU button 42 Menu Position 49 Monitor Output 52 MOUSE/Adjustment buttons 39, 42 Movie 44 Normal 37 ON button 30 Optional accessories 10 Options1 41, 47 Options2 41, 51 OSD Display 48 Password 51 PDF 6 Phase 46 Picture 40, 44 Picture Mode 44 PICTURE MODE button 36 Power cord 30 Power indicator 30 Presentation 44 PRJ mode 52 Progressive 45 Projector 54 R-CLICK/RETURN button 39, 43 Red 44 Remote control...
... MAC Address 54 MAGNIFY buttons 35 MENU button 42 Menu Position 49 Monitor Output 52 MOUSE/Adjustment buttons 39, 42 Movie 44 Normal 37 ON button 30 Optional accessories 10 Options1 41, 47 Options2 41, 51 OSD Display 48 Password 51 PDF 6 Phase 46 Picture 40, 44 Picture Mode 44 PICTURE MODE button 36 Power cord 30 Power indicator 30 Presentation 44 PRJ mode 52 Progressive 45 Projector 54 R-CLICK/RETURN button 39, 43 Red 44 Remote control...


