
XG-C330X , XG-C335X , XG-C430X Operation Manual
Page 1
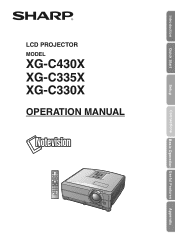
Introduction Quick Start LCD PROJECTOR MODEL XG-C430X XG-C335X XG-C330X OPERATION MANUAL Setup Connections Basic Operation Useful Features Appendix
Introduction Quick Start LCD PROJECTOR MODEL XG-C430X XG-C335X XG-C330X OPERATION MANUAL Setup Connections Basic Operation Useful Features Appendix

XG-C330X , XG-C335X , XG-C430X Operation Manual
Page 2
...édois, espagnol, italien, néerlandais, portugais, chinois et coréen. Lees de handleiding zorgvuldig door voor u de projector in Englisch, Deutsch, Französisch, Schwedisch, Spanisch, Italienisch, Niederländisch, Portugiesisch, Chinesisch und Koreanisch. The supplied CD-...Lea cuidadosamente las instrucciones de operación antes de utilizar el proyector. Carefully read through the operation instructions before operating the projector. El CD-ROM suministrado contiene instrucciones de operación en inglés, alemán, francés, sueco, españ...
...édois, espagnol, italien, néerlandais, portugais, chinois et coréen. Lees de handleiding zorgvuldig door voor u de projector in Englisch, Deutsch, Französisch, Schwedisch, Spanisch, Italienisch, Niederländisch, Portugiesisch, Chinesisch und Koreanisch. The supplied CD-...Lea cuidadosamente las instrucciones de operación antes de utilizar el proyector. Carefully read through the operation instructions before operating the projector. El CD-ROM suministrado contiene instrucciones de operación en inglés, alemán, francés, sueco, españ...

XG-C330X , XG-C335X , XG-C430X Operation Manual
Page 3
..."dangerous voltage" within a triangle is operated in a commercial environment. Introduction ENGLISH There are designed to your new SHARP Projector, using the projector, please read this product to rain or moisture. CONSUMER PRODUCT SAFETY ACT To ensure that children do not expose ...IMPORTANT "LIMITED WARRANTY" CLAUSE. REFER SERVICING TO QUALIFIED SERVICE PERSONNEL. ONLY The enclosed computer cable must be required to Part 15 of projector. U.S.A. ONLY WARNING: This is likely to cause harmful interference, in a residential area is a Class A product. These limits are...
..."dangerous voltage" within a triangle is operated in a commercial environment. Introduction ENGLISH There are designed to your new SHARP Projector, using the projector, please read this product to rain or moisture. CONSUMER PRODUCT SAFETY ACT To ensure that children do not expose ...IMPORTANT "LIMITED WARRANTY" CLAUSE. REFER SERVICING TO QUALIFIED SERVICE PERSONNEL. ONLY The enclosed computer cable must be required to Part 15 of projector. U.S.A. ONLY WARNING: This is likely to cause harmful interference, in a residential area is a Class A product. These limits are...
XG-C330X , XG-C335X , XG-C430X Operation Manual
Page 4
... Lamp Replacement See "Replacing the Lamp" on the remote control. Authorized representative responsible for about 90 seconds after the projector enters the standby mode. This SHARP projector uses an LCD (Liquid Crystal Display) panel. in the storage case. Ensure the cooling fan has stopped before storing the... projector in the United States and/or other countries. • All other countries. • PC/AT is a registered ...
... Lamp Replacement See "Replacing the Lamp" on the remote control. Authorized representative responsible for about 90 seconds after the projector enters the standby mode. This SHARP projector uses an LCD (Liquid Crystal Display) panel. in the storage case. Ensure the cooling fan has stopped before storing the... projector in the United States and/or other countries. • All other countries. • PC/AT is a registered ...

XG-C330X , XG-C335X , XG-C430X Operation Manual
Page 5
...or S-VIDEO. RETURN ENTER END Note • The "Fine Sync" menu is not available for setting up and operating the projector. For Future Reference Maintenance Page 55 Troubleshooting Pages 64 and 65 Index Page 68 -3 On-screen display -42 Info ...........Indicates ...safeguards when using the buttons on the projector. 1 Press MENU. • The "Picture" menu screen for the selected input mode is highlighted. Example: "Picture" screen menu for COMPUTER/...
...or S-VIDEO. RETURN ENTER END Note • The "Fine Sync" menu is not available for setting up and operating the projector. For Future Reference Maintenance Page 55 Troubleshooting Pages 64 and 65 Index Page 68 -3 On-screen display -42 Info ...........Indicates ...safeguards when using the buttons on the projector. 1 Press MENU. • The "Picture" menu screen for the selected input mode is highlighted. Example: "Picture" screen menu for COMPUTER/...
XG-C330X , XG-C335X , XG-C430X Operation Manual
Page 6
...Control 15 Usable Range 15 Inserting the Batteries 15 Quick Start Quick Start 16 Setup Setting Up the Projector 18 Setting Up the Projector 18 Projection (PRJ) Mode 19 Storing the Projector 20 How to Use the Storage Case 20 Connections Samples of Cables for Connection 21 Connecting to ...a Computer 23 Connecting to Video Equipment 25 Controlling the Projector by a Computer ... 27 Connecting to a Monitor with RGB Input Terminal 28 Connecting to an Amplifier or Other Audio Equipment 29 Using ...
...Control 15 Usable Range 15 Inserting the Batteries 15 Quick Start Quick Start 16 Setup Setting Up the Projector 18 Setting Up the Projector 18 Projection (PRJ) Mode 19 Storing the Projector 20 How to Use the Storage Case 20 Connections Samples of Cables for Connection 21 Connecting to ...a Computer 23 Connecting to Video Equipment 25 Controlling the Projector by a Computer ... 27 Connecting to a Monitor with RGB Input Terminal 28 Connecting to an Amplifier or Other Audio Equipment 29 Using ...
XG-C330X , XG-C335X , XG-C430X Operation Manual
Page 7
...Assignments 11 RS-232C Specifications and Commands ... 13 Setting up the Projector Network Environment 18 Controlling the Projector via LAN 24 Setting up the Projector Using RS-232C or Telnet 29 Resetting the Lamp Timer of the Projector via LAN 39 Troubleshooting 41 Dimensions 44 -5 Introduction Reference Appendix Maintenance... and Installing the Lamp Unit 61 Resetting the Lamp Timer 62 Computer Compatibility Chart 63 Troubleshooting 64 For SHARP Assistance 66 Specifications 67 Index 68 SETUP MANUAL Refer to the "SETUP MANUAL" contained on the supplied CDROM for details.
...Assignments 11 RS-232C Specifications and Commands ... 13 Setting up the Projector Network Environment 18 Controlling the Projector via LAN 24 Setting up the Projector Using RS-232C or Telnet 29 Resetting the Lamp Timer of the Projector via LAN 39 Troubleshooting 41 Dimensions 44 -5 Introduction Reference Appendix Maintenance... and Installing the Lamp Unit 61 Resetting the Lamp Timer 62 Computer Compatibility Chart 63 Troubleshooting 64 For SHARP Assistance 66 Specifications 67 Index 68 SETUP MANUAL Refer to the "SETUP MANUAL" contained on the supplied CDROM for details.
XG-C330X , XG-C335X , XG-C430X Operation Manual
Page 8
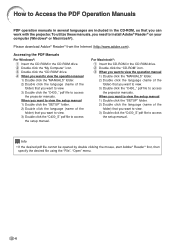
..." folder. 2) Double click the language (name of the folder) that you want to view. 3) Double click the "C430_" pdf file to access the projector manuals. To utilize these manuals, you want to view. 3) Double click the "C430_S" pdf file to access the setup manual. Please download Adobe® Reader...want to view the setup manual 1) Double click the "SETUP" folder. 2) Double click the language (name of the folder) that you can work with the projector. Accessing the PDF Manuals For Windows®: 1 Insert the CD-ROM in the CD-ROM drive. 2 Double click the "My Computer" icon. 3 Double...
..." folder. 2) Double click the language (name of the folder) that you want to view. 3) Double click the "C430_" pdf file to access the projector manuals. To utilize these manuals, you want to view. 3) Double click the "C430_S" pdf file to access the setup manual. Please download Adobe® Reader...want to view the setup manual 1) Double click the "SETUP" folder. 2) Double click the language (name of the folder) that you can work with the projector. Accessing the PDF Manuals For Windows®: 1 Insert the CD-ROM in the CD-ROM drive. 2 Double click the "My Computer" icon. 3 Double...

XG-C330X , XG-C335X , XG-C430X Operation Manual
Page 10
...not set "Fan Mode" to rest your nearest Sharp Authorized Pro- In case of the projector is from -4°F to 140°F (-20°C to avoid personal injury caused by a Sharp Authorized Projector Dealer or Service Center. Do not subject the projector to hard impact and/or vibration. ■ Take... that you use in these environments, the vents and lens must be performed by the projector falling down. Internal cleaning should be safely tilted to maintain high image quality, SHARP recommends that the intake vent and the exhaust vent are not blocked, plug the power cord...
...not set "Fan Mode" to rest your nearest Sharp Authorized Pro- In case of the projector is from -4°F to 140°F (-20°C to avoid personal injury caused by a Sharp Authorized Projector Dealer or Service Center. Do not subject the projector to hard impact and/or vibration. ■ Take... that you use in these environments, the vents and lens must be performed by the projector falling down. Internal cleaning should be safely tilted to maintain high image quality, SHARP recommends that the intake vent and the exhaust vent are not blocked, plug the power cord...
XG-C330X , XG-C335X , XG-C430X Operation Manual
Page 11
... a computer or other countries ■ The power supply voltage and the shape of the air vents, " " and " " will blink, and after projector operation, the cooling fan continues to hard impact and/or vibration, as this can result in the fan speed. If the temperature continues to rise..., the lamp will turn off, the temperature warning indicator on the projector will illumi- The sound of the picture. The storage case or projector may vary depending on the region or country you unplug the power cord after a 90-second cool-...
... a computer or other countries ■ The power supply voltage and the shape of the air vents, " " and " " will blink, and after projector operation, the cooling fan continues to hard impact and/or vibration, as this can result in the fan speed. If the temperature continues to rise..., the lamp will turn off, the temperature warning indicator on the projector will illumi- The sound of the picture. The storage case or projector may vary depending on the region or country you unplug the power cord after a 90-second cool-...

XG-C330X , XG-C335X , XG-C430X Operation Manual
Page 12
... Storage case GCASNA020WJSA • Operation manual (this manual (TINS-D048WJZZ) and CD-ROM (UDSKAA087WJZZ)) Optional accessories ■ 3 RCA to the wall outlet in your nearest Sharp Authorized Projector Dealer or Service Center. -10
... Storage case GCASNA020WJSA • Operation manual (this manual (TINS-D048WJZZ) and CD-ROM (UDSKAA087WJZZ)) Optional accessories ■ 3 RCA to the wall outlet in your nearest Sharp Authorized Projector Dealer or Service Center. -10
XG-C330X , XG-C335X , XG-C430X Operation Manual
Page 13
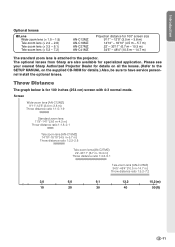
...40 50(ft) -11 Throw Distance The graph below is attached to have service personnel install the optional lenses. Please see your nearest Sharp Authorized Projector Dealer for details on all the lenses. (Refer to the SETUP MANUAL on the supplied CD-ROM for details.) Also, be sure to... the projector. Introduction Optional lenses ■ Lens Wide-zoom lens (× 1.5 - 1.9) Tele-zoom lens (× 2.2 - 2.8) Tele-zoom lens (× 3.3 - 5.1) Tele-zoom lens (× 5.2 - 7.2) AN...
...40 50(ft) -11 Throw Distance The graph below is attached to have service personnel install the optional lenses. Please see your nearest Sharp Authorized Projector Dealer for details on all the lenses. (Refer to the SETUP MANUAL on the supplied CD-ROM for details.) Also, be sure to... the projector. Introduction Optional lenses ■ Lens Wide-zoom lens (× 1.5 - 1.9) Tele-zoom lens (× 2.2 - 2.8) Tele-zoom lens (× 3.3 - 5.1) Tele-zoom lens (× 5.2 - 7.2) AN...

XG-C330X , XG-C335X , XG-C430X Operation Manual
Page 14
... operation manual where the topic is explained. Front View Zoom knob 33 For enlarging/ reducing the picture. INPUT buttons 34 For switching input mode. Projector Top View Power indicator 30·58 STANDBY/ON button 30 For turning the power on the front side of the strap through the hole... on and putting the projector into standby mode. Adjustment buttons 42 ('/"/\/|) For selecting and adjusting on-screen items. RETURN button 43 For returning to the previous display. Part Names...
... operation manual where the topic is explained. Front View Zoom knob 33 For enlarging/ reducing the picture. INPUT buttons 34 For switching input mode. Projector Top View Power indicator 30·58 STANDBY/ON button 30 For turning the power on the front side of the strap through the hole... on and putting the projector into standby mode. Adjustment buttons 42 ('/"/\/|) For selecting and adjusting on-screen items. RETURN button 43 For returning to the previous display. Part Names...

XG-C330X , XG-C335X , XG-C430X Operation Manual
Page 15
...RGB and Component signals. Refer to the information that came with the USB terminal on the lens cap to prevent damage to secure the projector. -13 AUDIO input terminal 23·25 Audio input terminal for Computer RGB and Component signals. S-VIDEO input terminal 26 VIDEO input ... MONITOR output terminal 28 Output terminal for COMPUTER/COMPONENT 1. Using the Carrying Handle When transporting the projector, carry it to the lens when transporting the projector. • Do not lift or carry the projector by the carrying handle on the side. • Always put on the computer for using a...
...RGB and Component signals. Refer to the information that came with the USB terminal on the lens cap to prevent damage to secure the projector. -13 AUDIO input terminal 23·25 Audio input terminal for Computer RGB and Component signals. S-VIDEO input terminal 26 VIDEO input ... MONITOR output terminal 28 Output terminal for COMPUTER/COMPONENT 1. Using the Carrying Handle When transporting the projector, carry it to the lens when transporting the projector. • Do not lift or carry the projector by the carrying handle on the side. • Always put on the computer for using a...
XG-C330X , XG-C335X , XG-C430X Operation Manual
Page 16
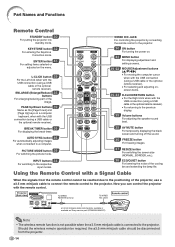
...of the cooling fan and extending the lamp life. BREAK TIMER button 36 For displaying the break timer. INPUT buttons 34 For switching to the projector. Projector (Rear view) To WIRED REMOTE terminal To WIRED R/C JACK Remote control ø3.5 mm minijack cable (commercially available or available as the [Page...control cannot be reached due to a computer. PICTURE MODE button 36 For switching the picture mode. PAGE Up/Down buttons 39 Same as Sharp service part QCNWGA038WJPZ) Note • The wireless remote function is not possible when the ø3.5 mm minijack cable is connected to the ...
...of the cooling fan and extending the lamp life. BREAK TIMER button 36 For displaying the break timer. INPUT buttons 34 For switching to the projector. Projector (Rear view) To WIRED REMOTE terminal To WIRED R/C JACK Remote control ø3.5 mm minijack cable (commercially available or available as the [Page...control cannot be reached due to a computer. PICTURE MODE button 36 For switching the picture mode. PAGE Up/Down buttons 39 Same as Sharp service part QCNWGA038WJPZ) Note • The wireless remote function is not possible when the ø3.5 mm minijack cable is connected to the ...

XG-C330X , XG-C335X , XG-C430X Operation Manual
Page 17
... short period, depending on how they are kept. Caution • Danger of new batteries or may malfunction under a fluorescent lamp. In this projector may run out, as possible with new batteries. • Remove the batteries from leaked batteries is incorrectly replaced. Battery fluid from the remote...operation. This may shorten the life of explosion if battery is harmful to leak. Replace only with this case, move the projector away from the remote control once they have different properties, therefore do not mix batteries of different types have run down the...
... short period, depending on how they are kept. Caution • Danger of new batteries or may malfunction under a fluorescent lamp. In this projector may run out, as possible with new batteries. • Remove the batteries from leaked batteries is incorrectly replaced. Battery fluid from the remote...operation. This may shorten the life of explosion if battery is harmful to leak. Replace only with this case, move the projector away from the remote control once they have different properties, therefore do not mix batteries of different types have run down the...

XG-C330X , XG-C335X , XG-C430X Operation Manual
Page 18
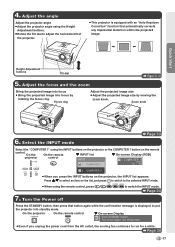
Quick Start This section shows the basic operation (projector connecting with the computer). Place the projector facing a screen 6 COMPUTER 1 button Page 18 2. Connect the projector to the computer and plug the power cord into the AC socket of the projector and the computer is explained using one example. 3 7 STANDBY... Height Adjustment buttons 1. For details, see pages 25, 28 and 29. Setup and Projection In this section, connection of the projector When connecting equipment other than the computer, see the page described below for each step. Remove the lens cap and turn the...
Quick Start This section shows the basic operation (projector connecting with the computer). Place the projector facing a screen 6 COMPUTER 1 button Page 18 2. Connect the projector to the computer and plug the power cord into the AC socket of the projector and the computer is explained using one example. 3 7 STANDBY... Height Adjustment buttons 1. For details, see pages 25, 28 and 29. Setup and Projection In this section, connection of the projector When connecting equipment other than the computer, see the page described below for each step. Remove the lens cap and turn the...
XG-C330X , XG-C335X , XG-C430X Operation Manual
Page 19
... mode. Page 34 7. Zoom knob Zoom out Zoom in Page 33 6. On the On the remote " INPUT list " On-screen Display (RGB) projector control INPUT 1 COMPUTER 1 1 COMPUTER 1 RGB 1024 × 768 2 COMPUTER 2 • When you unplug the power cord from the AC outlet...the STANDBY button, then press that button again while the confirmation message is displayed, to adjust the horizontal tilt of the projector. • This projector is equipped with an "Auto Keystone Correction" function that automatically corrects any trapezoidal distortion within the projected image. 4. Adjust ...
... mode. Page 34 7. Zoom knob Zoom out Zoom in Page 33 6. On the On the remote " INPUT list " On-screen Display (RGB) projector control INPUT 1 COMPUTER 1 1 COMPUTER 1 RGB 1024 × 768 2 COMPUTER 2 • When you unplug the power cord from the AC outlet...the STANDBY button, then press that button again while the confirmation message is displayed, to adjust the horizontal tilt of the projector. • This projector is equipped with an "Auto Keystone Correction" function that automatically corrects any trapezoidal distortion within the projected image. 4. Adjust ...
XG-C330X , XG-C335X , XG-C430X Operation Manual
Page 20
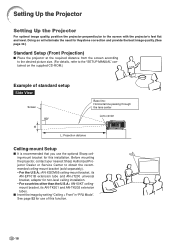
See page 52 for use the optional Sharp ceiling-mount bracket for this function. -18 Setting Up the Projector Setting Up the Projector For optimal image quality, position the projector perpendicular to the "SETUP MANUAL" contained on the supplied CD-ROM.) Example of standard ...H L: Projection distance Ceiling-mount Setup ■ It is recommended that you use of this installation. Before mounting the projector, contact your nearest Sharp Authorized Projector Dealer or Service Center to obtain the recommended ceiling-mount bracket (sold separately). • For the U.S.A.: AN-XGCM55 ...
See page 52 for use the optional Sharp ceiling-mount bracket for this function. -18 Setting Up the Projector Setting Up the Projector For optimal image quality, position the projector perpendicular to the "SETUP MANUAL" contained on the supplied CD-ROM.) Example of standard ...H L: Projection distance Ceiling-mount Setup ■ It is recommended that you use of this installation. Before mounting the projector, contact your nearest Sharp Authorized Projector Dealer or Service Center to obtain the recommended ceiling-mount bracket (sold separately). • For the U.S.A.: AN-XGCM55 ...
XG-C330X , XG-C335X , XG-C430X Operation Manual
Page 21
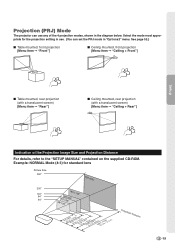
... of the Projection Image Size and Projection Distance For details, refer to the "SETUP MANUAL" contained on the supplied CD-ROM. Projection (PRJ) Mode The projector can use . (You can set the PRJ mode in "Options2" menu. Select the mode most appropriate for standard lens Picture Size 500" 400"×300...
... of the Projection Image Size and Projection Distance For details, refer to the "SETUP MANUAL" contained on the supplied CD-ROM. Projection (PRJ) Mode The projector can use . (You can set the PRJ mode in "Options2" menu. Select the mode most appropriate for standard lens Picture Size 500" 400"×300...


