
XG-C330X , XG-C335X , XG-C430X Operation Manual
Page 1
Introduction Quick Start LCD PROJECTOR MODEL XG-C430X XG-C335X XG-C330X OPERATION MANUAL Setup Connections Basic Operation Useful Features Appendix
Introduction Quick Start LCD PROJECTOR MODEL XG-C430X XG-C335X XG-C330X OPERATION MANUAL Setup Connections Basic Operation Useful Features Appendix

XG-C330X , XG-C335X , XG-C430X Operation Manual
Page 3
...This is likely to cause harmful interference, in which case the user may be of your purchase. 2. In a domestic environment this operation manual carefully. Do not stare into the beam of the FCC Rules. See bottom of important operating and maintenance (servicing) instructions in the literature...by the manufacturer could void the user's authority to Part 15 of light. The cable is provided to your new SHARP Projector, using the projector, please read this product may cause radio interference in which case the user will promptly receive any unauthorized changes or modifications...
...This is likely to cause harmful interference, in which case the user may be of your purchase. 2. In a domestic environment this operation manual carefully. Do not stare into the beam of the FCC Rules. See bottom of important operating and maintenance (servicing) instructions in the literature...by the manufacturer could void the user's authority to Part 15 of light. The cable is provided to your new SHARP Projector, using the projector, please read this product may cause radio interference in which case the user will promptly receive any unauthorized changes or modifications...

XG-C330X , XG-C335X , XG-C430X Operation Manual
Page 5
... MOUSE/Adjustment buttons ('/"/\/|) ENTER button MENU button RETURN button Buttons used in this operation Button used in this operation manual, the illustrations and on the projector. 1 Press MENU. • The "Picture" menu screen for the selected input mode is displayed. On-screen...Index Page 68 -3 Example: "Picture" screen menu for setting up and operating the projector. Note ........Indicates additional information for COMPUTER/COMPONENT 1 (RGB) mode 2 Press | or \ to Read this Operation Manual • In this step Menu Selections Example: Adjusting "Bright" • This ...
... MOUSE/Adjustment buttons ('/"/\/|) ENTER button MENU button RETURN button Buttons used in this operation Button used in this operation manual, the illustrations and on the projector. 1 Press MENU. • The "Picture" menu screen for the selected input mode is displayed. On-screen...Index Page 68 -3 Example: "Picture" screen menu for setting up and operating the projector. Note ........Indicates additional information for COMPUTER/COMPONENT 1 (RGB) mode 2 Press | or \ to Read this Operation Manual • In this step Menu Selections Example: Adjusting "Bright" • This ...
XG-C330X , XG-C335X , XG-C430X Operation Manual
Page 6
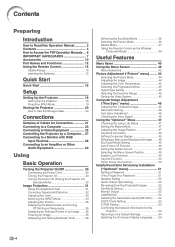
... How to Read this Operation Manual 3 Contents 4 How to Access the PDF Operation Manuals ... 6 IMPORTANT SAFEGUARDS 7 Accessories 10 Part Names and Functions 12 Using the Remote Control 15 Usable Range 15 Inserting the Batteries 15 Quick Start Quick Start 16 Setup Setting Up the Projector 18 Setting Up the Projector 18 Projection (PRJ) Mode...
... How to Read this Operation Manual 3 Contents 4 How to Access the PDF Operation Manuals ... 6 IMPORTANT SAFEGUARDS 7 Accessories 10 Part Names and Functions 12 Using the Remote Control 15 Usable Range 15 Inserting the Batteries 15 Quick Start Quick Start 16 Setup Setting Up the Projector 18 Setting Up the Projector 18 Projection (PRJ) Mode...
XG-C330X , XG-C335X , XG-C430X Operation Manual
Page 7
...Assignments 11 RS-232C Specifications and Commands ... 13 Setting up the Projector Network Environment 18 Controlling the Projector via LAN 24 Setting up the Projector Using RS-232C or Telnet 29 Resetting the Lamp Timer of the Projector via LAN 39 Troubleshooting 41 Dimensions 44 -5 Introduction Reference Appendix Maintenance... Removing and Installing the Lamp Unit 61 Resetting the Lamp Timer 62 Computer Compatibility Chart 63 Troubleshooting 64 For SHARP Assistance 66 Specifications 67 Index 68 SETUP MANUAL Refer to the "SETUP MANUAL" contained on the supplied CDROM for details.
...Assignments 11 RS-232C Specifications and Commands ... 13 Setting up the Projector Network Environment 18 Controlling the Projector via LAN 24 Setting up the Projector Using RS-232C or Telnet 29 Resetting the Lamp Timer of the Projector via LAN 39 Troubleshooting 41 Dimensions 44 -5 Introduction Reference Appendix Maintenance... Removing and Installing the Lamp Unit 61 Resetting the Lamp Timer 62 Computer Compatibility Chart 63 Troubleshooting 64 For SHARP Assistance 66 Specifications 67 Index 68 SETUP MANUAL Refer to the "SETUP MANUAL" contained on the supplied CDROM for details.
XG-C330X , XG-C335X , XG-C430X Operation Manual
Page 8
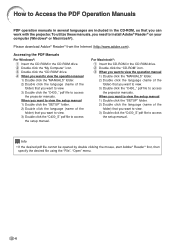
...that you want to view. 3) Double click the "C430_" pdf file to access the projector manuals. Please download Adobe® Reader® from the Internet (http://www.adobe.com). When you want to view the setup manual 1) Double click the "SETUP" folder. 2) Double click the language (name of the...click the language (name of the folder) that you want to view. 3) Double click the "C430_" pdf file to access the projector manuals. When you want to view the setup manual 1) Double click the "SETUP" folder. 2) Double click the language (name of the folder) that you want to view. 3) ...
...that you want to view. 3) Double click the "C430_" pdf file to access the projector manuals. Please download Adobe® Reader® from the Internet (http://www.adobe.com). When you want to view the setup manual 1) Double click the "SETUP" folder. 2) Double click the language (name of the...click the language (name of the folder) that you want to view. 3) Double click the "C430_" pdf file to access the projector manuals. When you want to view the setup manual 1) Double click the "SETUP" folder. 2) Double click the language (name of the folder) that you want to view. 3) ...
XG-C330X , XG-C335X , XG-C430X Operation Manual
Page 11
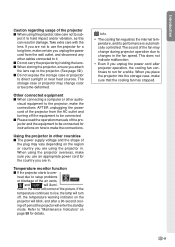
... the cooling fan has stopped. -9 When using the projector, take care not to the projector, make the connections. Refer to rise, the lamp will turn off the equipment to be connected. ■ Please read the operation manuals of the projector and the equipment to be connected for a long time..., make certain you are using the projector in damage. visual equipment to sub- The sound of the picture. If the temperature ...
... the cooling fan has stopped. -9 When using the projector, take care not to the projector, make the connections. Refer to rise, the lamp will turn off the equipment to be connected. ■ Please read the operation manuals of the projector and the equipment to be connected for a long time..., make certain you are using the projector in damage. visual equipment to sub- The sound of the picture. If the temperature ...

XG-C330X , XG-C335X , XG-C430X Operation Manual
Page 12
... (10' (3.0 m)) QCNWGA045WJPZ DIN-D-sub RS-232C adaptor (5 57/64" (15 cm)) QCNWGA015WJPZ Lens cap (attached) Lens cap strap PCAPHA026WJSA UBNDTA017WJZZ Storage case GCASNA020WJSA • Operation manual (this manual (TINS-D048WJZZ) and CD-ROM (UDSKAA087WJZZ)) Optional accessories ■ 3 RCA to the wall outlet in your nearest Sharp Authorized Projector Dealer or Service Center. -10
... (10' (3.0 m)) QCNWGA045WJPZ DIN-D-sub RS-232C adaptor (5 57/64" (15 cm)) QCNWGA015WJPZ Lens cap (attached) Lens cap strap PCAPHA026WJSA UBNDTA017WJZZ Storage case GCASNA020WJSA • Operation manual (this manual (TINS-D048WJZZ) and CD-ROM (UDSKAA087WJZZ)) Optional accessories ■ 3 RCA to the wall outlet in your nearest Sharp Authorized Projector Dealer or Service Center. -10
XG-C330X , XG-C335X , XG-C430X Operation Manual
Page 13
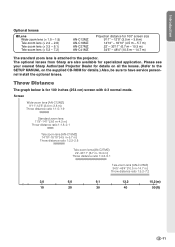
...) screen with 4:3 normal mode. Please see your nearest Sharp Authorized Projector Dealer for details on all the lenses. (Refer to the SETUP MANUAL on the supplied CD-ROM for specialized application. The optional lenses from Sharp are also available for details.) Also, be sure to the projector. Screen Wide-zoom lens (AN-C12MZ) 9'11"-12...
...) screen with 4:3 normal mode. Please see your nearest Sharp Authorized Projector Dealer for details on all the lenses. (Refer to the SETUP MANUAL on the supplied CD-ROM for specialized application. The optional lenses from Sharp are also available for details.) Also, be sure to the projector. Screen Wide-zoom lens (AN-C12MZ) 9'11"-12...

XG-C330X , XG-C335X , XG-C430X Operation Manual
Page 14
... buttons 42 ('/"/\/|) For selecting and adjusting on-screen items. RETURN button 43 For returning to the lens, as shown in this operation manual where the topic is explained. Projector Top View Power indicator 30·58 STANDBY/ON button 30 For turning the power on the front side of the strap through... the hole on and putting the projector into standby mode. KEYSTONE button 32 For entering the Keystone Correction mode. Tilt dial 31 Height Adjustment 31 button Adjustment foot 31 Push both ...
... buttons 42 ('/"/\/|) For selecting and adjusting on-screen items. RETURN button 43 For returning to the lens, as shown in this operation manual where the topic is explained. Projector Top View Power indicator 30·58 STANDBY/ON button 30 For turning the power on the front side of the strap through... the hole on and putting the projector into standby mode. KEYSTONE button 32 For entering the Keystone Correction mode. Tilt dial 31 Height Adjustment 31 button Adjustment foot 31 Push both ...
XG-C330X , XG-C335X , XG-C430X Operation Manual
Page 20
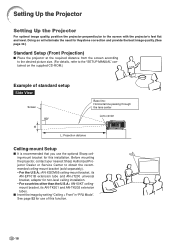
...projector, contact your nearest Sharp Authorized Projector Dealer or Service Center to the screen with the projector's feet flat and level. See page 52 for use the optional Sharp ceiling-mount bracket for this function. -18 Setting Up the Projector Setting Up the Projector For optimal image quality, position the projector...See page 32.) Standard Setup (Front Projection) ■ Place the projector at the required distance from the screen according to the desired picture size. (For details, refer to the "SETUP MANUAL" contained on the supplied CD-ROM.) Example of standard setup Side View...
...projector, contact your nearest Sharp Authorized Projector Dealer or Service Center to the screen with the projector's feet flat and level. See page 52 for use the optional Sharp ceiling-mount bracket for this function. -18 Setting Up the Projector Setting Up the Projector For optimal image quality, position the projector...See page 32.) Standard Setup (Front Projection) ■ Place the projector at the required distance from the screen according to the desired picture size. (For details, refer to the "SETUP MANUAL" contained on the supplied CD-ROM.) Example of standard setup Side View...
XG-C330X , XG-C335X , XG-C430X Operation Manual
Page 21
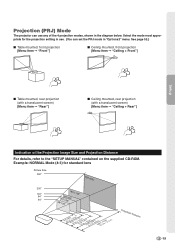
...m59"-'12(03.6."0-m1m)1-'11301.6"'(93m".6)-1m4-'124".33'(5m7.")1-2m8-'18".6 m5)8'(717"-.97m0'4-"21.4 m) Projection Distance -19 Projection (PRJ) Mode The projector can set the PRJ mode in the diagram below. Example: NORMAL Mode (4:3) for the projection setting in use. (You can use any of... the Projection Image Size and Projection Distance For details, refer to the "SETUP MANUAL" contained on the supplied CD-ROM. See page 52.) ■ Table mounted, front projection [Menu item ➞ "Front"] ■ Ceiling mounted...
...m59"-'12(03.6."0-m1m)1-'11301.6"'(93m".6)-1m4-'124".33'(5m7.")1-2m8-'18".6 m5)8'(717"-.97m0'4-"21.4 m) Projection Distance -19 Projection (PRJ) Mode The projector can set the PRJ mode in the diagram below. Example: NORMAL Mode (4:3) for the projection setting in use. (You can use any of... the Projection Image Size and Projection Distance For details, refer to the "SETUP MANUAL" contained on the supplied CD-ROM. See page 52.) ■ Table mounted, front projection [Menu item ➞ "Front"] ■ Ceiling mounted...

XG-C330X , XG-C335X , XG-C430X Operation Manual
Page 23
...Cable Terminal on the projector COMPUTER/ COMPONENT 1, 2 RGB output terminal Audio-visual equipment DVI digital video output terminal Audio output terminal DVI Digital cable (commercially available) ø3.5 mm stereo or mono audio cable (commercially available or available as Sharp service part QCNWGA038WJPZ) DVI...cable (commercially available) VIDEO Connections -21 for Connection • For more details of connection and cables, refer to the operation manual of the connecting equipment. • You may need other cables or connectors not listed below. Samples of Cables for using ...
...Cable Terminal on the projector COMPUTER/ COMPONENT 1, 2 RGB output terminal Audio-visual equipment DVI digital video output terminal Audio output terminal DVI Digital cable (commercially available) ø3.5 mm stereo or mono audio cable (commercially available or available as Sharp service part QCNWGA038WJPZ) DVI...cable (commercially available) VIDEO Connections -21 for Connection • For more details of connection and cables, refer to the operation manual of the connecting equipment. • You may need other cables or connectors not listed below. Samples of Cables for using ...

XG-C330X , XG-C335X , XG-C430X Operation Manual
Page 25
...instructions in your computer's operation manual to be half of the devices to enable your nearest Macintosh Dealer. • Depending on . (e.g. When connecting with computer signals other devices. Use with the RGB cable (Connecting to be connected are using a SHARP notebook computer). Press "Fn... are made. Contact your computer's external output port. Note • See page 63 "Computer Compatibility Chart" for use with the projector. After making connections. When connecting a computer, ensure that the devices to COMPUTER/COMPONENT 1 or 2: The illustration shown below is...
...instructions in your computer's operation manual to be half of the devices to enable your nearest Macintosh Dealer. • Depending on . (e.g. When connecting with computer signals other devices. Use with the RGB cable (Connecting to be connected are using a SHARP notebook computer). Press "Fn... are made. Contact your computer's external output port. Note • See page 63 "Computer Compatibility Chart" for use with the projector. After making connections. When connecting a computer, ensure that the devices to COMPUTER/COMPONENT 1 or 2: The illustration shown below is...
XG-C330X , XG-C335X , XG-C430X Operation Manual
Page 29
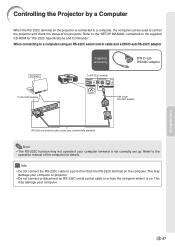
...cable (cross type, commercially available) Note • The RS-232C function may damage your computer or projector. • Do not connect or disconnect an RS-232C serial control cable to a port other ...than the RS-232C terminal on the supplied CD-ROM for details. Connections -27 Controlling the Projector by a Computer When the RS-232C terminal on . This may damage your computer. Info •... or from the computer while it is on the projector is not correctly set up. Refer to the "SETUP MANUAL" contained on the computer. Refer to the operation manual of the...
...cable (cross type, commercially available) Note • The RS-232C function may damage your computer or projector. • Do not connect or disconnect an RS-232C serial control cable to a port other ...than the RS-232C terminal on the supplied CD-ROM for details. Connections -27 Controlling the Projector by a Computer When the RS-232C terminal on . This may damage your computer. Info •... or from the computer while it is on the projector is not correctly set up. Refer to the "SETUP MANUAL" contained on the computer. Refer to the operation manual of the...

XG-C330X , XG-C335X , XG-C430X Operation Manual
Page 33
... menu is as perpendicular to approximately 9 degrees. just the horizontal tilt of the projector. • The inclination is slightly inclined. When you want to adjust the automatically corrected image, use the manual keystone correction. (See page 32.) Top View Height Adjustment button Info • Do... not press the Height Adjustment button when the adjustment feet come out. 2 Lift the projector to get your hands from the Height Adjustment...
... menu is as perpendicular to approximately 9 degrees. just the horizontal tilt of the projector. • The inclination is slightly inclined. When you want to adjust the automatically corrected image, use the manual keystone correction. (See page 32.) Top View Height Adjustment button Info • Do... not press the Height Adjustment button when the adjustment feet come out. 2 Lift the projector to get your hands from the Height Adjustment...

XG-C330X , XG-C335X , XG-C430X Operation Manual
Page 34
... Auto Keystone Correction function, you can make corrections manually using the following procedure. 1 Press KEYSTONE on the remote control to adjust the Keystone Correction. • You can also use KEYSTONE on the projector. mote control to enter the Keystone Correction mode.... Image Projection Correcting Trapezoidal Distortion Auto Keystone Correction When the image is called Keystone Correction. Compresses lower side. This projector is equipped with an "Auto Keystone Correction" function that automatically corrects any trapezoidal distortion within the projected image.The correction...
... Auto Keystone Correction function, you can make corrections manually using the following procedure. 1 Press KEYSTONE on the remote control to adjust the Keystone Correction. • You can also use KEYSTONE on the projector. mote control to enter the Keystone Correction mode.... Image Projection Correcting Trapezoidal Distortion Auto Keystone Correction When the image is called Keystone Correction. Compresses lower side. This projector is equipped with an "Auto Keystone Correction" function that automatically corrects any trapezoidal distortion within the projected image.The correction...

XG-C330X , XG-C335X , XG-C430X Operation Manual
Page 41
...(AN-MR2, optional) To USB terminal USB cable (commercially available or available as Sharp service part QCNWGA014WJPZ) The mouse pointer can use this function when displaying the menu ...use the remote control as the computer mouse. Press or PAGE. tails, see the operation manual of the receiver. L-CLICK and R-CLICK have set "Dot By Dot" as the screen ...projector with the remote control. However, this function does not work with the following operation systems that the computer recognizes the USB connection. • If "Resize" is displayed when signals having a higher resolution than XGA...
...(AN-MR2, optional) To USB terminal USB cable (commercially available or available as Sharp service part QCNWGA014WJPZ) The mouse pointer can use this function when displaying the menu ...use the remote control as the computer mouse. Press or PAGE. tails, see the operation manual of the receiver. L-CLICK and R-CLICK have set "Dot By Dot" as the screen ...projector with the remote control. However, this function does not work with the following operation systems that the computer recognizes the USB connection. • If "Resize" is displayed when signals having a higher resolution than XGA...

XG-C330X , XG-C335X , XG-C430X Operation Manual
Page 50
...will extend. (Projection brightness decreases 20%.) • You can be disabled. Manual Correction \ button | button Menu operation Page 42 6 Selecting a Startup and Background Image Selectable items Description Logo SHARP default image Blue Blue screen None Black screen 7 Eco/Quiet Mode Setting ... image becomes distorted trapezoidally. Selectable items Description On All On-screen Displays are not displayed. • "All buttons on the projector to an angle of approximately ±40 degrees with the slide bar. are displayed. Using the "Options1" Menu 4 Keystone ...
...will extend. (Projection brightness decreases 20%.) • You can be disabled. Manual Correction \ button | button Menu operation Page 42 6 Selecting a Startup and Background Image Selectable items Description Logo SHARP default image Blue Blue screen None Black screen 7 Eco/Quiet Mode Setting ... image becomes distorted trapezoidally. Selectable items Description On All On-screen Displays are not displayed. • "All buttons on the projector to an angle of approximately ±40 degrees with the slide bar. are displayed. Using the "Options1" Menu 4 Keystone ...

XG-C330X , XG-C335X , XG-C430X Operation Manual
Page 52
Disable The projector is turned on manually (see page 30), and does not turn on automatically when the power cord is plugged into the AC outlet or the breaker switch is turned on. Menu operation Page 42 Locking the Operation Buttons on the Projector (Keylock Function) Use this function to lock the operation buttons...
Disable The projector is turned on manually (see page 30), and does not turn on automatically when the power cord is plugged into the AC outlet or the breaker switch is turned on. Menu operation Page 42 Locking the Operation Buttons on the Projector (Keylock Function) Use this function to lock the operation buttons...


