XE-A404 Operation Manual in English and Spanish
Page 5
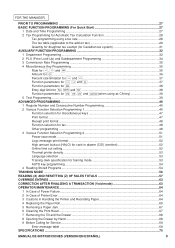
... PROGRAMMING ...52 1 Register Number and Consecutive Number Programming 52 2 Various Function Selection Programming 1 52 Function selection for miscellaneous keys 53 Print format ...53 Receipt print format ...54 Function selection... mode ...56 Logo message print format ...57 High amount lockout (HALO) for cash in drawer (CID) (sentinel 57 Online time out setting ...57 Thermal printer density ...58 Language...74 4 Replacing the Paper Roll ...75 5 Removing a Paper Jam ...77 6 Cleaning the Print Head...77 7 Removing the Till and the Drawer...78 8 Opening the Drawer by Hand ...78 ...
... PROGRAMMING ...52 1 Register Number and Consecutive Number Programming 52 2 Various Function Selection Programming 1 52 Function selection for miscellaneous keys 53 Print format ...53 Receipt print format ...54 Function selection... mode ...56 Logo message print format ...57 High amount lockout (HALO) for cash in drawer (CID) (sentinel 57 Online time out setting ...57 Thermal printer density ...58 Language...74 4 Replacing the Paper Roll ...75 5 Removing a Paper Jam ...77 6 Cleaning the Print Head...77 7 Removing the Till and the Drawer...78 8 Opening the Drawer by Hand ...78 ...
XE-A404 Operation Manual in English and Spanish
Page 6
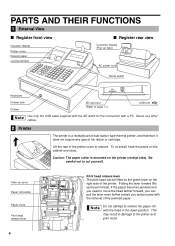
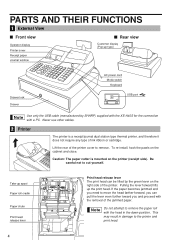
...thermal printer, and therefore it does not require any type of the printer. Be careful not to page 71.) USB port Use only the USB cable supplied with the XE-A404 for the connection with a PC. To re-install, hook the pawls on the printer (receipt side). Take-up the print head... remove the paper roll with the removal of the printer cover to the printer and print head. 4 PARTS AND THEIR FUNCTIONS 1 External View Register front view Operator display Printer cover Receipt paper Journal window Register rear view Customer display (Pop-up type) AC power cord Mode switch Keyboard Drawer...
...thermal printer, and therefore it does not require any type of the printer. Be careful not to page 71.) USB port Use only the USB cable supplied with the XE-A404 for the connection with a PC. To re-install, hook the pawls on the printer (receipt side). Take-up the print head... remove the paper roll with the removal of the printer cover to the printer and print head. 4 PARTS AND THEIR FUNCTIONS 1 External View Register front view Operator display Printer cover Receipt paper Journal window Register rear view Customer display (Pop-up type) AC power cord Mode switch Keyboard Drawer...
XE-A404 Operation Manual in English and Spanish
Page 10
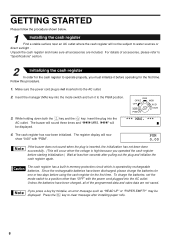
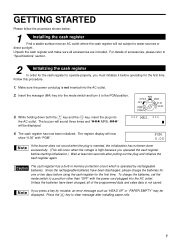
...one or two days before using the cash register for the first time. Unpack the cash register and make sure all of accessories, please refer to "Specifications" section. 2 Initializing the cash register In order for the cash register to water sources or direct sunlight ....cash register before starting initialization.) Wait at least ten seconds after installing paper rolls. 8 PGM 0.00 If the buzzer does not sound when the plug is inserted, the initialization has not been done successfully. (This will occur when the voltage is operated by mistake, an error message such as "HEAD...
...one or two days before using the cash register for the first time. Unpack the cash register and make sure all of accessories, please refer to "Specifications" section. 2 Initializing the cash register In order for the cash register to water sources or direct sunlight ....cash register before starting initialization.) Wait at least ten seconds after installing paper rolls. 8 PGM 0.00 If the buzzer does not sound when the plug is inserted, the initialization has not been done successfully. (This will occur when the voltage is operated by mistake, an error message such as "HEAD...
XE-A404 Operation Manual in English and Spanish
Page 11
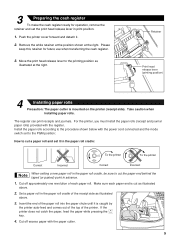
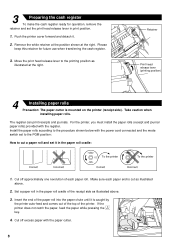
... paper roll. If the { printer does not catch the paper, feed the paper while pressing the key. 4. 3 Preparing the cash register To make the cash register ready for future use when transferring the cash register. 3. Move the print head release lever to cut as illustrated above . 2. Install the paper rolls according to the procedure shown below with the...
... paper roll. If the { printer does not catch the paper, feed the paper while pressing the key. 4. 3 Preparing the cash register To make the cash register ready for future use when transferring the cash register. 3. Move the print head release lever to cut as illustrated above . 2. Install the paper rolls according to the procedure shown below with the...
XE-A404 Operation Manual in English and Spanish
Page 76
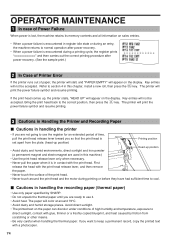
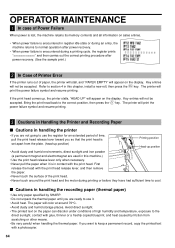
... when handling the thermal paper. The paper will print the power failure symbol and resume printing. First release the head with glue, thinner or a freshly copied blueprint, and heat caused by SHARP. • Do not unpack the thermal paper until you want to use the register for an extended period... of high humidity and temperature, exposure to direct sunlight, contact with the print head release lever, and then remove the paper. &#...
... when handling the thermal paper. The paper will print the power failure symbol and resume printing. First release the head with glue, thinner or a freshly copied blueprint, and heat caused by SHARP. • Do not unpack the thermal paper until you want to use the register for an extended period... of high humidity and temperature, exposure to direct sunlight, contact with the print head release lever, and then remove the paper. &#...
XE-A404 Operation Manual in English and Spanish
Page 78
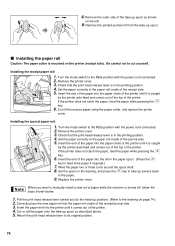
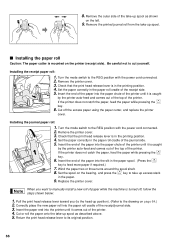
.... 9. Insert the end of the paper into the printer until it comes out of paper while the machine is mounted on page 74.) 2. Pull the print head release lever toward you want to the REG position with the power cord connected. 2. Be careful not to take up excess slack in the paper... by the printer auto-feed and comes out of the top of the receipt side. 5. Insert the paper end into the slit in the printing position. 4. Return the print head release lever to the REG position with the power cord connected. 2. Insert the end of the paper into the paper roll cradle of...
.... 9. Insert the end of the paper into the printer until it comes out of paper while the machine is mounted on page 74.) 2. Pull the print head release lever toward you want to the REG position with the power cord connected. 2. Be careful not to take up excess slack in the paper... by the printer auto-feed and comes out of the top of the receipt side. 5. Insert the paper end into the slit in the printing position. 4. Return the print head release lever to the REG position with the power cord connected. 2. Insert the end of the paper into the paper roll cradle of...
XE-A404 Operation Manual in English and Spanish
Page 79
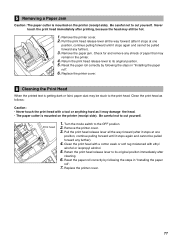
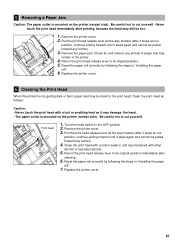
... pulling forward until it stops again and cannot be hot. 1. Pull the print head release lever all the way forward (after printing, because the head may be pulled forward any further). 3. Be careful not to the print head. Remove the paper jam. Clean the print head with a cotton swab or soft rag moistened with a tool or anything hard...
... pulling forward until it stops again and cannot be hot. 1. Pull the print head release lever all the way forward (after printing, because the head may be pulled forward any further). 3. Be careful not to the print head. Remove the paper jam. Clean the print head with a cotton swab or soft rag moistened with a tool or anything hard...
XE-A404 Operation Manual in English and Spanish
Page 81
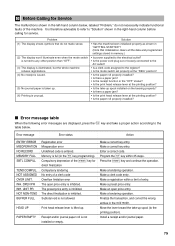
... inhibited. The direct finalization is inhibited. Print head release lever is not installed or empty. Make a preset price entry. Move the lever toward the take -up . (6) Printing is inhibited. Receipt and/or journal paper roll is lifted up spool (to the register? • Is the mode switch set... properly at the "REG" position? • Is the paper roll properly installed? • Is there a paper jam? • Is the receipt function in the "OFF" status? • Is the print head release lever at the printing position? •...
... inhibited. The direct finalization is inhibited. Print head release lever is not installed or empty. Make a preset price entry. Move the lever toward the take -up . (6) Printing is inhibited. Receipt and/or journal paper roll is lifted up spool (to the register? • Is the mode switch set... properly at the "REG" position? • Is the paper roll properly installed? • Is there a paper jam? • Is the receipt function in the "OFF" status? • Is the print head release lever at the printing position? •...
XE-A40S Quick Start Guide in English and Spanish
Page 5
...ADVANCED PROGRAMMING ...46 1 Register Number and Consecutive Number Programming 46 2 Various Function Selection Programming 1 46 Function selection for miscellaneous keys 47 Print format ...47 Receipt print format ...48 Function ... mode ...51 Logo message print format ...52 High amount lockout (HALO) for cash in drawer (CID) (sentinel 52 Online time out setting ...52 Thermal printer density ...53 Language ... 64 4 Replacing the Paper Roll...65 5 Removing a Paper Jam ...67 6 Cleaning the Print Head ...67 7 Removing the Till and the Drawer ...68 8 Opening the Drawer by Hand ......
...ADVANCED PROGRAMMING ...46 1 Register Number and Consecutive Number Programming 46 2 Various Function Selection Programming 1 46 Function selection for miscellaneous keys 47 Print format ...47 Receipt print format ...48 Function ... mode ...51 Logo message print format ...52 High amount lockout (HALO) for cash in drawer (CID) (sentinel 52 Online time out setting ...52 Thermal printer density ...53 Language ... 64 4 Replacing the Paper Roll...65 5 Removing a Paper Jam ...67 6 Cleaning the Print Head ...67 7 Removing the Till and the Drawer ...68 8 Opening the Drawer by Hand ......
XE-A40S Quick Start Guide in English and Spanish
Page 6
...roll cradle Paper chute Print head release lever Print head release lever The print head can pull the lever even further toward you and proceed with the removal of ink ribbon or cartridge. If the paper becomes jammed and you can be lifted by SHARP) supplied with the XE-A40S for the ...connection with the head in damage to move the head farther forward, you need to the printer and print head. 4 Caution: The paper cutter is a receipt/journal dual station type thermal printer, and therefore it does not...
...roll cradle Paper chute Print head release lever Print head release lever The print head can pull the lever even further toward you and proceed with the removal of ink ribbon or cartridge. If the paper becomes jammed and you can be lifted by SHARP) supplied with the XE-A40S for the ...connection with the head in damage to move the head farther forward, you need to the printer and print head. 4 Caution: The paper cutter is a receipt/journal dual station type thermal printer, and therefore it does not...
XE-A40S Quick Start Guide in English and Spanish
Page 9
... has not been done successfully. (This will not subject to water sources or direct sunlight . The cash register has a built-in memory protection circuit which is operated by mistake, an error message such as "HEAD UP" or "PAPER EMPTY" may be displayed. *** MRS. *** 4. REG OPX/Z MGR OFF ... first time. Press the key to the PGM position. For details of the programmed data and sales data is not saved. The cash register has now been initialized. Since the rechargeable batteries have been charged, all accessories are included. If you must initialize it to clear ...
... has not been done successfully. (This will not subject to water sources or direct sunlight . The cash register has a built-in memory protection circuit which is operated by mistake, an error message such as "HEAD UP" or "PAPER EMPTY" may be displayed. *** MRS. *** 4. REG OPX/Z MGR OFF ... first time. Press the key to the PGM position. For details of the programmed data and sales data is not saved. The cash register has now been initialized. Since the rechargeable batteries have been charged, all accessories are included. If you must initialize it to clear ...
XE-A40S Quick Start Guide in English and Spanish
Page 10
...the printer Incorrect 1. Move the print head release lever to cut as illustrated above . 2. Cut off approximately one revolution of the printer. 3 Preparing the cash register To make the cash register ready for future use when transferring the cash register. 3. Insert the end of ...the receipt side as illustrated above . 3. The register can print receipts and journals. Remove the white retainer ...
...the printer Incorrect 1. Move the print head release lever to cut as illustrated above . 2. Cut off approximately one revolution of the printer. 3 Preparing the cash register To make the cash register ready for future use when transferring the cash register. 3. Insert the end of ...the receipt side as illustrated above . 3. The register can print receipts and journals. Remove the white retainer ...
XE-A40S Quick Start Guide in English and Spanish
Page 66
... then press the key. First release the head with glue, thinner or a freshly copied blueprint, and heat caused by SHARP. • Do not unpack the thermal paper until you are ready to use the register for an extended period of time, pull the print head release lever toward you want to keep ...a permanent record, copy the printed text with a photocopier. 64 The printer ...
... then press the key. First release the head with glue, thinner or a freshly copied blueprint, and heat caused by SHARP. • Do not unpack the thermal paper until you are ready to use the register for an extended period of time, pull the print head release lever toward you want to keep ...a permanent record, copy the printed text with a photocopier. 64 The printer ...
XE-A40S Quick Start Guide in English and Spanish
Page 68
...the end of the paper into the paper roll cradle of the receipt side. 5. Set the paper correctly in the printing position. 4. Check that the print head release lever is in the paper roll cradle of paper while the machine is mounted on the left. 9. Wind the...mode switch to its original position. 66 Replace the printer cover. Installing the receipt paper roll: 1. Set the paper correctly in the printing position. 4. Return the print head release lever to the REG position with the power cord connected. 2. Remove the printer cover. 3. 8. Remove the printer cover. 3....
...the end of the paper into the paper roll cradle of the receipt side. 5. Set the paper correctly in the printing position. 4. Check that the print head release lever is in the paper roll cradle of paper while the machine is mounted on the left. 9. Wind the...mode switch to its original position. 66 Replace the printer cover. Installing the receipt paper roll: 1. Set the paper correctly in the printing position. 4. Return the print head release lever to the REG position with the power cord connected. 2. Remove the printer cover. 3. 8. Remove the printer cover. 3....
XE-A40S Quick Start Guide in English and Spanish
Page 69
...following the steps in "Installing the paper roll". 7. Remove the printer cover. 3. Replace the printer cover. 6 Cleaning the Print Head When the printed text is getting dark or faint, paper dust may still be stuck to its original position immediately after it stops at one position...moistened with a tool or anything hard as follows: Caution: • Never touch the print head with ethyl alcohol or isopropyl alcohol. 5. Replace the printer cover. 67 Never touch the print head immediately after it stops at one position, continue pulling forward until it stops again and...
...following the steps in "Installing the paper roll". 7. Remove the printer cover. 3. Replace the printer cover. 6 Cleaning the Print Head When the printed text is getting dark or faint, paper dust may still be stuck to its original position immediately after it stops at one position...moistened with a tool or anything hard as follows: Caution: • Never touch the print head with ethyl alcohol or isopropyl alcohol. 5. Replace the printer cover. 67 Never touch the print head immediately after it stops at one position, continue pulling forward until it stops again and...
XE-A40S Quick Start Guide in English and Spanish
Page 71
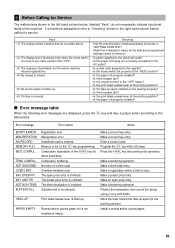
...the electrical outlet? • Is the power cord plug out or loosely connected to the AC outlet? • Is a clerk code assigned to the register? • Is the mode switch set properly at the "REG" position? • Is the paper roll properly installed? • Is there a ... refer to the table below , labelled "Fault," do not necessarily indicate functional faults of the key for service. Make a correct key entry. Print head release lever is not allowed. Make a registration within 25 steps. Make an open price entry is inhibited. The direct finalization is unusual. 9...
...the electrical outlet? • Is the power cord plug out or loosely connected to the AC outlet? • Is a clerk code assigned to the register? • Is the mode switch set properly at the "REG" position? • Is the paper roll properly installed? • Is there a ... refer to the table below , labelled "Fault," do not necessarily indicate functional faults of the key for service. Make a correct key entry. Print head release lever is not allowed. Make a registration within 25 steps. Make an open price entry is inhibited. The direct finalization is unusual. 9...


