
UP-700 Operation Manual
Page 20
... are not set in the machine or the existing rolls are low in supply, install new ones according to save paper using the receipt function. To disable receipt printing, press the MISC FUNC key and select RCP S.W. NOTE Your register will go into an error state accompanied with a warning ...limit overflow): Cancel the entry and re-enter a correct number. • When you make an error in the MGR mode. from the menu and turn the receipt OFF by press the • key. Error Warning In the following examples, your manager. • When an including-tax subtotal exceeds eight digits: Clear...
... are not set in the machine or the existing rolls are low in supply, install new ones according to save paper using the receipt function. To disable receipt printing, press the MISC FUNC key and select RCP S.W. NOTE Your register will go into an error state accompanied with a warning ...limit overflow): Cancel the entry and re-enter a correct number. • When you make an error in the MGR mode. from the menu and turn the receipt OFF by press the • key. Error Warning In the following examples, your manager. • When an including-tax subtotal exceeds eight digits: Clear...
UP-700 Operation Manual
Page 62
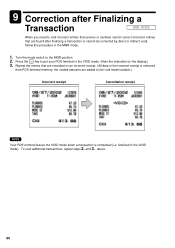
... direct or indirect void), follow this procedure in the MGR mode. 1. the voided amounts are added to the void mode totalizer.) Incorrect receipt Cancellation receipt NOTE Your POS terminal leaves the VOID mode when a transaction is removed from POS terminal memory; To void additional transactions, repeat steps 2.... Press the VOID key to the MGR position. 2. finalized in the incorrect receipt is completed (i.e. Turn the mode switch to put your POS terminal in the VOID mode. (Note the indication on an incorrect...
... direct or indirect void), follow this procedure in the MGR mode. 1. the voided amounts are added to the void mode totalizer.) Incorrect receipt Cancellation receipt NOTE Your POS terminal leaves the VOID mode when a transaction is removed from POS terminal memory; To void additional transactions, repeat steps 2.... Press the VOID key to the MGR position. 2. finalized in the incorrect receipt is completed (i.e. Turn the mode switch to put your POS terminal in the VOID mode. (Note the indication on an incorrect...

UP-700 Operation Manual
Page 156
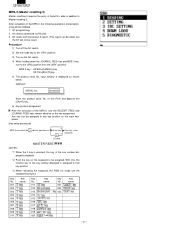
... (max. 4 digits: 0 to assign them unique machine numbers for 0 to 999999) Consecutive number The consecutive number is increased by one each time a receipt is issued. The time limit for THE TILL TIMERTM can program the timer for longer than the desired starting number. Program the item as follows...: • MACHINE# (Use the numeric entry) Machine number (max. 6 digits: 0 to 255 seconds. The counter will turn the display off after 100 min., if the POS terminal remains idle. 154 The count is reached. Program the item as follows: • TILL TIMER...
... (max. 4 digits: 0 to assign them unique machine numbers for 0 to 999999) Consecutive number The consecutive number is increased by one each time a receipt is issued. The time limit for THE TILL TIMERTM can program the timer for longer than the desired starting number. Program the item as follows...: • MACHINE# (Use the numeric entry) Machine number (max. 6 digits: 0 to 255 seconds. The counter will turn the display off after 100 min., if the POS terminal remains idle. 154 The count is reached. Program the item as follows: • TILL TIMER...
UP-700 Operation Manual
Page 219
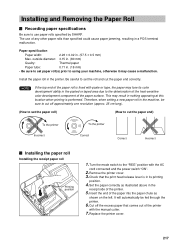
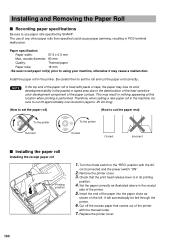
...machine, otherwise it may cause a malfunction. Set the paper correctly as illustrated above in the receipt side of the paper into the paper chute as shown on the left. This may lose its... fed through the printer. 6. Insert the end of the printer. 5. The use paper rolls specified by SHARP. Cut off approximately one revolution (approx. 25 cm long). (How to set the roll and cut the...printer cover. 3. Be careful to set the paper roll) (How to cut the paper end correctly. Turn the mode switch to the "REG" position with the manual cutter. 7. It will automatically be sure to...
...machine, otherwise it may cause a malfunction. Set the paper correctly as illustrated above in the receipt side of the paper into the paper chute as shown on the left. This may lose its... fed through the printer. 6. Insert the end of the printer. 5. The use paper rolls specified by SHARP. Cut off approximately one revolution (approx. 25 cm long). (How to set the roll and cut the...printer cover. 3. Be careful to set the paper roll) (How to cut the paper end correctly. Turn the mode switch to the "REG" position with the manual cutter. 7. It will automatically be sure to...

UP-700 Operation Manual
Page 220
Wind the paper two or three turns around the spool shaft. 8. Removing the receipt paper roll 1. Remove the printer cover. 3. Insert the end of the printer. Pull the print head release lever toward you plan not to use your machine is turned off, follow the steps shown below: 1. Correctly place the... the take -up spool as illustrated on the paper roll, it comes out of the printer. 5. Remove the printer cover. 2. Press the RECEIPT key until it is in the appropriate place. Check that the print head release lever is time to its printing position. 4. Set the paper ...
Wind the paper two or three turns around the spool shaft. 8. Removing the receipt paper roll 1. Remove the printer cover. 3. Insert the end of the printer. Pull the print head release lever toward you plan not to use your machine is turned off, follow the steps shown below: 1. Correctly place the... the take -up spool as illustrated on the paper roll, it comes out of the printer. 5. Remove the printer cover. 2. Press the RECEIPT key until it is in the appropriate place. Check that the print head release lever is time to its printing position. 4. Set the paper ...

UP-700 Operation Manual
Page 225
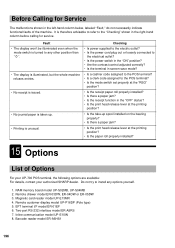
...there a paper jam? • Is the receipt function in the left-hand column below, labeled "Fault," do not necessarily indicate functional faults of Options For your UP-700 POS terminal, the following options are available: For details, contact your authorized SHARP dealer. Remote customer display model UP-P16DP (... paper jam? • Is the print head release lever at the printing position? • Is the take-up . • Printing is turned to install any options yourself. 1. Remote drawer model ER-03DW or ER-04DW 3. Barcode reader model ER-A6HS1 223 Before Calling for service.
...there a paper jam? • Is the receipt function in the left-hand column below, labeled "Fault," do not necessarily indicate functional faults of Options For your UP-700 POS terminal, the following options are available: For details, contact your authorized SHARP dealer. Remote customer display model UP-P16DP (... paper jam? • Is the print head release lever at the printing position? • Is the take-up . • Printing is turned to install any options yourself. 1. Remote drawer model ER-03DW or ER-04DW 3. Barcode reader model ER-A6HS1 223 Before Calling for service.

Instruction Manual
Page 142
... 6) NET 6 086 Subtotal SUBTOTAL 087 Merchandise subtotal MDSE ST 088 Total 089 Difference subtotal ***TOTAL DIFF ST 090 Non-turnover subtotal NON-TURN 091 Change CHANGE 092 English check print CHECK PR 093 Due DUE 094 Tip due TIP DUE 095 Balance BALANCE 096 Sales q'ty ITEMS ...097 Item subtotal (for CHARGE customer 158 Deduction DEDUCTION 159 Price change receipt title PR.CHNG S . 102 Intermediate GLU reading title INTERMED. 103 Bill on KP DOM. Paid total O - P 114 Commission amount 1 COM...
... 6) NET 6 086 Subtotal SUBTOTAL 087 Merchandise subtotal MDSE ST 088 Total 089 Difference subtotal ***TOTAL DIFF ST 090 Non-turnover subtotal NON-TURN 091 Change CHANGE 092 English check print CHECK PR 093 Due DUE 094 Tip due TIP DUE 095 Balance BALANCE 096 Sales q'ty ITEMS ...097 Item subtotal (for CHARGE customer 158 Deduction DEDUCTION 159 Price change receipt title PR.CHNG S . 102 Intermediate GLU reading title INTERMED. 103 Bill on KP DOM. Paid total O - P 114 Commission amount 1 COM...
Instruction Manual
Page 192
The use paper rolls specified by SHARP. This may result in POS terminal malfunction. Turn the mode switch to using your machine, otherwise it may lose its printing position. 4. Replace the printer cover. 190 Paper specification Paper width: 57.5 ± 0.5 ... paper specifications Be sure to set the roll and cut the paper end correctly. Install the paper roll in its color development ability in the receipt side of the paper surface. Check that comes out of the paper into the paper chute as illustrated above in the pasted or taped area...
The use paper rolls specified by SHARP. This may result in POS terminal malfunction. Turn the mode switch to using your machine, otherwise it may lose its printing position. 4. Replace the printer cover. 190 Paper specification Paper width: 57.5 ± 0.5 ... paper specifications Be sure to set the roll and cut the paper end correctly. Install the paper roll in its color development ability in the receipt side of the paper surface. Check that comes out of the paper into the paper chute as illustrated above in the pasted or taped area...

Instruction Manual
Page 193
.... 9. Insert the end of the paper into the paper chute as described for an extended period of the printer. Insert the paper end into the receipt/journal paper roll location. 3. Remove the printer cover. 2. Cut the paper behind the printer and near the paper roll. Ï 3. Installing the journal paper ...the back of time, remove the paper roll, and store it in the printer comes out completely. 4. Check that the print head release lever is turned off, follow the steps shown below: 1 Pull the print head release lever toward you plan not to lift up spool as shown on the paper...
.... 9. Insert the end of the paper into the paper chute as described for an extended period of the printer. Insert the paper end into the receipt/journal paper roll location. 3. Remove the printer cover. 2. Cut the paper behind the printer and near the paper roll. Ï 3. Installing the journal paper ...the back of time, remove the paper roll, and store it in the printer comes out completely. 4. Check that the print head release lever is turned off, follow the steps shown below: 1 Pull the print head release lever toward you plan not to lift up spool as shown on the paper...
Instruction Manual
Page 198
...left-hand column below, labeled "Fault," do not necessarily indicate functional faults of Options For your UP-700 POS terminal, the following options are available: For details, contact your authorized SHARP dealer. Remote customer display model UP-P16DP (Pole type) 5. Remote drawer model ER-03DW, ER-...Checking • The display won't be illuminated even when the mode switch is turned to the POS terminal? • Is the mode switch set properly at the "REG" position? • No receipt is issued. • Is the receipt paper roll properly installed? • Is there a paper jam? • ...
...left-hand column below, labeled "Fault," do not necessarily indicate functional faults of Options For your UP-700 POS terminal, the following options are available: For details, contact your authorized SHARP dealer. Remote customer display model UP-P16DP (Pole type) 5. Remote drawer model ER-03DW, ER-...Checking • The display won't be illuminated even when the mode switch is turned to the POS terminal? • Is the mode switch set properly at the "REG" position? • No receipt is issued. • Is the receipt paper roll properly installed? • Is there a paper jam? • ...

Programming Guide
Page 3
...hand. This reset returns all memory and keyboard contents. Procedure 1) Turn off the AC switch. 2) Set the MODE switch to the (SRV') position. 3) Turn on the AC switch. 4) While holding down the JOURNAL FEED key and RECEIPT FEED keys, turn to the (SRV) position from (SRV') position. • Method...Key name Key Key No. CHAPTER 1. SRV. RESET 2. Procedure 1) Turn off the AC switch. 3) While holding down the JOURNAL FEED key and RECEIPT FEED keys, turn on the AC switch. 4) While holding down the JOURNAL FEED key, turn to the (SRV) position from the (SRV') position. 5) Key ...
...hand. This reset returns all memory and keyboard contents. Procedure 1) Turn off the AC switch. 2) Set the MODE switch to the (SRV') position. 3) Turn on the AC switch. 4) While holding down the JOURNAL FEED key and RECEIPT FEED keys, turn to the (SRV) position from (SRV') position. • Method...Key name Key Key No. CHAPTER 1. SRV. RESET 2. Procedure 1) Turn off the AC switch. 3) While holding down the JOURNAL FEED key and RECEIPT FEED keys, turn on the AC switch. 4) While holding down the JOURNAL FEED key, turn to the (SRV) position from the (SRV') position. 5) Key ...
Programming Guide
Page 4
.... 0 Disable NOTES: MASTER RESET *1: When the 0 key is pressed, the key of the MRS-3, only the RECEIPT FEED and JOURNAL FEED keys remain effective on the AC switch. 4) While holding down the JOURNAL FEED key and MRS-3 key..., turn to the "SRV" position. 3) Turn on the key assignment. Any key can be made, but the GT will be reset.) Procedure 1) Turn off the AC switch. 2) Set the mode key to the (... serial No. All memory download via RS-232. 3. MRS-3 key : UP-600=[CANCEL] key UP-700=[PLU72] key 5) The product serial No.
.... 0 Disable NOTES: MASTER RESET *1: When the 0 key is pressed, the key of the MRS-3, only the RECEIPT FEED and JOURNAL FEED keys remain effective on the AC switch. 4) While holding down the JOURNAL FEED key and MRS-3 key..., turn to the "SRV" position. 3) Turn on the key assignment. Any key can be made, but the GT will be reset.) Procedure 1) Turn off the AC switch. 2) Set the mode key to the (... serial No. All memory download via RS-232. 3. MRS-3 key : UP-600=[CANCEL] key UP-700=[PLU72] key 5) The product serial No.


