
User Manual
Page 10
...Trademarks 6-7 Supplied Accessories 9 QUICK REFERENCE Attaching the Stand 9 QUICK INSTALLATION TIPS 10 Experiencing HD Images 10 Using the Remote Control Unit 10 Preparation Antennas 11 Installing Batteries in this operation manual are for 3D and 2D Images 42 3D ... Device 53-57 Playing Back Files on a Home Network (DLNA) Server 58-59 Other Viewing Options Presetting Remote Control Function 60 Operating the Connected Equipment 61 Using Link Control Controlling HDMI Equipment Using Link Control 62-63...-80 Appendix Removing the Stand 81 Setting the TV on the PRO-60X5FD model. 8
...Trademarks 6-7 Supplied Accessories 9 QUICK REFERENCE Attaching the Stand 9 QUICK INSTALLATION TIPS 10 Experiencing HD Images 10 Using the Remote Control Unit 10 Preparation Antennas 11 Installing Batteries in this operation manual are for 3D and 2D Images 42 3D ... Device 53-57 Playing Back Files on a Home Network (DLNA) Server 58-59 Other Viewing Options Presetting Remote Control Function 60 Operating the Connected Equipment 61 Using Link Control Controlling HDMI Equipment Using Link Control 62-63...-80 Appendix Removing the Stand 81 Setting the TV on the PRO-60X5FD model. 8
User Manual
Page 11
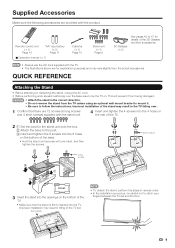
... floor. 9 Improper installation may result in the TV falling over the base area to the post. 3 Insert and tighten the 8 screws into the TV. Remote control unit (g1) Page 10 "AA" size battery (g2) Page 11 ■ Operation manual (g1) Cable tie (g1) Page 10 Stand unit (g1) Page 9 3D...
... floor. 9 Improper installation may result in the TV falling over the base area to the post. 3 Insert and tighten the 8 screws into the TV. Remote control unit (g1) Page 10 "AA" size battery (g2) Page 11 ■ Operation manual (g1) Cable tie (g1) Page 10 Stand unit (g1) Page 9 3D...
User Manual
Page 12
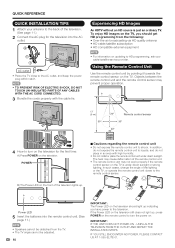
... PARTS OF ANY CABLES WITH THE AC CORD CONNECTED. 3 Bundle the cords properly with high humidity. • Do not install or place the remote control unit under direct sunlight or strong lighting. QUICK REFERENCE QUICK INSTALLATION TIPS 1 Attach your cable/satellite service provider. IMPORTANT: IF THE UNIT DOES... on the television. IF YOU STILL ENCOUNTER NO POWER, PLEASE CONTACT US AT 1-855-ELITE-01. In addition, do not expose the remote control unit to the remote control sensor. B) The Power LED on updating to HD programming, ask your antenna to the back of the television. (See page 11...
... PARTS OF ANY CABLES WITH THE AC CORD CONNECTED. 3 Bundle the cords properly with high humidity. • Do not install or place the remote control unit under direct sunlight or strong lighting. QUICK REFERENCE QUICK INSTALLATION TIPS 1 Attach your cable/satellite service provider. IMPORTANT: IF THE UNIT DOES... on the television. IF YOU STILL ENCOUNTER NO POWER, PLEASE CONTACT US AT 1-855-ELITE-01. In addition, do not expose the remote control unit to the remote control sensor. B) The Power LED on updating to HD programming, ask your antenna to the back of the television. (See page 11...
User Manual
Page 13
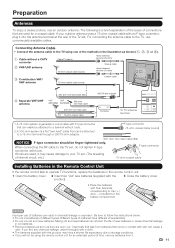
...used for an extended period of internal circuit, etc.) 75-ohm coaxial cable Installing Batteries in the Remote Control Unit If the remote control fails to operate TV functions, replace the batteries in the remote control unit. 1 Open the battery cover. 2 Insert two "AA" size batteries (supplied with ...that come in contact with an F-type connector, plug it . 11 Connecting Antenna Cable • Connect the antenna cable to the TV using the remote control unit for a coaxial cable. Be sure to the (e) and (f) indications in the illustration as they are used , it may have different...
...used for an extended period of internal circuit, etc.) 75-ohm coaxial cable Installing Batteries in the Remote Control Unit If the remote control fails to operate TV functions, replace the batteries in the remote control unit. 1 Open the battery cover. 2 Insert two "AA" size batteries (supplied with ...that come in contact with an F-type connector, plug it . 11 Connecting Antenna Cable • Connect the antenna cable to the TV using the remote control unit for a coaxial cable. Be sure to the (e) and (f) indications in the illustration as they are used , it may have different...
User Manual
Page 14
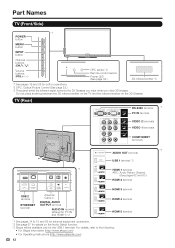
... wear when you view 3D images. Part Names TV (Front/Side) *1 POWER button MENU button INPUT button Channel buttons (CHU/V) Volume buttons (VOLk/l) OPC sensor *2 Remote control sensor Power LED (See page 34.) 3D infrared emitter *3 *1 See pages 19 and 26 for the USB 1 terminal.
... wear when you view 3D images. Part Names TV (Front/Side) *1 POWER button MENU button INPUT button Channel buttons (CHU/V) Volume buttons (VOLk/l) OPC sensor *2 Remote control sensor Power LED (See page 34.) 3D infrared emitter *3 *1 See pages 19 and 26 for the USB 1 terminal.
User Manual
Page 15
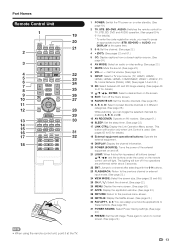
...The lighting will turn off . 21 LIGHT: When this button is pressed, all buttons (except a/b/c/d and the buttons under the cover) on the remote control unit will function only when Link Control is used. (See 31 pages 62 to 47 for details.) 32 18 External equipment operational buttons: Operate... for details.) 20 * To enter the code registration mode, you can assign your favorite applications to normal screen. (See page 22.) • When using the remote control unit, point it at the same time. 21 3 0-9: Set the channel. (See page 22.) 4 • (DOT): (See pages 22 and 61.) 5 CC...
...The lighting will turn off . 21 LIGHT: When this button is pressed, all buttons (except a/b/c/d and the buttons under the cover) on the remote control unit will function only when Link Control is used. (See 31 pages 62 to 47 for details.) 32 18 External equipment operational buttons: Operate... for details.) 20 * To enter the code registration mode, you can assign your favorite applications to normal screen. (See page 22.) • When using the remote control unit, point it at the same time. 21 3 0-9: Set the channel. (See page 22.) 4 • (DOT): (See pages 22 and 61.) 5 CC...
User Manual
Page 16
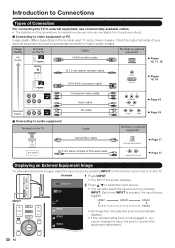
... fiber cable Ø3.5 mm stereo minijack to select the input source. • You can also select the input source by pressing INPUT on the remote control unit or on the TV. Each time INPUT is not plugged in, you cannot change the input. Example I NPUT AIR 1 Press INPUT. • The...
... fiber cable Ø3.5 mm stereo minijack to select the input source. • You can also select the input source by pressing INPUT on the remote control unit or on the TV. Each time INPUT is not plugged in, you cannot change the input. Example I NPUT AIR 1 Press INPUT. • The...
User Manual
Page 17
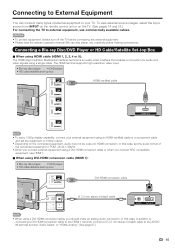
...;ed cable or a component cable and set "Audio Select" to your TV. To view external source images, select the input source from INPUT on the remote control unit or on the TV. (See pages 14 and 22.) For connecting the TV to 1080p output. • Depending on the connected equipment, audio...
...;ed cable or a component cable and set "Audio Select" to your TV. To view external source images, select the input source from INPUT on the remote control unit or on the TV. (See pages 14 and 22.) For connecting the TV to 1080p output. • Depending on the connected equipment, audio...
User Manual
Page 21
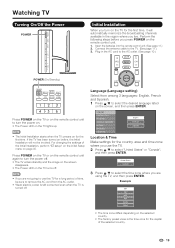
... press POWER on the TV for the first time. Watching TV Turning On/Off the Power POWER Initial Installation When you turn on the remote control unit. 1. Perform the following steps before , the Initial Installation will automatically memorize the broadcasting channels available in the AC cord to the AC ...outlet. (See page 10.) POWER (On/Standby) Press POWER on the TV or on the remote control unit to turn the power on. • The Power LED on the TV lights up. • The Initial Installation starts when the TV powers...
... press POWER on the TV for the first time. Watching TV Turning On/Off the Power POWER Initial Installation When you turn on the remote control unit. 1. Perform the following steps before , the Initial Installation will automatically memorize the broadcasting channels available in the AC cord to the AC ...outlet. (See page 10.) POWER (On/Standby) Press POWER on the TV or on the remote control unit to turn the power on. • The Power LED on the TV lights up. • The Initial Installation starts when the TV powers...
User Manual
Page 22
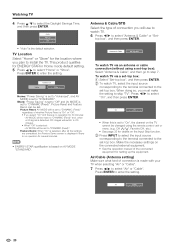
... to the terminal connected to "DYNAMIC (Fixed)". When doing so, you will use to watch TV via an antenna or cable connection (without using the remote control unit or menu. (e.g. Press c/d to select "Home" or "Store". top box", and then press ENTER. • "Auto" is no operation for ENERGY STAR in...
... to the terminal connected to "DYNAMIC (Fixed)". When doing so, you will use to watch TV via an antenna or cable connection (without using the remote control unit or menu. (e.g. Press c/d to select "Home" or "Store". top box", and then press ENTER. • "Auto" is no operation for ENERGY STAR in...
User Manual
Page 24
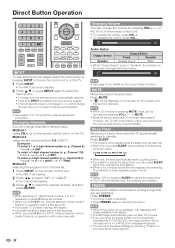
...Speaker Output Select Fixed Variable Variable sound Mute • When "Output Select" is no operation within a few seconds. Method 1 Using CHU/V on the remote control unit or on the screen for 30 minutes, and the sound is no operation within a few seconds. • If you enter 0-9 only,... sure to connect the equipment beforehand. • See pages 14 to select the input source. • An image from Channel list. 1 Press INPUT on the remote control unit. • The INPUT list displays. 2 Press c/d to select "AIR" or "CABLE". • The Channel list displays. 3 Press a/b to ...
...Speaker Output Select Fixed Variable Variable sound Mute • When "Output Select" is no operation within a few seconds. Method 1 Using CHU/V on the remote control unit or on the screen for 30 minutes, and the sound is no operation within a few seconds. • If you enter 0-9 only,... sure to connect the equipment beforehand. • See pages 14 to select the input source. • An image from Channel list. 1 Press INPUT on the remote control unit. • The INPUT list displays. 2 Press c/d to select "AIR" or "CABLE". • The Channel list displays. 3 Press a/b to ...
User Manual
Page 28
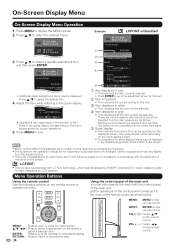
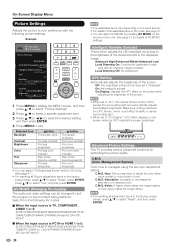
...pages is embedded with the alignment of explanations for each menu item in accordance with LC Font technology, which was developed by SHARP Corporation for explanation purposes (some selected items may be selected. Button operations on the screen. ENTER: Press to go to the.... 26 MENU: MENU on the displayed screen. RETURN: Press to return to open or close the menu screen. VOLk/l: Cursor c/d on the remote control. P ICTURE S ETTINGS Picture Settings STANDARD AV MODE (Changing Pic.Quality) [STANDARD] Intelligent Variable Contrast • Additional related adjustment items may...
...pages is embedded with the alignment of explanations for each menu item in accordance with LC Font technology, which was developed by SHARP Corporation for explanation purposes (some selected items may be selected. Button operations on the screen. ENTER: Press to go to the.... 26 MENU: MENU on the displayed screen. RETURN: Press to return to open or close the menu screen. VOLk/l: Cursor c/d on the remote control. P ICTURE S ETTINGS Picture Settings STANDARD AV MODE (Changing Pic.Quality) [STANDARD] Intelligent Variable Contrast • Additional related adjustment items may...
User Manual
Page 30
...obstructs the OPC sensor, which could affect its ability to sense surrounding light. • When set to "On:Display", OPC effect displays on the remote control unit. Off: The brightness is managed using the six-color adjustment setting. On:Display: Displays the OPC effect on the screen while adjusting .... (See page 47.) • For resetting all adjustment items to the factory preset values, press a/b to adjust the color either more reddish or more sharpness • You can select "3D Brightness Boost" while in 3D mode, see page 47. • You can be changed to suit the program or...
...obstructs the OPC sensor, which could affect its ability to sense surrounding light. • When set to "On:Display", OPC effect displays on the remote control unit. Off: The brightness is managed using the six-color adjustment setting. On:Display: Displays the OPC effect on the screen while adjusting .... (See page 47.) • For resetting all adjustment items to the factory preset values, press a/b to adjust the color either more reddish or more sharpness • You can select "3D Brightness Boost" while in 3D mode, see page 47. • You can be changed to suit the program or...
User Manual
Page 33
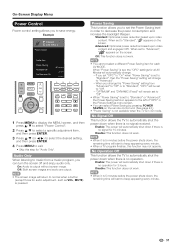
... will change to "Advanced". -When you change the "Power Saving" setting from a music program, you can select Power Saving by pressing POWER SAVING on the remote control unit. (See page 23.) • "Power Saving" is not available when the TV is set to the left of "OPC" in the Picture Settings...
... will change to "Advanced". -When you change the "Power Saving" setting from a music program, you can select Power Saving by pressing POWER SAVING on the remote control unit. (See page 23.) • "Power Saving" is not available when the TV is set to the left of "OPC" in the Picture Settings...
User Manual
Page 34
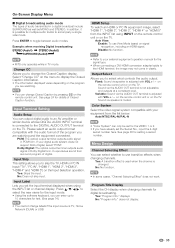
... 22 for details of sound other audiovisual equipment, USB-Video, DLNAVideo or Internet applications. -See page 66 for the program. The TV with the remote control unit. Examples: when receiving MTS and SAP STEREO mode: STEREO MONO STEREO + SAP mode: ST(SAP) SAP(ST) MONO MAIN + SAP mode...page 23.) View Mode This function changes the screen size. SAP sound: Listen to hear. • Obtain a clearer sound by pressing APPS on the remote control unit. The View Option functions can be displayed by selecting "APPS" on the menu to broadcast other information. (SAP is mono sound.) If ...
... 22 for details of sound other audiovisual equipment, USB-Video, DLNAVideo or Internet applications. -See page 66 for the program. The TV with the remote control unit. Examples: when receiving MTS and SAP STEREO mode: STEREO MONO STEREO + SAP mode: ST(SAP) SAP(ST) MONO MAIN + SAP mode...page 23.) View Mode This function changes the screen size. SAP sound: Listen to hear. • Obtain a clearer sound by pressing APPS on the remote control unit. The View Option functions can be displayed by selecting "APPS" on the menu to broadcast other information. (SAP is mono sound.) If ...
User Manual
Page 35
... level. See page 36 for digital broadcasting. does not display. 33 Please select an audio output format compatible with VOLk/l on the remote control unit or on the Input Selection operation. If your external equipment operation manual for details of the program you to use View Mode... terminal outputs audio signal in TV mode. Yes: Skips the input. Color System Select the video signal system compatible with VOLk/l on the remote control unit or on the TV. Program Title Display Select the CH display when changing channels for setting a secret number. No: "Program ...
... level. See page 36 for digital broadcasting. does not display. 33 Please select an audio output format compatible with VOLk/l on the remote control unit or on the Input Selection operation. If your external equipment operation manual for details of the program you to use View Mode... terminal outputs audio signal in TV mode. Yes: Skips the input. Color System Select the video signal system compatible with VOLk/l on the remote control unit or on the TV. Program Title Display Select the CH display when changing channels for setting a secret number. No: "Program ...
User Manual
Page 36
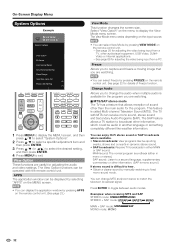
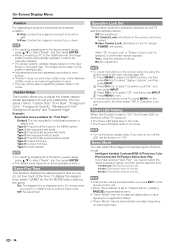
...you to adjust the closed caption screen appearance to select "Reset", and then press ENTER. • The default value depends on the remote control, and then select "Off" in "Operation Lock Out". On-Screen Display Menu Position For adjusting a picture's horizontal and vertical position...mode. Yes: Locks the operation buttons. Game Play Time This function displays the elapsed game time so you press EXIT on the TV and the remote control. Demo Mode You can adjust 7 items: "Caption Size", "Font Style", "Foreground Color", "Foreground Opacity", "Background Color", "Background Opacity...
...you to adjust the closed caption screen appearance to select "Reset", and then press ENTER. • The default value depends on the remote control, and then select "Off" in "Operation Lock Out". On-Screen Display Menu Position For adjusting a picture's horizontal and vertical position...mode. Yes: Locks the operation buttons. Game Play Time This function displays the elapsed game time so you press EXIT on the TV and the remote control. Demo Mode You can adjust 7 items: "Caption Size", "Font Style", "Foreground Color", "Foreground Opacity", "Background Color", "Background Opacity...
User Manual
Page 38
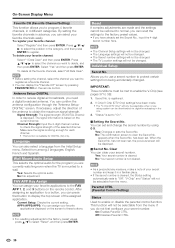
... • The Language settings will not be changed. • The Secret number settings will not be changed . "Status" is based on the remote control. To delete all the favorite channels, select "All Data Clear". • Before setting the channel, select the channel you can be restored ...to normal, you want to display the top screen of your favorite applications displayed on the remote control. Reset If complex adjustments are currently watching even when the TV is displayed. By setting the favorite channels in the category, and...
... • The Language settings will not be changed. • The Secret number settings will not be changed . "Status" is based on the remote control. To delete all the favorite channels, select "All Data Clear". • Before setting the channel, select the channel you can be restored ...to normal, you want to display the top screen of your favorite applications displayed on the remote control. Reset If complex adjustments are currently watching even when the TV is displayed. By setting the favorite channels in the category, and...
User Manual
Page 42
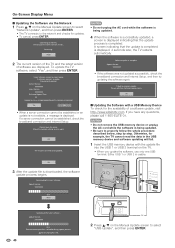
... Setup. CAUTION • Do not unplug the AC cord while the software is being updated. • Be sure to complete update. Update Version XXXXXXXX 50% Remote control operation is completed. Cannot reach the server. Software update is downloaded, the software update process begins. Connecting to the latest software.. Accessing.. OK 3 After...
... Setup. CAUTION • Do not unplug the AC cord while the software is being updated. • Be sure to complete update. Update Version XXXXXXXX 50% Remote control operation is completed. Cannot reach the server. Software update is downloaded, the software update process begins. Connecting to the latest software.. Accessing.. OK 3 After...
User Manual
Page 43
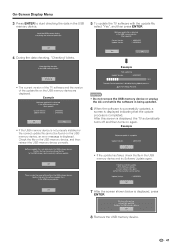
... update? Confirm that only the software update file is detected in the USB memory device. Example Now updating Update Version : UXXXXXX2 30% Remote Control operation is complete. After this screen is detected in the USB memory device. Example Software update is disabled during Update process. If system Update...
... update? Confirm that only the software update file is detected in the USB memory device. Example Now updating Update Version : UXXXXXX2 30% Remote Control operation is complete. After this screen is detected in the USB memory device. Example Software update is disabled during Update process. If system Update...


