
PG-D120U Operation Manual
Page 1
...on the rear of the projector and retain this OPERATION MANUAL so that may be of sufficient magnitude to constitute a risk or electric shock to come. Model No.: PG-D100U Serial No.: Important Information There are now the owner of a SHARP Color LCD Projector built for outstanding quality, ... within a triangle is adjusted for many years to persons. NO USER-SERVICEABLE PARTS EXCEPT LAMP UNIT. Every SHARP Color LCD Projector is intended to alert the user to the SHARP Family. ONLY WARNING: High brightness light source, do not stare directly into the beam of light, or ...
...on the rear of the projector and retain this OPERATION MANUAL so that may be of sufficient magnitude to constitute a risk or electric shock to come. Model No.: PG-D100U Serial No.: Important Information There are now the owner of a SHARP Color LCD Projector built for outstanding quality, ... within a triangle is adjusted for many years to persons. NO USER-SERVICEABLE PARTS EXCEPT LAMP UNIT. Every SHARP Color LCD Projector is intended to alert the user to the SHARP Family. ONLY WARNING: High brightness light source, do not stare directly into the beam of light, or ...
PG-D120U Operation Manual
Page 2
..., uses, and can perform many useful functions. U.S.A. But IMPROPER USE CAN RESULT IN POTENTIAL ELECTRICAL SHOCK OR FIRE HAZARD. For your LCD Projector, please be sure to read before use. 1) Read Instructions - All the safety and operating instructions should be used in a residential...in a built-in which case the user will only fit into this LCD Projector, observe the following basic rules for future reference. 3) Heed Warnings - Any mounting of this equipment in accordance with the instruction manual, may cause the product and cart combination to overturn. 10) Ventilation -...
..., uses, and can perform many useful functions. U.S.A. But IMPROPER USE CAN RESULT IN POTENTIAL ELECTRICAL SHOCK OR FIRE HAZARD. For your LCD Projector, please be sure to read before use. 1) Read Instructions - All the safety and operating instructions should be used in a residential...in a built-in which case the user will only fit into this LCD Projector, observe the following basic rules for future reference. 3) Heed Warnings - Any mounting of this equipment in accordance with the instruction manual, may cause the product and cart combination to overturn. 10) Ventilation -...

PG-D120U Operation Manual
Page 8
... TEL : 1-800-BE-SHARP U.S.A. Notes: • In some situations the wireless mouse may damage your computer. • Do not connect the mouse input terminal for IBM/MAC and the mouse input terminal for the laser beam. Please refer to your computer owners manual for IBM PS/2, serial ...laser pointer at temperatures between 41°F to 104°F (5°C to the mouse button determines the speed the mouse cursor travels. LIGHT LCD PROJECTOR LASER POINTER button MOUSE button RIGHT-CLICK button R/C OFF ON Main power switch of REMOTE CONTROL LEFT-CLICK button • First, connect the...
... TEL : 1-800-BE-SHARP U.S.A. Notes: • In some situations the wireless mouse may damage your computer. • Do not connect the mouse input terminal for IBM/MAC and the mouse input terminal for the laser beam. Please refer to your computer owners manual for IBM PS/2, serial ...laser pointer at temperatures between 41°F to 104°F (5°C to the mouse button determines the speed the mouse cursor travels. LIGHT LCD PROJECTOR LASER POINTER button MOUSE button RIGHT-CLICK button R/C OFF ON Main power switch of REMOTE CONTROL LEFT-CLICK button • First, connect the...
PG-D120U Operation Manual
Page 15
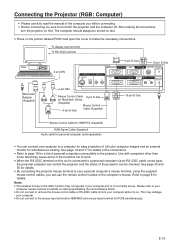
...232C cable to the mouse input terminal for IBM/MAC and mouse input terminal for simultaneous viewing. Connecting the Projector (RGB: Computer) • Please carefully read the manual of the computer you can use the remote control in place of personal computers connectable to page 18 for ...details of the connections. • Refer to the projector. After making all connections, turn both the projector and the computer off. Refer to ...
...232C cable to the mouse input terminal for IBM/MAC and mouse input terminal for simultaneous viewing. Connecting the Projector (RGB: Computer) • Please carefully read the manual of the computer you can use the remote control in place of personal computers connectable to page 18 for ...details of the connections. • Refer to the projector. After making all connections, turn both the projector and the computer off. Refer to ...

PG-D120U Operation Manual
Page 18
... picture image. Details on how to the data-projector for reference. E-18 Notes: • When connecting a notebook computer to change display modes can be able to display images from notebook computers in your notebook computer's operation manual. If this occurs, turn off the LCD display on the notebook computer and output the display... IBM and compatibles Input signals: The video output signal timing of different types of video signals are shown below for display on a (800 × 600) LCD screen, the screen may not be found in simultaneous (CRT...
... picture image. Details on how to the data-projector for reference. E-18 Notes: • When connecting a notebook computer to change display modes can be able to display images from notebook computers in your notebook computer's operation manual. If this occurs, turn off the LCD display on the notebook computer and output the display... IBM and compatibles Input signals: The video output signal timing of different types of video signals are shown below for display on a (800 × 600) LCD screen, the screen may not be found in simultaneous (CRT...

PG-D120U Operation Manual
Page 21
... buttons to display in this case, LANGUAGE) and then pressing the ENTER button. The ON-SCREEN DISPLAY is set the video input system mode manually by selecting the uppermost item (turquoise) with the INPUT SELECT button. Change the system mode The video input system mode is now programmed to ...the IMAGE ADJ. 3) Press the ADJUSTMENT / buttons to AUTO at the factory. If you connect a video device with a video signal supported by the projector and the video image appears with no colors, or other such problem occurs, set to highlight SYSTEM yellow. The menu will appear on -screen display...
... buttons to display in this case, LANGUAGE) and then pressing the ENTER button. The ON-SCREEN DISPLAY is set the video input system mode manually by selecting the uppermost item (turquoise) with the INPUT SELECT button. Change the system mode The video input system mode is now programmed to ...the IMAGE ADJ. 3) Press the ADJUSTMENT / buttons to AUTO at the factory. If you connect a video device with a video signal supported by the projector and the video image appears with no colors, or other such problem occurs, set to highlight SYSTEM yellow. The menu will appear on -screen display...


