Operation Manual
Page 6
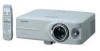
... nies. -2 NE REMPLACER QUE PAR UNE LAMPE SHARP DE TYPE BQC-PGB10S//1. As with any high technology electronic equipment such as shown in the drawing on the picture screen. DURING NORMAL OPERATION, NEVER TURN THE PROJECTOR OFF BY DISCONNECTING THE POWER CORD. HANDLE WITH ...CARE. Ensure the cooling fan has stopped before disconnecting the power cord. L'INTERIEUR DU BOITIER ETANT EXTREMEMENT CHAUD, ATTENDRE 1 HEURE AVANT DE PROCEDER AU REMPLACEMENT DE LA LAMPE. This SHARP projector uses an LCD (Liquid ...
... nies. -2 NE REMPLACER QUE PAR UNE LAMPE SHARP DE TYPE BQC-PGB10S//1. As with any high technology electronic equipment such as shown in the drawing on the picture screen. DURING NORMAL OPERATION, NEVER TURN THE PROJECTOR OFF BY DISCONNECTING THE POWER CORD. HANDLE WITH ...CARE. Ensure the cooling fan has stopped before disconnecting the power cord. L'INTERIEUR DU BOITIER ETANT EXTREMEMENT CHAUD, ATTENDRE 1 HEURE AVANT DE PROCEDER AU REMPLACEMENT DE LA LAMPE. This SHARP projector uses an LCD (Liquid ...
Operation Manual
Page 8
... View 14 Using the Remote Control 15 Usable Range 15 Inserting the Batteries 15 Basic Operation Setup and Projection 16 Projection Image Projection 18 Turning the Projector on 18 Switching the INPUT Mode 19 Adjusting the Volume 19 Displaying the Black Screen and... Turning off the Sound Temporarily 20 Correcting Trapezoidal Distortion 20 Turning the Power off (Putting the Projector into the Standby Mode) .... 21 Adjusting the Lens 22 Using the Adjustment Feet 23 Variable Lens Shift Feature 24 ...
... View 14 Using the Remote Control 15 Usable Range 15 Inserting the Batteries 15 Basic Operation Setup and Projection 16 Projection Image Projection 18 Turning the Projector on 18 Switching the INPUT Mode 19 Adjusting the Volume 19 Displaying the Black Screen and... Turning off the Sound Temporarily 20 Correcting Trapezoidal Distortion 20 Turning the Power off (Putting the Projector into the Standby Mode) .... 21 Adjusting the Lens 22 Using the Adjustment Feet 23 Variable Lens Shift Feature 24 ...
Operation Manual
Page 11
...to read the operation manuals of the projector is regularly cleaned, use an appropriate power cord for a replacement. I Do not carry the projector by a Sharp Authorized Projector Dealer or Service Center. When using the projector in internal temperature, as the projector is from the wall outlet and wait...power cord from the AC outlet and turning off period the projector will illuminate in and turn off, the temperature warning indicator on the region or country you are not obstructed. Rest your nearest Sharp Authorized Projector Dealer or Service Center for the country...
...to read the operation manuals of the projector is regularly cleaned, use an appropriate power cord for a replacement. I Do not carry the projector by a Sharp Authorized Projector Dealer or Service Center. When using the projector in internal temperature, as the projector is from the wall outlet and wait...power cord from the AC outlet and turning off period the projector will illuminate in and turn off, the temperature warning indicator on the region or country you are not obstructed. Rest your nearest Sharp Authorized Projector Dealer or Service Center for the country...

Operation Manual
Page 14
Power indicator 63 STANDBY button 21 For putting the projector into the standby mode. Part Names Numbers in refer to the main pages in...from the lens. 22 Focus ring 60 Intake vent Speaker 24 Lens shift lever -10 Projector (Front and Top View) ON button 18 For turning the power on the menu. 32 MENU button For displaying adjustment and setting screens. ...Remote control 15 sensor Zoom knob 22 Front adjustment foot 23 (on the bottom of the projector) HEIGHT ADJUST button 23...
Power indicator 63 STANDBY button 21 For putting the projector into the standby mode. Part Names Numbers in refer to the main pages in...from the lens. 22 Focus ring 60 Intake vent Speaker 24 Lens shift lever -10 Projector (Front and Top View) ON button 18 For turning the power on the menu. 32 MENU button For displaying adjustment and setting screens. ...Remote control 15 sensor Zoom knob 22 Front adjustment foot 23 (on the bottom of the projector) HEIGHT ADJUST button 23...

Operation Manual
Page 18
...Control (Front View) STANDBY button 21 For putting the projector into the standby mode. UNDO button 21 For undoing an operation or returning to a computer. INPUT buttons 19 For switching to the respective input modes. 18 ON button For turning the power on. 32 MENU button For displaying adjustment ... items selected or adjusted on the menu. 28 FREEZE button For freezing images. 20 AV MUTE button For temporarily displaying the black screen and turning off the sound. 26 RESIZE button For switching the screen size (NORMAL, BORDER, etc.). 19 Volume buttons For adjusting the speaker sound level...
...Control (Front View) STANDBY button 21 For putting the projector into the standby mode. UNDO button 21 For undoing an operation or returning to a computer. INPUT buttons 19 For switching to the respective input modes. 18 ON button For turning the power on. 32 MENU button For displaying adjustment ... items selected or adjusted on the menu. 28 FREEZE button For freezing images. 20 AV MUTE button For temporarily displaying the black screen and turning off the sound. 26 RESIZE button For switching the screen size (NORMAL, BORDER, etc.). 19 Volume buttons For adjusting the speaker sound level...

Operation Manual
Page 20
Turn the projector on On the projector On the remote control Page 18 -16 Pages 51, 55 3. Connect the projector to the computer and plug the power cord into the AC socket of the projector and the computer is explained as an example. 3 ON button 5 INPUT button 4 KEYSTONE button 4 Adjustment buttons ('"\ |) 3 ...ON button 4 KEYSTONE button 4 Zoom knob 4 Focus ring 4 Adjustment buttons ('"\ |) 5 INPUT 1 button 4 Lens shift lever 4 HEIGHT ADJUST button 1. Place the projector facing a wall or a screen Page 56 2. Setup and Projection In this section, connection of the...
Turn the projector on On the projector On the remote control Page 18 -16 Pages 51, 55 3. Connect the projector to the computer and plug the power cord into the AC socket of the projector and the computer is explained as an example. 3 ON button 5 INPUT button 4 KEYSTONE button 4 Adjustment buttons ('"\ |) 3 ...ON button 4 KEYSTONE button 4 Zoom knob 4 Focus ring 4 Adjustment buttons ('"\ |) 5 INPUT 1 button 4 Lens shift lever 4 HEIGHT ADJUST button 1. Place the projector facing a wall or a screen Page 56 2. Setup and Projection In this section, connection of the...

Operation Manual
Page 22
...angle, see "Using the Adjustment Feet" on page 23 or "Variable Lens Shift Feature" on page 24. Image Projection Turning the Projector on Connect the required external equipment to the projector before carrying out the following procedures. (See page 50.) Info • The language preset at the factory is ready ... box ON button -18 Green: The lamp is warming up. Red: The lamp should be replaced. • If the projector is put into the standby mode and immediately turned on again, the lamp indicator may take some time to "Anti-Theft (Setting the AntiTheft)" on page 46. • When...
...angle, see "Using the Adjustment Feet" on page 23 or "Variable Lens Shift Feature" on page 24. Image Projection Turning the Projector on Connect the required external equipment to the projector before carrying out the following procedures. (See page 50.) Info • The language preset at the factory is ready ... box ON button -18 Green: The lamp is warming up. Red: The lamp should be replaced. • If the projector is put into the standby mode and immediately turned on again, the lamp indicator may take some time to "Anti-Theft (Setting the AntiTheft)" on page 46. • When...

Operation Manual
Page 24
Note • Pressing again will turn off the sound. AV MUTE button KEYSTONE button UNDO button ', ", \, | buttons "On-screen display (Keystone Correction mode) -20 stone Correction mode. • You can also ... and the screen can also use on . Image Projection Displaying the Black Screen and Turning off the Sound Temporarily Press on the remote control to temporarily display a black screen and turn the projected image and sound back on the projector. Correcting Trapezoidal Distortion When the image is called Keystone Correction. Note • The...
Note • Pressing again will turn off the sound. AV MUTE button KEYSTONE button UNDO button ', ", \, | buttons "On-screen display (Keystone Correction mode) -20 stone Correction mode. • You can also ... and the screen can also use on . Image Projection Displaying the Black Screen and Turning off the Sound Temporarily Press on the remote control to temporarily display a black screen and turn the projected image and sound back on the projector. Correcting Trapezoidal Distortion When the image is called Keystone Correction. Note • The...

Operation Manual
Page 25
...the Keystone Correction. • You can cause damage due to rise in internal temperature, as the cooling fan also stops. -21 Projection Turning the Power off (Putting the Projector into the standby mode, wait until the confirmation message disappears. 2 Unplug the power cord from the AC outlet after the...to return to put the pro- Compresses lower side. This can also adjust the Keystone Cor- rection using the , , and buttons on the projector. played, to the default setting. • Straight lines or the edges of images may appear jagged while adjusting the image. 3 Press . &#...
...the Keystone Correction. • You can cause damage due to rise in internal temperature, as the cooling fan also stops. -21 Projection Turning the Power off (Putting the Projector into the standby mode, wait until the confirmation message disappears. 2 Unplug the power cord from the AC outlet after the...to return to put the pro- Compresses lower side. This can also adjust the Keystone Cor- rection using the , , and buttons on the projector. played, to the default setting. • Straight lines or the edges of images may appear jagged while adjusting the image. 3 Press . &#...

Operation Manual
Page 33
...The keylock function does not affect the operation with the remote control buttons. • You cannot use the keylock function while the projector is warming up . "On-screen display "On-screen display Functions -29 ON button Locking the Operation Buttons Taking the Keylock ...off Hold down on the projector for about 3 seconds. Hold down on the projector. Keylock Function Use this function to lock the operation buttons on the projector for about 3 seconds while the projector is being turned on.
...The keylock function does not affect the operation with the remote control buttons. • You cannot use the keylock function while the projector is warming up . "On-screen display "On-screen display Functions -29 ON button Locking the Operation Buttons Taking the Keylock ...off Hold down on the projector for about 3 seconds. Hold down on the projector. Keylock Function Use this function to lock the operation buttons on the projector for about 3 seconds while the projector is being turned on.

Operation Manual
Page 44
... from audio-visual equipment such as a DVD player or Digital Video. -40 ments. (See page 39.) Note • The projector will occur when the projector is turned on the "Fine Sync" menu and set it to check the current input signal information. Auto Sync adjustment is also performed by ...pressing on the projector or on the remote control. • The Auto Sync adjustment may take some time to complete, depending on...
... from audio-visual equipment such as a DVD player or Digital Video. -40 ments. (See page 39.) Note • The projector will occur when the projector is turned on the "Fine Sync" menu and set it to check the current input signal information. Auto Sync adjustment is also performed by ...pressing on the projector or on the remote control. • The Auto Sync adjustment may take some time to complete, depending on...
Operation Manual
Page 45
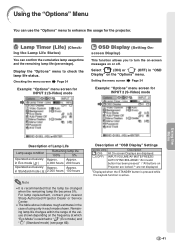
... the keylock function is active. -41 Checking the menu screen Page 34 Example: "Options" menu screen for the projector. For lamp replacement, contact your nearest Sharp Authorized Projector Dealer or Service Center. • The table above indicates rough estimates in "OSD Display" on or off. Remaining... lamp life changes within the range of using only in Standard mode ( ) 2,000 hours 100 hours Note • It is switched to turn the on...
... the keylock function is active. -41 Checking the menu screen Page 34 Example: "Options" menu screen for the projector. For lamp replacement, contact your nearest Sharp Authorized Projector Dealer or Service Center. • The table above indicates rough estimates in "OSD Display" on or off. Remaining... lamp life changes within the range of using only in Standard mode ( ) 2,000 hours 100 hours Note • It is switched to turn the on...
Operation Manual
Page 50
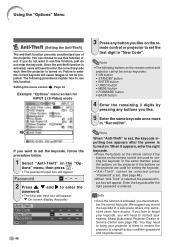
Once the anti-theft function is activated, users will cause images to enter the correct keycode each time the projector is turned on. Failure to enter the correct keycode will need to not be set , the keycode inputting box appears after the right password is ... display (keycode) -46 3 Press any buttons you must remember the correct keycode. Note • The following procedures explain how to bring your nearest Sharp Authorized Projector Dealer or Service Center (see page 73). Info • Once the function is entered. If you lose or forget your keycode, you do not...
Once the anti-theft function is activated, users will cause images to enter the correct keycode each time the projector is turned on. Failure to enter the correct keycode will need to not be set , the keycode inputting box appears after the right password is ... display (keycode) -46 3 Press any buttons you must remember the correct keycode. Note • The following procedures explain how to bring your nearest Sharp Authorized Projector Dealer or Service Center (see page 73). Info • Once the function is entered. If you lose or forget your keycode, you do not...

Operation Manual
Page 51
... you do not want to set on the re- If you want to change the keycode. 1 Press the buttons on the remote control or the projector to enter the preset 4-digit keycode in "Old Code". 2 Press any button you set when the keycode input box is entered, the image will not... be displayed, even if the projector receives the input signal. 1 Press on the remote control or on the projector to turn on the projector. 2 Enter the keycode you like on the projector or the remote control. mote control or the projector to enter the new keycode. 3 Enter the same 4-digit keycode...
... you do not want to set on the re- If you want to change the keycode. 1 Press the buttons on the remote control or the projector to enter the preset 4-digit keycode in "Old Code". 2 Press any button you set when the keycode input box is entered, the image will not... be displayed, even if the projector receives the input signal. 1 Press on the remote control or on the projector to turn on the projector. 2 Enter the keycode you like on the projector or the remote control. mote control or the projector to enter the new keycode. 3 Enter the same 4-digit keycode...

Operation Manual
Page 54
...by tightening the screws on both sides of the devices to be connected before making all connections, turn off the devices to be sure that it fits correctly into the terminal. Connecting the Projector to Other Devices Before Connecting Note • Before connecting, be sure to unplug the power ...cord of the projector from the AC outlet and turn on the projector and then the other is the umbrella term used to describe ...
...by tightening the screws on both sides of the devices to be connected before making all connections, turn off the devices to be sure that it fits correctly into the terminal. Connecting the Projector to Other Devices Before Connecting Note • Before connecting, be sure to unplug the power ...cord of the projector from the AC outlet and turn on the projector and then the other is the umbrella term used to describe ...

Operation Manual
Page 55
... can be half of the computer is compatible with a VESA DDC compatible computer. -51 Connections I This projector is switched to turn on the computer you are using, an image may be required for switching the computer signal output settings. ...• When using the ø3.5 mm stereo audio cable. To correct, change the menu setting from "Auto" to the com- Contact your nearest Sharp Authorized Projector Dealer or Service Center. • Depending on the projector...
... can be half of the computer is compatible with a VESA DDC compatible computer. -51 Connections I This projector is switched to turn on the computer you are using, an image may be required for switching the computer signal output settings. ...• When using the ø3.5 mm stereo audio cable. To correct, change the menu setting from "Auto" to the com- Contact your nearest Sharp Authorized Projector Dealer or Service Center. • Depending on the projector...
Operation Manual
Page 65
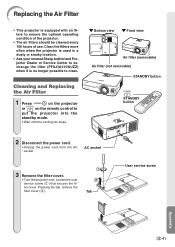
...3 Remove the filter cover. • Turn the projector over. Loosen the user service screw (1) that secures the fil- Clean the filters more often when the projector is used in a dusty or smoky location. • Ask your nearest Sharp Authorized Projector Dealer or Service Center to exchange the filter... (PFILDA010WJZZ) when it is equipped with air filters to ensure the optimal operating condition of the projector. • The air filters should be cleaned every 100...
...3 Remove the filter cover. • Turn the projector over. Loosen the user service screw (1) that secures the fil- Clean the filters more often when the projector is used in a dusty or smoky location. • Ask your nearest Sharp Authorized Projector Dealer or Service Center to exchange the filter... (PFILDA010WJZZ) when it is equipped with air filters to ensure the optimal operating condition of the projector. • The air filters should be cleaned every 100...

Operation Manual
Page 66
The power will not turn on the filter cover and place it while pressing the tab to secure the filter cover. Then tighten the user service screw (2) to close it ...
The power will not turn on the filter cover and place it while pressing the tab to secure the filter cover. Then tighten the user service screw (2) to close it ...

Operation Manual
Page 67
.... • Carefully replace the lamp. (See • Remaining lamp life page 66.) becomes 5% or less. • Take the projector to your nearest Sharp Authorized Projector Dealer or Service Center (see page 73) • Clogged air intake for advice. -63 Appendix After " " appears, be - ...Cooling fan break- • Take the projector to your nearest Sharp Authorized Projector Dealer or Service Center for repair. Red on Red on/ Standby Time to change to " " (red), the lamp will automatically turn off and then the projector will automatically enter the standby mode. Temperature...
.... • Carefully replace the lamp. (See • Remaining lamp life page 66.) becomes 5% or less. • Take the projector to your nearest Sharp Authorized Projector Dealer or Service Center (see page 73) • Clogged air intake for advice. -63 Appendix After " " appears, be - ...Cooling fan break- • Take the projector to your nearest Sharp Authorized Projector Dealer or Service Center for repair. Red on Red on/ Standby Time to change to " " (red), the lamp will automatically turn off and then the projector will automatically enter the standby mode. Temperature...

Operation Manual
Page 68
... be lit. sible solutions on the previous page and then wait until the projector has cooled down completely before plugging in the AC outlet and then turn the power on . (At least 5 minutes.) • If the power is turned off for about 90 seconds. -64 After the cooling fan has stopped, clean... change and this case, unplug the power cord from the AC outlet, replace the power cord in the power cord and turning the power back on again. • If you want to put the projector into the standby mode. Maintenance Indicators Info • If the temperature warning indicator illuminates, and the...
... be lit. sible solutions on the previous page and then wait until the projector has cooled down completely before plugging in the AC outlet and then turn the power on . (At least 5 minutes.) • If the power is turned off for about 90 seconds. -64 After the cooling fan has stopped, clean... change and this case, unplug the power cord from the AC outlet, replace the power cord in the power cord and turning the power back on again. • If you want to put the projector into the standby mode. Maintenance Indicators Info • If the temperature warning indicator illuminates, and the...

