
Operation Manual
Page 6
... A HAUTE PRESSION : RISQUE D'EXPLOSION. When you attach the "QUICK GUIDE" Label on the projector, be sure to align the label bottom and the upper part of the "Notevision" logo on the top cabinet of these materials may be regulated due to run for about 90...: The cooling fan in this projector continues to environmental considerations. During normal operation, when turning the power off . REPLACE WITH SAME SHARP LAMP UNIT TYPE BQC-PGA10X//1 ONLY. SEE OPERATION MANUAL. When Attaching the "QUICK GUIDE" Label Attaching the "QUICK GUIDE" Label (supplied) on the remote control.
... A HAUTE PRESSION : RISQUE D'EXPLOSION. When you attach the "QUICK GUIDE" Label on the projector, be sure to align the label bottom and the upper part of the "Notevision" logo on the top cabinet of these materials may be regulated due to run for about 90...: The cooling fan in this projector continues to environmental considerations. During normal operation, when turning the power off . REPLACE WITH SAME SHARP LAMP UNIT TYPE BQC-PGA10X//1 ONLY. SEE OPERATION MANUAL. When Attaching the "QUICK GUIDE" Label Attaching the "QUICK GUIDE" Label (supplied) on the remote control.

Operation Manual
Page 8
... the PDF Operation Manuals ..... 9 Part Names 10 Projector (Front and Top View 10 Projector (Rear View 11 Remote Control (Front View 12 Using the Remote Control 13 Usable Range 13 Inserting the Batteries 13 Accessories 14 Connections and Setup Connecting the Projector to Other Devices .... 15 Before Connecting 15 This projector can be connected to 15 Connecting the...
... the PDF Operation Manuals ..... 9 Part Names 10 Projector (Front and Top View 10 Projector (Rear View 11 Remote Control (Front View 12 Using the Remote Control 13 Usable Range 13 Inserting the Batteries 13 Accessories 14 Connections and Setup Connecting the Projector to Other Devices .... 15 Before Connecting 15 This projector can be connected to 15 Connecting the...

Operation Manual
Page 14
...warning indicator When the internal temperature rises, this indicator will illuminate green. Projector (Front and Top View) Power indicator 26 Illuminates red when the projector is explained. When the power is turned on or off. Remote control 13 sensor Exhaust vent 52 Foot release 21 (on the side of ...the projector) Front adjustment foot 21 Attaching and removing the lens cap • ...
...warning indicator When the internal temperature rises, this indicator will illuminate green. Projector (Front and Top View) Power indicator 26 Illuminates red when the projector is explained. When the power is turned on or off. Remote control 13 sensor Exhaust vent 52 Foot release 21 (on the side of ...the projector) Front adjustment foot 21 Attaching and removing the lens cap • ...

Operation Manual
Page 16
... (optional). INPUT buttons 27 For switching to the main pages in this operation manual where the topic is explained. Remote Control (Front View) Power ON/OFF buttons 26 For turning the power on or off the sound. 40 RESIZE button For switching the screen size (NORMAL, ...
... (optional). INPUT buttons 27 For switching to the main pages in this operation manual where the topic is explained. Remote Control (Front View) Power ON/OFF buttons 26 For turning the power on or off the sound. 40 RESIZE button For switching the screen size (NORMAL, ...

Operation Manual
Page 17
.... Be sure to replace them to control the projector within the ranges shown in a short period, depending on how they have different properties, therefore do not mix batteries of the signal may malfunction under a fluorescent lamp. Remote control sensor 45° 30° Remote control signal transmitters 30° 23' (7 m) Remote control Inserting the Batteries The batteries (two...
.... Be sure to replace them to control the projector within the ranges shown in a short period, depending on how they have different properties, therefore do not mix batteries of the signal may malfunction under a fluorescent lamp. Remote control sensor 45° 30° Remote control signal transmitters 30° 23' (7 m) Remote control Inserting the Batteries The batteries (two...

Operation Manual
Page 18
... RGB cable (32'10'' (10.0 m)) I 5 BNC to the wall outlet in your nearest Sharp Authorized Projector Dealer or Service Center. 14 A10X_A10S#E_Print#p06_14.p65 14 03.2.4, 2:01 PM Please check with your country. For Europe, except U.K. Accessories Supplied accessories Remote control RRMCGA138WJSA Power cord* (1) (2) Two R-6 batteries ("AA" size, UM/SUM-3, HP-7 or similar...
... RGB cable (32'10'' (10.0 m)) I 5 BNC to the wall outlet in your nearest Sharp Authorized Projector Dealer or Service Center. 14 A10X_A10S#E_Print#p06_14.p65 14 03.2.4, 2:01 PM Please check with your country. For Europe, except U.K. Accessories Supplied accessories Remote control RRMCGA138WJSA Power cord* (1) (2) Two R-6 batteries ("AA" size, UM/SUM-3, HP-7 or similar...
Operation Manual
Page 30
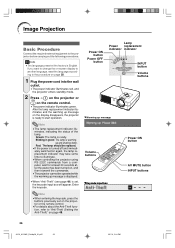
...1 Plug the power cord into the wall outlet. • The power indicator illuminates red, and the projector enters standby mode. 2 Press on the projector or on the remote control. • The power indicator illuminates green. Info • The language preset at least 30 seconds after...replacement indicator indicator INPUT button Volume buttons MWarming up message on the display disappears, the projector is ready to "Anti-Theft (Setting the Anti-Theft)" on the projector or the remote control. • For details about the Anti-Theft function, refer to start operation. Red...
...1 Plug the power cord into the wall outlet. • The power indicator illuminates red, and the projector enters standby mode. 2 Press on the projector or on the remote control. • The power indicator illuminates green. Info • The language preset at least 30 seconds after...replacement indicator indicator INPUT button Volume buttons MWarming up message on the display disappears, the projector is ready to "Anti-Theft (Setting the Anti-Theft)" on the projector or the remote control. • For details about the Anti-Theft function, refer to start operation. Red...

Operation Manual
Page 31
...27 03.2.4, 2:04 PM INPUT 2 Used for projecting im(S-Video) ages from equipment that the projector is received, "NO SIGNAL" will lower the volume. jected image and sound back on the remote con- Using Component INPUT 2 mode Using S-Video INPUT 3 mode Using Video Note • Pressing... PUT mode. • After pressing once on the remote control to receive is set to "OFF". (See page 44.) About the INPUT mode INPUT 1 Used for projecting images from equipment connected to the VIDEO input terminal. 4 Press or on the projector, use to the SVIDEO input terminal. INPUT 3 (Video...
...27 03.2.4, 2:04 PM INPUT 2 Used for projecting im(S-Video) ages from equipment that the projector is received, "NO SIGNAL" will lower the volume. jected image and sound back on the remote con- Using Component INPUT 2 mode Using S-Video INPUT 3 mode Using Video Note • Pressing... PUT mode. • After pressing once on the remote control to receive is set to "OFF". (See page 44.) About the INPUT mode INPUT 1 Used for projecting images from equipment connected to the VIDEO input terminal. 4 Press or on the projector, use to the SVIDEO input terminal. INPUT 3 (Video...

Operation Manual
Page 32
... pressed or and do not want to turn off the power, wait until the confirmation message disappears. • The projector cannot be set to rise in internal temperature, as the on the remote control, then press that button again while the confirmation message is displayed. Power OFF button ENTER button MENU button ', ", \, | buttons...
... pressed or and do not want to turn off the power, wait until the confirmation message disappears. • The projector cannot be set to rise in internal temperature, as the on the remote control, then press that button again while the confirmation message is displayed. Power OFF button ENTER button MENU button ', ", \, | buttons...

Operation Manual
Page 36
You can operate the menus from the remote control using the following procedure. Menu icon Menu screen Picture Fine Sync Options Language PRJ Mode Note • The "Fine Sync" menu is not available for ... menus, see the tree charts on the right is displayed when the INPUT 1 (RGB) mode is selected. 2 Press \ or | to adjust the image and various projector settings. Using the Menu Screen The menu screens allow you to display the other menu screens. • The menu icon for the selected menu screen...
You can operate the menus from the remote control using the following procedure. Menu icon Menu screen Picture Fine Sync Options Language PRJ Mode Note • The "Fine Sync" menu is not available for ... menus, see the tree charts on the right is displayed when the INPUT 1 (RGB) mode is selected. 2 Press \ or | to adjust the image and various projector settings. Using the Menu Screen The menu screens allow you to display the other menu screens. • The menu icon for the selected menu screen...

Operation Manual
Page 42
Select the item on the "Fine Sync" menu and the appropriate resolution. V-Pos center the on-screen image by pressing on the projector or on the remote control. • To reset all adjustment items, select "Reset" and press . Note • You can adjust the computer image, match the computer display mode, and check ...
Select the item on the "Fine Sync" menu and the appropriate resolution. V-Pos center the on-screen image by pressing on the projector or on the remote control. • To reset all adjustment items, select "Reset" and press . Note • You can adjust the computer image, match the computer display mode, and check ...

Operation Manual
Page 46
... Image 1 Press . • The projected image is changed. • When the input signal resolution and re- Displaying an Enlarged Portion of an image with the remote control. fresh rate (vertical frequency) change the location of the enlarged image using ', ", \ and |. 2 Press to cancel the operation. • The magnification then returns to the...
... Image 1 Press . • The projected image is changed. • When the input signal resolution and re- Displaying an Enlarged Portion of an image with the remote control. fresh rate (vertical frequency) change the location of the enlarged image using ', ", \ and |. 2 Press to cancel the operation. • The magnification then returns to the...
Operation Manual
Page 47
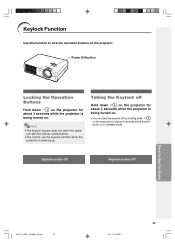
... by holding down on the projector for about 3 seconds while the projector is being turned on. Power ON button Locking the Operation Buttons Hold down on the projector. Note • The keylock function does not affect the operation with the remote control buttons. • You cannot... use the keylock function while the projector is in standby mode. Easy to lock the operation buttons on the projector for about 3 seconds while the projector is warming up. Keylock Function Use this function...
... by holding down on the projector for about 3 seconds while the projector is being turned on. Power ON button Locking the Operation Buttons Hold down on the projector. Note • The keylock function does not affect the operation with the remote control buttons. • You cannot... use the keylock function while the projector is in standby mode. Easy to lock the operation buttons on the projector for about 3 seconds while the projector is warming up. Keylock Function Use this function...

Operation Manual
Page 51
...nearest Sharp Authorized Projector Dealer or Service Center (see page 65). If you at least set a password, leave the fields in steps 2 and 3 blank and press . • To cancel the password settings, press . Note • If you forget the password, delete it using the remote control. firm..." and press . Note • You can only use the "Anti-Theft" function, you forget your projector to them to restore the projector to prevent others from setting the "AntiTheft" function. You may need...
...nearest Sharp Authorized Projector Dealer or Service Center (see page 65). If you at least set a password, leave the fields in steps 2 and 3 blank and press . • To cancel the password settings, press . Note • If you forget the password, delete it using the remote control. firm..." and press . Note • You can only use the "Anti-Theft" function, you forget your projector to them to restore the projector to prevent others from setting the "AntiTheft" function. You may need...
Operation Manual
Page 52
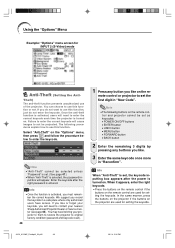
.... Note • The following procedures explain how to use of the projector. In the same manner, press the buttons on the projector if the buttons on the remote control and projector cannot be set , the keycode inputting box appears after the right password...control or projector to use this function, just do not want to use this function or not. Using the "Options" Menu Example: "Options" menu screen for INPUT 2 (S-Video) mode Anti-Theft (Setting the Anti- Info • Once the function is activated, users will cause images to contact your nearest Sharp Authorized Projector...
.... Note • The following procedures explain how to use of the projector. In the same manner, press the buttons on the projector if the buttons on the remote control and projector cannot be set , the keycode inputting box appears after the right password...control or projector to use this function, just do not want to use this function or not. Using the "Options" Menu Example: "Options" menu screen for INPUT 2 (S-Video) mode Anti-Theft (Setting the Anti- Info • Once the function is activated, users will cause images to contact your nearest Sharp Authorized Projector...

Operation Manual
Page 53
...keycode in "Reconfirm". Note • When "Anti-Theft" is selected, the password in "Old Code". 2 Press any button you like on the remote control or the projector to enter the preset 4-digit keycode in - put box will appear. After the password has been entered, you do not want to change the... keycode. 1 Press the buttons on the re- mote control or the projector to Use Functions A10X_A10S#E_Print#p40_50.p65 49 49 03.2.4, 2:06 PM Note • If you can change the keycode, follow the procedure ...
...keycode in "Reconfirm". Note • When "Anti-Theft" is selected, the password in "Old Code". 2 Press any button you like on the remote control or the projector to enter the preset 4-digit keycode in - put box will appear. After the password has been entered, you do not want to change the... keycode. 1 Press the buttons on the re- mote control or the projector to Use Functions A10X_A10S#E_Print#p40_50.p65 49 49 03.2.4, 2:06 PM Note • If you can change the keycode, follow the procedure ...

Operation Manual
Page 57
... the air filter. • Pick the air filter up with your nearest Sharp Authorized Projector Dealer or Service Center to exchange the filter (PFILDA008WJZZ) when it out of use. Replacing the Air Filter • This projector is no longer possible to ensure the optimal operating condition of the...filters more often when the projector is used in a dusty or smoky location. • Ask your fingers and lift it is equipped with air filters to clean. ing fan stops. nect the power cord. • Press on the projector or on the remote control. Loosen the user service screw...
... the air filter. • Pick the air filter up with your nearest Sharp Authorized Projector Dealer or Service Center to exchange the filter (PFILDA008WJZZ) when it out of use. Replacing the Air Filter • This projector is no longer possible to ensure the optimal operating condition of the...filters more often when the projector is used in a dusty or smoky location. • Ask your fingers and lift it is equipped with air filters to clean. ing fan stops. nect the power cord. • Press on the projector or on the remote control. Loosen the user service screw...

Operation Manual
Page 60
...the power is turned off and then turned on again, as during projector operation, be sure to clean the air vents during a brief test, the lamp replacement indicator may be triggered, preventing the power from going on the remote control and after the power has turned off and the cooling fan has ...stopped, then clean the vents. • Do not unplug the power cord after the power has been turned off , follow the above possible solutions and then wait until the projector has cooled down completely...
...the power is turned off and then turned on again, as during projector operation, be sure to clean the air vents during a brief test, the lamp replacement indicator may be triggered, preventing the power from going on the remote control and after the power has turned off and the cooling fan has ...stopped, then clean the vents. • Do not unplug the power cord after the power has been turned off , follow the above possible solutions and then wait until the projector has cooled down completely...

Operation Manual
Page 65
Computer P OWR _ _ _ 1 → ← Projector OK BUTTONS & REMOTE CONTROL KEY CONTROL CONTENTS Power Off (Standby) Power On INPUT1 INPUT2 INPUT3 Lamp Usage Time (hour) Remaining Lamp Life (Percentage) Lamp Status Unit Status Model Name Check AV ... to RS-232C standard. RS-232C Specifications and Command Settings PC control A computer can be used to control the projector by connecting an RS-232C serial control cable (cross type, sold separately) to the projector. (See page 20 for the previous command from the projector is being sent, send each command only after the response code...
Computer P OWR _ _ _ 1 → ← Projector OK BUTTONS & REMOTE CONTROL KEY CONTROL CONTENTS Power Off (Standby) Power On INPUT1 INPUT2 INPUT3 Lamp Usage Time (hour) Remaining Lamp Life (Percentage) Lamp Status Unit Status Model Name Check AV ... to RS-232C standard. RS-232C Specifications and Command Settings PC control A computer can be used to control the projector by connecting an RS-232C serial control cable (cross type, sold separately) to the projector. (See page 20 for the previous command from the projector is being sent, send each command only after the response code...

Operation Manual
Page 67
... selected input mode is wrong. • The AV MUTE function is working. • Cables incorrectly connected to rear panel of the projector. • Remote control batteries have run out. • External output has not been set when connecting notebook computer. • The filter/lamp unit cover ...is not installed correctly. • Cables incorrectly connected to the rear panel of the projector. • "Bright" is set . • Adjust the ...
... selected input mode is wrong. • The AV MUTE function is working. • Cables incorrectly connected to rear panel of the projector. • Remote control batteries have run out. • External output has not been set when connecting notebook computer. • The filter/lamp unit cover ...is not installed correctly. • Cables incorrectly connected to the rear panel of the projector. • "Bright" is set . • Adjust the ...


