LC-42D65U | LC-46D65U | LC-52D65U Operation Manual
Page 11
...SHARP CUSTOMER 3 IMPORTANT SAFETY INSTRUCTIONS 3 Supplied Accessories 6 QUICK REFERENCE 6 Attaching the Stand 6 QUICK INSTALLATION TIPS 7 Using the Remote Control Unit 7 Preparation 8 Antennas 8 Installing Batteries in the Remote Control Unit......8 Contents 9 Part Names 10 TV (Front 10 TV...AQUOS AUDIO Speaker System 37 Manually Changing AQUOS AUDIO Speaker System's Sound Mode 37 Displaying the Setup Menu of AQUOS LINK-Compatible Equipment ........37 HDMI Device Selection 37 Appendix 38 Removing the Stand 38 Setting the TV...for the LCD TV set are shown on the inside back cover. 9
...SHARP CUSTOMER 3 IMPORTANT SAFETY INSTRUCTIONS 3 Supplied Accessories 6 QUICK REFERENCE 6 Attaching the Stand 6 QUICK INSTALLATION TIPS 7 Using the Remote Control Unit 7 Preparation 8 Antennas 8 Installing Batteries in the Remote Control Unit......8 Contents 9 Part Names 10 TV (Front 10 TV...AQUOS AUDIO Speaker System 37 Manually Changing AQUOS AUDIO Speaker System's Sound Mode 37 Displaying the Setup Menu of AQUOS LINK-Compatible Equipment ........37 HDMI Device Selection 37 Appendix 38 Removing the Stand 38 Setting the TV...for the LCD TV set are shown on the inside back cover. 9

LC-42D65U | LC-46D65U | LC-52D65U Operation Manual
Page 13
... 24 25 11 26 27 12 13 28 14 29 30 15 16 • When using the remote control unit, point it at the TV. 1 TV POWER: Switch the TV power on or enters standby. (See page 14.) 2 DISPLAY: Display the channel information. 3 SOURCE POWER: Turns the power of the external ... 32 to normal screen. (See page 15.) 11 EXIT: Turn off if no operations are performed within about 5 seconds. The lighting will function only when AQUOS LINK is INPUT 4, 5, 6, 7, 8 or 9: STANDARD, MOVIE, GAME, PC, USER, DYNAMIC (Fixed), DYNAMIC) (See page 16.) 11 Press again to return to 33 for details.) *...
... 24 25 11 26 27 12 13 28 14 29 30 15 16 • When using the remote control unit, point it at the TV. 1 TV POWER: Switch the TV power on or enters standby. (See page 14.) 2 DISPLAY: Display the channel information. 3 SOURCE POWER: Turns the power of the external ... 32 to normal screen. (See page 15.) 11 EXIT: Turn off if no operations are performed within about 5 seconds. The lighting will function only when AQUOS LINK is INPUT 4, 5, 6, 7, 8 or 9: STANDARD, MOVIE, GAME, PC, USER, DYNAMIC (Fixed), DYNAMIC) (See page 16.) 11 Press again to return to 33 for details.) *...
LC-42D65U | LC-46D65U | LC-52D65U Operation Manual
Page 14
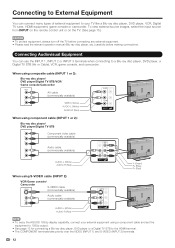
...available) VIDEO (Yellow) AUDIO-L (White) AUDIO-R (Red) When using component cable (INPUT 1 or 2): Blu-ray disc player/ DVD player/Digital TV STB Component video cable (commercially available) Audio cable (commercially available) AUDIO-L (White) AUDIO-R (Red) When using S-VIDEO cable (INPUT 2): VCR/...available) Audio cable (commercially available) AUDIO-L (White) AUDIO-R (Red) Y (Green) PB (Blue) PR (Red) • To enjoy the AQUOS 1080p display capability, connect your external equipment using a component cable and set the equipment to 1080p output. • See page 13 for connecting a ...
...available) VIDEO (Yellow) AUDIO-L (White) AUDIO-R (Red) When using component cable (INPUT 1 or 2): Blu-ray disc player/ DVD player/Digital TV STB Component video cable (commercially available) Audio cable (commercially available) AUDIO-L (White) AUDIO-R (Red) When using S-VIDEO cable (INPUT 2): VCR/...available) Audio cable (commercially available) AUDIO-L (White) AUDIO-R (Red) Y (Green) PB (Blue) PR (Red) • To enjoy the AQUOS 1080p display capability, connect your external equipment using a component cable and set the equipment to 1080p output. • See page 13 for connecting a ...
LC-42D65U | LC-46D65U | LC-52D65U Operation Manual
Page 15
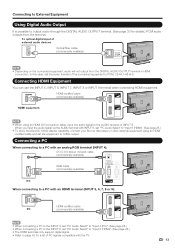
...) • Depending on the connected equipment, audio will not output from the terminal. When you input the audio signal via the AUDIO terminal with the TV. 13 Connecting a PC When connecting to a PC with an analog RGB terminal (INPUT 4): Ø 3.5 mm stereo minijack cable (commercially available) RGB ...; When using an HDMIcertified cable and set "PC Audio Select" to "Input 6 (HDMI)". (See page 28.) • To enjoy the AQUOS 1080p display capability, connect your Blu-ray disc player or other external equipment using an HDMI-DVI conversion cable, input the audio signal to PCM...
...) • Depending on the connected equipment, audio will not output from the terminal. When you input the audio signal via the AUDIO terminal with the TV. 13 Connecting a PC When connecting to a PC with an analog RGB terminal (INPUT 4): Ø 3.5 mm stereo minijack cable (commercially available) RGB ...; When using an HDMIcertified cable and set "PC Audio Select" to "Input 6 (HDMI)". (See page 28.) • To enjoy the AQUOS 1080p display capability, connect your Blu-ray disc player or other external equipment using an HDMI-DVI conversion cable, input the audio signal to PCM...
LC-42D65U | LC-46D65U | LC-52D65U Operation Manual
Page 21
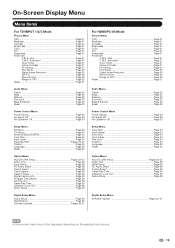
On-Screen Display Menu Menu Items For TV/INPUT 1/2/3 Mode Picture Menu OPC Page 21 Backlight Page 21 Contrast Page 21 Brightness Page 21 Color Page 21 Tint Page 21 Sharpness Page 21 Advanced C.M.S.-Hue Page 21 C.M.S.-...24 Parental CTRL Pages 25-27 Position Page 25 Language Page 25 Reset Page 25 Option Menu AQUOS LINK Setup Pages 34-37 Audio Only Page 28 Input Select Page 28 PC Audio Select Page...Page 24 Fine Sync Page 24 Position Page 25 Language Page 25 Reset Page 25 Option Menu AQUOS LINK Setup Pages 34-37 Audio Only Page 28 HDMI Setup Page 28 PC Audio Select Page...
On-Screen Display Menu Menu Items For TV/INPUT 1/2/3 Mode Picture Menu OPC Page 21 Backlight Page 21 Contrast Page 21 Brightness Page 21 Color Page 21 Tint Page 21 Sharpness Page 21 Advanced C.M.S.-Hue Page 21 C.M.S.-...24 Parental CTRL Pages 25-27 Position Page 25 Language Page 25 Reset Page 25 Option Menu AQUOS LINK Setup Pages 34-37 Audio Only Page 28 Input Select Page 28 PC Audio Select Page...Page 24 Fine Sync Page 24 Position Page 25 Language Page 25 Reset Page 25 Option Menu AQUOS LINK Setup Pages 34-37 Audio Only Page 28 HDMI Setup Page 28 PC Audio Select Page...
LC-42D65U | LC-46D65U | LC-52D65U Operation Manual
Page 22
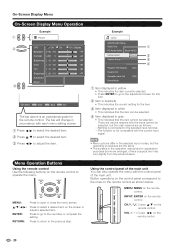
... Buttons Using the remote control Use the following buttons on the remote control. 20 Using the control panel of the main unit. Example Option AQUOS LINK Setup Audio Only PC Audio Select [Input 4 (PC)] Output select [Fixed] Caption Setup Digital Caption Info. VOLk/l: Cursor c/d on...On-Screen Display Menu Operation Example Picture OPC Off On Backlight [b12] a16 Contrast [b30] 0 Brightness [ 0] a30 Color [ 0] a30 Tint [ 0] a30 Sharpness [ b2] a10 Advanced Reset On : Display b16 b40 b30 b30 b30 b10 : Select ENTER : Enter RETURN : Back MENU : Exit The bar above is not...
... Buttons Using the remote control Use the following buttons on the remote control. 20 Using the control panel of the main unit. Example Option AQUOS LINK Setup Audio Only PC Audio Select [Input 4 (PC)] Output select [Fixed] Caption Setup Digital Caption Info. VOLk/l: Cursor c/d on...On-Screen Display Menu Operation Example Picture OPC Off On Backlight [b12] a16 Contrast [b30] 0 Brightness [ 0] a30 Color [ 0] a30 Tint [ 0] a30 Sharpness [ b2] a10 Advanced Reset On : Display b16 b40 b30 b30 b30 b10 : Select ENTER : Enter RETURN : Back MENU : Exit The bar above is not...

LC-42D65U | LC-46D65U | LC-52D65U Operation Manual
Page 30
... • If you want to connect HDMI-compatible equipment using only an HDMI-certified cable, set INPUT 1 or 2 to Auto, the TV will not be set for the signal type. • When connecting an HDMI-DVI conversion adapter/cable to the HDMI terminal, the image may need... press ENTER. 4 Press MENU to your equipment from "INPUT SOURCE" menu using an analog RGB cable. On-Screen Display Menu Option Menu Example Option AQUOS LINK Setup Audio Only PC Audio Select [Input 4 (PC)] Output Select [Fixed] Caption Setup Digital Caption Info. Skip this item when the audio ...
... • If you want to connect HDMI-compatible equipment using only an HDMI-certified cable, set INPUT 1 or 2 to Auto, the TV will not be set for the signal type. • When connecting an HDMI-DVI conversion adapter/cable to the HDMI terminal, the image may need... press ENTER. 4 Press MENU to your equipment from "INPUT SOURCE" menu using an analog RGB cable. On-Screen Display Menu Option Menu Example Option AQUOS LINK Setup Audio Only PC Audio Select [Input 4 (PC)] Output Select [Fixed] Caption Setup Digital Caption Info. Skip this item when the audio ...

LC-42D65U | LC-46D65U | LC-52D65U Operation Manual
Page 36
... cable (commercially available) HDMI-certified cable (commercially available) Connecting AQUOS BD Player via AQUOS AQUOS BD Player LINK-compatible Audio system TV • Point the remote control toward the TV, not to TV. REC STOP and OPTION buttons will function only when AQUOS LINK is used . If the equipment does not operate, turn on page...
... cable (commercially available) HDMI-certified cable (commercially available) Connecting AQUOS BD Player via AQUOS AQUOS BD Player LINK-compatible Audio system TV • Point the remote control toward the TV, not to TV. REC STOP and OPTION buttons will function only when AQUOS LINK is used . If the equipment does not operate, turn on page...

LC-42D65U | LC-46D65U | LC-52D65U Operation Manual
Page 37
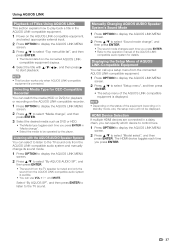
...is connected. • Check that there is sufficient available space on the recording media (HDD, DVD, etc.). • On the TV, use "AQUOS LINK Setup" and "Selecting Recorder" to select the equipment for recording. • By default, the recorder connected to INPUT 5 is in "Selecting... Touch Play function is connected to stop recording. 35 No: This function does not work . Prepare the connected AQUOS LINK-compatible recorder for recording. Yes: While the TV is selected for recording when you to set the recorder for recording. 1 Press REC to start recording. 2 Press...
...is connected. • Check that there is sufficient available space on the recording media (HDD, DVD, etc.). • On the TV, use "AQUOS LINK Setup" and "Selecting Recorder" to select the equipment for recording. • By default, the recorder connected to INPUT 5 is in "Selecting... Touch Play function is connected to stop recording. 35 No: This function does not work . Prepare the connected AQUOS LINK-compatible recorder for recording. Yes: While the TV is selected for recording when you to set the recorder for recording. 1 Press REC to start recording. 2 Press...

LC-42D65U | LC-46D65U | LC-52D65U Operation Manual
Page 38
...it , you move ahead to record. • You can call up the CEC-compatible recorder's EPG and preset timer recordings using the TV's remote control. 1 Press OPTION to display the AQUOS LINK MENU screen. 2 Press a/b to select "Recorder EPG", and then press ENTER. • The recorder's EPG is displayed. 3...Each time you press it , you move back to the start of the previous chapter. AQUOS LINK Menu AQUOS LINK Recorder EPG Top menu/title list Media change By AQUOS AUDIO SP By AQUOS SP Sound mode change Setup menu Model select Timer Recording You can use the following buttons during...
...it , you move ahead to record. • You can call up the CEC-compatible recorder's EPG and preset timer recordings using the TV's remote control. 1 Press OPTION to display the AQUOS LINK MENU screen. 2 Press a/b to select "Recorder EPG", and then press ENTER. • The recorder's EPG is displayed. 3...Each time you press it , you move back to the start of the previous chapter. AQUOS LINK Menu AQUOS LINK Recorder EPG Top menu/title list Media change By AQUOS AUDIO SP By AQUOS SP Sound mode change Setup menu Model select Timer Recording You can use the following buttons during...
LC-42D65U | LC-46D65U | LC-52D65U Operation Manual
Page 39
... and then press ENTER. • The title list data from the connected AQUOS LINK- compatible equipment displays. 4 Select the title with the AQUOS AUDIO Speaker System You can select to listen to the TV sound only from the AQUOS LINK-compatible audio system and manually change ", and then press ENTER. 3 ... change its sound mode. 1 Press OPTION to display the AQUOS LINK MENU screen. 2 Press a/b to select "By AQUOS AUDIO SP", and then press ENTER. • The sound from the TV speaker is muted and only the sound from the AQUOS LINK-compatible audio system is audible. • You can switch...
... and then press ENTER. • The title list data from the connected AQUOS LINK- compatible equipment displays. 4 Select the title with the AQUOS AUDIO Speaker System You can select to listen to the TV sound only from the AQUOS LINK-compatible audio system and manually change ", and then press ENTER. 3 ... change its sound mode. 1 Press OPTION to display the AQUOS LINK MENU screen. 2 Press a/b to select "By AQUOS AUDIO SP", and then press ENTER. • The sound from the TV speaker is muted and only the sound from the AQUOS LINK-compatible audio system is audible. • You can switch...


