
LC-42D64U | LC-46D64U | LC-52D64U Operation Manual
Page 5
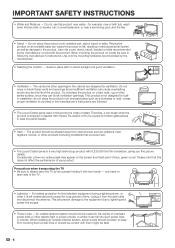
...or fire. To ensure safety and many useful functions, but it can result in performance - Additional Safety Information 15) Power Sources-This product should be sure to install the product according to prevent potential danger, please observe the following precautions carefully before ...water. 6) Clean only with the apparatus. In order to the method recommended by the manufacturer or have fallen into this product. DEAR SHARP CUSTOMER Thank you are provided for your safety. A grounding type plug has two blades and a third grounding prong. However, improper use...
...or fire. To ensure safety and many useful functions, but it can result in performance - Additional Safety Information 15) Power Sources-This product should be sure to install the product according to prevent potential danger, please observe the following precautions carefully before ...water. 6) Clean only with the apparatus. In order to the method recommended by the manufacturer or have fallen into this product. DEAR SHARP CUSTOMER Thank you are provided for your safety. A grounding type plug has two blades and a third grounding prong. However, improper use...
LC-42D64U | LC-46D64U | LC-52D64U Operation Manual
Page 6
...the product on the screen as radiators, heat registers, stoves, or other electric light or power circuits, or where it is dropped or applied with the product. Be careful not to always carry the TV by the manufacturer or sold with impact. Please note that produce heat. • The ... with them might be taken to keep from the wall outlet and disconnect the antenna. Precautions when transporting the TV • Be sure to be sure to lightning and power-line surges. • Power Lines - in an enclosed place such as a bookcase or rack, unless proper ventilation is a very high ...
...the product on the screen as radiators, heat registers, stoves, or other electric light or power circuits, or where it is dropped or applied with the product. Be careful not to always carry the TV by the manufacturer or sold with impact. Please note that produce heat. • The ... with them might be taken to keep from the wall outlet and disconnect the antenna. Precautions when transporting the TV • Be sure to be sure to lightning and power-line surges. • Power Lines - in an enclosed place such as a bookcase or rack, unless proper ventilation is a very high ...

LC-42D64U | LC-46D64U | LC-52D64U Operation Manual
Page 7
... equipment, be sure the antenna system is grounded so as vases, should be placed on the top or near the TV set or other heavy items. • Turn off the main power and unplug the AC cord from the wall outlet before handling. • Use a soft cloth and gently wipe the... voltage surges and built-up static charges. NATIONAL ELECTRICAL CODE ANTENNA DISCHARGE UNIT (NEC SECTION 810-20) GROUNDING CONDUCTORS (NEC SECTION 810-21) GROUND CLAMPS POWER SERVICE GROUNDING ELECTRODE SYSTEM (NEC ART 250, PART H) • To prevent fire, never place any type of the National Electrical Code, ANSI/...
... equipment, be sure the antenna system is grounded so as vases, should be placed on the top or near the TV set or other heavy items. • Turn off the main power and unplug the AC cord from the wall outlet before handling. • Use a soft cloth and gently wipe the... voltage surges and built-up static charges. NATIONAL ELECTRICAL CODE ANTENNA DISCHARGE UNIT (NEC SECTION 810-20) GROUNDING CONDUCTORS (NEC SECTION 810-21) GROUND CLAMPS POWER SERVICE GROUNDING ELECTRODE SYSTEM (NEC ART 250, PART H) • To prevent fire, never place any type of the National Electrical Code, ANSI/...
LC-42D64U | LC-46D64U | LC-52D64U Operation Manual
Page 9
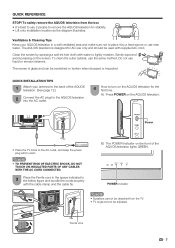
... on the AQUOS television for the AQUOS television into the AC outlet. 4 How to the AC outlet, and keep the power plug within reach. Power AC outlet • Place the TV close to turn on the front of the AQUOS television. (See page 12.) 2 Connect the AC plug for the first time...
... on the AQUOS television for the AQUOS television into the AC outlet. 4 How to the AC outlet, and keep the power plug within reach. Power AC outlet • Place the TV close to turn on the front of the AQUOS television. (See page 12.) 2 Connect the AC plug for the first time...
LC-42D64U | LC-46D64U | LC-52D64U Operation Manual
Page 10
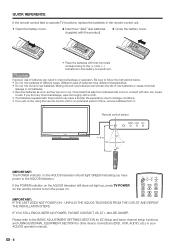
...• If you have different characteristics. • Do not mix old and new batteries. If the POWER indicator on the AQUOS television still does not light up, press TV POWER on the remote control to follow the instructions below. • Do not mix batteries of different types. ...Different types of batteries have power to the AQUOS television. IF YOU STILL ENCOUNTER NO POWER, PLEASE CONTACT US AT 1-800-BE-SHARP. Remote control sensor 17´...
...• If you have different characteristics. • Do not mix old and new batteries. If the POWER indicator on the AQUOS television still does not light up, press TV POWER on the remote control to follow the instructions below. • Do not mix batteries of different types. ...Different types of batteries have power to the AQUOS television. IF YOU STILL ENCOUNTER NO POWER, PLEASE CONTACT US AT 1-800-BE-SHARP. Remote control sensor 17´...
LC-42D64U | LC-46D64U | LC-52D64U Operation Manual
Page 11
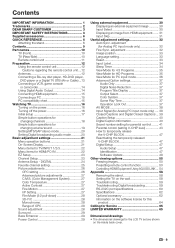
...28 Monochrome 28 Range of OPC 28 Sound adjustment 28 Surround 29 Bass Enhancer 29 Power Control 29 Using external equipment 30 Displaying an external equipment image 30 Input Select ... IMPORTANT INFORMATION 1 Trademarks 2 DEAR SHARP CUSTOMER 3 IMPORTANT SAFETY INSTRUCTIONS 3 Supplied accessories 6 QUICK REFERENCE 6 Attaching the stand 6 Contents 9 Part names 10 TV (Front 10 TV (Rear/Side 10 Remote control unit...Menu operation buttons 21 On-Screen Display 21 Menu items for TV/INPUT 1/2/3 22 Menu items for the LCD TV set are shown on the software license for this product ...
...28 Monochrome 28 Range of OPC 28 Sound adjustment 28 Surround 29 Bass Enhancer 29 Power Control 29 Using external equipment 30 Displaying an external equipment image 30 Input Select ... IMPORTANT INFORMATION 1 Trademarks 2 DEAR SHARP CUSTOMER 3 IMPORTANT SAFETY INSTRUCTIONS 3 Supplied accessories 6 QUICK REFERENCE 6 Attaching the stand 6 Contents 9 Part names 10 TV (Front 10 TV (Rear/Side 10 Remote control unit...Menu operation buttons 21 On-Screen Display 21 Menu items for TV/INPUT 1/2/3 22 Menu items for the LCD TV set are shown on the software license for this product ...
LC-42D64U | LC-46D64U | LC-52D64U Operation Manual
Page 13
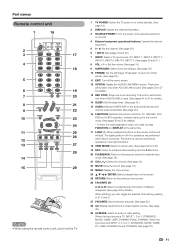
...to 57 for details.) While watching, you need to 53 for TV, CBL/SAT, VCR, DVD and AUDIO operation. Indicator lights up for the current mode. (See pages 50 to press FUNCTION and DISPLAY at the TV. 1 TV POWER: Switch the TV power on or enters standby. (See page 16.) 2 DISPLAY: ...Display the channel information. 3 SOURCE POWER: Turns the power of the external equipment on and off if no operations are performed within about 5 ...
...to 57 for details.) While watching, you need to 53 for TV, CBL/SAT, VCR, DVD and AUDIO operation. Indicator lights up for the current mode. (See pages 50 to press FUNCTION and DISPLAY at the TV. 1 TV POWER: Switch the TV power on or enters standby. (See page 16.) 2 DISPLAY: ...Display the channel information. 3 SOURCE POWER: Turns the power of the external equipment on and off if no operations are performed within about 5 ...

LC-42D64U | LC-46D64U | LC-52D64U Operation Manual
Page 17
...; When using an HDMI cable and set PC input signals. Refer to page 38 to set the equipment to AUDIO terminal of Sun Microsystems, Inc. Power Management is necessary to set the PC correctly to a PC with an analog RGB terminal. (INPUT 7) RGB cable (commercially available) Ø 3.5 mm stereo minijack cable....9 kHz 60 Hz 72 Hz O O 37.5 kHz 75 Hz O 35.1 kHz 56 Hz O SVGA 800 x 600 PC 37.9 kHz 48.1 kHz 60 Hz 72 Hz O O 46.9 kHz 75 Hz O 48.4 kHz 60 Hz O XGA 1024 x 768 56.5 kHz 70 Hz O 60.0 kHz 75 Hz O WXGA 1360 x 768 47.7 kHz 60 Hz...
...; When using an HDMI cable and set PC input signals. Refer to page 38 to set the equipment to AUDIO terminal of Sun Microsystems, Inc. Power Management is necessary to set the PC correctly to a PC with an analog RGB terminal. (INPUT 7) RGB cable (commercially available) Ø 3.5 mm stereo minijack cable....9 kHz 60 Hz 72 Hz O O 37.5 kHz 75 Hz O 35.1 kHz 56 Hz O SVGA 800 x 600 PC 37.9 kHz 48.1 kHz 60 Hz 72 Hz O O 46.9 kHz 75 Hz O 48.4 kHz 60 Hz O XGA 1024 x 768 56.5 kHz 70 Hz O 60.0 kHz 75 Hz O WXGA 1360 x 768 47.7 kHz 60 Hz...
LC-42D64U | LC-46D64U | LC-52D64U Operation Manual
Page 18
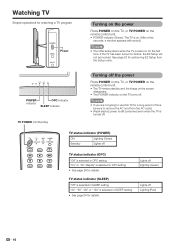
...are not going to remove the AC cord from the Setup menu. Watching TV Simple operations for watching a TV program Power Turning on the power Press POWER on the TV, or TV POWER on the remote control unit. • POWER indicator (Green): The TV is on. (After a few seconds, a window appears with sound.) ...EZ Setup will not be sure to use this TV for the first time. POWER indicator OPC indicator SLEEP indicator TV POWER (On/Standby) Turning off the power Press POWER on the TV, or TV POWER on the remote control unit. • The TV enters standby and the image on the screen ...
...are not going to remove the AC cord from the Setup menu. Watching TV Simple operations for watching a TV program Power Turning on the power Press POWER on the TV, or TV POWER on the remote control unit. • POWER indicator (Green): The TV is on. (After a few seconds, a window appears with sound.) ...EZ Setup will not be sure to use this TV for the first time. POWER indicator OPC indicator SLEEP indicator TV POWER (On/Standby) Turning off the power Press POWER on the TV, or TV POWER on the remote control unit. • The TV enters standby and the image on the screen ...

LC-42D64U | LC-46D64U | LC-52D64U Operation Manual
Page 19
...the following steps before you press TV POWER on the screen, and then press ENTER. Insert the batteries into the remote control unit. (See page 8.) 2. Plug in the AC cord to the AC outlet. (See page 7.) Channel search Channel auto search makes the TV look for the first time... control unit. 1. Language Air/Cable CH Search English Français Español Antenna setting Make sure what kind of connection made with your TV when selecting "Air" or "Cable". 2 Press c/d to select "Start", and then press ENTER. Example Language Air/Cable CH Search Air Cable 3...
...the following steps before you press TV POWER on the screen, and then press ENTER. Insert the batteries into the remote control unit. (See page 8.) 2. Plug in the AC cord to the AC outlet. (See page 7.) Channel search Channel auto search makes the TV look for the first time... control unit. 1. Language Air/Cable CH Search English Français Español Antenna setting Make sure what kind of connection made with your TV when selecting "Air" or "Cable". 2 Press c/d to select "Start", and then press ENTER. Example Language Air/Cable CH Search Air Cable 3...
LC-42D64U | LC-46D64U | LC-52D64U Operation Manual
Page 24
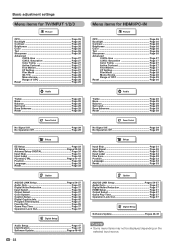
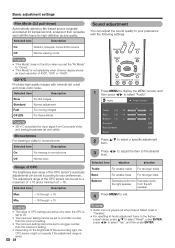
Basic adjustment settings Menu items for TV/INPUT 1/2/3 Picture OPC Page 26 Backlight Page 26 Contrast Page 26 Brightness Page 26 Color Page 26 Tint Page 26 Sharpness Page 26 Advanced C.M.S.-Hue Page 27 C.M.S.-Saturation Page 27 Color Temp Page 27 Active Contrast Page 27 Fine Motion Page 27 I/P Setting Page 27 Film... Page 28 Reset Page 26 Audio Treble Page 28 Bass Page 28 Balance Page 28 Surround Page 29 Bass Enhancer Page 29 Reset Page 28 Power Control No Signal Off Page 29 No Operation Off Page 29 Setup EZ Setup Page 23 CH Setup Pages 23-24 Antenna Setup-DIGITAL Page...
Basic adjustment settings Menu items for TV/INPUT 1/2/3 Picture OPC Page 26 Backlight Page 26 Contrast Page 26 Brightness Page 26 Color Page 26 Tint Page 26 Sharpness Page 26 Advanced C.M.S.-Hue Page 27 C.M.S.-Saturation Page 27 Color Temp Page 27 Active Contrast Page 27 Fine Motion Page 27 I/P Setting Page 27 Film... Page 28 Reset Page 26 Audio Treble Page 28 Bass Page 28 Balance Page 28 Surround Page 29 Bass Enhancer Page 29 Reset Page 28 Power Control No Signal Off Page 29 No Operation Off Page 29 Setup EZ Setup Page 23 CH Setup Pages 23-24 Antenna Setup-DIGITAL Page...
LC-42D64U | LC-46D64U | LC-52D64U Operation Manual
Page 30
f16 through e16 Min. Audio Power Control Treble [ 0] a15 b15 Bass [ 0] a15 b15 Balance [ 0] L R Surround [Off] Bass Enhancer [On] Reset 2 Press a/b to select a specific adjustment item. 3 Press c/d to adjust the ...
f16 through e16 Min. Audio Power Control Treble [ 0] a15 b15 Bass [ 0] a15 b15 Balance [ 0] L R Surround [Off] Bass Enhancer [On] Reset 2 Press a/b to select a specific adjustment item. 3 Press c/d to adjust the ...

LC-42D64U | LC-46D64U | LC-52D64U Operation Manual
Page 31
... grayed out when Output Select is no signal for 3 hours. 1 Press MENU to display the MENU screen, and then press c/d to select "Power Control". 2 Press a/b to select "No Operation Off", and then press ENTER. 3 Press c/d to select "Enable", and then press ENTER. •...8226; "Disable" is the factory preset value. • When a TV program finishes, this case, please refer to "Variable". NOTE • "Disable" is the factory preset value. 29 No signal off When set to "Enable", the power will automatically shut down , the remaining time displays every minute. 4...
... grayed out when Output Select is no signal for 3 hours. 1 Press MENU to display the MENU screen, and then press c/d to select "Power Control". 2 Press a/b to select "No Operation Off", and then press ENTER. 3 Press c/d to select "Enable", and then press ENTER. •...8226; "Disable" is the factory preset value. • When a TV program finishes, this case, please refer to "Variable". NOTE • "Disable" is the factory preset value. 29 No signal off When set to "Enable", the power will automatically shut down , the remaining time displays every minute. 4...
LC-42D64U | LC-46D64U | LC-52D64U Operation Manual
Page 35
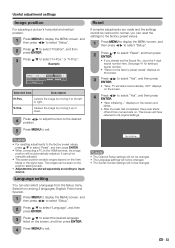
... to select "Setup". 2 Press a/b to select "Position", and then press ENTER. 3 Press a/b to select "Yes", and then press ENTER. • "Now, TV will restart automatically. Centers the image by moving it to the left or right. Language setting You can reset the settings to the factory preset... "Yes", and then press ENTER. • "Now initializing..." displays on the screen and blinks. • After the reset has completed, the power shuts off and then comes back on the View Mode or the signal type. It cannot be changed. 33 Select from the Setup menu. Reset...
... to select "Setup". 2 Press a/b to select "Position", and then press ENTER. 3 Press a/b to select "Yes", and then press ENTER. • "Now, TV will restart automatically. Centers the image by moving it to the left or right. Language setting You can reset the settings to the factory preset... "Yes", and then press ENTER. • "Now initializing..." displays on the screen and blinks. • After the reset has completed, the power shuts off and then comes back on the View Mode or the signal type. It cannot be changed. 33 Select from the Setup menu. Reset...

LC-42D64U | LC-46D64U | LC-52D64U Operation Manual
Page 39
... program, you can only be set for "Audio Only". To display the elapsed time, select "GAME" for digital broadcasting. Button Control All buttons on the TV, except POWER, Lock are locked. Digital Noise Reduction Produces a clearer video image. Color System Select the video signal system compatible with VOL k/l on the remote control...
... program, you can only be set for "Audio Only". To display the elapsed time, select "GAME" for digital broadcasting. Button Control All buttons on the TV, except POWER, Lock are locked. Digital Noise Reduction Produces a clearer video image. Color System Select the video signal system compatible with VOL k/l on the remote control...

LC-42D64U | LC-46D64U | LC-52D64U Operation Manual
Page 49
...similar device whose DIGITAL AUDIO INPUT terminal is working and censors a broadcast, "V-CHIP HAS BEEN ACTIVATED." NOTE • Performing any of the TV software is working , and then the secret number setting menu displays. 2 Input the 4-digit secret number by using 0- 9. Please select...then press c/d to select "Digital Setup". 2 Press a/b to reactivate BLOCK. (See pages 44 and 47.) Method 3: Switch off the TV power. Useful adjustment settings How to temporarily release the V-CHIP BLOCK When the V-CHIP BLOCK is displayed. 47 Dolby Digital The optical output terminal ...
...similar device whose DIGITAL AUDIO INPUT terminal is working and censors a broadcast, "V-CHIP HAS BEEN ACTIVATED." NOTE • Performing any of the TV software is working , and then the secret number setting menu displays. 2 Input the 4-digit secret number by using 0- 9. Please select...then press c/d to select "Digital Setup". 2 Press a/b to reactivate BLOCK. (See pages 44 and 47.) Method 3: Switch off the TV power. Useful adjustment settings How to temporarily release the V-CHIP BLOCK When the V-CHIP BLOCK is displayed. 47 Dolby Digital The optical output terminal ...

LC-42D64U | LC-46D64U | LC-52D64U Operation Manual
Page 54
... viewing options 1 2 3 4 ■ Cable control buttons When the FUNCTION is set to CBL/SAT, the cable converter connected to the TV can be operated using 1 to 4. 1 SOURCE POWER Turns the cable converter power on and off . 1 2 0-9, • (DOT) Press a button (or buttons) that corresponds to the channel that you wish to watch. 3 FLASHBACK...
... viewing options 1 2 3 4 ■ Cable control buttons When the FUNCTION is set to CBL/SAT, the cable converter connected to the TV can be operated using 1 to 4. 1 SOURCE POWER Turns the cable converter power on and off . 1 2 0-9, • (DOT) Press a button (or buttons) that corresponds to the channel that you wish to watch. 3 FLASHBACK...

LC-42D64U | LC-46D64U | LC-52D64U Operation Manual
Page 55
... stops when pressed. The following 1 to 10 can be used to control the VCR. 1 CH r/s Press to select the channel of the TV tuner on the VCR. 2 SOURCE POWER Turns the power of the VCR on and off . 3 F Sets pauses and still pictures. 4 G Rewinds the tape and allows picture search. 5 H Stops ... to 8 can be used to control the DVD player. 1 L Pressing quickly once takes you move ahead to the start of the previous chapter. 3 SOURCE POWER Turns the power of the DVD player on and off . 4 F Sets pauses and still pictures. 5 G Hold down to the start of the chapter currently playing. Other ...
... stops when pressed. The following 1 to 10 can be used to control the VCR. 1 CH r/s Press to select the channel of the TV tuner on the VCR. 2 SOURCE POWER Turns the power of the VCR on and off . 3 F Sets pauses and still pictures. 4 G Rewinds the tape and allows picture search. 5 H Stops ... to 8 can be used to control the DVD player. 1 L Pressing quickly once takes you move ahead to the start of the previous chapter. 3 SOURCE POWER Turns the power of the DVD player on and off . 4 F Sets pauses and still pictures. 5 G Hold down to the start of the chapter currently playing. Other ...

LC-42D64U | LC-46D64U | LC-52D64U Operation Manual
Page 57
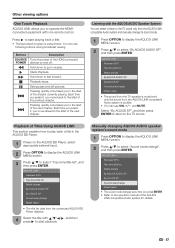
... Location [1.0.0.0] [1.0.1.0] [2.0.0.0] When an AQUOS LINK-compatible Audio system or other equipment is connected between the TV and recorder, "Sub" is enabled. Other viewing options Auto Power On If this function allows you to set the recorder for recording when you press REC on and plays...Press c/d to select "Yes", and then press ENTER. 5 Press MENU to exit. 4 Press MENU to select "Auto Power On", and then press ENTER. Auto Power On Selecting Recorder Yes No Selecting Recorder When multiple AQUOS LINK-compatible devices are connected, this is activated, the One Touch ...
... Location [1.0.0.0] [1.0.1.0] [2.0.0.0] When an AQUOS LINK-compatible Audio system or other equipment is connected between the TV and recorder, "Sub" is enabled. Other viewing options Auto Power On If this function allows you to set the recorder for recording when you press REC on and plays...Press c/d to select "Yes", and then press ENTER. 5 Press MENU to exit. 4 Press MENU to select "Auto Power On", and then press ENTER. Auto Power On Selecting Recorder Yes No Selecting Recorder When multiple AQUOS LINK-compatible devices are connected, this is activated, the One Touch ...
LC-42D64U | LC-46D64U | LC-52D64U Operation Manual
Page 59
... during broadcast viewing. Hold down to go in the AQUOS BD Player. 1 Power on and off. Playback stops. Listening with a/b/c/d, and then press d to start playback. Buttons SOURCE POWER G I J H F T U Description Turns the power of the AQUOS LINK-compatible Audio system for details. 57 Select "By AQUOS SP...from the connected AQUOS BD Player displays. 4 Select the title with the AQUOS AUDIO Speaker System You can select to listen to the TV sound only from the AQUOS LINK-compatible Audio system is audible. • You can use VOLk/l and MUTE. Manually changing AQUOS AUDIO...
... during broadcast viewing. Hold down to go in the AQUOS BD Player. 1 Power on and off. Playback stops. Listening with a/b/c/d, and then press d to start playback. Buttons SOURCE POWER G I J H F T U Description Turns the power of the AQUOS LINK-compatible Audio system for details. 57 Select "By AQUOS SP...from the connected AQUOS BD Player displays. 4 Select the title with the AQUOS AUDIO Speaker System You can select to listen to the TV sound only from the AQUOS LINK-compatible Audio system is audible. • You can use VOLk/l and MUTE. Manually changing AQUOS AUDIO...


