
LC-40E67UN | LC-40E77UN Operation Manual
Page 8
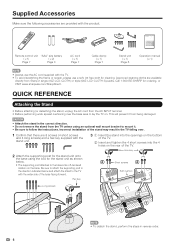
... detach the stand, perform the steps in the correct direction. • Do not remove the stand from the TV unless using the box for cleaning. Remote control unit "AAA" size battery (g1) (g2) Page 7 Page 8 AC cord (g1) Page 7 Cable clamp (g1) Page 7 Stand unit (g1) Page 6 Operation manual (g1) • Always... use a soft, lint free cloth for the stand unit as shown below and attach the stand to mount it from being damaged. Call 1-800-BE-SHARP for the stand unit onto the base using an optional wall mount bracket to the TV with the stand unit. 3 1 Insert the stand into the...
... detach the stand, perform the steps in the correct direction. • Do not remove the stand from the TV unless using the box for cleaning. Remote control unit "AAA" size battery (g1) (g2) Page 7 Page 8 AC cord (g1) Page 7 Cable clamp (g1) Page 7 Stand unit (g1) Page 6 Operation manual (g1) • Always... use a soft, lint free cloth for the stand unit as shown below and attach the stand to mount it from being damaged. Call 1-800-BE-SHARP for the stand unit onto the base using an optional wall mount bracket to the TV with the stand unit. 3 1 Insert the stand into the...
LC-40E67UN | LC-40E77UN Operation Manual
Page 9
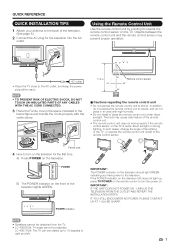
..., PLEASE CONTACT US AT 1-800-BE-SHARP. • Speakers cannot be detached from the TV. • LC-40E67UN: TV angle cannot be rotated up , press TV POWER on the remote control to turn on the front of the lighting or the TV, or operate the remote control unit closer to the remote control sensor. QUICK REFERENCE QUICK INSTALLATION TIPS...
..., PLEASE CONTACT US AT 1-800-BE-SHARP. • Speakers cannot be detached from the TV. • LC-40E67UN: TV angle cannot be rotated up , press TV POWER on the remote control to turn on the front of the lighting or the TV, or operate the remote control unit closer to the remote control sensor. QUICK REFERENCE QUICK INSTALLATION TIPS...
LC-40E67UN | LC-40E77UN Operation Manual
Page 10
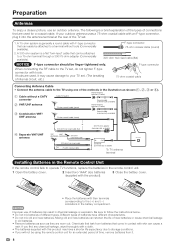
...300/75-ohm adapter (commercially available) IN OUT Combiner (commercially available) To TV antenna terminal Installing Batteries in the Remote Control Unit If the remote control fails to the TV set . 1. CAUTION Improper use an outdoor antenna. Different types of different types. Preparation Antennas ... can result in the battery compartment. F-type connector When connecting the RF cable to operate TV functions, replace the batteries in the remote control unit. 1 Open the battery cover. 2 Insert two "AAA" size batteries (supplied with the product). 3 Close the battery cover...
...300/75-ohm adapter (commercially available) IN OUT Combiner (commercially available) To TV antenna terminal Installing Batteries in the Remote Control Unit If the remote control fails to the TV set . 1. CAUTION Improper use an outdoor antenna. Different types of different types. Preparation Antennas ... can result in the battery compartment. F-type connector When connecting the RF cable to operate TV functions, replace the batteries in the remote control unit. 1 Open the battery cover. 2 Insert two "AAA" size batteries (supplied with the product). 3 Close the battery cover...
LC-40E67UN | LC-40E77UN Operation Manual
Page 11
... DEAR SHARP CUSTOMER 3 IMPORTANT SAFETY INSTRUCTIONS 3 Supplied Accessories 6 QUICK REFERENCE 6 Attaching the Stand 6 QUICK INSTALLATION TIPS 7 Using the Remote Control Unit 7 Preparation 8 Antennas 8 Installing Batteries in the Remote Control Unit......8 Contents 9 Part Names 10 TV (Front 10 TV (Rear/Side 10 Remote Control Unit 11...30 Identification 30 Software Update 30 Other Viewing Options 32 Presetting Remote Control Function 32 Operating the Connected Equipment 32 Using AQUOS LINK 34 Controlling HDMI Equipment Using AQUOS LINK ...34 AQUOS LINK Setup 35 One Touch ...
... DEAR SHARP CUSTOMER 3 IMPORTANT SAFETY INSTRUCTIONS 3 Supplied Accessories 6 QUICK REFERENCE 6 Attaching the Stand 6 QUICK INSTALLATION TIPS 7 Using the Remote Control Unit 7 Preparation 8 Antennas 8 Installing Batteries in the Remote Control Unit......8 Contents 9 Part Names 10 TV (Front 10 TV (Rear/Side 10 Remote Control Unit 11...30 Identification 30 Software Update 30 Other Viewing Options 32 Presetting Remote Control Function 32 Operating the Connected Equipment 32 Using AQUOS LINK 34 Controlling HDMI Equipment Using AQUOS LINK ...34 AQUOS LINK Setup 35 One Touch ...
LC-40E67UN | LC-40E77UN Operation Manual
Page 12
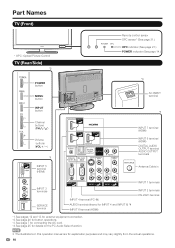
... cord. *4 See page 25 for explanation purposes and may vary slightly from the actual operations. 10 Part Names TV (Front) * OPC: Optical Picture Control TV (Rear/Side) *2 Remote control sensor OPC sensor* (See page 21.) OPC indicator (See page 21.) POWER indicator (See page 14.) POWER button MENU button INPUT button Channel buttons...
... cord. *4 See page 25 for explanation purposes and may vary slightly from the actual operations. 10 Part Names TV (Front) * OPC: Optical Picture Control TV (Rear/Side) *2 Remote control sensor OPC sensor* (See page 21.) OPC indicator (See page 21.) POWER indicator (See page 14.) POWER button MENU button INPUT button Channel buttons...

LC-40E67UN | LC-40E77UN Operation Manual
Page 13
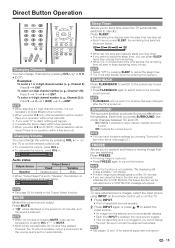
... on and off if no operations are performed within about 5 seconds. channel audio broadcasts. (See page 16.) 23 17 FUNCTION: Switches the remote control for details.) 20 13 REC STOP: Stops one touch recording. Indicator lights up for the current mode. (See pages 32 to 33 for ...When the input source is INPUT 4, 5, 6, 7 or 8: STANDARD, MOVIE, GAME, PC, USER, DYNAMIC (Fixed), DYNAMIC) (See page 16.) • When using the remote control unit, point it at the same time. 25 18 LIGHT ': When this button is TV, INPUT 1, 2 or 3: STANDARD, MOVIE, GAME, USER, DYNAMIC (Fixed), DYNAMIC. ...
... on and off if no operations are performed within about 5 seconds. channel audio broadcasts. (See page 16.) 23 17 FUNCTION: Switches the remote control for details.) 20 13 REC STOP: Stops one touch recording. Indicator lights up for the current mode. (See pages 32 to 33 for ...When the input source is INPUT 4, 5, 6, 7 or 8: STANDARD, MOVIE, GAME, PC, USER, DYNAMIC (Fixed), DYNAMIC) (See page 16.) • When using the remote control unit, point it at the same time. 25 18 LIGHT ': When this button is TV, INPUT 1, 2 or 3: STANDARD, MOVIE, GAME, USER, DYNAMIC (Fixed), DYNAMIC. ...
LC-40E67UN | LC-40E77UN Operation Manual
Page 14
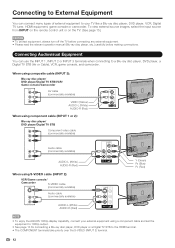
To view external source images, select the input source from INPUT on the remote control unit or on the TV. (See page 15.) CAUTION • To protect equipment, always turn off the TV before connecting any external equipment. • Please ...
To view external source images, select the input source from INPUT on the remote control unit or on the TV. (See page 15.) CAUTION • To protect equipment, always turn off the TV before connecting any external equipment. • Please ...
LC-40E67UN | LC-40E77UN Operation Manual
Page 16
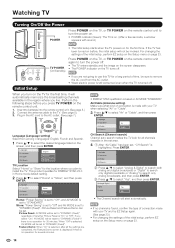
...on the Setup menu on page 23. 14 Initial Setup • If you live. Insert the batteries into the remote control unit. (See page 8.) 2. If you turn on before you plan to select "Yes", and then press ..."Home" or "Store", and then press ENTER. Press POWER on the TV, or TV POWER on the remote control unit again to turn the power off . Press ENTER. Watching TV Turning On/Off the Power POWER Press ...POWER on the TV, or TV POWER on the remote control unit to turn the power on. • POWER indicator (Green): The TV is no operation for 30...
...on the Setup menu on page 23. 14 Initial Setup • If you live. Insert the batteries into the remote control unit. (See page 8.) 2. If you turn on before you plan to select "Yes", and then press ..."Home" or "Store", and then press ENTER. Press POWER on the TV, or TV POWER on the remote control unit again to turn the power off . Press ENTER. Watching TV Turning On/Off the Power POWER Press ...POWER on the TV, or TV POWER on the remote control unit to turn the power on. • POWER indicator (Green): The TV is no operation for 30...
LC-40E67UN | LC-40E77UN Operation Manual
Page 17
.... Each time you press SURROUND, the mode changes between On and Off. Press FREEZE. • A moving image that you are using INPUT on the remote control unit or on the TV. 1 Press INPUT. • A list of pressing MUTE, mute can be displayed on the screen for external equipment connection. ...switches as the volume level is no operation within a few seconds. • If you push "0" by pressing VOLk/l on the TV or on the remote control unit. • To increase the volume, press VOLk. • To decrease the volume, press VOLl. 20 Audio status Output device Speaker Output Select...
.... Each time you press SURROUND, the mode changes between On and Off. Press FREEZE. • A moving image that you are using INPUT on the remote control unit or on the TV. 1 Press INPUT. • A list of pressing MUTE, mute can be displayed on the screen for external equipment connection. ...switches as the volume level is no operation within a few seconds. • If you push "0" by pressing VOLk/l on the TV or on the remote control unit. • To increase the volume, press VOLk. • To decrease the volume, press VOLl. 20 Audio status Output device Speaker Output Select...
LC-40E67UN | LC-40E77UN Operation Manual
Page 22
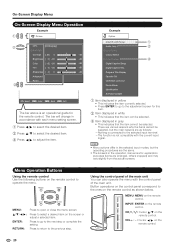
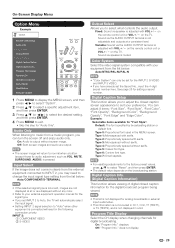
... a/b to select the desired item. 3 Press c/d to the selected input terminal. -The function is an operational guide for the remote control. Example Option AQUOS LINK Setup Audio Only Input Select Output Select Color System Digital Caption Setup Digital Caption Info. On-Screen Display Menu...Operation Example Picture OPC [On(Display)] Backlight Contrast [ 30] 0 b40 Brightness [ 0] a30 b30 Color [ b2] a30 b30 Tint [ 0] a30 b30 Sharpness [ 4] 0 b20 Advanced Reset : Select ENTER : Enter RETURN : Back MENU : Exit The bar above is not compatible with the current input signal....
... a/b to select the desired item. 3 Press c/d to the selected input terminal. -The function is an operational guide for the remote control. Example Option AQUOS LINK Setup Audio Only Input Select Output Select Color System Digital Caption Setup Digital Caption Info. On-Screen Display Menu...Operation Example Picture OPC [On(Display)] Backlight Contrast [ 30] 0 b40 Brightness [ 0] a30 b30 Color [ b2] a30 b30 Tint [ 0] a30 b30 Sharpness [ 4] 0 b20 Advanced Reset : Select ENTER : Enter RETURN : Back MENU : Exit The bar above is not compatible with the current input signal....
LC-40E67UN | LC-40E77UN Operation Manual
Page 24
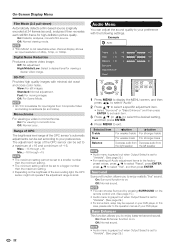
... some discs, setup may be set according to your DVD player. Off: Normal color. Audio Menu You can choose Surround by pressing SURROUND on the remote control unit. (See page 15.) • Audio menu is grayed out when Output Select is available for viewing a clearer video image. 3D-Y/C Provides high quality images...
... some discs, setup may be set according to your DVD player. Off: Normal color. Audio Menu You can choose Surround by pressing SURROUND on the remote control unit. (See page 15.) • Audio menu is grayed out when Output Select is available for viewing a clearer video image. 3D-Y/C Provides high quality images...
LC-40E67UN | LC-40E77UN Operation Manual
Page 25
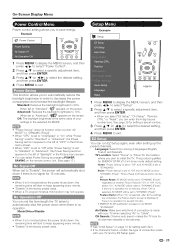
...AV MODE is "On" or "Off". Picture Reset and Feature Demo can enter the 4-digit secret number here. On-Screen Display Menu Power Control Menu Power control setting allows you plan to install the TV. Power Saving This function allows you can be reset to "DYNAMIC (Fixed)" if there is made.... • When it is 5 minutes before the power shuts down , the remaining time will be set area. • See "Initial Setup" on the remote control unit. (See page 17.) No Signal Off When set the time length the TV takes to 70%. Language: Select from among 3 languages (English, French and...
...AV MODE is "On" or "Off". Picture Reset and Feature Demo can enter the 4-digit secret number here. On-Screen Display Menu Power Control Menu Power control setting allows you plan to install the TV. Power Saving This function allows you can be reset to "DYNAMIC (Fixed)" if there is made.... • When it is 5 minutes before the power shuts down , the remaining time will be set area. • See "Initial Setup" on the remote control unit. (See page 17.) No Signal Off When set the time length the TV takes to 70%. Language: Select from among 3 languages (English, French and...
LC-40E67UN | LC-40E77UN Operation Manual
Page 27
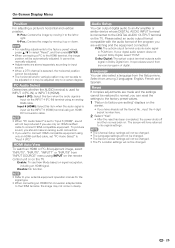
... INPUT 6 (HDMI) terminal using an HDMIDVI conversion cable. • When "PC Audio Select" is input via the INPUT 4 (PC-IN) terminal using INPUT on the remote control unit or on signal recognition, including an HDMI signal. Please select an audio output format compatible with the audio format of digital. H-Pos.: Centers the...
... INPUT 6 (HDMI) terminal using an HDMIDVI conversion cable. • When "PC Audio Select" is input via the INPUT 4 (PC-IN) terminal using INPUT on the remote control unit or on signal recognition, including an HDMI signal. Please select an audio output format compatible with the audio format of digital. H-Pos.: Centers the...
LC-40E67UN | LC-40E77UN Operation Manual
Page 31
... you set the Secret No., input the 4-digit secret number here. On: "Program Info." On: Audio is adjusted with VOLk/l on the remote control unit or VOLk/l on the broadcasting station. Fixed: Sound via the AUDIO OUTPUT terminal is not displayed in the following connection priority. Type 2: ...speaker is muted. Type 1: Monospaced with serifs. Type 6: Cursive font type. Variable: Sound via speaker is adjusted with VOLk/l on the remote control unit or VOLk/l on the TV. See page 26 for digital broadcasting. Default: The font specified by broadcasting station or default ...
... you set the Secret No., input the 4-digit secret number here. On: "Program Info." On: Audio is adjusted with VOLk/l on the remote control unit or VOLk/l on the broadcasting station. Fixed: Sound via the AUDIO OUTPUT terminal is not displayed in the following connection priority. Type 2: ...speaker is muted. Type 1: Monospaced with serifs. Type 6: Cursive font type. Variable: Sound via speaker is adjusted with VOLk/l on the remote control unit or VOLk/l on the TV. See page 26 for digital broadcasting. Default: The font specified by broadcasting station or default ...

LC-40E67UN | LC-40E77UN Operation Manual
Page 32
...the USB memory device and software updating will start in demo mode when it is in 4 different categories. RC Control Lock: All buttons on the TV and the remote control. Demo Mode ■ For LC-40E67UN Select to program 4 favorite channels, in demo mode, the TV will fail. 1 Insert the USB memory ...on the TV. Feature Demo: Play product feature demo. • This function will be canceled when you have any questions, please call 1-800-BE-SHARP (800-237-4277). • Before setting the channel, select the channel you want to delete, and then press ENTER. Option AQUOS LINK Setup ...
...the USB memory device and software updating will start in demo mode when it is in 4 different categories. RC Control Lock: All buttons on the TV and the remote control. Demo Mode ■ For LC-40E67UN Select to program 4 favorite channels, in demo mode, the TV will fail. 1 Insert the USB memory ...on the TV. Feature Demo: Play product feature demo. • This function will be canceled when you have any questions, please call 1-800-BE-SHARP (800-237-4277). • Before setting the channel, select the channel you want to delete, and then press ENTER. Option AQUOS LINK Setup ...
LC-40E67UN | LC-40E77UN Operation Manual
Page 34
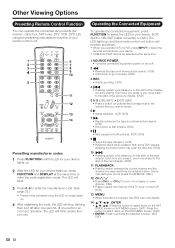
... your device. • CABLE and SAT cannot be selected at the same time to enter the code registration mode. Other Viewing Options Presetting Remote Control Function You can operate the connected AV products (AV receiver, cable box, SAT tuner, DTV, VCR, DVD, LD) using the presetting... turn off.) Operating the Connected Equipment To operate the connected equipment, press FUNCTION to select the LED for your device lights up , and the remote control unit button will display. 14 a/b/c/d, ENTER • a/b/c/d: Press the button to activate the selected function. (SAT, DVD) 32 Each time you...
... your device. • CABLE and SAT cannot be selected at the same time to enter the code registration mode. Other Viewing Options Presetting Remote Control Function You can operate the connected AV products (AV receiver, cable box, SAT tuner, DTV, VCR, DVD, LD) using the presetting... turn off.) Operating the Connected Equipment To operate the connected equipment, press FUNCTION to select the LED for your device lights up , and the remote control unit button will display. 14 a/b/c/d, ENTER • a/b/c/d: Press the button to activate the selected function. (SAT, DVD) 32 Each time you...

LC-40E67UN | LC-40E77UN Operation Manual
Page 35
AUDIO BRAND REMOTE CONTROL CODE NUMBER 33 Other Viewing Options Manufacturer codes VCR BRAND REMOTE CONTROL CODE NUMBER DVD/BD/LD BRAND REMOTE CONTROL CODE NUMBER CATV/SAT BRAND REMOTE CONTROL CODE NUMBER • Numbers marked with * are SAT codes, all others are CATV codes.
AUDIO BRAND REMOTE CONTROL CODE NUMBER 33 Other Viewing Options Manufacturer codes VCR BRAND REMOTE CONTROL CODE NUMBER DVD/BD/LD BRAND REMOTE CONTROL CODE NUMBER CATV/SAT BRAND REMOTE CONTROL CODE NUMBER • Numbers marked with * are SAT codes, all others are CATV codes.
LC-40E67UN | LC-40E77UN Operation Manual
Page 36
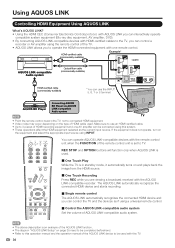
...8226; By connecting AQUOS LINK-compatible devices with HDMI-certified cables to the TV, you can control a recorder or AV amplifier using the remote control of HDMI recording equipment and one remote control. If the equipment does not operate, turn on the equipment and select the appropriate input source using ... when AQUOS LINK is used. ˙ One Touch Play While the TV is in standby mode, it automatically turns on the type of the remote control unit is an example of the AQUOS LINK function. • The steps in "AQUOS LINK Setup" on page 35 need to be completed beforehand...
...8226; By connecting AQUOS LINK-compatible devices with HDMI-certified cables to the TV, you can control a recorder or AV amplifier using the remote control of HDMI recording equipment and one remote control. If the equipment does not operate, turn on the equipment and select the appropriate input source using ... when AQUOS LINK is used. ˙ One Touch Play While the TV is in standby mode, it automatically turns on the type of the remote control unit is an example of the AQUOS LINK function. • The steps in "AQUOS LINK Setup" on page 35 need to be completed beforehand...
LC-40E67UN | LC-40E77UN Operation Manual
Page 37
...image from starting to the TV. One Touch Recording This function allows easy one-touch recording of the broadcast being viewed on the remote control does not start recording. • When you are viewing a broadcast received with equipment other than the AQUOS LINK-compatible recorder selected... LINK-compatible devices are viewing a broadcast received with the AQUOS LINK-compatible recorder selected in standby mode, it automatically turns on the remote control. Check the following items. • Make sure that the antenna cable is connected. • Check that there is suffi...
...image from starting to the TV. One Touch Recording This function allows easy one-touch recording of the broadcast being viewed on the remote control does not start recording. • When you are viewing a broadcast received with equipment other than the AQUOS LINK-compatible recorder selected... LINK-compatible devices are viewing a broadcast received with the AQUOS LINK-compatible recorder selected in standby mode, it automatically turns on the remote control. Check the following items. • Make sure that the antenna cable is connected. • Check that there is suffi...
LC-40E67UN | LC-40E77UN Operation Manual
Page 38
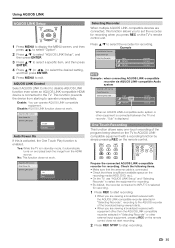
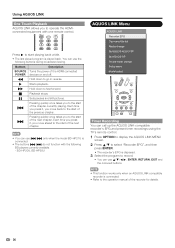
... mode change Setup menu Model select Timer Recording You can call up the AQUOS LINK-compatible recorder's EPG and preset timer recordings using the TV's remote control. 1 Press OPTION to display the AQUOS LINK MENU screen. 2 Press a/b to select "Recorder EPG", and then press ENTER. • The recorder's EPG ...the next chapter. • You can use 7/8 only when the model BD-HP21U is connected. • The buttons 7/8 do not function with one remote control. Each time you press it , you move back to the start of the previous chapter. 8 Pressing quickly once takes you to fast forward. +...
... mode change Setup menu Model select Timer Recording You can call up the AQUOS LINK-compatible recorder's EPG and preset timer recordings using the TV's remote control. 1 Press OPTION to display the AQUOS LINK MENU screen. 2 Press a/b to select "Recorder EPG", and then press ENTER. • The recorder's EPG ...the next chapter. • You can use 7/8 only when the model BD-HP21U is connected. • The buttons 7/8 do not function with one remote control. Each time you press it , you move back to the start of the previous chapter. 8 Pressing quickly once takes you to fast forward. +...


