
Operation Manual
Page 8
..., unplug the AC cord from being damaged. CAUTION • Attach the stand in the correct direction. • Be sure to follow the instructions. Remote control unit "AAA" size battery (g1) (g2) Page 8 Page 8 AC cord (g1) Page 7 NOTE • Always use the AC cord supplied with the...provided with the product. Supplied accessories Make sure the following accessories are 9 screws (all the same size) supplied with the TV. 3 1 Insert the stand into the openings on the bottom of the TV. 2 Insert and tighten the 4 screws into the 4 holes on the rear of the base. 2 Hex key Screw...
..., unplug the AC cord from being damaged. CAUTION • Attach the stand in the correct direction. • Be sure to follow the instructions. Remote control unit "AAA" size battery (g1) (g2) Page 8 Page 8 AC cord (g1) Page 7 NOTE • Always use the AC cord supplied with the...provided with the product. Supplied accessories Make sure the following accessories are 9 screws (all the same size) supplied with the TV. 3 1 Insert the stand into the openings on the bottom of the TV. 2 Insert and tighten the 4 screws into the 4 holes on the rear of the base. 2 Hex key Screw...
Operation Manual
Page 10
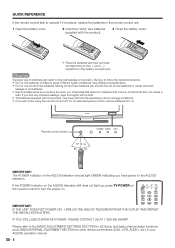
...batteries can result in chemical leakage or explosion. IMPORTANT: IF THE UNIT DOES NOT POWER ON - QUICK REFERENCE If the remote control fails to operate TV functions, replace the batteries in the remote control unit. 1 Open the battery cover. 2 Insert two "AAA" size batteries (supplied with the product). 3 Close the... in your AQUOS operation manual. 8 Chemicals that leak from it. IF YOU STILL ENCOUNTER NO POWER, PLEASE CONTACT US AT 1-800-BE-SHARP. If you find any chemical leakage, wipe thoroughly with a cloth. • The batteries supplied with this product may have a ...
...batteries can result in chemical leakage or explosion. IMPORTANT: IF THE UNIT DOES NOT POWER ON - QUICK REFERENCE If the remote control fails to operate TV functions, replace the batteries in the remote control unit. 1 Open the battery cover. 2 Insert two "AAA" size batteries (supplied with the product). 3 Close the... in your AQUOS operation manual. 8 Chemicals that leak from it. IF YOU STILL ENCOUNTER NO POWER, PLEASE CONTACT US AT 1-800-BE-SHARP. If you find any chemical leakage, wipe thoroughly with a cloth. • The batteries supplied with this product may have a ...
Operation Manual
Page 11
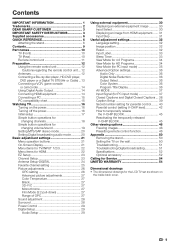
Contents IMPORTANT INFORMATION 1 Trademarks 2 DEAR SHARP CUSTOMER 3 IMPORTANT SAFETY INSTRUCTIONS 3 Supplied accessories 6 QUICK REFERENCE 6 Attaching the stand 6 Contents 9 Part names 10 TV (Front 10 TV (Rear 10 Remote control unit 11 Preparation 12 Using the remote control unit 12 Cautions regarding the remote control unit....12 Antennas 12 Connecting a Blu-ray disc player, HD-DVD player, DVD player or a Digital...
Contents IMPORTANT INFORMATION 1 Trademarks 2 DEAR SHARP CUSTOMER 3 IMPORTANT SAFETY INSTRUCTIONS 3 Supplied accessories 6 QUICK REFERENCE 6 Attaching the stand 6 Contents 9 Part names 10 TV (Front 10 TV (Rear 10 Remote control unit 11 Preparation 12 Using the remote control unit 12 Cautions regarding the remote control unit....12 Antennas 12 Connecting a Blu-ray disc player, HD-DVD player, DVD player or a Digital...
Operation Manual
Page 13
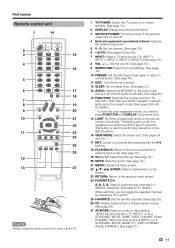
..., USER, DYNAMIC (Fixed), DYNAMIC. This button is INPUT 4 or 5: STANDARD, MOVIE, GAME, PC, USER, DYNAMIC (Fixed), DYNAMIC.) (See page 37.) 11 The lighting will light. When the input source is used for performing operations in lowlight situations. 16 VIEW MODE: Select the screen size. (See ...you need to press FUNCTION and DISPLAY at the TV. 1 TV POWER: Switch the TV power on or enters standby. (See page 16.) 2 DISPLAY: Display the channel information. 3 SOURCE POWER: Turns the power of the external equipment on the remote control unit will turn off if no operations are performed...
..., USER, DYNAMIC (Fixed), DYNAMIC. This button is INPUT 4 or 5: STANDARD, MOVIE, GAME, PC, USER, DYNAMIC (Fixed), DYNAMIC.) (See page 37.) 11 The lighting will light. When the input source is used for performing operations in lowlight situations. 16 VIEW MODE: Select the screen size. (See ...you need to press FUNCTION and DISPLAY at the TV. 1 TV POWER: Switch the TV power on or enters standby. (See page 16.) 2 DISPLAY: Display the channel information. 3 SOURCE POWER: Turns the power of the external equipment on the remote control unit will turn off if no operations are performed...

Operation Manual
Page 14
...-lead cable (flat "twin-lead" cable that are used for a coaxial cable. If tools are used , it towards the remote control sensor on the TV is a flat ) VHF UHF ANTENNA ANTENNA 300-ohm twin-lead cable 300-ohm twin-lead cable or 75-ohm coaxial cable...and do not tighten F-type connector with F-type connector that can be attached to the TV using one of the remote control unit. • The remote control unit may not work properly if the remote control sensor on the TV. The heat may prevent proper operation. Antennas To enjoy a clearer picture, use an ...
...-lead cable (flat "twin-lead" cable that are used for a coaxial cable. If tools are used , it towards the remote control sensor on the TV is a flat ) VHF UHF ANTENNA ANTENNA 300-ohm twin-lead cable 300-ohm twin-lead cable or 75-ohm coaxial cable...and do not tighten F-type connector with F-type connector that can be attached to the TV using one of the remote control unit. • The remote control unit may not work properly if the remote control sensor on the TV. The heat may prevent proper operation. Antennas To enjoy a clearer picture, use an ...

Operation Manual
Page 15
...1080p display capability, connect your TV like a Blu-ray disc player, HD-DVD player, DVD player, VCR, Digital TV tuner, HDMI equipment, game console or camcorder. To view external source images, select the input source from INPUT on the remote control unit or on the TV. (See pages 30 and 31....) CAUTION • To protect equipment, always turn off the TV before connecting any external equipment. • Please read the relevant operation manual (Blu...
...1080p display capability, connect your TV like a Blu-ray disc player, HD-DVD player, DVD player, VCR, Digital TV tuner, HDMI equipment, game console or camcorder. To view external source images, select the input source from INPUT on the remote control unit or on the TV. (See pages 30 and 31....) CAUTION • To protect equipment, always turn off the TV before connecting any external equipment. • Please read the relevant operation manual (Blu...

Operation Manual
Page 18
Turning off the power Press POWER on the TV, or TV POWER on the remote control unit. • The TV enters standby and the image on the screen disappears. • The POWER indicator on the TV turns off Lighting (Red) 16 TV status indicator (SLEEP) "Off" is selected in SLEEP setting "30", "...from the Setup menu. Watching TV Simple operations for watching a TV program POWER POWER indicator OPC indicator SLEEP indicator TV POWER (On/Standby) Turning on the power Press POWER on the TV, or TV POWER on the remote control unit. • POWER indicator (Green): The TV is turned off. See ...
Turning off the power Press POWER on the TV, or TV POWER on the remote control unit. • The TV enters standby and the image on the screen disappears. • The POWER indicator on the TV turns off Lighting (Red) 16 TV status indicator (SLEEP) "Off" is selected in SLEEP setting "30", "...from the Setup menu. Watching TV Simple operations for watching a TV program POWER POWER indicator OPC indicator SLEEP indicator TV POWER (On/Standby) Turning on the power Press POWER on the TV, or TV POWER on the remote control unit. • POWER indicator (Green): The TV is turned off. See ...
Operation Manual
Page 19
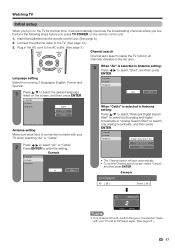
... setting: Press a/b to select "Analog & Digital Search Start" to search both analog and digital broadcasts or "Analog Search Start" to the TV. (See page 12.) 3. Connect the antenna cable to search only analog broadcasts, and then press ENTER. Language setting Select from among 3 languages...ol Antenna setting Make sure what kind of connection made with your TV when selecting "Air" or "Cable". 2 Press c/d to select "Air" or "Cable". Perform the following steps before you press TV POWER on the remote control unit. 1. Insert the batteries into the remote control unit. (See page 8.) 2.
... setting: Press a/b to select "Analog & Digital Search Start" to search both analog and digital broadcasts or "Analog Search Start" to the TV. (See page 12.) 3. Connect the antenna cable to search only analog broadcasts, and then press ENTER. Language setting Select from among 3 languages...ol Antenna setting Make sure what kind of connection made with your TV when selecting "Air" or "Cable". 2 Press c/d to select "Air" or "Cable". Perform the following steps before you press TV POWER on the remote control unit. 1. Insert the batteries into the remote control unit. (See page 8.) 2.
Operation Manual
Page 20
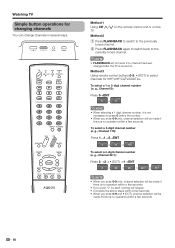
... and • (DOT), channel selection will be made if there is no channel has been changed after the TV is no operation within a few seconds. 18 Watching TV Simple button operations for VHF/UHF/CATV/DIGITAL. Air 22.1 Air DIGITAL 22.1 NOTE • When you enter ...a few seconds. • When you enter 0-9 only, channel selection will be made if there is turned on the TV. Method 1 Using CH r/s on the remote control unit or on . Method 3 Using remote control buttons 0-9, • (DOT) to the currently tuned channel. To select a 3-digit channel number (e. Method 2 1...
... and • (DOT), channel selection will be made if there is no channel has been changed after the TV is no operation within a few seconds. 18 Watching TV Simple button operations for VHF/UHF/CATV/DIGITAL. Air 22.1 Air DIGITAL 22.1 NOTE • When you enter ...a few seconds. • When you enter 0-9 only, channel selection will be made if there is turned on the TV. Method 1 Using CH r/s on the remote control unit or on . Method 3 Using remote control buttons 0-9, • (DOT) to the currently tuned channel. To select a 3-digit channel number (e. Method 2 1...

Operation Manual
Page 21
...• Within 30 minutes of pressing MUTE, mute can be canceled by choosing "Surround" on the remote control unit Mutes the current sound output. However, the TV will be displayed on the remote control unit SURROUND produces Surround effect from the speakers. Each time you press VOLl/k or MUTE. • ... VOLk. • To decrease the volume, press VOLl. Surround : Off Surround : On NOTE • You can change the volume on the TV or on the remote control unit. ■ Using MUTE on the menu items. (See page 28.) 19 Press MUTE. • M will cancel if you press SURROUND,...
...• Within 30 minutes of pressing MUTE, mute can be canceled by choosing "Surround" on the remote control unit Mutes the current sound output. However, the TV will be displayed on the remote control unit SURROUND produces Surround effect from the speakers. Each time you press VOLl/k or MUTE. • ... VOLk. • To decrease the volume, press VOLl. Surround : Off Surround : On NOTE • You can change the volume on the TV or on the remote control unit. ■ Using MUTE on the menu items. (See page 28.) 19 Press MUTE. • M will cancel if you press SURROUND,...
Operation Manual
Page 23
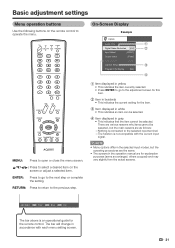
...the next step or complete the setting. MENU: Press to operate the menu. RETURN: Press to return to select a desired item on the remote control to open or close the menu screen. There are various reasons why items cannot be selected, but the operating procedures are the same. •...; The screens in brackets • This indicates the current setting for the remote control. ENTER: Press to go to the selected input terminal. -The function is connected to the adjustment screen for this item. 2 Item in the...
...the next step or complete the setting. MENU: Press to operate the menu. RETURN: Press to return to select a desired item on the remote control to open or close the menu screen. There are various reasons why items cannot be selected, but the operating procedures are the same. •...; The screens in brackets • This indicates the current setting for the remote control. ENTER: Press to go to the selected input terminal. -The function is connected to the adjustment screen for this item. 2 Item in the...

Operation Manual
Page 27
... a/b/c/d to select the position in the category, and then press ENTER to exit. Deleting a favorite channel 1 Repeat steps 2 and 3 in Using Favorite CH on the remote control unit 1 Select the channel you want to register as a favorite channel. 2 Press MENU to display the MENU screen, and then press c/d to select "Option". 3 Press...
... a/b/c/d to select the position in the category, and then press ENTER to exit. Deleting a favorite channel 1 Repeat steps 2 and 3 in Using Favorite CH on the remote control unit 1 Select the channel you want to register as a favorite channel. 2 Press MENU to display the MENU screen, and then press c/d to select "Option". 3 Press...
Operation Manual
Page 30
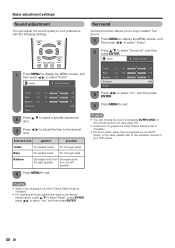
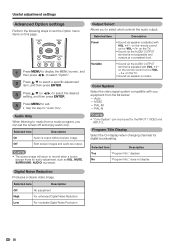
...; Audio menu is grayed out when Output Select is set to "Variable". • For some discs, setup may be required on the remote control unit. (See page 19.) • Audio menu is grayed out when Output Select is set to "Variable". • For resetting all... Audio adjustment items to the factory preset values, press a/b to select "Reset", press ENTER, press c/d to select "Yes", and then press ENTER. 28 Audio Power Control Treble [ 0] a15 b15 Bass [ 0] a15 b15 Balance [ 0] L R Surround [Off] Reset 2 Press a/b to select a specific adjustment item. 3 Press...
...; Audio menu is grayed out when Output Select is set to "Variable". • For some discs, setup may be required on the remote control unit. (See page 19.) • Audio menu is grayed out when Output Select is set to "Variable". • For resetting all... Audio adjustment items to the factory preset values, press a/b to select "Reset", press ENTER, press c/d to select "Yes", and then press ENTER. 28 Audio Power Control Treble [ 0] a15 b15 Bass [ 0] a15 b15 Balance [ 0] L R Surround [Off] Reset 2 Press a/b to select a specific adjustment item. 3 Press...

Operation Manual
Page 32
...If the image does not come in clearly from the external equipment connected to INPUT 1 you may need to set INPUT 1 to Auto, the TV will result in , you cannot change the input signal type setting on the "Input Select" menu. Option Audio Only Digital Noise Reduction [Off] ... be selected on the "INPUT SOURCE" menu. INPUT SOURCE TV INPUT1 INPUT2 INPUT3 INPUT4 INPUT5 2 Press INPUT again to connect the equipment beforehand. Be sure to select the input source. • An image from INPUT on the remote control unit or on the TV. 1 Press INPUT. • A list of the external...
...If the image does not come in clearly from the external equipment connected to INPUT 1 you may need to set INPUT 1 to Auto, the TV will result in , you cannot change the input signal type setting on the "Input Select" menu. Option Audio Only Digital Noise Reduction [Off] ... be selected on the "INPUT SOURCE" menu. INPUT SOURCE TV INPUT1 INPUT2 INPUT3 INPUT4 INPUT5 2 Press INPUT again to connect the equipment beforehand. Be sure to select the input source. • An image from INPUT on the remote control unit or on the TV. 1 Press INPUT. • A list of the external...

Operation Manual
Page 33
...Displaying an image from HDMI equipment 1 To watch an HDMI equipment image, select INPUT4 or INPUT 5 from "INPUT SOURCE" menu using INPUT on the remote control unit or on the Input Selection operation. 1 Press MENU to display the MENU screen, and then press c/d to select "Setup". 2 Press a/b ...", and then press ENTER. 3 Press a/b to select the Input (INPUT 4 or INPUT 5) you wish to skip, and then press ENTER. INPUT SOURCE TV INPUT1 INPUT2 INPUT3 INPUT4 INPUT5 2 Press MENU to display the MENU screen, and then press c/d to select "Option". 3 Press a/b to select the desired ...
...Displaying an image from HDMI equipment 1 To watch an HDMI equipment image, select INPUT4 or INPUT 5 from "INPUT SOURCE" menu using INPUT on the remote control unit or on the Input Selection operation. 1 Press MENU to display the MENU screen, and then press c/d to select "Setup". 2 Press a/b ...", and then press ENTER. 3 Press a/b to select the Input (INPUT 4 or INPUT 5) you wish to skip, and then press ENTER. INPUT SOURCE TV INPUT1 INPUT2 INPUT3 INPUT4 INPUT5 2 Press MENU to display the MENU screen, and then press c/d to select "Option". 3 Press a/b to select the desired ...
Operation Manual
Page 38
...Program Title Display Select the CH display when changing channels for "Audio Only". Color System Select the video signal system compatible with VOL k/l on the remote control unit or VOL l/k on this page. 1 Press MENU to display the MENU screen, and then press c/d to select "Option". 2 Press ...this step for digital broadcasting. Selected item Fixed Variable Description • Sound via speaker is adjusted with VOL k/l on the remote control unit or VOLl/k on the TV. • Sound via the AUDIO OUTPUT terminal is not adjustable and outputs at a consistent level. • Sound via ...
...Program Title Display Select the CH display when changing channels for "Audio Only". Color System Select the video signal system compatible with VOL k/l on the remote control unit or VOL l/k on this page. 1 Press MENU to display the MENU screen, and then press c/d to select "Option". 2 Press ...this step for digital broadcasting. Selected item Fixed Variable Description • Sound via speaker is adjusted with VOL k/l on the remote control unit or VOLl/k on the TV. • Sound via the AUDIO OUTPUT terminal is not adjustable and outputs at a consistent level. • Sound via ...

Operation Manual
Page 48
...to enter the code registration mode. Presetting manufacturer codes 1 Press FUNCTION until the LED for your device lights up. 2 After the LED for your remote control unit. 1 Press FREEZE. • A moving image that you are watching. The LED will blink quickly then turn off .) 46 NOTE •... time to enter the manufacturer code. (See page 47.) • Preset mode is not available, "No displaying still image available." Presetting remote control function You can operate the connected AV products (AV Receiver, Cable Box, SAT tuner, DTV, VCR, DVD, LD) using the freeze ...
...to enter the code registration mode. Presetting manufacturer codes 1 Press FUNCTION until the LED for your device lights up. 2 After the LED for your remote control unit. 1 Press FREEZE. • A moving image that you are watching. The LED will blink quickly then turn off .) 46 NOTE •... time to enter the manufacturer code. (See page 47.) • Preset mode is not available, "No displaying still image available." Presetting remote control function You can operate the connected AV products (AV Receiver, Cable Box, SAT tuner, DTV, VCR, DVD, LD) using the freeze ...

Operation Manual
Page 49
AUDIO BRAND REMOTE CONTROL CODE NUMBER 47 Other viewing options Manufacturer codes VCR BRAND REMOTE CONTROL CODE NUMBER DVD/LD BRAND REMOTE CONTROL CODE NUMBER CATV/SAT BRAND REMOTE CONTROL CODE NUMBER NOTE • Numbers marked with * are SAT codes, all others are CATV codes.
AUDIO BRAND REMOTE CONTROL CODE NUMBER 47 Other viewing options Manufacturer codes VCR BRAND REMOTE CONTROL CODE NUMBER DVD/LD BRAND REMOTE CONTROL CODE NUMBER CATV/SAT BRAND REMOTE CONTROL CODE NUMBER NOTE • Numbers marked with * are SAT codes, all others are CATV codes.

Operation Manual
Page 51
... items on the DVD MENU screen. 9 J Hold down to fast forward. 10 I Starts playback. 3 10 5 6 2 1 8 ■ DVD control buttons The remote control unit button will function as follows when the FUNCTION of the DVD player on and off . 3 F Sets pauses and still pictures. 4 G Rewinds the tape... of the TV tuner on the VCR. 2 SOURCE POWER Turns the power of the VCR on and off . 4 F Sets pauses and still pictures. 5 G Hold down to go in reverse. 7 6 H Playback stops when pressed. Other viewing options 8 2 4 7 3 6 5 1 ■ VCR control buttons The remote control unit button ...
... items on the DVD MENU screen. 9 J Hold down to fast forward. 10 I Starts playback. 3 10 5 6 2 1 8 ■ DVD control buttons The remote control unit button will function as follows when the FUNCTION of the DVD player on and off . 3 F Sets pauses and still pictures. 4 G Rewinds the tape... of the TV tuner on the VCR. 2 SOURCE POWER Turns the power of the VCR on and off . 4 F Sets pauses and still pictures. 5 G Hold down to go in reverse. 7 6 H Playback stops when pressed. Other viewing options 8 2 4 7 3 6 5 1 ■ VCR control buttons The remote control unit button ...
Operation Manual
Page 53
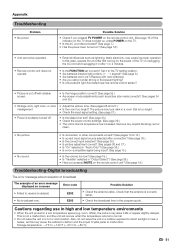
... signal setting. (See page 37.) • Power is correctly setup. • Check the broadcast time in the program guide. The picture may look dark in a room that the antenna is suddenly turned off /with new batteries.) • Are you pressed MUTE on the remote control unit? (See page 19.)... bright? Appendix Troubleshooting Problem • No power Possible Solution • Check if you pressed TV POWER on the remote control unit. (See page 16.) If the indicator on the TV does not light up, press POWER on the TV. • Is the AC cord disconnected? (See page 7.) • Has the power...
... signal setting. (See page 37.) • Power is correctly setup. • Check the broadcast time in the program guide. The picture may look dark in a room that the antenna is suddenly turned off /with new batteries.) • Are you pressed MUTE on the remote control unit? (See page 19.)... bright? Appendix Troubleshooting Problem • No power Possible Solution • Check if you pressed TV POWER on the remote control unit. (See page 16.) If the indicator on the TV does not light up, press POWER on the TV. • Is the AC cord disconnected? (See page 7.) • Has the power...


