LC-32GP3U Operation Manual
Page 10
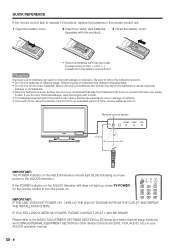
...old and new batteries can result in your AQUOS operation manual. 8 IF YOU STILL ENCOUNTER NO POWER, PLEASE CONTACT US AT 1-800-BE-SHARP. Chemicals that come in contact with this product may have a shorter life expectancy due to storage conditions. • If you will not ...channel setup functions and USING EXTERNAL EQUIPMENT SECTION for an extended period of batteries have power to the AQUOS television. Remote control sensor 17´ (5 m) 30º 30º 30º 30º IMPORTANT: The POWER indicator on . QUICK REFERENCE If the remote control fails to operate TV functions...
...old and new batteries can result in your AQUOS operation manual. 8 IF YOU STILL ENCOUNTER NO POWER, PLEASE CONTACT US AT 1-800-BE-SHARP. Chemicals that come in contact with this product may have a shorter life expectancy due to storage conditions. • If you will not ...channel setup functions and USING EXTERNAL EQUIPMENT SECTION for an extended period of batteries have power to the AQUOS television. Remote control sensor 17´ (5 m) 30º 30º 30º 30º IMPORTANT: The POWER indicator on . QUICK REFERENCE If the remote control fails to operate TV functions...
LC-32GP3U Operation Manual
Page 11
... drawings for Analog PC input mode only 34 Fine Sync. adjustment (for the LCD TV set are shown on the power 17 Turning off the power 17 Initial setup 18 Simple button operations for changing channels 19 Simple button operations for changing volume/...32 Input Select 32 Displaying an image from HDMI equipment....... 33 Input Skip 33 Select Game Input 33 Useful adjustment settings 34 Auto Sync. Contents IMPORTANT INFORMATION 1 Trademarks 2 DEAR SHARP CUSTOMER 3 IMPORTANT SAFETY INSTRUCTIONS 3 Supplied accessories 6 QUICK REFERENCE 7 Contents 9 Part names 10 TV (Front 10 TV...
... drawings for Analog PC input mode only 34 Fine Sync. adjustment (for the LCD TV set are shown on the power 17 Turning off the power 17 Initial setup 18 Simple button operations for changing channels 19 Simple button operations for changing volume/...32 Input Select 32 Displaying an image from HDMI equipment....... 33 Input Skip 33 Select Game Input 33 Useful adjustment settings 34 Auto Sync. Contents IMPORTANT INFORMATION 1 Trademarks 2 DEAR SHARP CUSTOMER 3 IMPORTANT SAFETY INSTRUCTIONS 3 Supplied accessories 6 QUICK REFERENCE 7 Contents 9 Part names 10 TV (Front 10 TV...

LC-32GP3U Operation Manual
Page 19
...image on the screen disappears. • The POWER indicator on the TV turns off . NOTE • If you are not going to use this TV for a long period of time, be invoked. See page 24 for performing EZ Setup from the AC outlet. • Weak electric power is still consumed...(After a few seconds, a window appears with sound.) NOTE • The initial setup starts when the TV powers on for the first time. Watching TV Simple operations for watching a TV program Power Turning on the power Press POWER on the TV, or TV POWER on the remote control unit. • POWER indicator (Blue): The...
...image on the screen disappears. • The POWER indicator on the TV turns off . NOTE • If you are not going to use this TV for a long period of time, be invoked. See page 24 for performing EZ Setup from the AC outlet. • Weak electric power is still consumed...(After a few seconds, a window appears with sound.) NOTE • The initial setup starts when the TV powers on for the first time. Watching TV Simple operations for watching a TV program Power Turning on the power Press POWER on the TV, or TV POWER on the remote control unit. • POWER indicator (Blue): The...

LC-32GP3U Operation Manual
Page 20
... the set area. Language Air/Cable CH Search Start Cancel When "Cable" is made with your TV and try EZ Setup again. (See page 24.) 18 Perform the following steps before you press TV POWER on the screen, and then press ENTER. Language setting Select from among 3 languages: English... type of connection is selected in Antenna setting: Press c/d to search only analog broadcasts, and then press ENTER. Watching TV Initial setup When you turn on the TV for all channels viewable in the AC cord to select the desired language listed on the remote control unit. 1. Press ...
... the set area. Language Air/Cable CH Search Start Cancel When "Cable" is made with your TV and try EZ Setup again. (See page 24.) 18 Perform the following steps before you press TV POWER on the screen, and then press ENTER. Language setting Select from among 3 languages: English... type of connection is selected in Antenna setting: Press c/d to search only analog broadcasts, and then press ENTER. Watching TV Initial setup When you turn on the TV for all channels viewable in the AC cord to select the desired language listed on the remote control unit. 1. Press ...
LC-32GP3U Operation Manual
Page 24
... operation manual are various reasons why items cannot be selected. On-Screen Display Example Option AQUOS LINK Setup Audio Only Digital Noise Reduction [Off] Input Select [VIDEO] Output select [Fixed] Color System [Auto] Caption Setup Digital Caption Info. Button operations on the control panel correspond to the selected input terminal. -The function...
... operation manual are various reasons why items cannot be selected. On-Screen Display Example Option AQUOS LINK Setup Audio Only Digital Noise Reduction [Off] Input Select [VIDEO] Output select [Fixed] Color System [Auto] Caption Setup Digital Caption Info. Button operations on the control panel correspond to the selected input terminal. -The function...
LC-32GP3U Operation Manual
Page 25
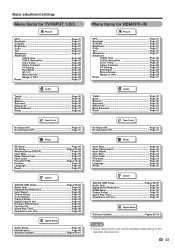
Basic adjustment settings Menu items for TV/INPUT 1/2/3 Picture OPC Page 27 Backlight Page 27 Contrast Page 27 Brightness Page 27 Color Page 27 Tint Page 27 Sharpness Page 27 Advanced C.M.S.-Hue Page 28 C.M.S.-Saturation Page 28 Color Temp Page 28 Active Contrast Page 28 I/P Setting Page 28 Film ...Position Page 35 Language Page 35 Reset Page 35 Option AQUOS LINK Setup Pages 56-59 Audio Only Page 39 Digital Noise Reduction Page 39 Input Select Page 32 Output Select Page 39 Color System Page 39 Caption Setup Page 42 Digital Caption Info Page 42 Program Title Display Page ...
Basic adjustment settings Menu items for TV/INPUT 1/2/3 Picture OPC Page 27 Backlight Page 27 Contrast Page 27 Brightness Page 27 Color Page 27 Tint Page 27 Sharpness Page 27 Advanced C.M.S.-Hue Page 28 C.M.S.-Saturation Page 28 Color Temp Page 28 Active Contrast Page 28 I/P Setting Page 28 Film ...Position Page 35 Language Page 35 Reset Page 35 Option AQUOS LINK Setup Pages 56-59 Audio Only Page 39 Digital Noise Reduction Page 39 Input Select Page 32 Output Select Page 39 Color System Page 39 Caption Setup Page 42 Digital Caption Info Page 42 Program Title Display Page ...

LC-32GP3U Operation Manual
Page 26
...run EZ Setup again, even after setting up the preset channels. Antenna setting 1 Press MENU to display the MENU screen, and then press c/d to enter the setting. Antenna setting Make sure what kind of connection is found , confirm the type of connection made with your TV and try... a/b to select "CH Search", and then press ENTER. 3 When "Air" is found , confirm the type of connection made with your TV and try EZ Setup again. • If you select "Analog Search Start" and initiate the channel search, the CH Memory for Cable Digital will start automatically. •...
...run EZ Setup again, even after setting up the preset channels. Antenna setting 1 Press MENU to display the MENU screen, and then press c/d to enter the setting. Antenna setting Make sure what kind of connection is found , confirm the type of connection made with your TV and try... a/b to select "CH Search", and then press ENTER. 3 When "Air" is found , confirm the type of connection made with your TV and try EZ Setup again. • If you select "Analog Search Start" and initiate the channel search, the CH Memory for Cable Digital will start automatically. •...

LC-32GP3U Operation Manual
Page 27
... of DIGITAL channel is displayed. Signal Strength 1 Press MENU to display the MENU screen, and then press c/d to select "Setup". 2 Press a/b to select "Antenna Setup DIGITAL", and then press ENTER. 3 Press a/b to select "Signal Strength". • The signal strength of connection is available...Press MENU to exit. The signal information is strong enough for DIGITAL (Air) only. 25 NOTE • This function is made with your TV. Antenna Setup - DIGITAL. 2 Press a/b to select "Channel Strength", and then press ENTER. 3 Input the 2-digit channel number to check the signal ...
... of DIGITAL channel is displayed. Signal Strength 1 Press MENU to display the MENU screen, and then press c/d to select "Setup". 2 Press a/b to select "Antenna Setup DIGITAL", and then press ENTER. 3 Press a/b to select "Signal Strength". • The signal strength of connection is available...Press MENU to exit. The signal information is strong enough for DIGITAL (Air) only. 25 NOTE • This function is made with your TV. Antenna Setup - DIGITAL. 2 Press a/b to select "Channel Strength", and then press ENTER. 3 Input the 2-digit channel number to check the signal ...
LC-32GP3U Operation Manual
Page 32
... on the remote control unit. (See page 20.) • Audio menu is grayed out when Output Select is set to "Variable". • For some discs, setup may be required on your DVD player. • When AV MODE is set to "GAME", the factory preset value for Subwoofer is "On". • Audio...
... on the remote control unit. (See page 20.) • Audio menu is grayed out when Output Select is set to "Variable". • For some discs, setup may be required on your DVD player. • When AV MODE is set to "GAME", the factory preset value for Subwoofer is "On". • Audio...

LC-32GP3U Operation Manual
Page 34
...type. • If you want to set INPUT 1 or 3 to Auto, the TV will automatically select the input signal. • Setting INPUT 1 or 3 signal selection to your external... equipment operation manual for external equipment connection. 32 Be sure to connect the equipment beforehand. 3 Press a/b to select the signal type...when other equipment is connected will result in the following connection priority. Option AQUOS LINK Setup Audio Only Digital Noise Reduction [Off] Input Select [Auto] Output Select [Fixed] 1 Press INPUT....
...type. • If you want to set INPUT 1 or 3 to Auto, the TV will automatically select the input signal. • Setting INPUT 1 or 3 signal selection to your external... equipment operation manual for external equipment connection. 32 Be sure to connect the equipment beforehand. 3 Press a/b to select the signal type...when other equipment is connected will result in the following connection priority. Option AQUOS LINK Setup Audio Only Digital Noise Reduction [Off] Input Select [Auto] Output Select [Fixed] 1 Press INPUT....
LC-32GP3U Operation Manual
Page 35
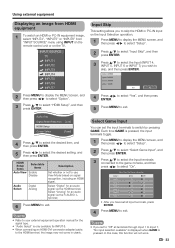
...available for an audio signal via the HDMI terminal. Each time GAME is pressed. NOTE • If you to exit. INPUT SOURCE TV INPUT1 INPUT2 INPUT3 INPUT4 INPUT5 INPUT6 INPUT7 Input Skip This setting allows you set all terminals through Input 1 to skip, and then ... (HDMI) Input 7 (RGB) Yes No 2 Press MENU to display the MENU screen, and then press c/d to select "Option". 3 Press a/b to select "HDMI Setup", and then press ENTER. 4 Press c/d to select "Yes", and then press ENTER. 5 Press MENU to switch by pressing GAME. Using external equipment Displaying an image...
...available for an audio signal via the HDMI terminal. Each time GAME is pressed. NOTE • If you to exit. INPUT SOURCE TV INPUT1 INPUT2 INPUT3 INPUT4 INPUT5 INPUT6 INPUT7 Input Skip This setting allows you set all terminals through Input 1 to skip, and then ... (HDMI) Input 7 (RGB) Yes No 2 Press MENU to display the MENU screen, and then press c/d to select "Option". 3 Press a/b to select "HDMI Setup", and then press ENTER. 4 Press c/d to select "Yes", and then press ENTER. 5 Press MENU to switch by pressing GAME. Using external equipment Displaying an image...

LC-32GP3U Operation Manual
Page 36
...adjustment is needed to optimize the image. 1 Press MENU to display the MENU screen, and then press c/d to select "Setup". 1 Press MENU to display the MENU screen, and then press c/d to select "Setup". 2 Press a/b to select "Auto Sync.", and then press ENTER. 3 Press c/d to adjust the "Clock" or ...the left or right. H-Pos. [ 90] a b V-Pos. [ 39] a b Clock [ 90] a b Phase [ 20] a b Reset Yes No 30% 4 Press MENU to the TV and switch it up or down. If not, Auto Sync. Clock Adjust when the image flickers with vertical stripes. may fail even if "Completed...
...adjustment is needed to optimize the image. 1 Press MENU to display the MENU screen, and then press c/d to select "Setup". 1 Press MENU to display the MENU screen, and then press c/d to select "Setup". 2 Press a/b to select "Auto Sync.", and then press ENTER. 3 Press c/d to adjust the "Clock" or ...the left or right. H-Pos. [ 90] a b V-Pos. [ 39] a b Clock [ 90] a b Phase [ 20] a b Reset Yes No 30% 4 Press MENU to the TV and switch it up or down. If not, Auto Sync. Clock Adjust when the image flickers with vertical stripes. may fail even if "Completed...
LC-32GP3U Operation Manual
Page 37
......" Language setting You can reset the settings to the factory preset values. 1 Press MENU to display the MENU screen, and then press c/d to select "Setup". 2 Press a/b to select "Reset", and then press ENTER. • If you can also select a language from among 3 languages: English, French and... No., input the 4-digit secret number here. Select from the Setup menu. The screen will have returned to select "Yes", and then press ENTER. • "Now, TV will not be changed . 35 NOTE • The Channel Setup settings will not be changed. • The Language settings will ...
......" Language setting You can reset the settings to the factory preset values. 1 Press MENU to display the MENU screen, and then press c/d to select "Setup". 2 Press a/b to select "Reset", and then press ENTER. • If you can also select a language from among 3 languages: English, French and... No., input the 4-digit secret number here. Select from the Setup menu. The screen will have returned to select "Yes", and then press ENTER. • "Now, TV will not be changed . 35 NOTE • The Channel Setup settings will not be changed. • The Language settings will ...

LC-32GP3U Operation Manual
Page 38
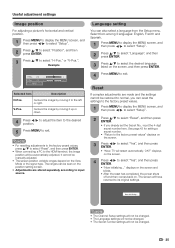
... when the remaining time reaches zero. • When the sleep timer is TV. 36 Sleep Timer: Remaining 30 1 Press INPUT to select the desired input source. 2 Press MENU to display the MENU screen, and then press c/d to select "Setup". 3 Press a/b to select "Input Label", and then press ENTER. 4... Press a/b/c/d to select the new name for the input mode, and then press ENTER. Useful adjustment settings Input Label Lets you set , its indicator on the TV lights red. 5 Press MENU to exit...
... when the remaining time reaches zero. • When the sleep timer is TV. 36 Sleep Timer: Remaining 30 1 Press INPUT to select the desired input source. 2 Press MENU to display the MENU screen, and then press c/d to select "Setup". 3 Press a/b to select "Input Label", and then press ENTER. 4... Press a/b/c/d to select the new name for the input mode, and then press ENTER. Useful adjustment settings Input Label Lets you set , its indicator on the TV lights red. 5 Press MENU to exit...

LC-32GP3U Operation Manual
Page 42
...Press MENU to exit. The pair of the 2 input signals listed above. 1 Press MENU to display the MENU screen, and then press c/d to select "Setup". 2 Press a/b to select "Input Signal", and then press ENTER. 3 Press a/b to select the desired input signal on ] * The xvYCC signal allows ...the mode displayed on ] MOVIE For a movie [Enhanced Picture Contrast: off] GAME Optimizes the lag time between the game console and the TV. Lowers image brightness for easier viewing [Enhanced Picture Contrast: off] PC For PC [Enhanced Picture Contrast: off] xvYCC* Supports the xvYCC ...
...Press MENU to exit. The pair of the 2 input signals listed above. 1 Press MENU to display the MENU screen, and then press c/d to select "Setup". 2 Press a/b to select "Input Signal", and then press ENTER. 3 Press a/b to select the desired input signal on ] * The xvYCC signal allows ...the mode displayed on ] MOVIE For a movie [Enhanced Picture Contrast: off] GAME Optimizes the lag time between the game console and the TV. Lowers image brightness for easier viewing [Enhanced Picture Contrast: off] PC For PC [Enhanced Picture Contrast: off] xvYCC* Supports the xvYCC ...

LC-32GP3U Operation Manual
Page 44
... appearance to suit your preference. 1 Press MENU to display the MENU screen, and then press c/d to select "Option". 2 Press a/b to select "Caption Setup", and then press ENTER. 3 Press a/b to select a specific adjustment item. • You can adjust 7 items here; Type 6 Cursive font ... The font specified by broadcasting station or default font. Digital Caption Services in the MENU screen. Useful adjustment settings Caption Setup This function allows you to adjust the closed caption information for children. 4 Press MENU to exit. Type 1 Monospaced with serifs....
... appearance to suit your preference. 1 Press MENU to display the MENU screen, and then press c/d to select "Option". 2 Press a/b to select "Caption Setup", and then press ENTER. 3 Press a/b to select a specific adjustment item. • You can adjust 7 items here; Type 6 Cursive font ... The font specified by broadcasting station or default font. Digital Caption Services in the MENU screen. Useful adjustment settings Caption Setup This function allows you to adjust the closed caption information for children. 4 Press MENU to exit. Type 1 Monospaced with serifs....

LC-32GP3U Operation Manual
Page 45
... enable and "Off" to disable Parental CTRL. a a a a New Secret No. Setting a secret number 1 Press MENU to display the MENU screen, and then press c/d to select "Setup". 2 Press a/b to select "Parental CTRL", and then press ENTER. 3 Press a/b to enable or disable the parental control function. 1 Repeat steps 1 and 2 in the U.S. 43 Secret...
... enable and "Off" to disable Parental CTRL. a a a a New Secret No. Setting a secret number 1 Press MENU to display the MENU screen, and then press c/d to select "Setup". 2 Press a/b to select "Parental CTRL", and then press ENTER. 3 Press a/b to enable or disable the parental control function. 1 Repeat steps 1 and 2 in the U.S. 43 Secret...

LC-32GP3U Operation Manual
Page 48
... indicates the item is blocked. English Ratings Can. Example MPAA TV Guidelines Can. Useful adjustment settings Voluntary movie rating system (MPAA) 1 Press MENU to display the MENU screen, and then press c/d to select "Setup". 2 Press a/b to register after all individual content rating items ...are set. V-Chip V-Chip (DTV Only) Secret No. TV Parental Guidelines (TV Guidelines) 1 Repeat steps 1 to 4 in Voluntary movie rating system (MPAA)....
... indicates the item is blocked. English Ratings Can. Example MPAA TV Guidelines Can. Useful adjustment settings Voluntary movie rating system (MPAA) 1 Press MENU to display the MENU screen, and then press c/d to select "Setup". 2 Press a/b to register after all individual content rating items ...are set. V-Chip V-Chip (DTV Only) Secret No. TV Parental Guidelines (TV Guidelines) 1 Repeat steps 1 to 4 in Voluntary movie rating system (MPAA)....

LC-32GP3U Operation Manual
Page 50
...adjustment settings Canadian English ratings 1 Press MENU to display the MENU screen, and then press c/d to select "Setup". 2 Press a/b to "On", the configuration settings will not work . (See page 43.) MPAA TV Guidelines Can. V-Chip V-Chip (DTV Only) Secret No. Status Canadian French ratings 1 Repeat steps 1 to... the item to exit. is not set . (See page 43.) • "V-Chip" and "Status" will not work . (See page 43.) Example MPAA TV Guidelines Can. French Ratings Example 4 Press MENU to your secret number. (See page 43.) 3 Input the 4-digit secret number by using...
...adjustment settings Canadian English ratings 1 Press MENU to display the MENU screen, and then press c/d to select "Setup". 2 Press a/b to "On", the configuration settings will not work . (See page 43.) MPAA TV Guidelines Can. V-Chip V-Chip (DTV Only) Secret No. Status Canadian French ratings 1 Repeat steps 1 to... the item to exit. is not set . (See page 43.) • "V-Chip" and "Status" will not work . (See page 43.) Example MPAA TV Guidelines Can. French Ratings Example 4 Press MENU to your secret number. (See page 43.) 3 Input the 4-digit secret number by using...
LC-32GP3U Operation Manual
Page 51
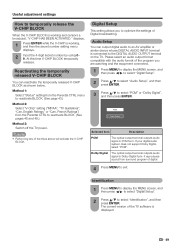
... form. Identification 1 Press MENU to display the MENU screen, and then press c/d to select "Digital Setup". 2 Press a/b to reactivate BLOCK. (See page 43.) Method 2: Select "V-Chip" setting ("MPAA", "TV Guidelines", "Can. Digital Setup This setting allows you are watching and the equipment connected. 1 Press MENU to display the MENU screen, and...
... form. Identification 1 Press MENU to display the MENU screen, and then press c/d to select "Digital Setup". 2 Press a/b to reactivate BLOCK. (See page 43.) Method 2: Select "V-Chip" setting ("MPAA", "TV Guidelines", "Can. Digital Setup This setting allows you are watching and the equipment connected. 1 Press MENU to display the MENU screen, and...

