

LC-32D64U | LC-37D64U Operation Manual
Page 10
...SHARP CUSTOMER 3 IMPORTANT SAFETY INSTRUCTIONS 3 QUICK REFERENCE 5 Attaching/Detaching the Stand 5 Setting the TV on the Wall 5 QUICK INSTALLATION TIPS 6 Using the Remote Control Unit 6 Preparation 7 Antennas 7 Installing Batteries in the Remote Control Unit......7 Contents 8 Supplied Accessories 8 Part Names 9 TV (Front 9 TV... Connected Equipment 30 Using AQUOS LINK 32 Controlling HDMI Equipment Using AQUOS LINK ...32 AQUOS LINK Menu 34 Appendix 35 ...; The dimensional drawings for the LCD TV set are provided with the TV. 8 Cable clamp (g1) Cable tie (g1) Page 6...
...SHARP CUSTOMER 3 IMPORTANT SAFETY INSTRUCTIONS 3 QUICK REFERENCE 5 Attaching/Detaching the Stand 5 Setting the TV on the Wall 5 QUICK INSTALLATION TIPS 6 Using the Remote Control Unit 6 Preparation 7 Antennas 7 Installing Batteries in the Remote Control Unit......7 Contents 8 Supplied Accessories 8 Part Names 9 TV (Front 9 TV... Connected Equipment 30 Using AQUOS LINK 32 Controlling HDMI Equipment Using AQUOS LINK ...32 AQUOS LINK Menu 34 Appendix 35 ...; The dimensional drawings for the LCD TV set are provided with the TV. 8 Cable clamp (g1) Cable tie (g1) Page 6...
LC-32D64U | LC-37D64U Operation Manual
Page 12
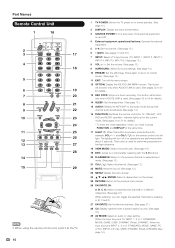
.... The lighting will light. This button will function only when AQUOS LINK is used. (See pages 32 to 34 for performing operations in low-light situations. 18 VIEW MODE: Select the screen size. (See...is used for details.) 13 REC STOP: Stops one touch recording. This button is used . (See pages 32 to 34 for details.) 14 SLEEP: Set the sleep timer. (See page 13.) 15 AUDIO: Selects the... 27 28 14 15 29 • When using the remote control unit, point it at the TV. 10 1 TV POWER: Switch the TV power on or enters standby. (See page 12.) 2 DISPLAY: Display the channel information. 3 ...
.... The lighting will light. This button will function only when AQUOS LINK is used. (See pages 32 to 34 for performing operations in low-light situations. 18 VIEW MODE: Select the screen size. (See...is used for details.) 13 REC STOP: Stops one touch recording. This button is used . (See pages 32 to 34 for details.) 14 SLEEP: Set the sleep timer. (See page 13.) 15 AUDIO: Selects the... 27 28 14 15 29 • When using the remote control unit, point it at the TV. 10 1 TV POWER: Switch the TV power on or enters standby. (See page 12.) 2 DISPLAY: Display the channel information. 3 ...
LC-32D64U | LC-37D64U Operation Manual
Page 13
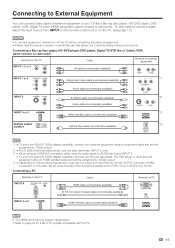
... External Equipment You can connect many types of external equipment to page 38 for a list of PC signals compatible with the TV. 11 In this case, set the equipment to PCM, 32/44.1/48 kHz and 16 bits. To view external source images, select the input source from the DIGITAL AUDIO OUTPUT... terminal in HDMI connection. Connecting a Blu-ray disc player, HD-DVD player, DVD player, Digital TV STB (Air or Cable), VCR, game console...
... External Equipment You can connect many types of external equipment to page 38 for a list of PC signals compatible with the TV. 11 In this case, set the equipment to PCM, 32/44.1/48 kHz and 16 bits. To view external source images, select the input source from the DIGITAL AUDIO OUTPUT... terminal in HDMI connection. Connecting a Blu-ray disc player, HD-DVD player, DVD player, Digital TV STB (Air or Cable), VCR, game console...
LC-32D64U | LC-37D64U Operation Manual
Page 19
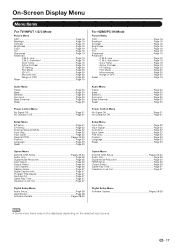
On-Screen Display Menu Menu Items For TV/INPUT 1/2/3 Mode Picture Menu OPC Page 19 Backlight Page 19 Contrast Page 19 Brightness Page 19 Color Page 19 Tint Page 19 Sharpness Page 19 Advanced C.M.S.-Hue Page 19 C.M.S.-Saturation Page 19 Color Temp Page 19 Active Contrast Page 19 I/P Setting Page 20 Film ...22 Input Label Page 22 Parental CTRL Pages 23-25 Position Page 23 Language Page 23 Reset Page 23 Option Menu AQUOS LINK Setup Pages 32-34 Audio Only Page 26 Digital Noise Reduction Page 26 Input Select Page 26 Output Select Page 26 Color System Page 26 Caption Setup Page...
On-Screen Display Menu Menu Items For TV/INPUT 1/2/3 Mode Picture Menu OPC Page 19 Backlight Page 19 Contrast Page 19 Brightness Page 19 Color Page 19 Tint Page 19 Sharpness Page 19 Advanced C.M.S.-Hue Page 19 C.M.S.-Saturation Page 19 Color Temp Page 19 Active Contrast Page 19 I/P Setting Page 20 Film ...22 Input Label Page 22 Parental CTRL Pages 23-25 Position Page 23 Language Page 23 Reset Page 23 Option Menu AQUOS LINK Setup Pages 32-34 Audio Only Page 26 Digital Noise Reduction Page 26 Input Select Page 26 Output Select Page 26 Color System Page 26 Caption Setup Page...
LC-32D64U | LC-37D64U Operation Manual
Page 34
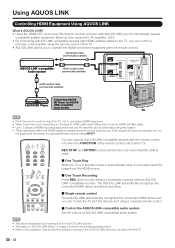
...;er, DVD). • By connecting AQUOS LINK-compatible devices with HDMI-certified cables to the TV, you can control a recorder or AV amplifier using INPUT. If the equipment does not operate,...the image from the HDMI source. ˙ One Touch Recording Press REC while you can control the TV and the devices as the current input source. REC STOP and OPTION buttons will function only when AQUOS... steps in "AQUOS LINK Setup" on page 33 need to be completed beforehand. • Refer to this TV. 32 Make sure to use an HDMI-certified cable. • Up to 3 pieces of HDMI cable used ...
...;er, DVD). • By connecting AQUOS LINK-compatible devices with HDMI-certified cables to the TV, you can control a recorder or AV amplifier using INPUT. If the equipment does not operate,...the image from the HDMI source. ˙ One Touch Recording Press REC while you can control the TV and the devices as the current input source. REC STOP and OPTION buttons will function only when AQUOS... steps in "AQUOS LINK Setup" on page 33 need to be completed beforehand. • Refer to this TV. 32 Make sure to use an HDMI-certified cable. • Up to 3 pieces of HDMI cable used ...


