
Operation Manual
Page 1
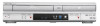
Before you start Connections Getting started Recording VCR/DVD RECORDER COMBINATION DV-RW340U DV-RW350U OPERATION MANUAL Please read this unit is 1. INSTRUCCIONES EN ESPAÑOL INCLUIDAS. 1 The region number for this Operation Manual carefully before using your VCR/DVD RECORDER COMBINATION. Playing discs Editing Changing the SETUP ...8226; Remote control (9HSNB114UD) with two "AA" size batteries • Round Coaxial cable • Audio/Video cables • Operation Manual (9HSWPZ0901TM003) (9HSWX1E56B5-001) (9HS1VMN20224) Operation Manual • QUICK USE GUIDE (9HS1VMN20237)
Before you start Connections Getting started Recording VCR/DVD RECORDER COMBINATION DV-RW340U DV-RW350U OPERATION MANUAL Please read this unit is 1. INSTRUCCIONES EN ESPAÑOL INCLUIDAS. 1 The region number for this Operation Manual carefully before using your VCR/DVD RECORDER COMBINATION. Playing discs Editing Changing the SETUP ...8226; Remote control (9HSNB114UD) with two "AA" size batteries • Round Coaxial cable • Audio/Video cables • Operation Manual (9HSWPZ0901TM003) (9HSWX1E56B5-001) (9HS1VMN20224) Operation Manual • QUICK USE GUIDE (9HS1VMN20237)

Operation Manual
Page 5
... the center out. Before you start Connections Getting started Recording Playing discs Before you start Precautions (cont'd) Others It is the intent of Sharp that this product be used in full compliance with a cleaning cloth.Wipe the disc from copyright owners whenever necessary. A NOTE ABOUT RECYCLING ...do not belong in the dust bin. • You can see a clear picture. ¡Playback picture may need to the surfaces of this manual.) 3. If a streaky or snowy picture appears during playback, the video heads in accordance with your unit may become blurred or interrupted while the...
... the center out. Before you start Connections Getting started Recording Playing discs Before you start Precautions (cont'd) Others It is the intent of Sharp that this product be used in full compliance with a cleaning cloth.Wipe the disc from copyright owners whenever necessary. A NOTE ABOUT RECYCLING ...do not belong in the dust bin. • You can see a clear picture. ¡Playback picture may need to the surfaces of this manual.) 3. If a streaky or snowy picture appears during playback, the video heads in accordance with your unit may become blurred or interrupted while the...

Operation Manual
Page 6
... setting 19 Getting channels automatically 19 Adding/deleting channels 20 Selecting the TV stereo or SAP 21 Setting the clock 22 Auto Clock Setting 22 Manual Clock Setting 23 Setting the daylight saving time 25 Selecting the TV aspect ratio 26 Recording 27 Information on DVD recording 27 Information 27 Recording...
... setting 19 Getting channels automatically 19 Adding/deleting channels 20 Selecting the TV stereo or SAP 21 Setting the clock 22 Auto Clock Setting 22 Manual Clock Setting 23 Setting the daylight saving time 25 Selecting the TV aspect ratio 26 Recording 27 Information on DVD recording 27 Information 27 Recording...

Operation Manual
Page 7
... for a desired point on the disc type or the recording mode. Playing discs Recording DVD mode VCR mode This unit is compatible with this operation manual Many functions of titles, etc. Up to 8 programs recording: You can easily find the part you want to change the recording speed, press REC MODE...
... for a desired point on the disc type or the recording mode. Playing discs Recording DVD mode VCR mode This unit is compatible with this operation manual Many functions of titles, etc. Up to 8 programs recording: You can easily find the part you want to change the recording speed, press REC MODE...

Operation Manual
Page 12
.... Indicates a Tape Counter. 5. Some operations are on page 43. 4 1 1 5 1 00:00:00 DVD-RW Video mode 2 SP 1:25 Rem. Note: In some descriptions on this manual, only one disc type is playing. Indicates a recording speed only five seconds. 4. Before you start Functional overview (cont'd) DISPLAY menu DVD mode First: DVD Press...
.... Indicates a Tape Counter. 5. Some operations are on page 43. 4 1 1 5 1 00:00:00 DVD-RW Video mode 2 SP 1:25 Rem. Note: In some descriptions on this manual, only one disc type is playing. Indicates a recording speed only five seconds. 4. Before you start Functional overview (cont'd) DISPLAY menu DVD mode First: DVD Press...
Operation Manual
Page 16
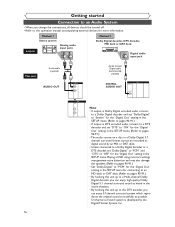
... or a DTS decoder, set "Dolby Digital" to "PCM" and "DTS" to "OFF" for the "Digital Out" setting in the SETUP menu. (Refer to the operation manual accompanying external devices for the "Digital Out" setting in the SETUP menu. AUDIO Method 1 Stereo system Analog audio input jacks Method 2 Dolby Digital decoder, DTS...
... or a DTS decoder, set "Dolby Digital" to "PCM" and "DTS" to "OFF" for the "Digital Out" setting in the SETUP menu. (Refer to the operation manual accompanying external devices for the "Digital Out" setting in the SETUP menu. AUDIO Method 1 Stereo system Analog audio input jacks Method 2 Dolby Digital decoder, DTS...

Operation Manual
Page 17
... chapters wherever you format, the entire contents on the following type of the above functions and implied restrictions, see the explanations inside the manual. This DVD recorder can record on that is necessary to prepare the disc for recording. You want to Record TV programs Reuse by ... on pages 29-30. Details are in the unit. DVD-RW VR DVD-RW Video DVD-R *1 *1 Features Recording Rewritable? When you like (manual) Can record 16:9 size pictures Can record Copy-Once programs Editing Can perform basic edit functions Can perform advanced edit functions (Playlist edit) *1 DVD...
... chapters wherever you format, the entire contents on the following type of the above functions and implied restrictions, see the explanations inside the manual. This DVD recorder can record on that is necessary to prepare the disc for recording. You want to Record TV programs Reuse by ... on pages 29-30. Details are in the unit. DVD-RW VR DVD-RW Video DVD-R *1 *1 Features Recording Rewritable? When you like (manual) Can record 16:9 size pictures Can record Copy-Once programs Editing Can perform basic edit functions Can perform advanced edit functions (Playlist edit) *1 DVD...

Operation Manual
Page 18
... TIMER PROG. Original and Playlist (VR mode) You can not edit any information that is on that is recorded on a different DVD player- Throughout this manual, you will allow a disc that disc. • If you want to play . REC MONITOR ENTER I Hint 1: Play the recorded contents You can edit the following...
... TIMER PROG. Original and Playlist (VR mode) You can not edit any information that is on that is recorded on a different DVD player- Throughout this manual, you will allow a disc that disc. • If you want to play . REC MONITOR ENTER I Hint 1: Play the recorded contents You can edit the following...

Operation Manual
Page 19
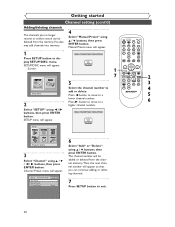
... SETUP menu. Getting channels automatically Getting started Recording The unit will appear. All channels are on page 38. Setup > Channel Preset VCR DVD Auto Preset Manual Preset TV Audio Select Stereo 3 Press SETUP button to turn on the unit. Channel Preset menu will appear. Notes for using the CHANNEL buttons. 1 POWER...
... SETUP menu. Getting channels automatically Getting started Recording The unit will appear. All channels are on page 38. Setup > Channel Preset VCR DVD Auto Preset Manual Preset TV Audio Select Stereo 3 Press SETUP button to turn on the unit. Channel Preset menu will appear. Notes for using the CHANNEL buttons. 1 POWER...
Operation Manual
Page 20
...move to display SETUP/DISC menu. Setup > Channel Preset VCR DVD Auto Preset Manual Preset TV Audio Select Stereo 6 Select "Add" or "Delete" using K / L / { / B buttons, then press ENTER button. Setup > Channel Preset > Manual Preset CH2 Add Delete PQRS 7 DISPLAY TUV 8 SPACE 0 VCR WXYZ VIDEO/...added or deleted from the memory.You also may add channels into memory. 4 Select "Manual Preset" using K / L buttons, then press ENTER button. SETUP/DISC menu will appear. Setup > Channel Preset > Manual Preset CH18 Add Delete Setup Playback Setting 3 Select "Channel" using K / L buttons,...
...move to display SETUP/DISC menu. Setup > Channel Preset VCR DVD Auto Preset Manual Preset TV Audio Select Stereo 6 Select "Add" or "Delete" using K / L / { / B buttons, then press ENTER button. Setup > Channel Preset > Manual Preset CH2 Add Delete PQRS 7 DISPLAY TUV 8 SPACE 0 VCR WXYZ VIDEO/...added or deleted from the memory.You also may add channels into memory. 4 Select "Manual Preset" using K / L buttons, then press ENTER button. SETUP/DISC menu will appear. Setup > Channel Preset > Manual Preset CH18 Add Delete Setup Playback Setting 3 Select "Channel" using K / L buttons,...

Operation Manual
Page 21
Setup > Channel Preset VCR DVD Auto Preset Manual Preset TV Audio Select SteSrteeoreo SAP POWER REC MODE REC SPEED AUDIO OPEN/CLOSE .@/: 1 GHI 4 PQRS 7 DISPLAY ABC 2 JKL 5 TUV 8 SPACE 0 VCR DEF 3 MNO CH 6 ... PLAY Setup Menu 2 Select "SETUP" using K / L buttons, then press ENTER button. SAP: (Secondary Audio Program) Outputs sub-audio. Setup > Channel Preset VCR DVD Auto Preset Manual Preset TV Audio Select Stereo 6 Press SETUP button to select either Stereo or SAP in second audio or stereo on page 102 for more information...
Setup > Channel Preset VCR DVD Auto Preset Manual Preset TV Audio Select SteSrteeoreo SAP POWER REC MODE REC SPEED AUDIO OPEN/CLOSE .@/: 1 GHI 4 PQRS 7 DISPLAY ABC 2 JKL 5 TUV 8 SPACE 0 VCR DEF 3 MNO CH 6 ... PLAY Setup Menu 2 Select "SETUP" using K / L buttons, then press ENTER button. SAP: (Secondary Audio Program) Outputs sub-audio. Setup > Channel Preset VCR DVD Auto Preset Manual Preset TV Audio Select Stereo 6 Press SETUP button to select either Stereo or SAP in second audio or stereo on page 102 for more information...

Operation Manual
Page 22
... for the time only when the power is available in the power cord. matically after you do not know your PBS channel number, select "Manual" using { / B buttons, then press ENTER button. tions are correct. • If this unit and plug in your area, follow... No. Option window will appear. This unit will appear. • If you try the 4 timer recording. Note • The clock may set the clock manually. 22 SETUP menu will search for several minutes to give this case, the current time will appear. If a Public Broadcasting Station (PBS) is off. Getting...
... for the time only when the power is available in the power cord. matically after you do not know your PBS channel number, select "Manual" using { / B buttons, then press ENTER button. tions are correct. • If this unit and plug in your area, follow... No. Option window will appear. This unit will appear. • If you try the 4 timer recording. Note • The clock may set the clock manually. 22 SETUP menu will search for several minutes to give this case, the current time will appear. If a Public Broadcasting Station (PBS) is off. Getting...
Operation Manual
Page 23
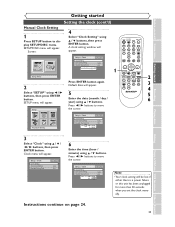
... failure or this unit has been unplugged for more than 30 seconds when you start Connections Getting started Recording Getting started Setting the clock (cont'd) Manual Clock Setting 1 Press SETUP button to display SETUP/DISC menu. Setup > Clock Clock Setting Auto Clock Setting Daylight Saving Time VCR DVD Auto ON 6 Enter... STOP REC/OTR SETUP TIMER PROG. Default date will appear. Screen: 4 Select "Clock Setting" using K / L buttons, then press ENTER button. Before you set the clock manually.
... failure or this unit has been unplugged for more than 30 seconds when you start Connections Getting started Recording Getting started Setting the clock (cont'd) Manual Clock Setting 1 Press SETUP button to display SETUP/DISC menu. Setup > Clock Clock Setting Auto Clock Setting Daylight Saving Time VCR DVD Auto ON 6 Enter... STOP REC/OTR SETUP TIMER PROG. Default date will appear. Screen: 4 Select "Clock Setting" using K / L buttons, then press ENTER button. Before you set the clock manually.

Operation Manual
Page 24
... MENU/LIST TOP MENU RETURN 7 CLEAR/C.RESET ZOOM SKIP SEARCH MODE CM SKIP SKIP When "Auto Clock Setting" is selected to "Auto" or "Manual", change it to (3) in "Manual Clock Setting". 4 Select "Auto Clock Setting" using K / L buttons, then press ENTER button. 6 Press SETUP button to select AM or PM, then press ENTER...
... MENU/LIST TOP MENU RETURN 7 CLEAR/C.RESET ZOOM SKIP SEARCH MODE CM SKIP SKIP When "Auto Clock Setting" is selected to "Auto" or "Manual", change it to (3) in "Manual Clock Setting". 4 Select "Auto Clock Setting" using K / L buttons, then press ENTER button. 6 Press SETUP button to select AM or PM, then press ENTER...

Operation Manual
Page 34
...-SAT L MON-FRI L SAT L FRI L Note L SUN L DEC/31 7 Enter the time to start and to a year in "Auto Clock Setting" on page 22 or "Manual Clock Setting" on page 23 before making a timer programming. • Press { or B buttons to move the cursor to set the clock yet: A clock setting window...
...-SAT L MON-FRI L SAT L FRI L Note L SUN L DEC/31 7 Enter the time to start and to a year in "Auto Clock Setting" on page 22 or "Manual Clock Setting" on page 23 before making a timer programming. • Press { or B buttons to move the cursor to set the clock yet: A clock setting window...

Operation Manual
Page 94
.../TV button. 2) At the cable box or satellite box, select the channel you want to view. be automatically adjusted upon playback.To adjust the tracking manually, press the CHANNEL K/L buttons on the front panel of the unit or CHK/CHL buttons on the front panel of the unit. • There is...
.../TV button. 2) At the cable box or satellite box, select the channel you want to view. be automatically adjusted upon playback.To adjust the tracking manually, press the CHANNEL K/L buttons on the front panel of the unit or CHK/CHL buttons on the front panel of the unit. • There is...

Operation Manual
Page 97
... TV program using the CH o / p buttons. • Press VIDEO/TV button if necessary. • Adjust TV antenna. • Adjust the picture (see the TV's instruction manual). • Place the unit and TV farther apart. • Place the TV and any bunched antenna cables farther apart. • Switch the input to some...
... TV program using the CH o / p buttons. • Press VIDEO/TV button if necessary. • Adjust TV antenna. • Adjust the picture (see the TV's instruction manual). • Place the unit and TV farther apart. • Place the TV and any bunched antenna cables farther apart. • Switch the input to some...

Operation Manual
Page 98
... quality. Press STOP C button twice. • You have recorded or edited a disc. • This is because the unit is dirty or flawed. See the instruction manual supplied with the labeled side facing up. • The disc is no sound. • If the audio signal does not come through your VCR to...
... quality. Press STOP C button twice. • You have recorded or edited a disc. • This is because the unit is dirty or flawed. See the instruction manual supplied with the labeled side facing up. • The disc is no sound. • If the audio signal does not come through your VCR to...